RTI Routing Service
Getting Started Guide
Version 5.0
RTI Routing Service
Getting Started Guide
Version 5.0

©
All rights reserved.
Printed in U.S.A. First printing.
August 2012.
Trademarks
Copy and Use Restrictions
No part of this publication may be reproduced, stored in a retrieval system, or transmitted in any form (including electronic, mechanical, photocopy, and facsimile) without the prior written permission of Real- Time Innovations, Inc. The software described in this document is furnished under and subject to the RTI software license agreement. The software may be used or copied only under the terms of the license agreement.
Technical Support
232 E. Java Drive
Sunnyvale, CA 94089
Phone: |
(408) |
Email: |
support@rti.com |
Website: |
|
|||
|
|||
|
|||
|
Installing on a |
||
|
|||
|
|||
|
|||
|
|||
|
|||
|
|||
|
|||
|
|||
|
|||
|
|||
|
Example 4 - Transforming the Data’s Type and Topic with an Assignment Transformation..... |
||
|
|||
|
|||
|
|||
|
|||
|
|||
|
|||
|
|||
iii
Chapter 1 Welcome to RTI Routing Service
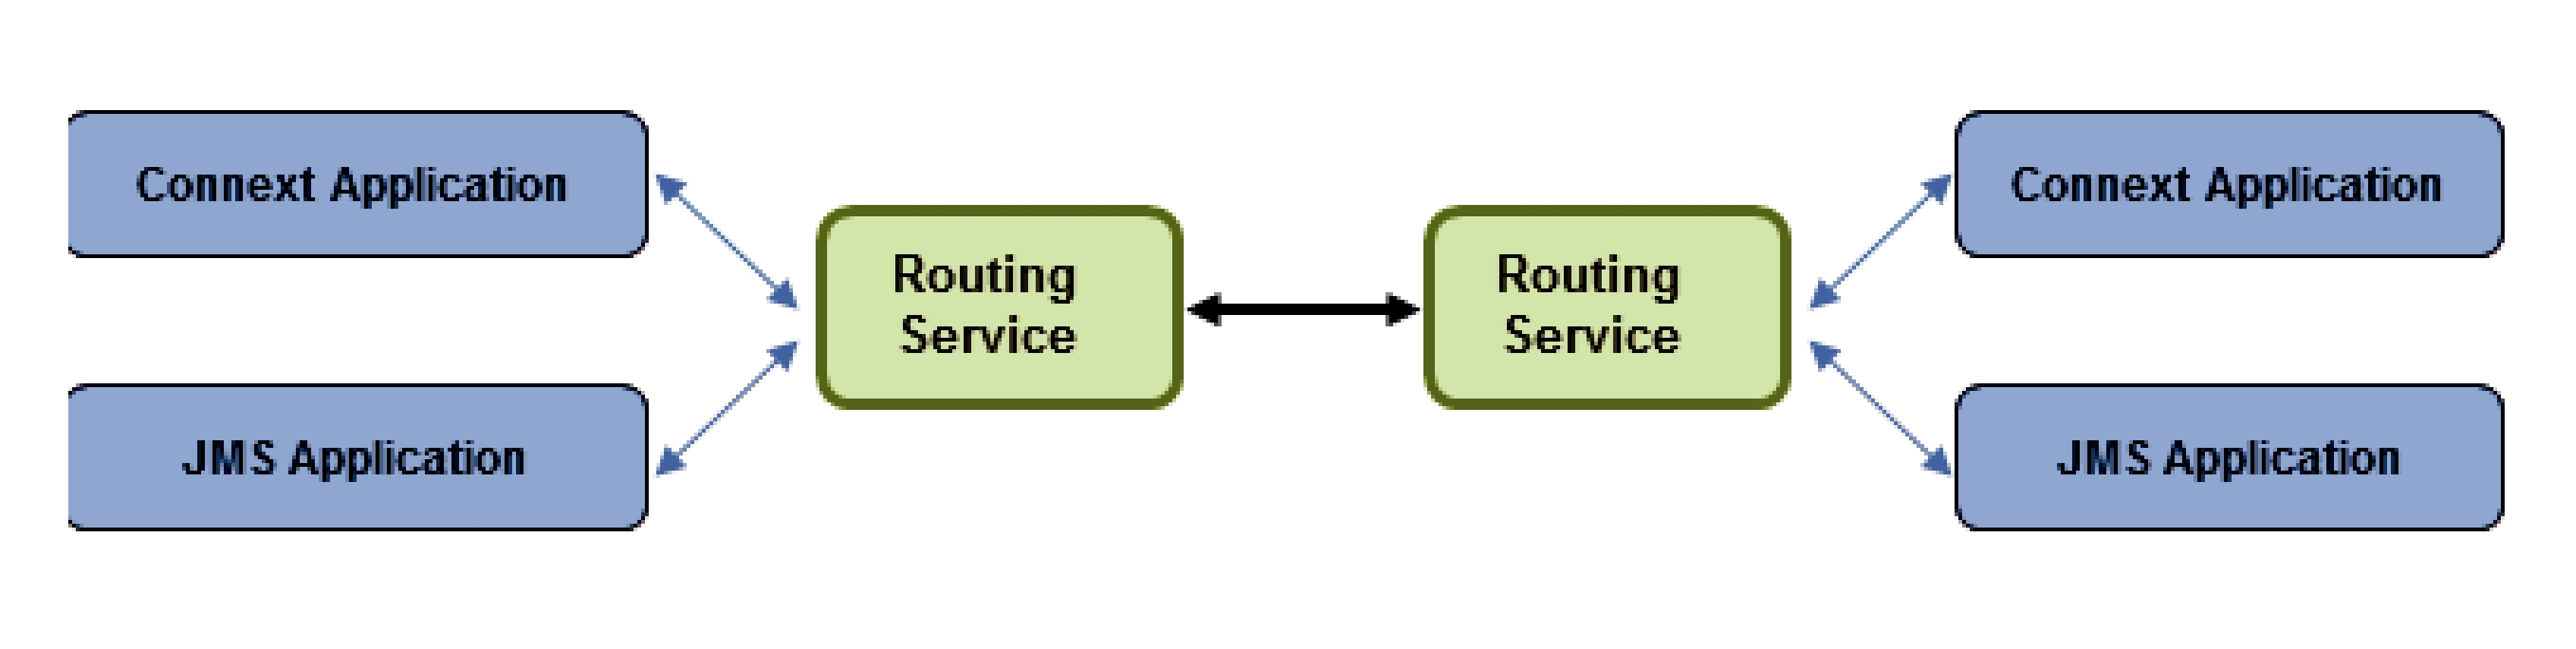
Welcome to RTI® Routing Service, an out-
Connext systems using
Traditionally, Connext applications can only communicate with applications in the same domain. With Routing Service, you can send and receive data across domains. You can even transform and filter the data along the way! Not only can you change the actual data values, you can change the data’s type. So the sending and receiving applications don’t even need to use the same data structure. You can also control which data is sent by using allow and deny lists.
Simply set up Routing Service to pass data from one domain to another and specify any desired data filtering and transformations. No changes are required in the Connext applications.
Key benefits of Routing Service:
❏It can significantly reduce the time and effort spent integrating and scaling Connext applications across Wide Area Networks and
Many systems today already rely on Connext to distribute their information across a Local Area Network (LAN). However, more and more of these systems are being integrated in Wide Area Networks (WANs). With Routing Service, you can scale Connext
make it available throughout a
❏With Routing Service, you can build modular systems out of existing systems. Data can be contained in private domains within subsystems and you can designate that only certain “global topics” can be seen across domains. The same mechanism controls the scope of discovery. Both
❏Routing Service provides secure deployment across multiple sites. You can partition networks and protect them with firewalls and NATS and precisely control the flow of data between the network segments.
❏It allows you to manage the evolution of your data model at the subsystem level. You can use Routing Service to transform data on the fly, changing topic names, type definitions, QoS, etc., seamlessly bridging different generations of Connext topic definitions.
❏Routing Service provides features for development, integration and testing. Multiple sites can each locally test and integrate their core application, expose selected topics of data, and accept data from remote sites to test integration connectivity, topic compatibility and specific
❏It connects remotely to live, deployed systems so you can perform live data analytics, fault condition analysis, and data verification.
❏RTI Routing Service Adapter SDK allows you to quickly build and deploy bridges to integrate Connext and
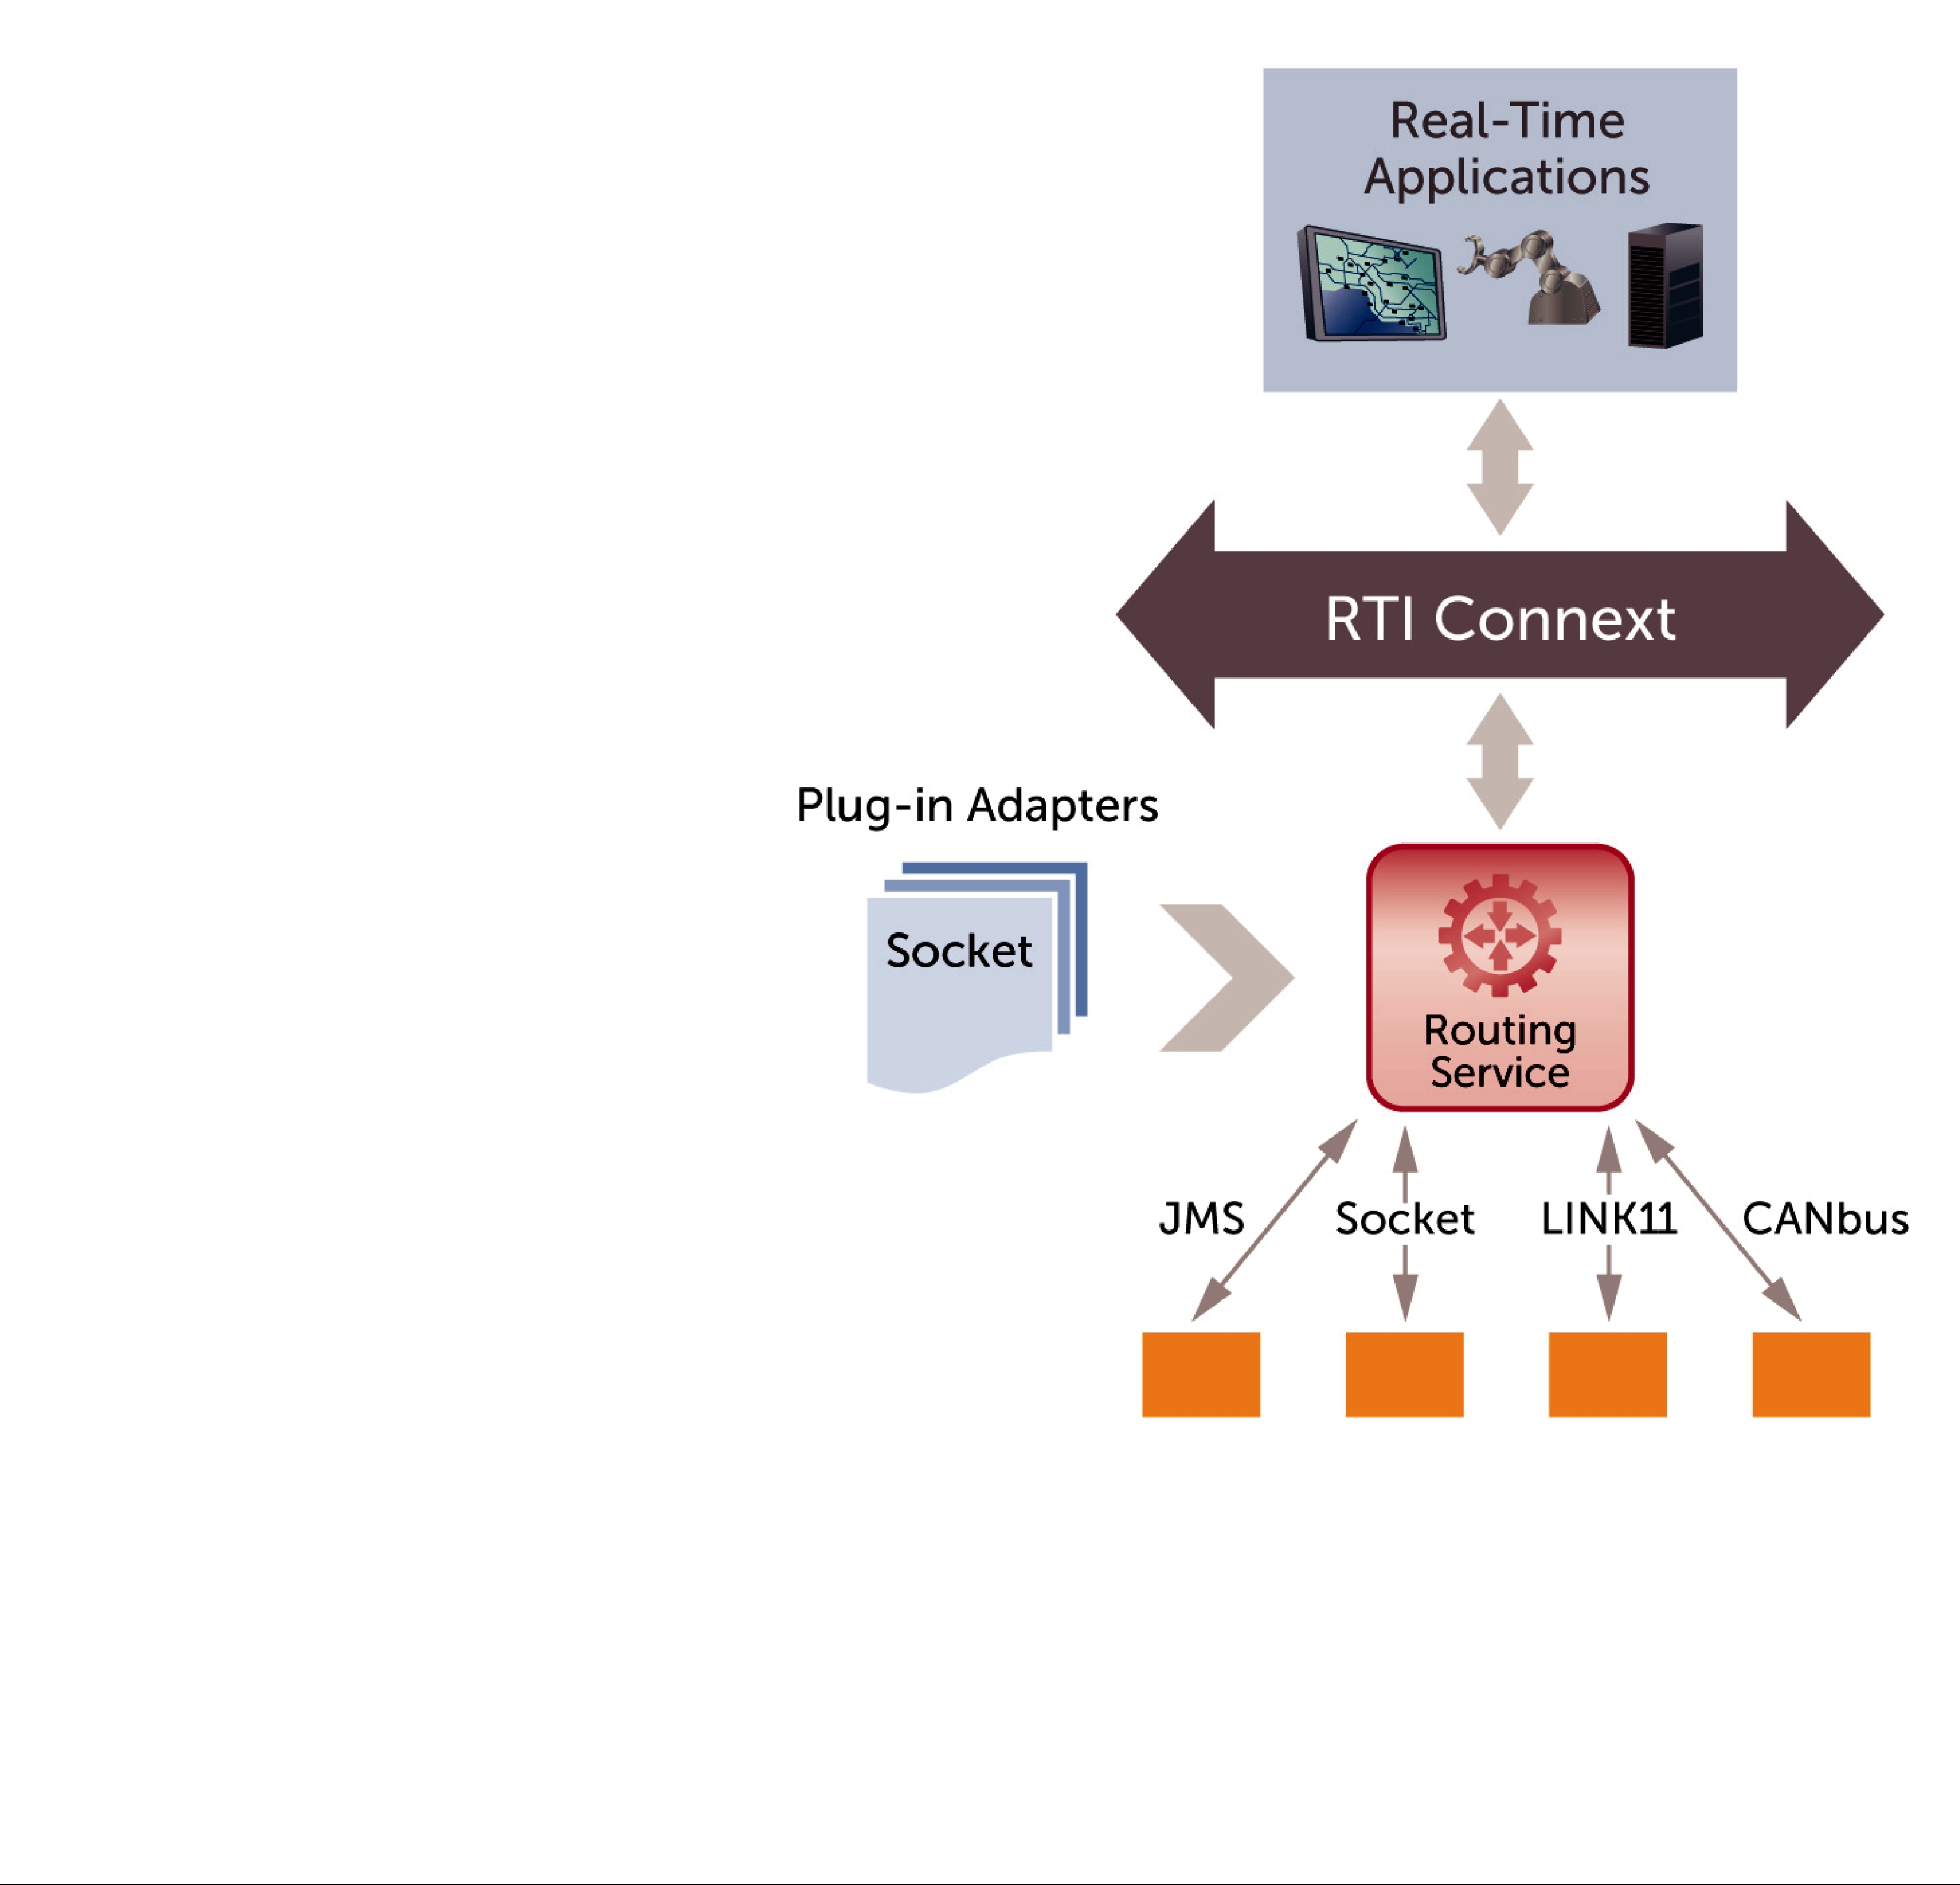
RTI Routing Service Adapter SDK offers an
Quickly build and deploy bridges between natively incompatible protocols and technologies using Connext
1.1Available Documentation
Routing Service documentation includes:
❏Getting Started Guide
❏Release Notes
❏User’s Manual
If the optional RTI Routing Service Adapter SDK is installed, you will also have the following documents:
❏RTI Routing Service Adapter SDK Installation Guide
❏RTI Routing Service Adapter SDK Release Notes

Chapter 2 Installing Routing Service
This chapter describes:
❏Installing on a
❏Installing on a Windows System (Section 2.2)
❏Installing the License File (Section 2.3)
For a list of supported system architectures, please see the Release Notes.
2.1Installing on a
The distribution is packaged in a .tar.gz file. Unpack it as described below. You do not need to be logged in as root during installation.
1.Make sure you have GNU’s version of the tar utility (which handles long file names). On Linux systems, this is the default tar executable. On Solaris systems, use gtar.
2.Create a directory for RTI Routing Service. We will assume that you want to install under / opt/rti/ (you may replace references to /opt/rti/ with the directory of your choice).
3.Move the downloaded file into your newly created directory. In these instructions, we assume your distribution file is named
4.Extract the distribution from the compressed files. For example:
gunzip
The names of these files will differ based on the name of your version and target platform.
Using our example path, you will end up with /opt/rti/RTI_Routing_Service_5.0.x.

2.2Installing on a Windows System
The distribution is packaged in a .zip file. Unpack it as described below. Depending on your version of Windows and where you want to expand these files, your user account may or may not require administrator privileges.
1.Create a directory for Routing Service. We will assume that you want to install under
C:\Program Files\RTI (you may replace references to C:\Program Files\RTI with the directory of your choice).
2.Move the downloaded files into your newly created directory.
3.Extract the distribution from the compressed files. You will need a zip file utility such as WinZip® to help you.
Using our example path, you will end up with C:\Program Files\RTI\RTI_Routing_Service_5.0.x.
4.See Installing the License File (Section 2.3).
2.3Installing the License File
If your Routing Service distribution requires a license file, you will receive one via email after you download the software.
Save the license file in any location of your choice. When Routing Service starts, it will look in these locations until it finds a valid license:
1.The file specified with the
2.The file specified in the environment variable RTI_LICENSE_FILE, which you may set to point to the full path of the license file, including the filename (for example,
C:\RTI\my_rti_license.dat).
3.The file rti_license.dat in the current working directory.
4.The file rti_license.dat in the directory specified by the environment variable NDDSHOME.
If you have any questions about license installation, please contact support@rti.com.
2.4Uninstalling
To uninstall Routing Service, simply remove the directory where you installed the files.

Chapter 3 Running Routing Service
3.1Starting Routing Service
Routing Service runs as a separate application. The script to run the executable is located in
<Routing Service installation directory>/scripts.
Routing Service supports loading Java adapters. If your configuration is set up to load a Java adapter, follow these steps:
1.On Windows Systems: To use a Java adapter, you must have the Visual Studio 2005
service pack 1 redistributable libraries. You can obtain this package from Microsoft or RTI (see the RTI Core Libraries and Utilities Release Notes1 for details).
2.Make sure Java 1.5 or higher is available.
3.Make sure you add the directory of the Java Virtual Machine dynamic library to your environment variable: LD_LIBRARY_PATH (on
setenv LD_LIBRARY_PATH \
${LD_LIBRARY_PATH}:/local/java/jdk1.5.0_07/jre/lib/i386/client
To start Routing Service, enter:
cd <Routing Service installation directory> scripts/rtiroutingservice [options]
Example:
cd <Routing Service installation directory>
scripts/rtiroutingservice
Table 3.1 describes the
3.2Stopping Routing Service
To stop Routing Service, press
1. See <Connext installation directory>/ndds.<version>/doc/pdf/RTI_CoreLibrariesAndUtilities_ReleaseNotes.pdf.
Table 3.1 RTI Routing Service
Option |
Description |
|
|
|
|
|
|
|
|
Assigns a name to the execution of the Routing Service. |
|
|
Remote commands and status information will refer to the routing |
|
|
service using this name. See the Routing Service User’s Manual for more |
|
information. |
||
In addition, the name of DomainParticipants created by Routing |
||
|
||
|
Service will be based on this name. |
|
|
Default: The name given with |
|
|
“RTI_Routing_Service”. |
|
|
|
|
Specifies a configuration file to be loaded. |
||
|
||
|
|
|
|
Specifies a configuration name. Routing Service will look for a matching |
|
<routing_service> tag in the configuration file. |
||
This parameter is required unless you use |
||
|
||
|
||
|
|
|
|
Sets the base domain ID. |
|
|
This value is added to the domain IDs in the configuration file. For |
|
example, if you set |
||
in the configuration file, then the Routing Service will use domains 50 |
||
|
||
|
and 51. |
|
|
Default: 0 |
|
|
|
|
Displays help information. |
||
|
|
|
|
Appends the host name and process ID to the service name provided |
|
with the |
||
administration and monitoring. |
||
|
||
|
For example: MyRoutingService_myhost_20024 |
|
|
|
|
|
Specifies the license file (path and filename). Only applicable to |
|
licensed versions of Routing Service. |
||
If not specified, Routing Service looks for the license as described in |
||
|
||
|
Installing the License File (Section 2.3) in the Getting Started Guide. |
|
|
|
|
Parameter for the DomainParticipantFactory. |
||
|
|
|
|
Starts Routing Service in a disabled state. |
|
|
Use this option if you plan to enable Routing Service remotely, as |
|
described in the User’s Manual. |
||
|
This option overwrites the value of the enable attribute in the |
|
|
<routing_service> tag. |
|
|
|
|
|
Enables remote administration and sets the domain ID for remote |
|
|
communication. |
|
|
When remote administration is enabled, Routing Service will create a |
|
|
DomainParticipant, Publisher, Subscriber, DataWriter, and DataReader in |
|
the designated domain. The QoS values for these entities are described |
||
in the Routing Service User’s Manual. |
||
<ID> |
||
This option overwrites the value of the tag <domain_id> within a |
||
|
||
|
<administration> tag. (See the Routing Service User’s Manual for |
|
|
information on configuring remote access). |
|
|
Default: Remote administration is not enabled unless it is enabled from |
|
|
the XML file. |
|
|
|
Table 3.1 RTI Routing Service
Option |
|
Description |
|
|
|
|
|
|
|
Enables remote monitoring and sets the domain ID for status |
|
|
publication. |
|
|
When remote monitoring is enabled, Routing Service will create one |
|
|
DomainParticipant, one Publisher, five DataWriters for data |
|
|
publication (one for each kind of entity), and five DataWriters for |
|
status publication (one for each kind of entity). The QoS values for |
||
these entities are described in the Routing Service User’s Manual. |
||
|
This option overwrites the value of the tag <domain_id> within a |
|
|
<monitoring> tag. (See the Routing Service User’s Manual for |
|
|
information on configuring remote monitoring). |
|
|
Default: Remote monitoring is not enabled unless it is enabled from |
|
|
the XML file. |
|
|
|
|
Stops the service after the specified number of seconds. |
||
|
|
|
|
Enables compatibility with RTI Data Distribution Service 4.2e. |
|
|
This option should be used when compatibility with 4.2e is required |
|
and the topic data types contain double, long long, unsigned long |
||
|
long, or long double members. |
|
|
Default: Disabled |
|
|
|
|
|
Controls what type of messages are logged: |
|
|
0 |
- Silent |
|
1 |
- Exceptions (Connext and Routing Service) (default) |
|
2 |
- Warnings(Routing Service) |
3 - Information (Routing Service) |
||
|
4 |
- Warnings (Connext and Routing Service) |
|
5 |
- Tracing (Routing Service) |
|
6 |
- Tracing (Connext and Routing Service) |
|
Each verbosity level, n, includes all the verbosity levels smaller than n. |
|
|
|
|
Prints the Routing Service version number. |
||
|
|
|
Chapter 4 Using the Examples
This chapter describes several examples, all of which use RTI Shapes Demo to publish and subscribe to topics which are colored moving shapes (squares, circles, triangles):
❏Example 1 - Routing All Data from One Domain to Another (Section 4.1)
❏Example 2 - Changing Data to a Different Topic of Same Type (Section 4.2)
❏Example 3 - Changing Some Values in Data (Section 4.3)
❏Example 4 - Transforming the Data’s Type and Topic with an Assignment Transformation
❏Example 5 - Transforming Data with a Custom Transformation (Section 4.5)
❏Example 6 - Using Remote Administration (Section 4.6)
❏Example 7 - Monitoring (Section 4.7)
❏Example 8 - Using the TCP Transport with Routing Service (Section 4.8)
❏Example 9 - Using a File Adapter (Section 4.9)
❏Example 10 - Bridging JMS and Connext (Section 4.10)
❏Example 11 - Using a Socket Adapter (Section 4.11)
In each example, you can start all the applications on the same computer or on different computers in your network.
If you don't have Shapes Demo installed already, you should download and install it from RTI’s Downloads page (www.rti.com/downloads) or the RTI Support Portal, accessible from https:/ /support.rti.com/ (the latter requires an account name and password).
If you are not already familiar with how to start Shapes Demo and change its domain ID, please see the Shapes Demo User's Manual for details.
Note: If you run Shapes Demo and Routing Service on different machines and these machines do not communicate over multicast, you will have to set the environment variable NDDS_DISCOVERY_PEERS to enable communication. For example, assume that you run Routing Service on Host 1 and Shapes Demo on Host 2 and Host 3. In this case, the environment variable would be set as follows:
Host 1: set NDDS_DISCOVERY_PEERS=<host2>, <host3> (on Windows systems)
setenv NDDS_DISCOVERY_PEERS <host2>, <host3> (on
Host 2: set NDDS_DISCOVERY_PEERS=<host1>
Host 3: set NDDS_DISCOVERY_PEERS=<host1>

4.1Example 1 - Routing All Data from One Domain to Another
This example uses the default configuration file1 for Routing Service, which routes all data published on domain 0 to subscribers on domain 1.
1.Start Shapes Demo. Its Configuration dialog will pop up automatically. Keep the default settings as they are and click Start. We'll call this the Publishing Demo. It uses domain ID 0.
2.Start a second copy of Shapes Demo. When its Configuration dialog pops up, change the Domain ID to 1 and click Start. We'll call this the Subscribing Demo.
3.In the Publishing Demo, publish some Squares, Circles, and Triangles.
4.In the Subscribing Demo, subscribe to Squares, Circles and Triangles.
Notice that the Subscribing Demo does not receive any shapes. Since we haven’t started Routing Service yet, data from domain 0 isn’t routed to domain 1.
5.Start Routing Service by entering the following in a command shell:
cd <Routing Service installation directory>
scripts/rtiroutingservice
Now you should see all the shapes in the Subscribing Demo.
6.Stop Routing Service by pressing
You should see that the Subscribing Demo stops receiving shapes.
Additionally, you can start Routing Service (Step 5) with the following parameters:
❏
❏
4.2Example 2 - Changing Data to a Different Topic of Same Type
In this example, the routing service receives samples of topic Square and republishes them as samples of topic Circle.
1.Start Shapes Demo. Its Configuration dialog will pop up automatically. Keep the default settings as they are and click Start. We'll call this the Publishing Demo. It uses domain ID 0.
2.Start a second copy of Shapes Demo. When its Configuration dialog pops up, change the Domain ID to 1 and click Start. We'll call this the Subscribing Demo.
3.Start Routing Service by entering the following in a command shell:
cd <Routing Service installation directory>
scripts/rtiroutingservice
4.In the Publishing Demo (domain 0), publish some Squares, Circles and Triangles.
5.In the Subscribing Demo (domain 1), subscribe to Squares, Circles and Triangles.
You will see that all the squares (and only squares) from domain 0 are republished as circles on domain 1.
1.<installation directory for Routing Service>/resource/xml/RTI_ROUTING_SERVICE.xml

6.Stop Routing Service by pressing
7.To see how this example is configured, review the contents of example/shapes/ topic_bridge.xml.
8.Try writing your own topic route that republishes triangles on domain 0 to circles on domain 1. Create some Triangle publishers and a Circle subscriber on the respective
Shapes Demo windows.
4.3Example 3 - Changing Some Values in Data
So far, we have learned how to route samples from one topic to another topic of the same data type. Now we will see how to change the value of some fields in the samples and republish them.
1.Start Shapes Demo. Its Configuration dialog will pop up automatically. Keep the default settings as they are and click Start. We'll call this the Publishing Demo. It uses domain ID 0.
2.Start a second copy of Shapes Demo. When its Configuration dialog pops up, change the Domain ID to 1 and click Start. We'll call this the Subscribing Demo.
3.Start Routing Service by entering the following in a command shell:
cd <installation directory for Routing Service>
scripts/rtiroutingservice \
4.In the Publishing Demo (domain 0), publish some Squares.
5.In the Subscribing Demo (domain 1), subscribe to Squares.
In the Subscribing Demo, notice that the (x,y) coordinates of the shapes are inverted from what appears in the Publishing Demo.
6.Stop Routing Service by pressing
7.To see how this example is configured, review the contents of example/shapes/ topic_bridge_w_transf1.xml.
8.Try changing the transformation to assign the output shapesize to the input x.
4.4Example 4 - Transforming the Data’s Type and Topic with an Assignment Transformation
This example shows how to transform the data topic and type. We will use the rtiddsspy utility from Connext to verify the result.
1.Start Shapes Demo. Its Configuration dialog will pop up automatically. Keep the default settings as they are and click Start. We'll call this the Publishing Demo. It uses domain ID 0.
2.Start Routing Service by entering the following in a command shell:
cd <Routing Service installation directory>
scripts/rtiroutingservice \
3. In the Publishing Demo (domain 0), publish some Squares.

4.We will use the rtiddsspy utility to verify the transformation of the data topic and type. If you have the Connext Core Libraries and Utilities installed, run these commands:
rtiddsspy
rtiddsspy
rtiddsspy is a utility provided with Connext; it monitors publications on any Connext domain.
You will notice that the publishing samples received by rtiddsspy for domain 0 is of type ShapeType and topic Square. The subscribing samples received by rtiddsspy for domain 1 are of type Point and topic Position. Notice that the two data structures are different.
5.Stop Routing Service by pressing
6.To see how this example is configured, review the contents of example/shapes/ topic_bridge_w_transf2.xml.
4.5Example 5 - Transforming Data with a Custom Transformation
The previous example used a
1.Compile the transformation in example/shapes/transformation/src:
•On
a.Set the environment variable NDDSHOME as described in the RTI Core Libraries and Utilities Getting Started Guide.1
b.Enter:
cd <Routing Service installation directory>
cd example/shapes/transformation/make
c. Enter:
gmake
The transformation shared library, libshapestransf.so, will be copied to <installation directory for Routing Service>bin/<architecture>.
•On Windows systems:
a.Set the environment variable NDDSHOME as described in the RTI Core Libraries and Utilities Getting Started Guide.1
b.Open the Visual Studio solution under example/shapes/transformation/windows. For example, if you are using Visual Studio 2005, open
c.Select the release build mode.
d.Build the solution.
The transformation shared library, shapestransf.dll, will be copied to <installation directory for Routing Service>/bin/<architecture>.
1. See <Connext installation directory>/ndds.<version>/doc/pdf/RTI_CoreLibrariesAndUtilities_GettingStarted.pdf.

2.Run Shapes Demo and Routing Service as in the previous examples:
a.Start Shapes Demo on domain 0 (the default domain). We'll call this the Publishing Demo.
b.Start a second copy of Shapes Demo on domain 1. We'll call this the Subscribing Demo.
c.Start Routing Service by entering the following in a command shell:
cd <Routing Service installation directory>
scripts/rtiroutingservice \
3.In the Publishing Demo (domain 0), publish some Squares.
4.In the Subscribing Demo (domain 1), subscribe to Squares.
Notice that squares on domain 1 have only two possible values for ‘x’.
5.Stop Routing Service by pressing
6.To see how this example is configured, review the contents of example/shapes/ topic_bridge_w_custom_transf.xml. Notice how the transformation is instantiated inside the topic route.
7.Change the fixed ‘x’ values for the Squares in the configuration file and restart Routing Service.
8.Stop Routing Service by pressing
9.Edit the source code to make the transformation multiply the value of the field by the given integer constant instead of assigning the constant.
Hint: look for the function ShapesTransformationPlugin_createOutputSample(), called from ShapesTransformation_transform() and use DDS_DynamicData_get_long() before DDS_DynamicData_set_long().
10.Recompile the transformation (the new shared library will be copied automatically) and run Routing Service as before.
4.6Example 6 - Using Remote Administration
In this example, we will configure Routing Service remotely. We won't see data being routed until we remotely enable an auto topic route after the application is started. Then we will change a QoS value and see that it takes effect on the fly.
1.Start Shapes Demo. Its Configuration dialog will pop up automatically. Keep the default settings as they are and click Start. We'll call this the Publishing Demo. It uses domain ID 0.
2.Start a second copy of Shapes Demo. When its Configuration dialog pops up, change the Domain ID to 1 and click Start. We'll call this the Subscribing Demo.
3.Start Routing Service by entering the following in a command shell:
cd <Routing Service installation directory>
scripts/rtiroutingservice
4.In the Publishing Demo (domain 0), publish some Squares, Circles and Triangles.
5.In the Subscribing Demo (domain 1), subscribe to Squares, Circles and Triangles. Notice that no data is routed to domain 1.
6. On a different or the same machine, start the Routing Service shell:
cd < Routing Service installation directory>
scripts/rtirssh
Note: We use domain 0 in the shell because Routing Service is configured in administration.xml to receive remote commands on that domain. You could have started Routing Service with the
7.In the shell, enter the following command:
>enable MyRoutingService RemoteConfigExample::Session::Shapes
Notice that the shapes are now received on domain 1. The above command consists of two parts: the name of the routing service, which you gave when you launched the application with the option
Note that you could have run Routing Service without
8.Examine the file example/shapes/time_filter_qos.xml on the routing service machine. It contains an XML snippet that defines a QoS value for an auto topic route's DataReader. Execute the following command in the shell (on one line):
>update MyRoutingService RemoteConfigExample::Session::Shapes
example/shapes/time_filter_qos.xml
Note: The path to the XML file in this example is relative to the working directory from which you run Routing Service.
Notice that the receiving application only gets shapes every 2 seconds. The auto topic route has been configured to read (and forward) samples with a minimum separation of 2 seconds.
Routing Service can be configured remotely using files located on the routing service machine or the shell machine. In step 9 you will edit the configuration files on both machines. Step 10 shows how to specify which of the two configuration files you want to use. If you are running the shell and Routing Service on the same machine, skip steps 9 and 10.
9.Edit the XML configuration files on both machines:
a.In example/shapes/time_filter_qos.xml on the routing service machine, change the minimum separation to 0 seconds.
b.In example/shapes/time_filter_qos.xml on the shell machine, change the minimum separation to 5 seconds.
10.Run the following commands in the shell:
a. Enter the following command (on one line). Notice the use of remote at the
>update MyRoutingService RemoteConfigExample::Session::Shapes example/shapes/time_filter_qos.xml remote
Note: The path to the XML file in this example is relative to the working directory from which you run Routing Service.
Since no time filter applies, the shapes are received as they are published.

b.Enter the following command (on one line). This time we use local at the
>update MyRoutingService RemoteConfigExample::Session::Shapes example/shapes/time_filter_qos.xml local
Note: The path to the XML file in this example is relative to the working directory from which you run the Routing Service shell.
You will see that now the shapes are only received every 5 seconds.
c.Enter the following command. Once again, we use remote at the end to switch back to the XML file on the routing service machine.
>update MyRoutingService RemoteConfigExample::Session::Shapes example/shapes/time_filter_qos.xml remote
Shapes are once again received as they are published.
11.Disable the auto topic route again by entering:
>disable MyRoutingService RemoteConfigExample::Session::Shapes
The shapes are no longer received on Domain 1.
Note: At this point, you could still update the auto topic route’s configuration. You could also change immutable QoS values, since the DataWriter and DataReader haven’t been created yet. These changes would take effect the next time you called enable.
12.Run these commands in the shell and see what happens after each one:
>enable MyRoutingService RemoteConfigExample::Session::SquaresToCircles
>disable MyRoutingService RemoteConfigExample::Session::SquaresToCircles
>enable MyRoutingService RemoteConfigExample::Session::SquaresToTriangles
These commands change the output topic that is published after receiving the input Square topic. As you can see, you can use the shell to switch topic routes after Routing Service has been started.
13.Stop the shell by running this command in the shell:
>exit
14.Stop Routing Service by pressing
4.7Example 7 - Monitoring
With Routing Service you can publish status information. The monitoring configuration is quite flexible and allows selecting the entities that you want to monitor and how often they should publish their status.
1.Start Shapes Demo. Its Configuration dialog will pop up automatically. Keep the default settings as they are and click Start. We'll call this the Publishing Demo. It uses domain ID 0.
2.Start a second copy of Shapes Demo. When its Configuration dialog pops up, change the Domain ID to 1 and click Start. We'll call this the Subscribing Demo.
3.In the Publishing Demo (domain 0), publish two Squares, two Circles, and two Triangles.
4.In the Subscribing Demo (domain 1), subscribe to Squares, Circles and Triangles.
5.Start Routing Service by entering the following in a command shell:
cd <Routing Service installation directory>

scripts/rtiroutingservice
This configuration file routes Squares and Circles using two different topic routes.
6.Now you can subscribe to the monitoring topics (see Chapter 5 in the Routing Service User’s Manual for more information). You can do it in your own application, or by using
RTI Spreadsheet
rtiddsspy
rtiddsspy is a utility provided with the RTI Connext Core Libraries and Utilities; it monitors publications on any Connext domain.
If you have Spreadsheet
Note: We use domain 2 in rtiddsspy because Routing Service is configured in monitoring.xml to publish status information on that domain. You could have started Routing Service with the
7.Depending on the publication period of the entity in the XML file we used, you will receive status samples at different rates. In rtiddsspy, check the statistics about the two topic routes we are using. We will focus on the input samples per second:
The number of samples per second in our case is 32. That value depends on the publication rate of Shapes Demo, configurable with the option
Using Spreadsheet
8.Create two additional Square publishers on the publishing demo (domain 0).
9.Check rtiddsspy again for new status information:
In the topic route Squares we are receiving double amount of data.
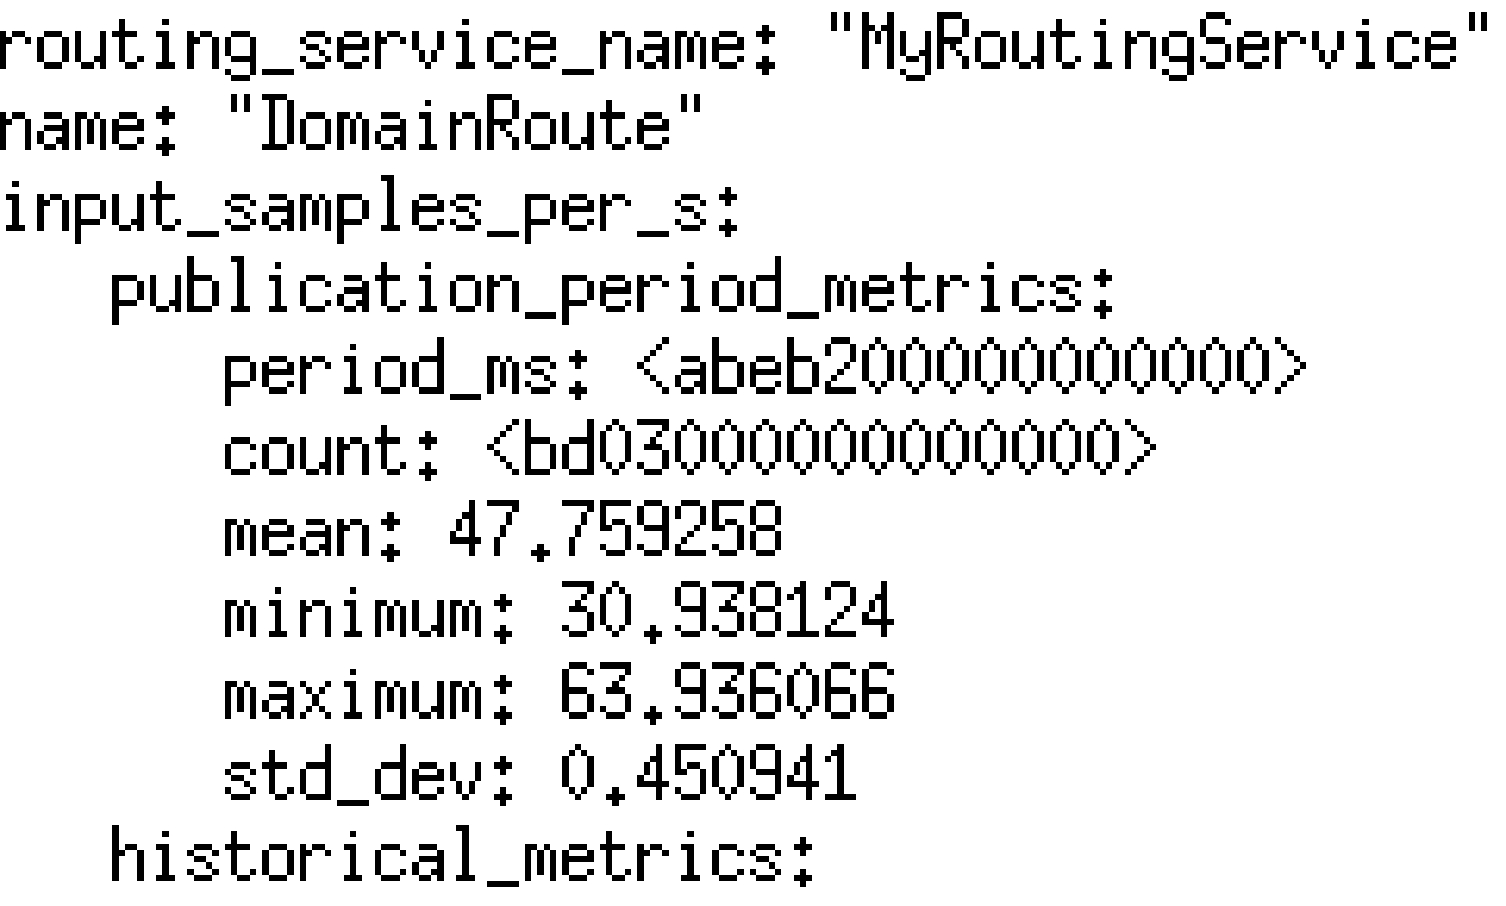
Also look at the status of the domain route:
It contains an aggregation of the two contained topic routes, giving us a mean of nearly 48 samples per second.
We can update the monitoring configuration at run time using the remote administration feature. In the configuration file, we enabled remote administration on domain 0.
10.On a different or the same machine, start the Routing Service shell:
>cd <Routing Service installation directory>
>scripts/rtirssh
11.We are receiving the status of the topic route Circles every five seconds. To receive it more often, use the following command (on one line):
>update MyRoutingService DomainRoute::Session::Circles
topic_route.entity_monitoring.status_publication_period.sec=2
12.In some cases, you might want to know only about one specific topic route. If you only want to know about the topic route Circles but not Squares, you can disable monitoring for Squares:
>update MyRoutingService DomainRoute::Session::Squares topic_route.entity_monitoring.enabled=false
13.To enable it again, enter:
>update MyRoutingService DomainRoute::Session::Squares topic_route.entity_monitoring.enabled=true
14.If you are no longer interested in monitoring this routing service, you can completely disable it with the following command:
>update MyRoutingService routing_service.monitoring.enabled=false
Now you won’t receive any more status samples.
15.You can enable it again any time by entering:
>update MyRoutingService routing_service.monitoring.enabled=true
16.Stop rtiddsspy by pressing
17.Stop the shell:
>exit
18.Stop Routing Service by pressing
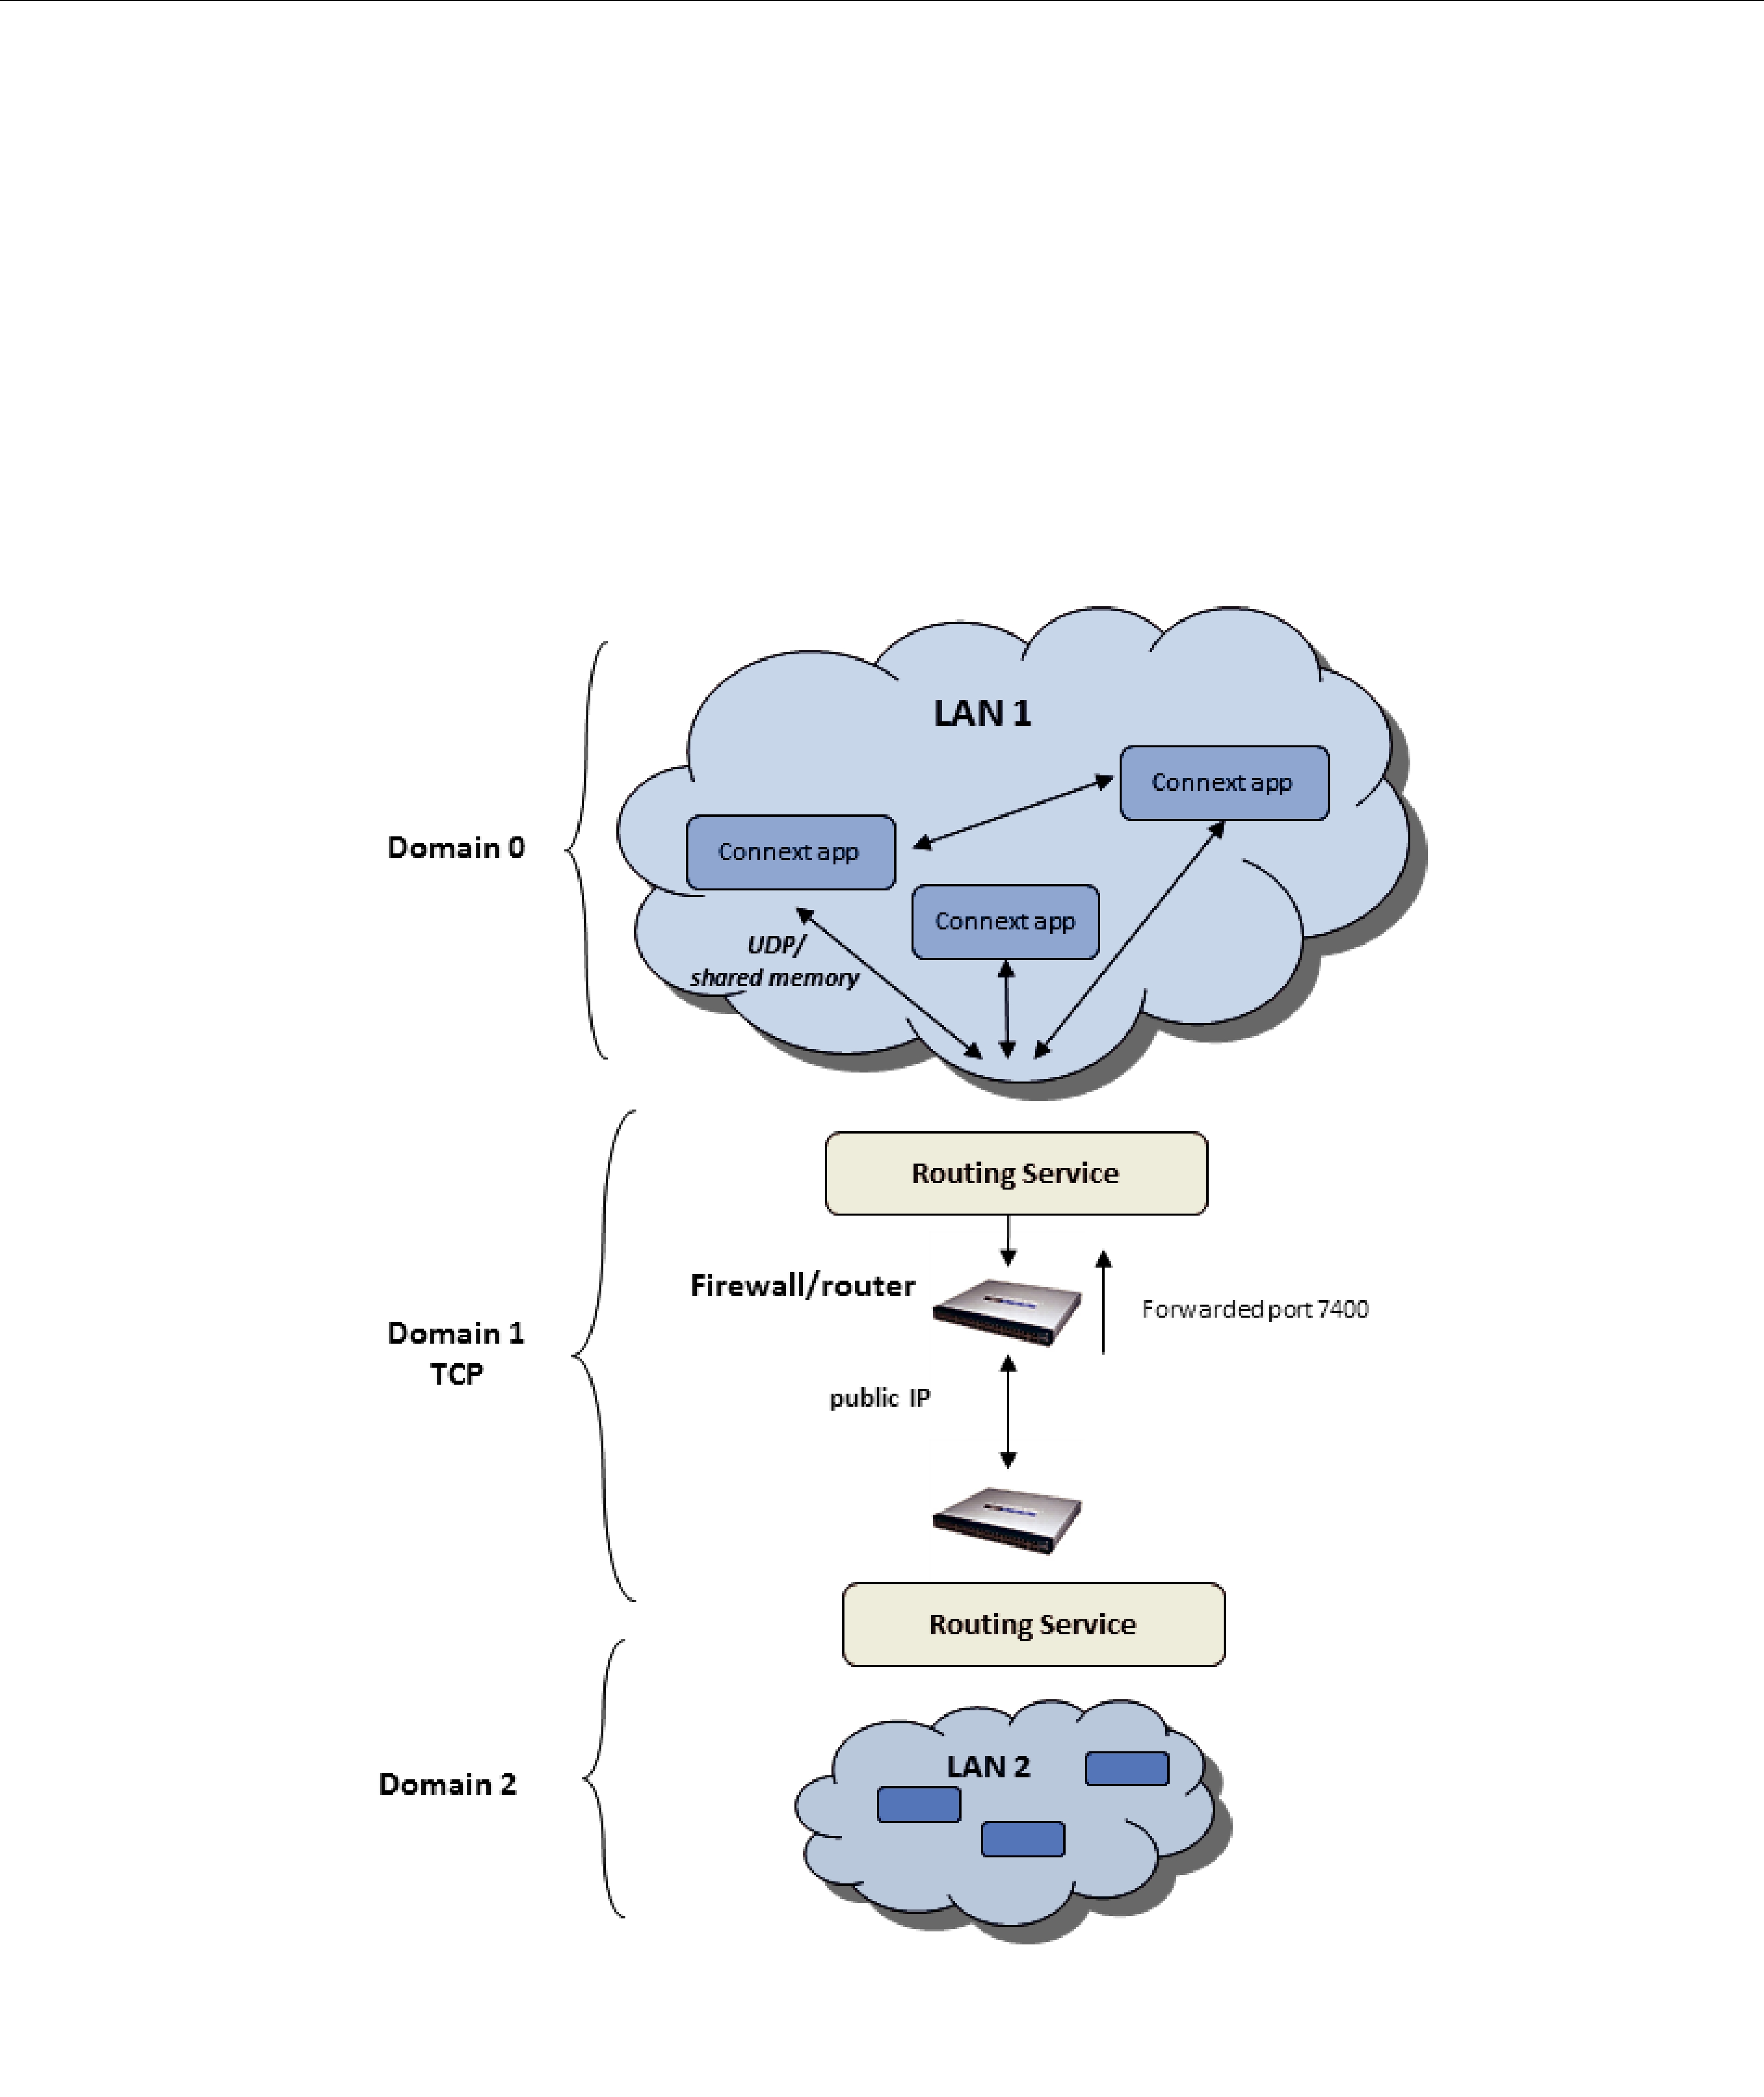
4.8Example 8 - Using the TCP Transport with Routing Service
This example shows how to use Routing Service to bridge data between different LANs over TCP. Routing Service will act as the gateway in a LAN with which other Connext applications can communicate to send or receive data. Chapter 7 of the Routing Service User’s Manual has more information about scenarios and detailed configuration parameters.
You will run two copies of Routing Service. One copy will run on a machine that is behind a firewall/router with a public IP (First Peer); the other will run on a machine in another LAN (Second Peer).
On the First Peer (behind a firewall/router with a public IP):
1.In the First Peer's network, configure the firewall to forward the TCP ports used by
Routing Service.
In this example, we will use port 7400.
You do not need to configure your firewall for every single Connext application in your LAN; doing it just once for Routing Service will allow other applications to communicate through the firewall.
2.Include the Second Peer’s public IP address and port in the
NDDS_DISCOVERY_PEERS environment variable. For example, on a
setenv NDDS_DISCOVERY_PEERS tcpv4_wan://<server’s public IP address>:<port>

On a Windows system:
set NDDS_DISCOVERY_PEERS=tcpv4_wan://<server's public IP address>:<port>
When you configure NDDS_DISCOVERY_PEERS, make sure to use a transport class prefix (tcpv4_wan, udpv4, shmem) for each entry. (See Section 12.2 in the RTI Core Libraries and Utilities User’s Manual1 for details on formatting addresses in
NDDS_DISCOVERY_PEERS.)
For example:
setenv NDDS_DISCOVERY_PEERS tcpv4_wan://10.10.1.10:7400,\
udpv4://192.168.0.1,udpv4://192.168.0.2,shmem://
3.Set the public IP address and port in the configuration file:
a.Open the file example/shapes/tcp_transport.xml.
b.The file contains several routing service configurations. Find the routing service configuration, <routing_service name="TCP_1">. Then find the "public_address" property (<name>dds.transport.TCPv4.tcp1.public_address</name>) within that configuration.
c.Set the local public IP address and port. For example, to set the address to 10.10.1.150 and port 7400:
<element>
<name>dds.transport.TCPv4.tcp1.public_address</name>
<value>10.10.1.150:7400</value>
</element>
d. Save and close the file.
4.Run these commands and choose “TCP_1”: cd <Routing Service installation directory>
scripts/rtiroutingservice
5.On any computer in this LAN, start Shapes Demo and publish some shapes on domain 0.
On the Second Peer (a machine in any other LAN):
6.Include the First Peer’s public IP address and port in the NDDS_DISCOVERY_PEERS environment variable the same way you did before.
7.Set the public IP address and port in the configuration file:
a.The file contains several routing service configurations. Find the routing service configuration, <routing_service name="TCP_2">. Then find the "public_address" property (<name>dds.transport.TCPv4.tcp1.public_address</name>) within that configuration.
b.Set the local public IP address and port. For example, to set the address to 10.10.1.10 and port 7400:
<element>
<name>dds.transport.TCPv4.tcp1.public_address</name>
<value>10.10.1.10:7400</value>
</element>
c. Save and close the file.
8.Run these commands and choose “TCP_2”:
cd <Routing Service installation directory>
1. See <Connext installation directory>/ndds.<version>/doc/pdf/RTI_CoreLibrariesAndUtilities_UsersManual.pdf.
scripts/rtiroutingservice
9.On any computer in this LAN, start Shapes Demo and create subscribers on domain 2. Do not use an already running instance of Shapes
You should receive what is being published in the server's LAN.
Notes:
❏Running Shapes Demo on a Different Computer
If the computer running Shapes Demo is different than the computer running the client routing service, add the address of the client (IP address or host name) to the Shapes Demo discovery peers before starting the shapes demo. To do so, use the
❏Using Two Computers in the Same LAN
If both machines are in the same LAN, run both routing services with the configuration file tcp_transport_lan.xml and use “tcpv4_lan://” as the peer prefix in the environment variable NDDS_DISCOVERY_PEERS. You don’t need to specify an IP address in the configuration file.
❏Running the Example on One Computer
To run the example on the same machine, open the file example/shapes/ tcp_transport_lan.xml and change the property dds.transport.TCPv4.tcp1.server_bind_port within TCP_1 to 7401. Run both routing services with the modified tcp_transport_lan.xml configuration file and use “tcpv4_lan:/ /” as the peer prefix in the environment variable NDDS_DISCOVERY_PEERS. You will also need to specify port 7401 in the tcpv4_lan peer in the NDDS_DISCOVERY_PEERS environment variable of the routing service in the Second Peer to reflect this port change in the configuration file.
❏Using a Secure Connection over WAN
To run this example, you need OpenSSL 0.9.8n (or higher) and RTI TLS Support. To purchase RTI TLS Support, contact your account representative or sales@rti.com. OpenSSL is available from the RTI’s Downloads page (www.rti.com/downloads), or you may obtain it from another source. Make sure the OpenSSL libraries’ location is in your LD_LIBRARY_PATH (on
To run the example using a secure connection between the two router instances, use the configuration file tcp_transport_tls.xml. You will also need to set the peer prefix to “tlsv4_wan://” in the NDDS_DISCOVERY_PEERS environment variable. The tcp_transport_tls.xml file is based on tcp_transport.xml and uses a WAN configuration to establish communication.
❏Using a Secure Connection over LAN
To run this example using a secure connection between two routers instances within the same LAN, you need OpenSSL 0.9.8n (or higher) and TLS Support. To purchase TLS Support, contact your account representative or sales@rti.com. OpenSSL is available from the RTI’s Downloads page (www.rti.com/downloads), or you may obtain it from another source. Make sure the OpenSSL libraries’ location is in your LD_LIBRARY_PATH (on
To use TLS encryption over a LAN configuration, you can use the file tcp_transport_tls_lan.xml. You will also need to set the peer prefix to “tlsv4_lan://” in the NDDS_DISCOVERY_PEERS environment variable. The tcp_transport_tls_lan.xml configuration file is based on tcp_transport_lan.xml and uses a LAN configuration to establish communication.
4.9Example 9 - Using a File Adapter
The previous examples showed how to use Routing Service. In this one we will learn how to use an adapter, specifically RTI Routing Service Adapter SDK, to write and read data from files. Routing Service allows bridging data from different data domains with a pluggable adapter interface.
To learn how to implement your own adapter, you can follow this example and the next examples and inspect the code that is distributed with these adapters. You can also start your own adapter from scratch and follow
The file adapter can read data from files with a specific format and provide it to Routing Service, or receive data from Routing Service and write it into files.
In this example, we will first write Connext topic data (a colored square and circle) into a file and then use that file to write it back into Connext, allowing us to modify the data with a text editor.
Adapter Plugin API
x=10,y=20,color=RED
x=11,y=20,color=RED
x=12,y=21,color=RED
… |
File |
Routing Service |
|
||
|
adapter |
|
|
|
MySquare.txt
|
|
x=30,y=20,color=BLUE |
|
|
x=31,y=19,color=BLUE |
|
|
x=32,y=17,color=BLUE |
Routing Service |
File |
… |
|
||
adapter |
|
MyCircle.txt
To run this example, you must have Routing Service Adapter SDK installed.
Compile the adapter
1.Compile the file adapter in adapters/file/src:
•On
a.Set the NDDSHOME environment variable as described in the RTI Core Libraries and Utilities Getting Started Guide.1
b.Enter:
cd <Routing Service installation directory>
cd adapters/file/make
gmake
The adapter shared library, libfileadapter.so, will be copied to <installation directory for Routing Service>/bin/<architecture>.
1. See <Connext installation directory>/ndds.<version>/doc/pdf/RTI_CoreLibrariesAndUtilities_GettingStarted.pdf.
•On Windows systems:
a.Set the NDDSHOME environment variable as described in the RTI Core Libraries and Utilities Getting Started Guide.
b.Open the Visual Studio solution under adapters/file/windows. If you are using Visual Studio 2005. For example, open
c.Build the solution.
The adapter shared library, fileadapter.dll, will be copied to <installation directory for Routing Service>/bin/<architecture>.
From Connext to files:
2.Run Shapes Demo and Routing Service as in the previous examples:
a.Start Shapes Demo on domain 0 (the default domain).
b.Start Routing Service by entering the following in a command shell: cd <Routing Service installation directory>
scripts/rtiroutingservice \
3.In Shapes Demo, publish some Squares.
4.Wait a few seconds and then stop Routing Service by pressing
5.A file called MySquare.txt should have been created in the current directory. Open it with a text editor of your choice. It should contain several lines, each consisting of a list of <field>=<value> elements. Each line represents a sample (Square) published by Shapes Demo and written by Routing Service and the file adapter.
6.On
7.We have seen how an “output” adapter works. Open the configuration file and look for <routing_service name=”dds_to_file”> to see the configuration we have just run.
From a file to Connext:
8.In Shapes Demo, delete the Square publisher and create a Square subscriber.
9.Run Routing Service as in the previous examples:
cd <installation directory for Routing Service>
scripts/rtiroutingservice \
10.You should see squares being received by Shapes Demo. These samples come from what we recorded before.
11.You might have noticed than the rate at which the shape moves is much slower. This is the rate at which the file adapter is providing data to Routing Service. To change this rate, open example/shapes/file_bridge.xml and look for <route name=”square_file”> within <routing service name=”file_to_dds”>. In the <property> tag change the property ReadPeriod from 1000 (milliseconds) to 100.
12.Stop and start again Routing Service as described in Step 9. The squares should be received and displayed about 10 times faster.
13.Other properties that you can configure in the file adapter are: FileName, MaxSampleSize, Loop and SamplesPerRead and, in the <output>, FileName, Flush and WriteMode.
14.You can also edit the text file and publish the new data. Open MySquare.txt and replace all the occurrences of “shapesize=30” with “shapesize=100”.
15.Stop and start again Routing Service as described in Step 9. The squares will have the same position and color, but they will be bigger now.

Customize the file adapter
In the example, the file adapters use a specific format, which you already saw in the file MySquare.txt. Now try adapting the example to your own format.
16.The code that reads/writes from the file is in adapters/file/src/LineConversion.c.
17.Edit the function RTI_RoutingServiceFileAdapter_read_sample to implement how file data maps into a sample.
18.Edit the function RTI_RoutingServiceFileAdapter_write_sample to implement how a sample is written to a file.
19.Compile the code as described in Step 1 on page
4.10Example 10 - Bridging JMS and Connext
As we saw in the previous example, Routing Service can load adapter plugins to read and write data from different sources. We used a file adapter implemented in C. Routing Service also supports Java plugins.
The adapter introduced in this chapter interfaces with JMS to produce and consume messages in Routing Service, allowing you to bridge JMS with other data sources, like Connext.
This example shows how a JMS application can produce messages representing colored shapes with random positions and how Shapes Demo can receive and display the equivalent Connext samples. This is possible thanks to a running instance of Routing Service bridging JMS and Connext using the adapter. The opposite scenario, in which Connext samples are received by a JMS consumer, will also work.
To run this example, you must have RTI Routing Service Adapter SDK installed, plus RTI Message Service or an equivalent JMS implementation.
Compile the JMS Adapter:
To compile the JMS adapter, use the build script described below:
1.The script expects the following variables to be set. They can be set by editing the script file or environment variables.
a.JAVA_HOME must point to a Java JDK installation (1.5 or higher)
b.JAVAEEJAR must contain the full path and filename of the Java EE library (for example, /myjava/j2ee/lib/javaee.jar)
2.After setting the values for the variables, run the build script.
On
cd <Routing Service installation directory>
cd adapters/jms
./build
On Windows systems:
cd <Routing Service installation directory>
cd adapters\jms
build
A Java JAR file, jmsadapter.jar, will be generated in the directory, objs.
Compile the Example JMS Publisher and Subscriber Applications:
Another build script can be used to build the JMS publisher and subscriber example.
3.The script expects the same variables as Step 1.
4.After setting the values for the variables, run the build script:
On
cd <Routing Service installation directory>
cd example/shapes/jmsPubSub
./build
On Windows systems:
cd <Routing Service installation directory>
cd example\shapes\jmsPubSub
build
The class files will be generated in the directory objs.
Run the Example JMS and Connext Publisher and Subscribers:
5.The JMS applications expect the same environment variables as in Step 1 plus the following:
JMS_CLASSPATH must contain the classpath required to run the example with a JMS vendor of your choice. In our example, we use RTI Messaging Service, but you could choose a different vendor such as JBoss:
On
setenv JMS_CLASSPATH $NDDSHOME/class/nddsjava.jar:$NDDSHOME/class/rtijms.jar
On Windows systems (enter the following all on one line):
set JMS_CLASSPATH= %NDDSHOME%\class\nddsjava.jar;%NDDSHOME%\class\rtijms.jar
6. Run the following applications on the same or different machines:
a.A JMS application publishing green Squares at random coordinates. Set the same environment variables mentioned in Step 5 and enter:
On
cd example/shapes/jmsPubSub
./run Pub Shapes/Square Green 15
On Windows systems:
cd example\shapes\jmsPubSub
run Pub Shapes/Square Green 15
b.A JMS application subscribing to Circles. Set the environment variables mentioned in Step 5 and enter:
On
cd example/shapes/jmsPubSub
./run Sub Shapes/Circle
On Windows systems:
cd example\shapes\jmsPubSub
run Sub Shapes/Circle
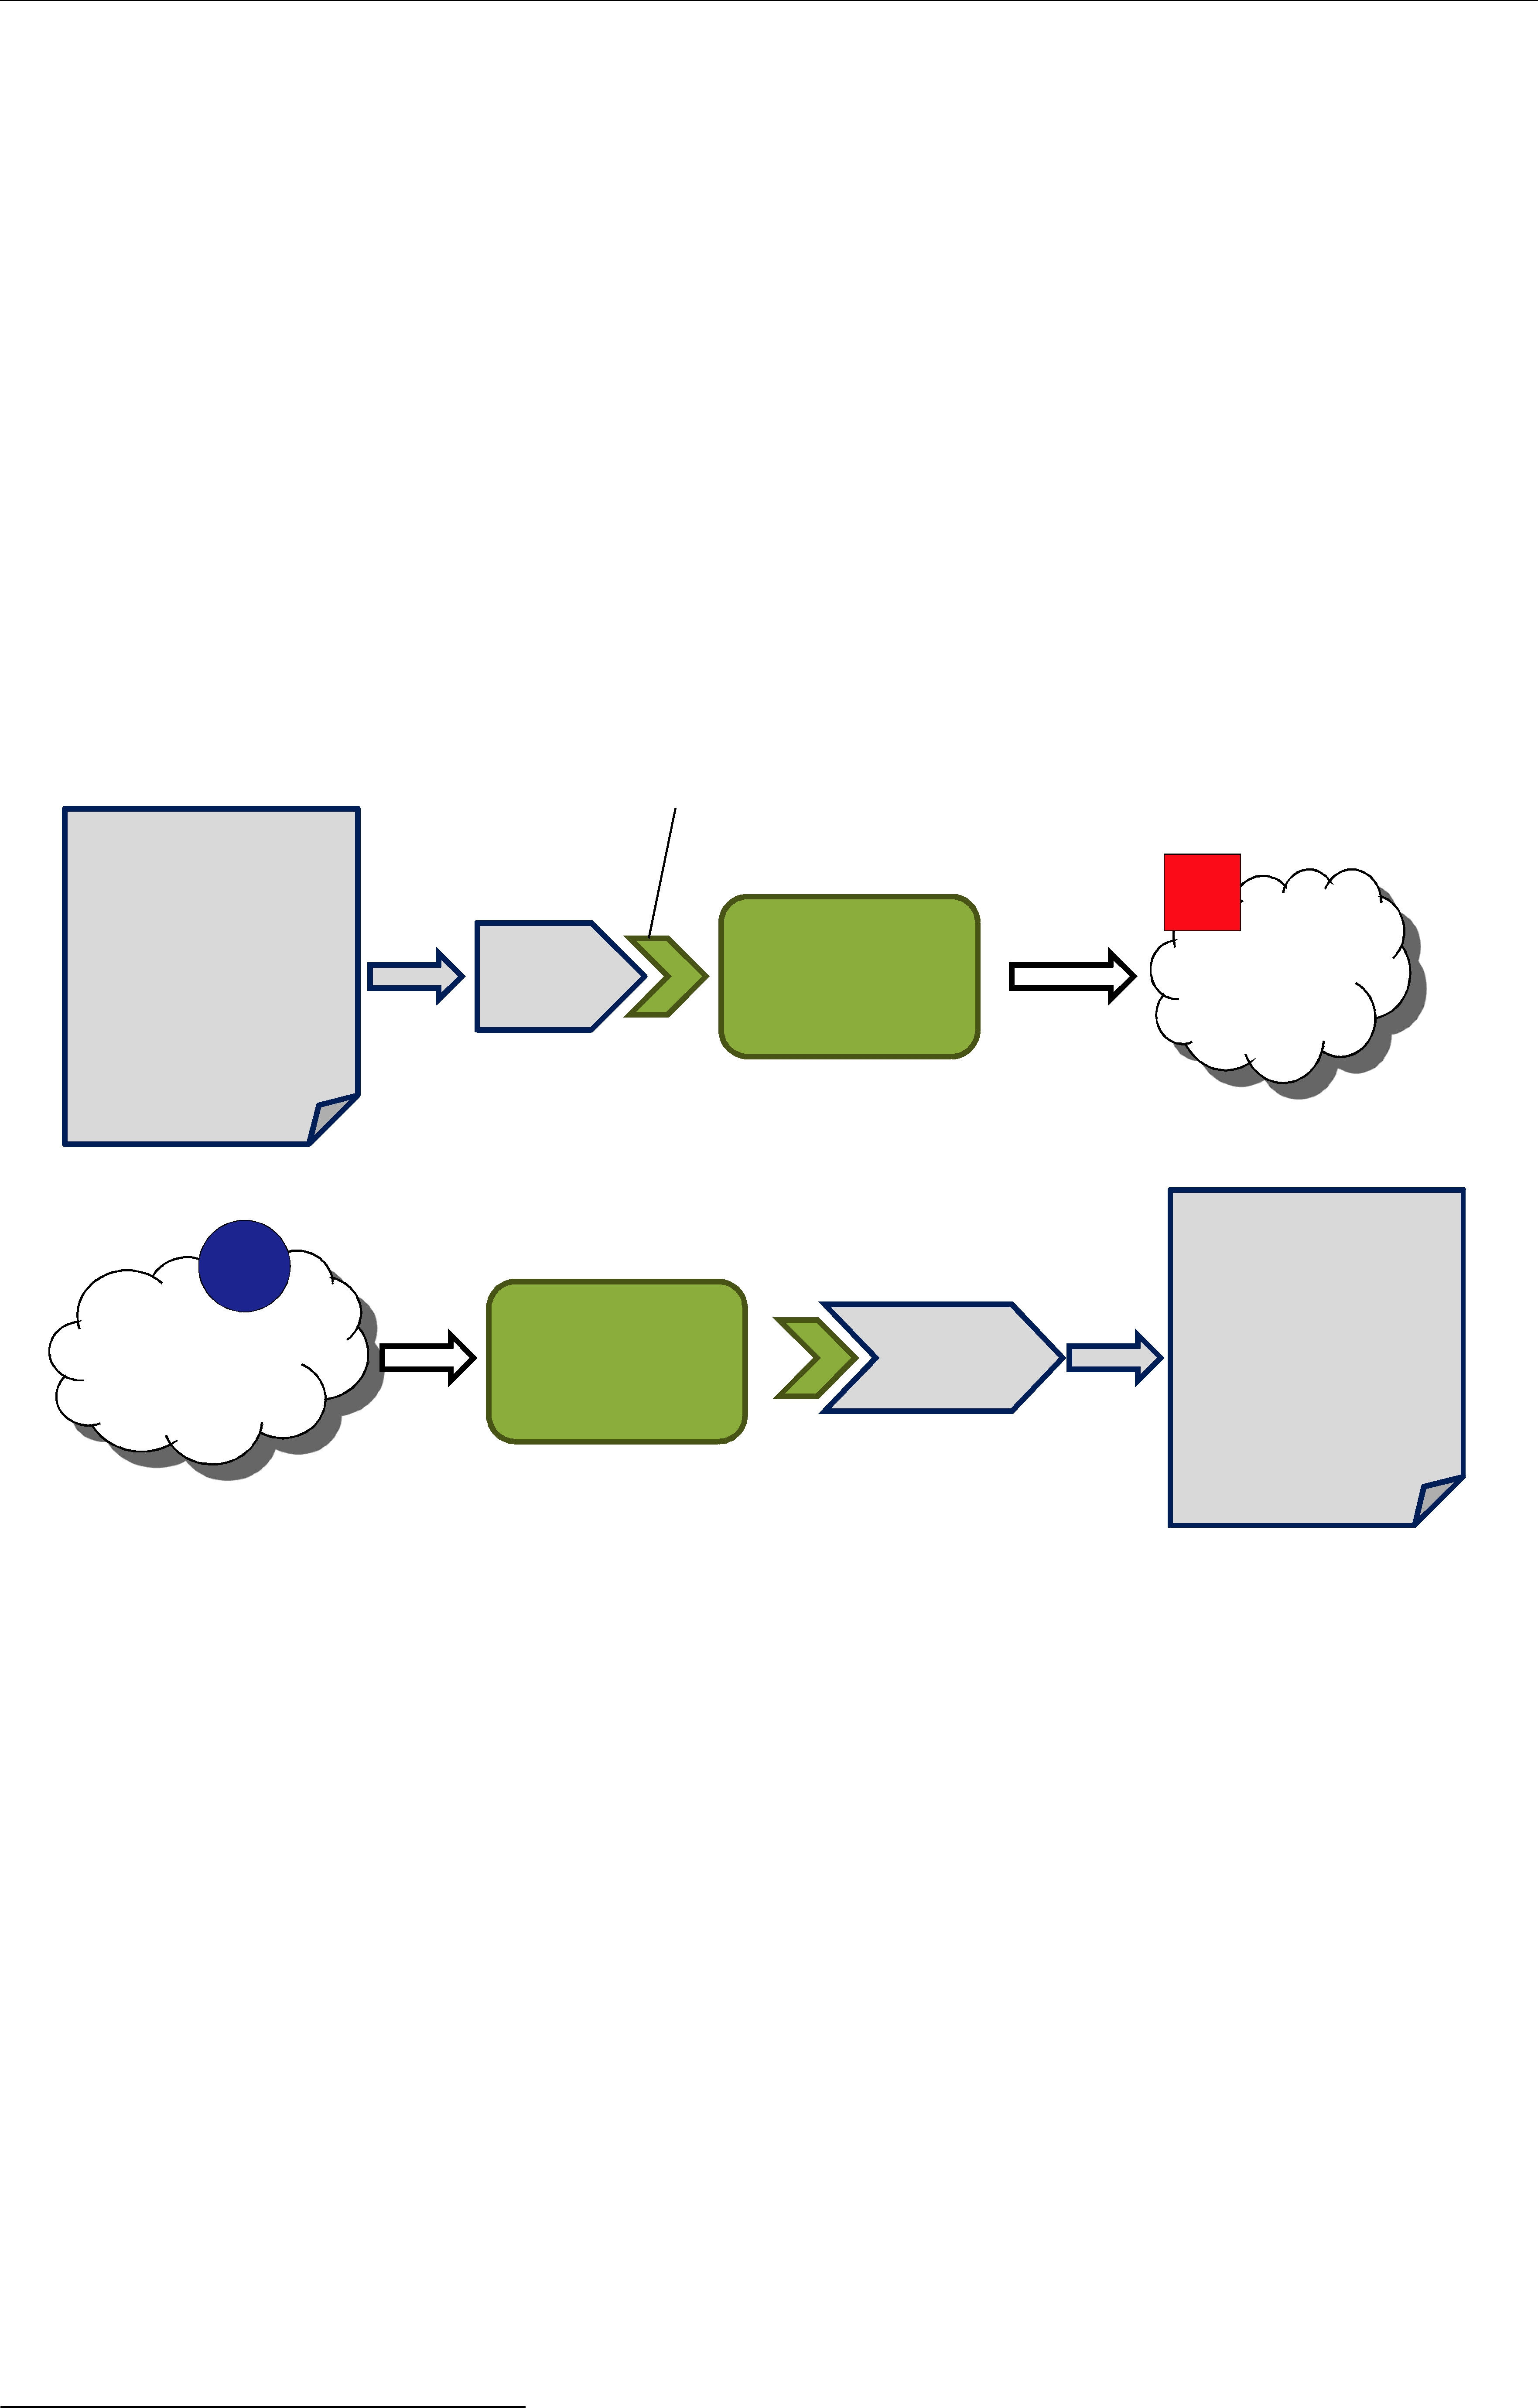
c.A Connext application publishing blue Circles and subscribing to Squares. Start Shapes Demo on domain 0 and create a blue Circle publisher and a Square subscriber.
Now we have the following scenario, in which none of the subscribers are receiving data yet.
Configure and Run Routing Service with the JMS Adapter:
We are going to use the configuration file example/shapes/jms_rti_shapes.xml to run Routing Service and the JMS adapter with RTI Message Service.
7.Our example Routing Service configuration file expects the environment variables JAVAEEJAR and JMS_CLASSPATH as set in Step 5. To use different configuration or set up a different JMS vendor, you can edit the file and change the values of <jvm>/ <class_path>, and the JMS connection <property> under the different <domain_route> tags.
8.When using Java adapters with Routing Service, the Java Virtual Machine shared library (libjvm.so on
•On
•On Windows systems: %JAVA_HOME%\jre\bin\client
9.Run the following command to start Routing Service1:
cd <Routing Service installation directory>
scripts/rtiroutingservice
1.In addition to jms_rti.xml, you can find in the same directory the file jms_openjms.xml, which includes the config- uration to run the JMS adapter with OpenJMS as the JMS vendor.
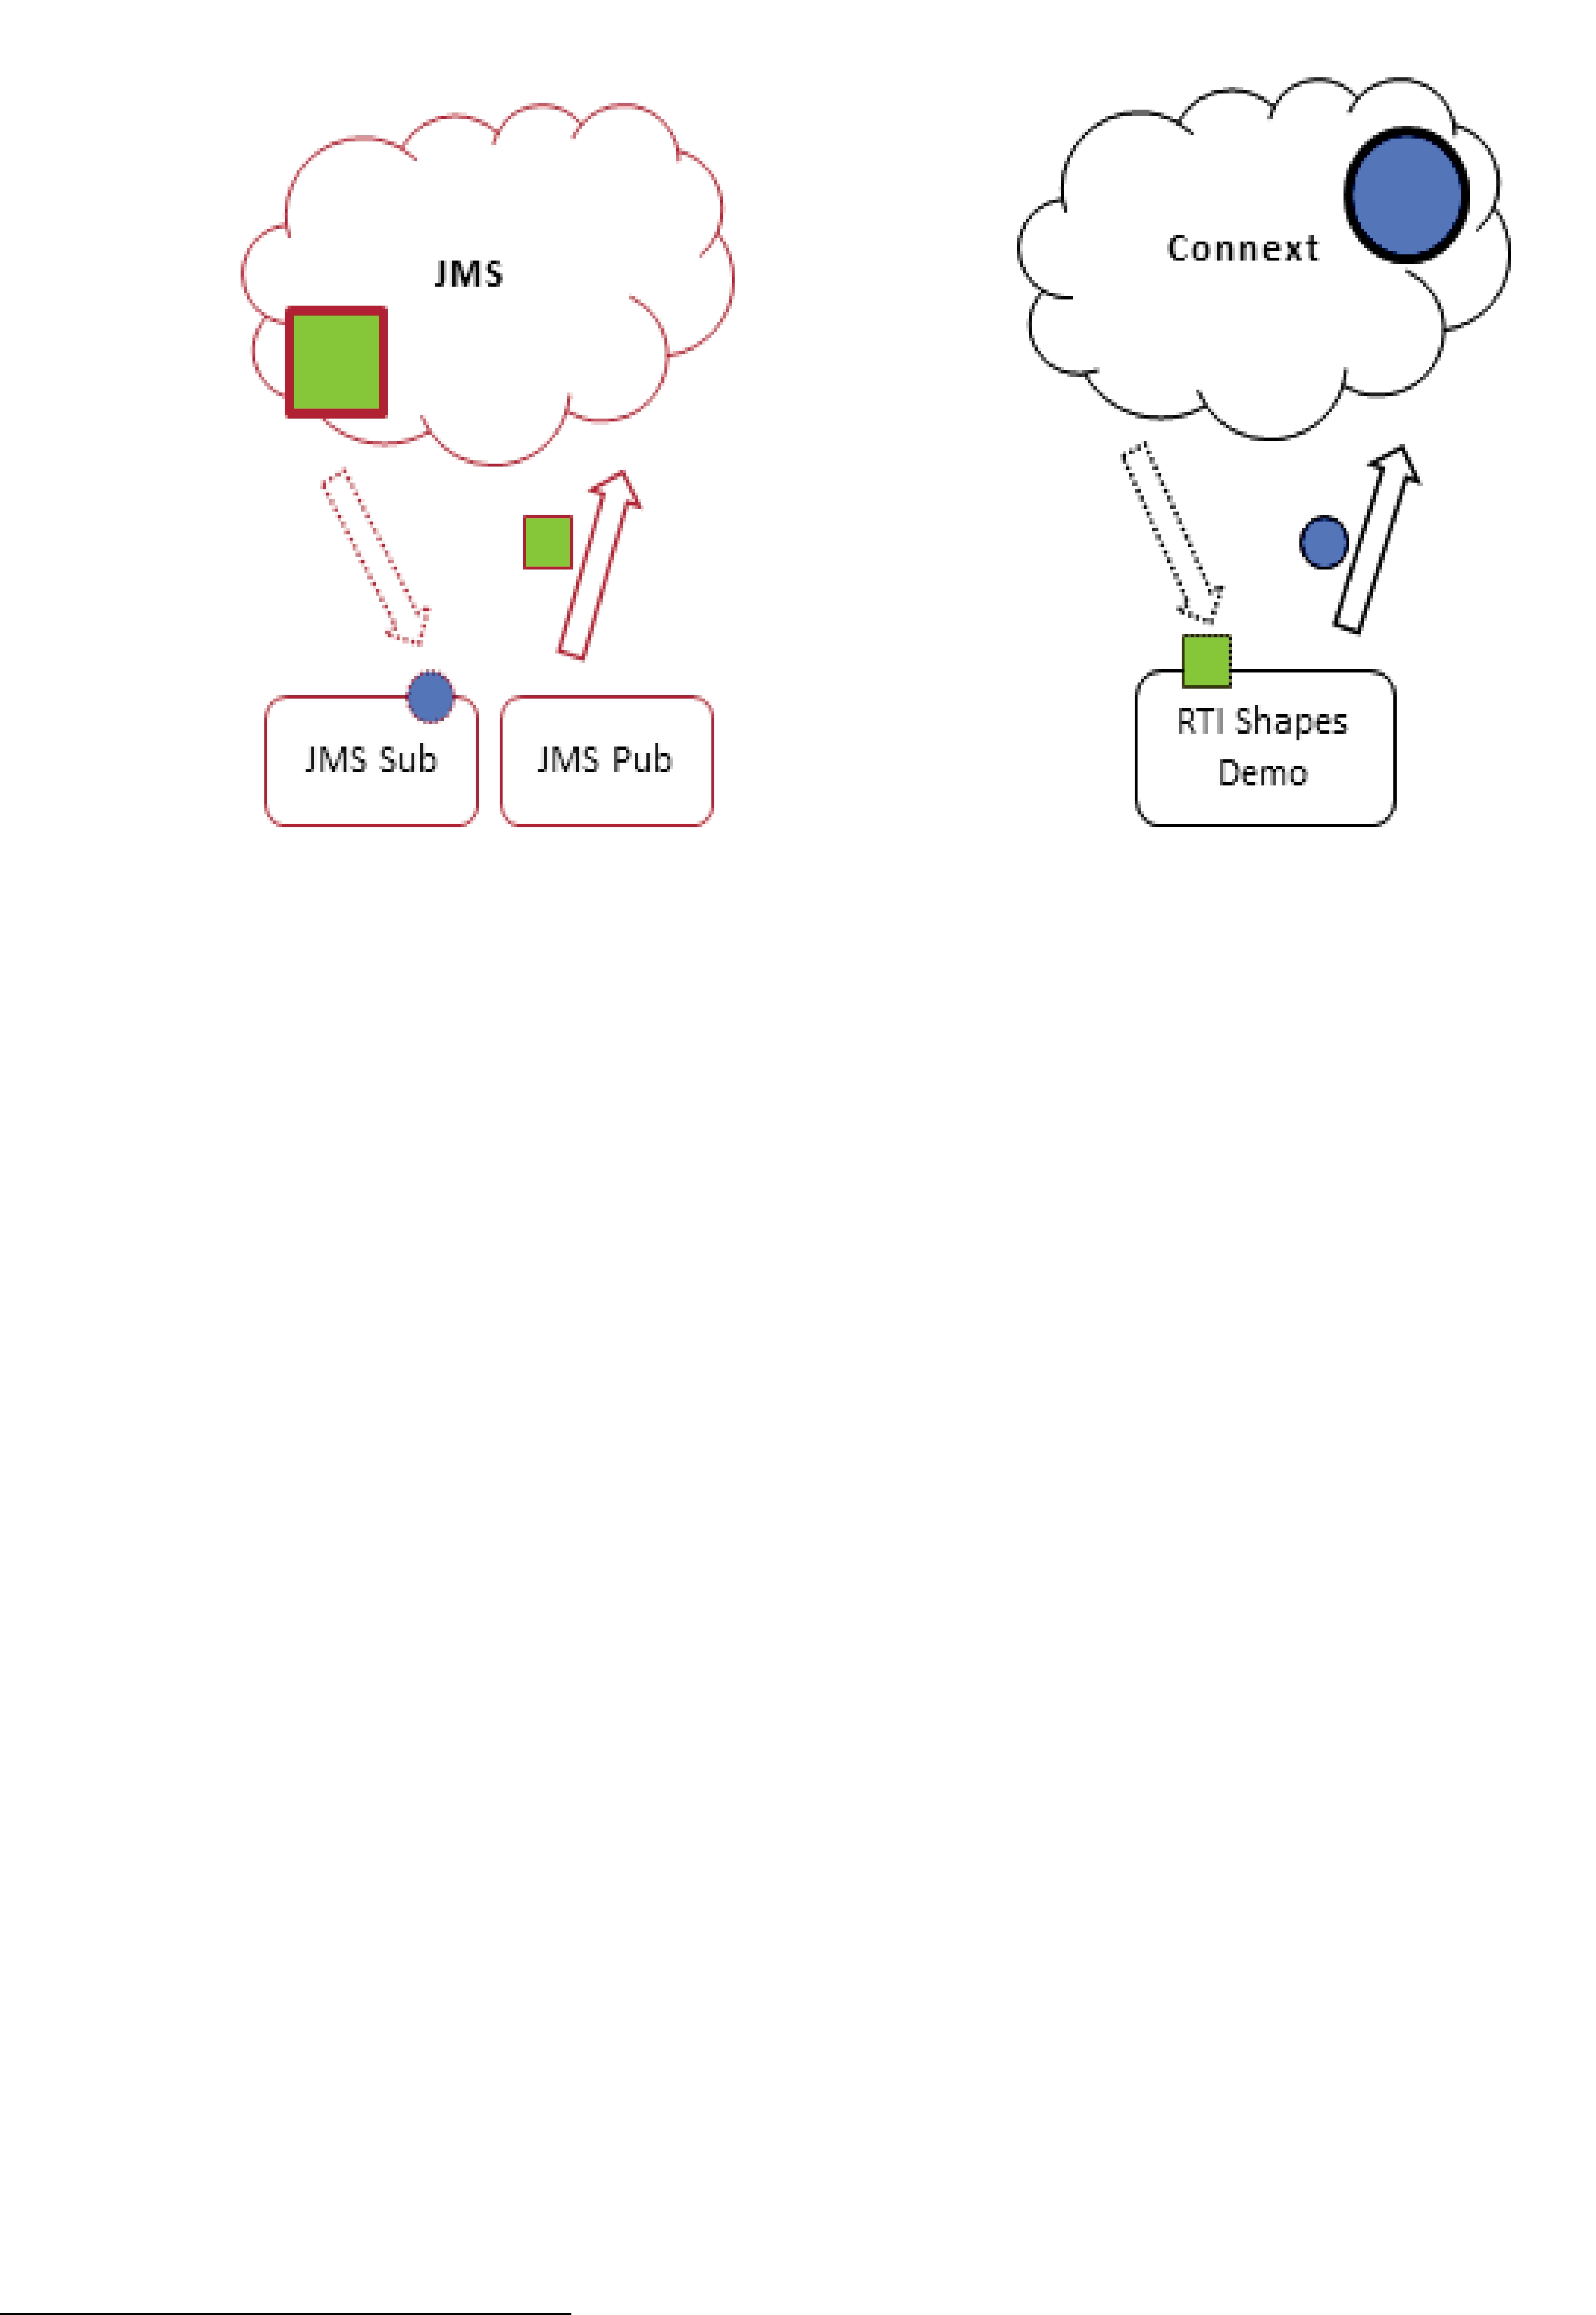
10.Routing Service will bridge between JMS and Connext: the JMS subscriber application will receive the blue Circles published by the Shapes Demo publisher, and the Shapes Demo subscriber will receive the green Squares published by the JMS publisher application.
JMS
Routing
Service
Connext
JMS Sub |
JMS Pub |
RTI Shapes |
Demo |
How to customize the JMS adapter:
The implementation of the JMS adapter is meant to be extended to better fit your specific type system. This example will only work with JMS MapMessages and Connext types with
The fundamental point of extension is the translation between JMS messages and Connext DynamicData samples. To customize this translation, follow these steps:
11.To translate from JMS messages to DynamicData samples, implement the following interface (let’s call your class mypackage.MyJMSToDynamicData):
com.rti.jmsadapter.adapter.JMSToDynamicDataMessageTranslation
12.To translate from DynamicData samples to JMS messages, implement the following interface (let’s call your class mypackage.MyDynamicDataToJMS):
com.rti.jmsadapter.adapter.DynamicDataToJMSMessageTranslation
You can find the default implementations in adapters/jms/src/.
13.Modify your routing service configuration file to tell the JMS adapter that it should instantiate and use your classes:
a.In a <route> that reads from the JMS adapter, add a property below <input> with the name JMSDynamicDataTranslator and the value mypackage.MyJMSToDynamicData.
b.In a <route> that writes to the JMS adapter, add a property below <output> with the name DynamicDataJMSTranslator and the value mypackage.MyDynamicDataToJMS.
c.Make sure mypackage reachable in your classpath (within the <jvm>/<classpath> tag in your configuration file or in the environment variable CLASSPATH).
See example/shapes/jms_rti.xml for more details.
Optional Exercise:
If you have completed this example and the previous one which introduced the file adapter, as an optional exercise you can make these two adapters work together. Write a routing service configuration file that does the same thing as the example file, but have it read and write from/ to JMS instead of Connext.

Hint: Your <domain_route> will contain two connections, each instantiating one of the adapter plugins (<connection_1 plugin_name=”adapters::jms”>, and <connection_2 plugin_name=”adapters::file”>).
4.11Example 11 - Using a Socket Adapter
To run this example, you must have RTI Routing Service Adapter SDK; it must be installed on top of RTI Routing Service.
This adapter can read and write from TCP sockets, serializing and deserializing Connext DynamicData samples into a simple format.
The reader will establish a TCP connection and receive bytes, converting them to DynamicData samples for Routing Service. The writer will create a TCP server and forward samples provided by Routing Service to all the TCP clients that connect to it.
This adapter is similar to the file adapter in Example 9 - Using a File Adapter (Section 4.9); the following instructions assume that you have gone through that example.
Compile the adapter:
1.Compile the socket adapter in adapters/socket:
•On
a.Set the NDDSHOME environment variable as described in the RTI Core Libraries and Utilities Getting Started Guide.1
b.Enter:
cd <Routing Service installation directory>
cd adapters/socket/make
gmake
The adapter shared library, libsocketadapter.so, will be copied to <installation direc- tory for Routing Service>/bin/<architecture>.
•On Windows systems:
a.Set the NDDSHOME environment variable as described in the RTI Core Libraries and Utilities Getting Started Guide.1
b.Open the Visual Studio solution under adapters/socket/windows. If you are using Visual Studio 2005. For example, open
c.Build the solution.
The adapter shared library, socketadapter.dll, will be copied to <installation directory for Routing Service>/bin/<architecture>.
Run the examples:
The example configuration file for Routing Service is located in example/shapes/ socket_bridge.xml. It defines several <routing_service> configurations for different examples. We will use Shapes Demo to publish and subscribe to colored shapes. To send TCP traffic and listen to connections coming from the socket adapter, we will use the UNIX utility, netcat (nc).
Netcat is a UNIX utility with many different uses involving TCP or UDP. Among other things, it can open TCP connections and listen to arbitrary TCP ports and accept connections. We will use netcat in this example to communicate with the socket adapter. You could use your own socket application or any other
2.Read from Connext and send through a TCP socket.
1.See <Connext installation directory>/ndds.<version>/doc/pdf/RTI_CoreLibrariesAndUtilities_GettingStarted.pdf.
a.Start Shapes Demo on domain 0 (the default domain) and publish some Squares.
b.On machine HostA, run Routing Service:
cd <Routing Service installation directory>
HostA> scripts/rtiroutingservice \
c.On machine HostB, connect to HostA using netcat:
HostB> nc HostA 8112
d.Data should be being printed in netcat.
e.Optionally, run netcat as before on one or more additional machines. Data will be sent to all of them.
3.Read from a TCP socket and publish into Connext.
a.The configuration file uses “MyHost” as a host name to connect to in different places. Find and replace them to use the host where you will run netcat (we will call it HostB).
b.Start Shapes Demo on domain 0 (the default domain) and create a Square subscriber.
c.On machine HostB, start netcat and listen to TCP connections on port 8111:
HostB> nc
d.On machine HostA, run Routing Service:
HostA> scripts/rtiroutingservice \
e.From netcat (HostB), enter:
x=100,y=100,shapesize=50,color=RED;
x=150,y=150,shapesize=10,color=BLUE;
You should see two squares in Shapes Demo.
4. Use remote administration to change the host Routing Service is writing to.
a.On another machine, HostC run netcat:
HostC> nc
b.On any machine, using the Routing Service shell (see Section 4.6) on domain 1, send the following command (all on one line):
RTI Routing Service> update socket_to_dds
socketdds::s::square_socket route.input.property[Host]=HostC
c.From netcat (HostC), enter: x=100,y=100,shapesize=10,color=RED; x=150,y=150,shapesize=50,color=BLUE;
d.In Shapes Demo, the size of the shapes should have changed.
e.The Routing Service adapter API lets an adapter update its configuration on the fly when the service receives a remote command that changes its configuration properties. Explore the code to see how
RTI_RoutingServiceSocketStreamReader_update() is implemented.
5.There are two other <routing_service> tags in the configuration file. One of them (socket_to_socket) eliminates Connext from the picture and just reads from a socket and writes to a different one. The other one, socket_tester, reads from TCP and uses a Java
adapter that works as an output test adapter, counting the samples received and reporting failure or success depending the expected result configured with the tag <property>.
Customize the Socket Adapter
In the example, the socket adapters use a specific format, which you already saw in netcat. Now try adapting the example to your own format. The code that serializes/deserializes DynamicData samples to/from a byte buffer is in adapters/socket/src/SampleParsing.c.
6.Edit the function RTI_RoutingServiceSocketAdapter_parse_sample() to implement how a DynamicData sample gets created from a byte buffer
7.In the same file, edit the function
RTI_RoutingServiceSocketAdapter_serialize_sample() to implement how a sample is converted to a byte buffer.
8.Compile the code as described in Step 1 on page