Building and Running “Hello, World”
Let’s start by compiling and running Hello World, a basic program that publishes information over the network.
For now, do not worry about understanding the code (we start covering it in Capabilities and Performance. Use the following instructions to run your first middleware program using Connext DDS.
Step 1: Set Up the Environment
There are a few things to take care of before you start working with the example code.
Set Up the Environment on Your Development Machine
- Set the NDDSHOME environment variable.
Set the environment variable NDDSHOME to the Connext DDS install directory. (Connext DDS itself does not require that you set this environment variable. It is used in the scripts used to build and run the example code because it is a simple way to locate the install directory. You may or may not choose to use the same mechanism when you create scripts to build and/or run your own applications.)
The default installation paths are described in Paths Mentioned in Documentation:
- Update your path.
- If you will be using the separate add-on product, Ada Language Support:
Connext DDS does not require that you have the environment variable NDDSHOME set at run time. However, if it is set, the middleware will use it to load certain configuration files. Additionally, you may have previously set your path based on the value of that variable. Therefore, if you have NDDSHOME set, be sure it is pointing to the right copy of Connext DDS.
Add Connext DDS's bin directory to your path. This will allow you to run some of the simple command-line utilities included in your distribution without typing the full path to the executable.
Add $NDDSHOME/lib/gnat to your ADA_PROJECT_PATH environment variable. This directory contains Ada project files that will be used in the generated example project file.
Make sure the Ada compiler, gprbuild, is in your path. The makefile used by the example assumes that gprbuild is in your path.
- Make sure Java is available (only needed if you will be developing in Java).
Ensure that appropriate java and javac executables are in your path. They can be found within the bin directory of your JDK installation. The Release Notes list the Java versions that are supported.
- Make sure the preprocessor is available.
Check whether the C preprocessor (e.g., cpp) is in your search path. This step is optional, but makes code generation with the rtiddsgen utility more convenient.Capabilities and Performance describes how to use rtiddsgen.
Running the script vcvars32.bat, vsvars32.bat, or vcvarsall.bat (depending on your version of Visual Studio) will update the path for a given command prompt. If the Visual Studio installer did not add cl to your path already, you can run this script before running rtiddsgen.
This is often the case with Java users. You can either choose not to use a preprocessor or to obtain a no-cost version of Visual Studio from Microsoft's web site.
- Get your project files ready.
If you installed Connext DDS in C:\Program Files or another system directory, Microsoft Visual Studio may present you with a warning message when you open a solution file from the installation directory. If you see this dialog, you may want to copy the example directory somewhere else, as described above.

The makefiles that RTI provides with the example code are intended to be used with the GNU distribution of the make utility. On modern Linux systems, the make binary typically is GNU make. On other systems, GNU make is called gmake. For the sake of clarity, the name gmake is used below. Make sure that the GNU make binary is on your path before continuing.
Set Up the Environment on Your Deployment Machine
Some configuration has to be done for the machine(s) on which you run your application; the RTI installer can’t do that for you, because those machines may or may not be the same as where you created and built the application.
- Make sure Java is available (only needed if you will be developing in Java).
- Make sure the dynamic libraries are available.
Ensure that appropriate java and javac executables are in your path. They can be found within the bin directory of your JDK installation. The Release Notes list the Java versions that are supported.
On Linux systems: Note that GNU java (from the GNU Classpath project) is not supported—and will typically not work—but is in the path by default on many Linux systems.
- Make sure that your application can load the Connext DDS dynamic libraries. If you use C, C++, or Ada with static libraries (the default configuration in the examples covered in this document), you can skip this step. However, if you plan to use dynamic libraries, or Java or .NET1RTI Connext DDS .NET language binding is currently supported for C# and C++/CLI. (which always use dynamic libraries), you will need to modify your environment as described here. To see if dynamic libraries are supported for your machine’s architecture, see the RTI Connext DDS Core Libraries Platform Notes2In the Platform Notes, see the “Building Instructions...” table for your target architecture..For more information about where the Windows OS looks for dynamic libraries, see: http://msdn.microsoft.com/en-us/library/ms682586.aspx.
- On UNIX-based systems: Add this directory to your LD_LIBRARY_PATH environment variable.
- On Mac OS systems: Add this directory to your DYLD_LIBRARY_PATH environment variable.
- On Windows systems: Add this directory to your Path environment variable.
- On AIX systems: Add this directory to your LIBPATH environment variable.
The dynamic libraries needed by C or C++ applications are in the directory ${NDDSHOME}/lib/<architecture>. The dynamic libraries needed by Ada applications are in the directory ${NDDSHOME}/lib/GNATgcc/relocatable.
On UNIX-based systems: Add this directory to your LD_LIBRARY_PATH environment variable.
On Mac OS systems: Add this directory to your DYLD_LIBRARY_PATH environment variable.
On Windows systems: Add this directory to your Path environment variable or copy the DLLs inside into the directory containing your executable.
On AIX systems: Add this directory to your LIBPATH environment variable.
The native dynamic libraries needed by Java applications are in the directory ${NDDSHOME}/lib/<architecture>. The native dynamic libraries needed by Ada applications are in the directory $NDDSHOME/lib/<architecture>.
Java .jar files are in the directory ${NDDSHOME}/lib/java. They will need to be on your application’s class path.
On Windows systems: The dynamic libraries needed by .NET applications are in the directory %NDDSHOME%\lib\i86Win32VSnnnn, where nnnn represents the Visual Studio version number. You will need to either copy the DLLs from that directory to the directory containing your executable, or add the directory containing the DLLs to your Path environment variable3The file nddsdotnet.dll (or nddsdotnetd.dll for debug) must be in the executable directory. Visual Studio will, by default, do this automatically.. (If the .NET framework is unable to load the dynamic libraries at run time, it will throw a System.IO.FileNotFoundException and your application may fail to launch.)
Step 2: Compile the Hello World Program
The same example code is provided in C, Traditional C++, C#, Java, and Ada4Ada support requires a separate add-on product, Ada Language Support. . The following instructions cover C++, Java, and Ada in detail; the procedures for C and C# are very similar. The same source code can be built and run on different architectures. Examples for the Modern C++ API are provided in the RTI Community portal.
By default, examples are copied into your home directory the first time you run RTI Launcher or any script in <NDDSHOME>/bin. This document refers to the location of the copied examples as <path to examples>.
Wherever you see <path to examples>, replace it with the appropriate path.
Default path to the examples:
- Mac OS X systems: /Users/your user name/rti_workspace/5.2.0/examples
- UNIX-based systems: /home/your user name/rti_workspace/5.2.0/examples
- Windows systems: your Windows documents folder\rti_workspace\5.2.0\examples
Where 'your Windows documents folder' depends on your version of Windows. For example, on Windows 7, the folder is C:\Users\your user name\Documents; on Windows Server 2003, the folder is C:\Documents and Settings\your user name\Documents.
Note: You can specify a different location for rti_workspace. You can also specify that you do not want the examples copied to the workspace.
The instructions also focus on Windows and UNIX-based systems. If you will be using an embedded platform, see the Embedded Systems Addendum for more instructions.
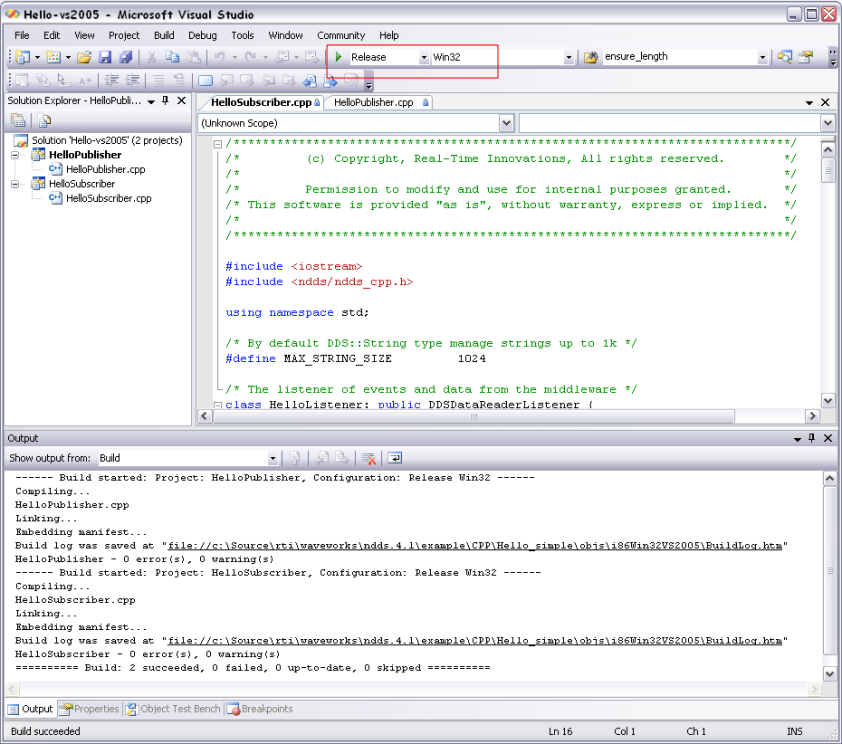
- In the Windows Explorer, go to <path to examples>\connext_dds\c++\hello_simple\win32 and open the Microsoft Visual Studio solution file for your architecture. For example, the file for Visual Studio 2013 for 32-bit platforms is Hello-i86Win32VS2013.sln.
- The Solution Configuration combo box in the toolbar indicates whether you are building debug or release executables; select Release. Select Build Solution from the Build menu.
From your command shell, go to <path to examples>/connext_dds/c++/hello_simple/.
Type:
> gmake -f make/Makefile.<architecture>
where <architecture> is one of the supported architectures; see the contents of the make directory for a list of available architectures. (If you do not see a makefile for your architecture, please refer to Generating Code with RTI Code Generator to learn how to generate a makefile or project files for your platform). This command will build a release executable. To build a debug version instead, type:
> gmake -f make/Makefile.<architecture> DEBUG=1
From your command shell, go to <path to examples>\connext_dds\java\hello_simple.
Type:
> build
From your command shell, go to <path to examples>/connext_dds/java/hello_simple.
Type:
> ./build.sh
From your command shell, go to <path to examples>/connext_dds/ada/hello_simple/.
Type:
> gmake -f make/Makefile.<architecture>
where <architecture> is one of the supported architectures; see the contents of the make directory for a list of available architectures. (If you do not see a makefile for your architecture, please refer toGenerating Code with RTI Code Generator to learn how to generate a makefile or project files for your platform). This command will build a release executable. To build a debug version instead,
> gmake -f make/Makefile.<architecture> DEBUG=1
Step 3: Start the Subscriber
From your command shell, go to examples\connext_dds\c++\Hello_simple and type:
> objs\<architecture>\HelloSubscriber.exe
where <architecture> is one of the supported architectures; see the contents of the win32 directory for a list of available architectures. For example, the Windows architecture name corresponding to 32-bit Visual Studio 2013 is i86Win32VS2013.
From your command shell, go to /examples/connext_dds/c++/Hello_simple and type:
> objs/<architecture>/HelloSubscriber
where <architecture> is one of the supported architectures; see the contents of the make directory for a list of available architectures. For example, the architecture name corresponding to Red Hat® Enterprise Linux 5 is i86Linux2.6gcc4.1.1.
(As described in Step 1: Set Up the Environment, you should have already set your path appropriately so that the example application can load the native libraries on which Connext DDS depends. If you have not, you can set the variable RTI_EXAMPLE_ARCH in your command shell—e.g., to i86Win32VS2013 or i86Linux2.6gcc4.1.1—and the example launch scripts will use it to set your path for you.)
From your command shell, go to examples\connext_dds\java\Hello_simple and type:
> runSub
From your command shell, go to examples/connext_dds/java/Hello_simple and type:
> ./runSub.sh
From your command shell, go to:
/examples/connext_dds/ada/Hello_simple and type:
> objs/<architecture>/hellosubscriber
Where <architecture> is one of the supported architectures; see the content of the make directory for a list of available architectures. For example, the architecture name corresponding to Red Hat Enterprise Linux 5.5 is x64Linux2.6gcc4.4.5.
Step 4: Start the Publisher
Connext DDS interoperates across all of the programming languages it supports, so you can choose whether to run the publisher in the same language you chose for the subscriber or a different language.
From a different command shell, go to examples\connext_dds\c++\Hello_simple and type:
> objs\<architecture>\HelloPublisher.exe
where <architecture> is one of the supported architectures; see the contents of the win32 directory for a list of available architectures. For example, the Windows architecture name corresponding to 32-bit Visual Studio 2013 is i86Win32VS2013.
From a different command shell, go to examples/connext_dds/c++/Hello_simple and type:
> objs/<architecture>/HelloPublisher
where <architecture> is one of the supported architectures; see the contents of the make directory for a list of available architectures. For example, the architecture name corresponding to Red Hat Enterprise Linux 5 is i86Linux2.6gcc4.1.1.
(As described above, you should have already set your path appropriately so that the example application can load the native libraries on which Connext DDS depends. If you have not, you can set the variable RTI_EXAMPLE_ARCH in your command shell—e.g., to i86Win32VS2013 or i86Linux2.6gcc4.1.1.—and the example launch scripts will use it to set your path for you.)
From a different command shell, go to <path to examples>\connext_dds\java\hello_simple and type:
> runPub
From a different command shell, go to <path to examples>/connext_dds/java/hello_simple and type:
> ./runPub.sh
From a different command shell, go to <path to examples>/connext_dds/ada/hello_simple and type:
> objs/<architecture>/hellopublisher
Where <architecture> is one of the supported architectures; see the contents of the make directory for a list of available architectures. For example, the architecture name corresponding to Red Hat Enterprise Linux 5.5 is x64Linux2.6gcc4.4.5.
If you typed "Hello, World" in the publishing application, you should see output similar to the following:

Congratulations! You’ve run your first Connext DDS program!
© 2015 RTI