10. Tutorials
Note
The commands shown in these examples are for the x64Linux3gcc5.4.0
architecture. For simplicity, all the examples assume that all the
applications run on the same host machine and the environment variable
NDDSHOME is set to point to your RTI Connext installation.
Note
Some of the examples require OpenSSL libraries and you must ensure they are
present in your library path before starting the applications.
Example commands assume the existence of the environment variable
OPENSSLHOMELIB set to the directory that contains the OpenSSL libraries.
If you use the OpenSSL libraries distributed by RTI, the libraries will have the following locations:
On Linux and macOS systems:
NDDSHOME/third_party/openssl-<version>/<architecture>/release/libOn Windows systems:
NDDSHOME\third_party\openssl-<version>\<architecture>\release\lib
10.1. Example: Using a Builtin UDP Transport
This example illustrates the basic functionality of Cloud Discovery Service. It shows how Connext DDS applications discover each other through an instance of Cloud Discovery Service.
10.1.1. Setup
The first step is to have two Connext applications that can talk to each
other. For that, you can use an IDL file of your choice and run rtiddsgen to
generate the example. For instance, you can create a file named
CDSHelloWorld.idl with the following content:
struct CDSHelloWorld {
    long count;
};
Generate the publisher and subscriber examples by running the following command
(you can replace C++11 with any other supported language of your choice):
$NDDHSOME/bin/rtiddsgen -language C++11 -example x64Linux3gcc5.4.0 \
    -ppDisable CDSHelloWorld.idl
Modify CDSHelloWorld_publisher.cxx to increase the count field each time
the sample is written. For instance, you can add the following line in the
main writing loop:
sample.count(count);
To compile the generated code, run:
make -f makefile_CDSHelloWorld_x64Linux3gcc5.4.0
You should have two executables, CDSHelloWorld_publisher and
CDSHelloWorld_subscriber. Now you can run the examples to make sure
everything is fine. You need to run the examples from the directory that
contains the generated USER_QOS_PROFILES.xml.
From one terminal run:
./objs/x64Linux3gcc5.4.0/CDSHelloWorld_publisher
Writing CDSHelloWorld, count 0
Writing CDSHelloWorld, count 1
...
From a different terminal, run:
./objs/x64Linux3gcc5.4.0/CDSHelloWorld_subscriber
CDSHelloWorld subscriber sleeping for 4 sec...
[count: 3]
CDSHelloWorld subscriber sleeping for 4 sec...
[count: 4]
...
You should see that the subscriber application receives the samples generated by the publisher application. This occurs because by default, DomainParticipants enable multicast. That is, participant announcements are automatically sent to a multicast destination.
10.1.3. Cloud Discovery Service in Action
To make the applications communicate, we need to run Cloud Discovery Service. From a terminal, run the following command:
$NDDSHOME/bin/rticlouddiscoveryservice -verbosity LOCAL
This command will run Cloud Discovery Service with the builtin configuration that listens on port 7400 over the UDP transport.
Re-run the publisher and subscriber applications, but this time set the
initial peers to talk to Cloud Discovery Service
(see RTPS Peer Descriptor). To do that,
open the USER_QOS_PROFILES.xml file and add the following snippet
to <domain_participant_qos>.
<domain_participant_qos>
. . .

    <discovery>
        . . .
        <initial_peers>
            <element>rtps@localhost:7400</element>
        </initial_peers>
    </discovery>
</domain_participant_qos>
Now run the applications and verify that the subscriber receives samples. In addition, you can start more publishers and subscribers, then see how they all discover each other and communicate. You can also stop Cloud Discovery Service and see that the applications continue communicating because once Discovery has completed, Cloud Discovery Service is no longer needed.
10.2. Example: Using a Custom Listening Port
This example extends Example: Using a Builtin UDP Transport to run Cloud Discovery Service on a custom listening port over UDP. For that, you can run Cloud Discovery Service as follows:
$NDDSHOME/bin/rticlouddiscoveryservice -transport <port>
where <port> represents the port number you want to use.
This example will use 10000.
$NDDSHOME/bin/rticlouddiscoveryservice -transport 10000
To see which exact address Cloud Discovery Service is using to listen for participant
announcements, run the service with -verbosity LOCAL and look for the
line:
...
[/cloud_discovery_services/rti.cds.builtin.config.default/forwarder/receiver|ENABLE] listening for announcements on:
{
  "locator":[
    "udpv4://172.17.0.2:10000"
  ]
}
...
Set the initial peers accordingly to indicate where Cloud Discovery Service is listening:
<domain_participant_qos>
. . .

    <discovery>
        . . .
        <initial_peers>
            <element>rtps@localhost:10000</element>
        </initial_peers>
    </discovery>
</domain_participant_qos>
10.3. Example: Using RTI TCP Transport
This example extends Example: Using a Builtin UDP Transport to use the RTI TCP transport for both discovery and user data. The example shows how to run Cloud Discovery Service using the preregistered instance of RTI TCP transport.
Note
To run this example, you need RTI TCP Transport, which is included with Connext.
10.3.1. Setup
The first step of this example is to configure the publisher and subscriber
applications so they communicate over the RTI TCP transport in LAN mode.
For that, you can include the following XML code within the
<domain_participant_qos> tag of the file USER_QOS_PROFILES.xml
generated by rtiddsgen.
<property>
    <value>
        <element>
            <name>dds.transport.load_plugins</name>
            <value>dds.transport.tcp.tcp1</value>
        </element>
        <element>
            <name>dds.transport.tcp.tcp1.library</name>
            <value>nddstransporttcp</value>
        </element>
        <element>
            <name>dds.transport.tcp.tcp1.create_function</name>
            <value>NDDS_Transport_TCPv4_create</value>
        </element>
        <element>
            <name>dds.transport.tcp.tcp1.server_bind_port</name>
            <value>$(BIND_PORT)</value>
        </element>
        <element>
            <name>dds.transport.tcp.tcp1.parent.classid</name>
            <value>NDDS_TRANSPORT_CLASSID_TCPV4_LAN</value>
        </element>
    </value>
</property>
The server bind port property value is obtained from the environment variable
$(BIND_PORT). This is a convenience for this example so you can reuse the
same file to specify a different port for the publisher and subscriber
applications, which is required when running on the same host machine.
Now you can run the applications. You need to run from the directory that
contains the generated USER_QOS_PROFILES.xml you just modified.
From the terminal, run the Publisher application:
export LD_LIBRARY_PATH=$NDDSHOME/lib/x64Linux3gcc5.4.0
export BIND_PORT=7401
export NDDS_DISCOVERY_PEERS=tcpv4_lan://localhost:7402

./objs/x64Linux3gcc5.4.0/CDSHelloWorld_publisher
Then run the Subscriber application:
export LD_LIBRARY_PATH=$NDDSHOME/lib/x64Linux3gcc5.4.0
export BIND_PORT=7402
export NDDS_DISCOVERY_PEERS=tcpv4_lan://localhost:7401

./objs/x64Linux3gcc5.4.0/CDSHelloWorld_subscriber
You should see the subscriber receive samples. This is possible since in the initial peers list, you indicated how the applications can reach each other.
10.3.2. Cloud Discovery Service in Action
Now you will use Cloud Discovery Service to provide the discovery for the applications.
From a terminal, run the following:
export LD_LIBRARY_PATH=$NDDSHOME/lib/x64Linux3gcc5.4.0

$NDDSHOME/bin/rticlouddiscoveryservice -transport tcpv4_lan:7400
This will run Cloud Discovery Service with the builtin configuration and override the
transport selection to use RTI TCP with bind port 7400.
Re-run the publisher and subscriber application, but this time set the initial peers to talk to Cloud Discovery Service (see RTPS Peer Descriptor). For that, you can set the environment from the application terminal as follows:
For the Publisher application:
export LD_LIBRARY_PATH=$NDDSHOME/lib/x64Linux3gcc5.4.0
export BIND_PORT=7401
export NDDS_DISCOVERY_PEERS=rtps@tcpv4_lan://localhost:7400
For the Subscriber application:
export LD_LIBRARY_PATH=$NDDSHOME/lib/x64Linux3gcc5.4.0
export BIND_PORT=7402
export NDDS_DISCOVERY_PEERS=rtps@tcpv4_lan://localhost:7400
Now run the applications and verify that the subscriber receives samples. You can also stop Cloud Discovery Service and see how the applications continue communicating.
10.3.3. Configuration for TCP transport in WAN Mode using a public address
In this example, we have seen how to configure the TCP transport in the publisher and subscriber applications, and how to configure Cloud Discovery Service to operate in LAN mode. However, there can be situations where Cloud Discovery Service or the publisher and subscriber applications are located across LANs or firewalls. In such a use case, it would be typical to have Cloud Discovery Service expose a public IP address which can be used for asymmetric discovery by the publisher or subscriber application.
To apply this example in that context, you will need to make the following changes:
10.3.3.1. USER_QOS_PROFILES.xml
First, change the classid for the TCP transport. The publisher and subscriber also need a publicly reachable address when communicating with Cloud Discovery Service or other peers in the domain. To achieve both of these changes, add the following to configuration of the RTI TCP transport:
<property>
    <value>
        <element>
            <name>dds.transport.tcp.tcp1.parent.classid</name>
            <value>NDDS_TRANSPORT_CLASSID_TCPV4_WAN</value>
        </element>
        <element>
            <name>dds.transport.tcp.tcp1.public_address</name>
            <value>$(PUBLIC_ADDRESS)</value>
        </element>
    </value>
</property>
The $(PUBLIC_ADDRESS) environment variable allows us to use the same configuration file
for the publisher and subscriber applications.
10.3.3.2. Cloud Discovery Service
Create a configuration file for Cloud Discovery Service, select the TCP transport for the WAN alias, and set the public address. This public address will be used by the publisher and the subscriber applications in their discovery peers.
<?xml version="1.0" ?>
<dds xmlns:xsi="http://www.w3.org/2001/XMLSchema-instance"
        xsi:noNamespaceSchemaLocation="../../resource/schema/rti_cloud_discovery_service.xsd">
    <cloud_discovery_service name="ExampleTCPWAN">
        <annotation>
            <documentation>
                <![CDATA[
                Example that configures the pre-registered instance of the
                RTI TCP WAN transport with a public IP address.
                ]]>
            </documentation>
        </annotation>
        <transport>
            <element>
                <alias>tcpv4_wan</alias>
                <receive_port>9000</receive_port>
                <property>
                    <element>
                        <name>dds.transport.cds.tcp1.public_address</name>
                        <value>35.6.9.10:4589</value>
                    </element>
                </property>
            </element>
        </transport>
    </cloud_discovery_service>
</dds>
You can download the configuration file from here:
rti_cds_example_tcp_wan.xml
You can read more about the public_address property of the RTI TCP transport in
RTI TCP Transport configuration.
An important thing to note here is the format of the specified address. It
follows the [ip:port] format, where the IP is the public address of the
router that provides access to the WAN. The port is the router port that is
used to reach the private server_bind_port inside the LAN from the outside.
In this example, the private server_bind_port is 9000 and the external
port is 4589.
You should change these values as per your network configuration.
To use this configuration, from the terminal, run:
$NDDSHOME/bin/rticlouddiscoveryservice \
        -cfgFile <working_dir>/rti_cds_example_tcp_wan.xml -cfgName ExampleTCPWAN
10.3.3.3. NDDS_DISCOVERY_PEERS
Run the publisher and subscriber applications exactly the way you did in Setup, but with one modification.
export NDDS_DISCOVERY_PEERS=rtps@tcpv4_wan://35.6.9.10:4589
Make sure you set the PUBLIC_ADDRESS environment variable for the publisher and subscriber
applications.
# Replace the [ip:port] pair depending upon the mapping setup in your router
export PUBLIC_ADDRESS=10.20.30.40:7000
You will see that until Cloud Discovery Service is started, the publisher and subscriber applications won’t discover each other. Once Cloud Discovery Service starts, these applications will complete discovery and start communicating with each other.
10.4. Example: Using RTI TCP Transport with RTI TLS Support
This example extends Example: Using a Builtin UDP Transport to enable TLS for secure communication. The example shows how to run Cloud Discovery Service using the preregistered transport instance of the RTI TCP transport with TLS enabled.
Note
To run this example, you need the RTI TCP Transport, which is shipped with Connext. Additionally, you will need to install the optional packages RTI TLS support and OpenSSL.
10.4.1. Setup
The first step in this example is to configure the publisher and subscriber
applications to communicate over the RTI TCP transport in LAN mode with
TLS enabled. For that, you can include the following XML code within the
<domain_participant_qos> tag of the file USER_QOS_PROFILES.xml generated
by rtiddsgen.
<property>
    <value>
        <element>
            <name>dds.transport.load_plugins</name>
            <value>dds.transport.tcp.tcp1</value>
        </element>
        <element>
            <name>dds.transport.tcp.tcp1.library</name>
            <value>nddstransporttcp</value>
        </element>
        <element>
            <name>dds.transport.tcp.tcp1.create_function</name>
            <value>NDDS_Transport_TCPv4_create</value>
        </element>
        <element>
            <name>dds.transport.tcp.tcp1.server_bind_port</name>
            <value>$(BIND_PORT)</value>
        </element>
        <element>
            <name>dds.transport.tcp.tcp1.parent.classid</name>
            <value>NDDS_TRANSPORT_CLASSID_TLSV4_LAN</value>
        </element>
        <element>
            <name>dds.transport.tcp.tcp1.tls.verify.ca_file</name>
            <value>$(PATH_TO_EXAMPLES)/dds_security/cert/tls_rsa01/ca/rsa01RootCaCert.pem</value>
        </element>
        <element>
            <name>dds.transport.tcp.tcp1.tls.identity.certificate_chain_file</name>
            <value>$(PATH_TO_EXAMPLES)/dds_security/cert/tls_rsa01/identities/rsa01Peer01.pem</value>
        </element>
    </value>
</property>
Note
This Cloud Discovery Service example reuses the security artifacts in other examples shipped with
Connext. To identify what the value of the environment variable
$(PATH_TO_EXAMPLES) should be, refer to Paths Mentioned in Documentation
The server bind port property value is obtained from the environment variable
$(BIND_PORT). This is a convenience for this example so you can reuse the
same file to specify different ports for the publisher and subscriber
applications, which is required when running on the same host machine.
Now you can run the applications. You need to run from the directory that
contains the generated USER_QOS_PROFILES.xml that you just modified and
the certificates.
Because TLS is enabled, you must ensure that the RTI TLS Support and OpenSSL libraries are present in your library path before starting the applications. See the beginning of this section for a note on how to locate the OpenSSL libraries.
From the terminal, run the Publisher application:
export LD_LIBRARY_PATH=$NDDSHOME/lib/x64Linux3gcc5.4.0:$OPENSSLHOMELIB
export BIND_PORT=7401
export NDDS_DISCOVERY_PEERS=tlsv4_lan://localhost:7402

./objs/x64Linux3gcc5.4.0/CDSHelloWorld_publisher
Then run the Subscriber application:
export LD_LIBRARY_PATH=$NDDSHOME/lib/x64Linux3gcc5.4.0:$OPENSSLHOMELIB
export BIND_PORT=7402
export NDDS_DISCOVERY_PEERS=tlsv4_lan://localhost:7401

./objs/x64Linux3gcc5.4.0/CDSHelloWorld_subscriber
You should see the subscriber receives samples. This is possible since in the initial peers list, you indicated how the applications can reach each other.
10.4.2. Cloud Discovery Service in Action
Now you will use Cloud Discovery Service to provide the discovery for the applications. In this case, you need to configure the transport with an instance of the RTI TCP transport with TLS enabled.
The configuration required for this example is shown below:
<?xml version="1.0"?>
<dds  xmlns:xsi="http://www.w3.org/2001/XMLSchema-instance"
      xsi:noNamespaceSchemaLocation="../../resource/schema/rti_cloud_discovery_service.xsd">

    <cloud_discovery_service name="ExampleTls">
        <annotation>
            <documentation><![CDATA[
                Example that configures the pre-registered instance of the
                RTI TCP transport with TLS enabled.
                ]]>
            </documentation>
        </annotation>
        <transport>
            <element>
                <alias>tlsv4_lan</alias>
                <receive_port>7400</receive_port>
                <property>
                    <element>
                        <name>dds.transport.cds.tcp1.tls.verify.ca_file</name>
                        <value>$(PATH_TO_EXAMPLES)/dds_security/cert/tls_rsa01/ca/rsa01RootCaCert.pem</value>
                    </element>
                    <element>
                        <name>dds.transport.cds.tcp1.tls.identity.certificate_chain_file</name>
                        <value>$(PATH_TO_EXAMPLES)/dds_security/cert/tls_rsa01/identities/rsa01Peer01.pem</value>
                    </element>
                </property>
            </element>
        </transport>
    </cloud_discovery_service>

</dds>
You can download the configuration file from here:
rti_cds_example_tls.xml
From a terminal, run:
export LD_LIBRARY_PATH=$OPENSSLHOMELIB
$NDDSHOME/bin/rticlouddiscoveryservice \
        -cfgFile <working_dir>/rti_cds_example_tls.xml -cfgName ExampleTls
This command will run Cloud Discovery Service with the custom configuration for this example,
located under the directory <working_dir>.
Re-run the publisher and subscriber applications, but this time set the initial peers to talk to Cloud Discovery Service (see RTPS Peer Descriptor). For that, you can set the environment from the application terminal as follows:
For the Publisher application:
export LD_LIBRARY_PATH=$NDDSHOME/lib/x64Linux3gcc5.4.0:$OPENSSLHOMELIB
export BIND_PORT=7401
export NDDS_DISCOVERY_PEERS=rtps@tlsv4_lan://localhost:7400
For the Subscriber application:
export LD_LIBRARY_PATH=$NDDSHOME/lib/x64Linux3gcc5.4.0:$OPENSSLHOMELIB
export BIND_PORT=7402
export NDDS_DISCOVERY_PEERS=rtps@tlsv4_lan://localhost:7400
Now run the applications and verify that the subscriber receives samples. You can also stop Cloud Discovery Service and see how the applications continue communicating.
10.5. Example: Using RTI Real-Time WAN Transport
This example extends the example in Example: Using a Builtin UDP Transport to use RTI RTI Real-Time WAN Transport to assist in the communication when the publisher and subscriber applications sit behind Cone NATs. This example shows how to run Cloud Discovery Service with the pre-registered transport instance of RTI Real-Time WAN Transport.
Note
To run this example, you will need an additional license to run RTI Real-Time WAN Transport. Contact support@rti.com or your sales representative for further information.
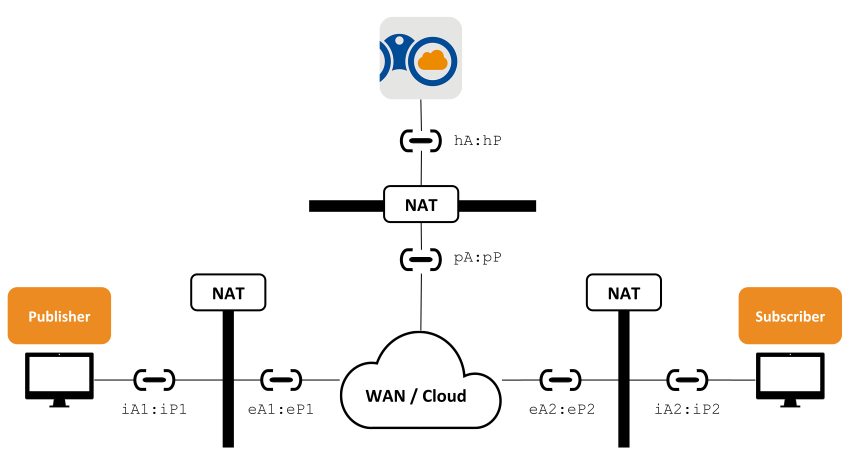
Figure 10.1 Example setup and network layout
Figure 10.1 shows the different hosts and applications involved in this example:
The publisher and subscriber applications sit behind different Cone NATs. You will run these applications in hosts belonging to different networks, in remote locations preferably. These hosts have private transport addresses represented as
iA:iPand public or external addresseseA:eP. The values of these addresses are irrelevant in this example.A Cloud Discovery Service instance also sitting behind a NAT of any kind and that is configured to allow incoming traffic by statically mapping a public address
pA:pPto the private address of Cloud Discovery ServicehA:hP. You will run Cloud Discovery Service in a host from a different network different to the ones the publisher and subscriber applications run. For example, you could run Cloud Discovery Service in an EC2 instance from the Amazon Web Services <https://aws.amazon.com>.
Warning
This example only works if the publisher and application NATs are of any of the Cone type. Symmetric NATs are not supported in this setup.
10.5.1. Setup
The first step in this example is to configure the publisher and subscriber
applications to communicate over RTI Real-Time WAN Transport. You will simply
need to configure the corresponding builtin transport mask. For that, you
can modify the <domain_participant_qos> tag of the file USER_QOS_PROFILES.xml
generated by rtiddsgen to look as follows:
<domain_participant_qos>
    ...

    <transport_builtin>
        <mask>UDPv4_WAN</mask>
    </transport_builtin>
</domain_participant_qos>
Now you can run the applications making sure each is behind a NAT. You need to
run from the directory that contains the generated USER_QOS_PROFILES.xml
For the Publisher application in the host behind NAT Pub:
./objs/x64Linux3gcc5.4.0/CDSHelloWorld_publisher
For the Subscriber application in the host behind NAT Sub:
./objs/x64Linux3gcc5.4.0/CDSHelloWorld_subscriber
You will naturally observe that the applications cannot communicate. This is expected since none of them know how reach each other out.
10.5.2. Cloud Discovery Service in Action
Now you will use Cloud Discovery Service to provide discovery for the applications. In this
case, we will use a builtin configuration part of Cloud Discovery Service that enables
the UDP WAN Transport. The configuration has name
rti.cds.builtin.config.default_wan and looks as follows:
<cloud_discovery_service name="rti.cds.builtin.config.default_wan">
    <annotation>
        <documentation><![CDATA[
            Enables Real-Time WAN Transport.
            XML variables:
                - RTI_CDS_PORT: CDS public and host port number
                - RTI_CDS_PUBLIC_ADDR: CDS WAN public address
            ]]>
        </documentation>
    </annotation>
    <transport>
        <element>
            <alias>builtin.udpv4_wan</alias>
            <receive_port>$(RTI_CDS_PORT)</receive_port>
            <property>
                <element>
                    <name>dds.transport.UDPv4_WAN.builtin.public_address</name>
                    <value>$(RTI_CDS_PUBLIC_ADDR)</value>
                </element>
            </property>
        </element>
    </transport>
</cloud_discovery_service>
Note two important elements in this configuration:
<receive_port>: This is the host UDP port where Cloud Discovery Service runs. By default this is also the public port that should be reachable externally.Property
dds.transport.UDPv4_WAN.builtin.public_address: specifies the public IPv4 address for the host where Cloud Discovery Service runs. Note that this address may be different than the host private address if Cloud Discovery Service sits behind a NAT as well. If this is the case, it’s expected that the NAT configuration has a port forwarding rule to map the host port to a public port statically. The default value forRTI_CDS_PUBLIC_ADDRislocalhost(the default host address, typically chosen by the OS).
You will need to deploy Cloud Discovery Service in a host machine that is publicly reachable. You may need to configure port forwarding rules if a NAT is present (like the case of EC2 in AWS). For this example we will assume the following values:
public IPv4 address:
107.21.118.142public UDP port:
39170(and a forwarding rule to a private port with the same number).
From a terminal in this host machine, run the following command:
$NDDSHOME/bin/rticlouddiscoveryservice \
        -cfgName rti.cds.builtin.config.default_wan \
        -DRTI_CDS_PORT=39170 \
        -DRTI_CDS_PUBLIC_ADDR=107.21.118.142
Re-run the publisher and subscriber application, but this time set the initial peers to talk to Cloud Discovery Service (see RTPS Peer Descriptor). For that, you can set the environment in the application terminal as follows, for both the publisher and subscriber applications:
export NDDS_DISCOVERY_PEERS=rtps@udpv4_wan://107.21.118.142:39170
Now run the applications and verify that the subscriber receives samples. You can also stop Cloud Discovery Service and see how the applications continue communicating.
10.6. Example: Discovering Connext Micro applications with Cloud Discovery Service
This example illustrates how a Connext Micro publisher application discovers a subscriber application via an instance of Cloud Discovery Service. To reiterate, we are assuming that we are on a network that doesn’t support multicast.
10.6.1. Installing Connext Micro
Before we move to how Cloud Discovery Service is configured, you first need to have Connext Micro installed. This example assumes that you have Connext Micro version 3.0.0 or higher installed. This includes the rtiddsgen code generator. rtiddsgen can be used to generate example applications for publishing and subscribing to data. Earlier versions of rtiddsgen shipped with Connext Micro didn’t support this functionality of generating examples. Please follow the step by step instructions in the Connext Micro documentation to build the source code before moving on to the next steps.
10.6.2. Setup
Just like Connext Professional, you will need an IDL file to feed into rtiddsgen to
create an example publisher and subscriber application. You can use the same
IDL as used in Setup, CDSHelloWorld.idl:
struct CDSHelloWorld {
    long count;
};
Generate the publisher and subscriber applications by running the following command (you can also use C++):
$RTIMEHOME/rtiddsgen/scripts/rtiddsgen -micro -language C -example \
        CDSHelloWorld.idl
Modify the CDSHelloWorld_publisher.c file to increase the count variable
with each written sample. For instance, you could add the following line to the
main writing loop:
sample->count = i;
The next step is to compile the applications.
Note
rtiddsgen creates a README.txt file which contains instructions on how to compile for most standard platforms.
For example:
$RTIMEHOME/resource/scripts/rtime-make --config Release --build --name \
        x64Linux3gcc5.4.0 --target Linux --source-dir . \
        -G "Unix Makefiles" --delete
This will generate two executables, CDSHelloWorld_publisher and
CDSHelloWorld_subscriber, under the objs/ folder. Run the examples to
make sure everything is as expected. From the top-level directory of the project,
run the following commands in two different terminals.
Terminal 1:
./objs/x64Linux3gcc5.4.0/CDSHelloWorld_publisher
Written sample 1
Matched a subscriber
Written sample 2
Written sample 3
Written sample 4
Written sample 5
Terminal 2:
./objs/x64Linux3gcc5.4.0/CDSHelloWorld_subscriber
Running for 24 hours, press Ctrl-C to exit
Matched a publisher

Valid sample received

Valid sample received

Valid sample received

Valid sample received
You should see that the subscriber application receives the samples generated by the publisher application. This happens because the Connext Micro application you created adds the loopback address as a default peer and runs on domain ID 0.
10.6.3. Understanding the Connext Micro Peer Descriptor
Connext Micro follows a different naming convention than Connext Professional when it comes to its peer descriptor string. The peer descriptor format is:
[participant_index@][interface://]address
You can read more about the peer descriptor string in the Connext Micro documentation. But the important point to note here is that Connext Micro doesn’t allow you to directly specify a port number in the peer descriptor. So you need to be aware of which port number is selected based on the combination of participant index and domain ID. As you will see in more detail below, it is essential for the purpose of avoiding port conflicts.
For the use case of Cloud Discovery Service working with Connext Micro, we have two configuration options:
Configure by Port - You can compute the port number that the combination of peer descriptor and domain ID will refer to, based on the RTPS well-known ports specification. This idea is useful when one of the Connext Micro publishers or subscribers is running on the same machine as Cloud Discovery Service.
Configure by Domain ID - You can configure Cloud Discovery Service to run on a particular domain ID and by default it will assume the participant index 0. This idea is useful when Cloud Discovery Service is running on a separate machine than the publisher or the subscriber application.
10.6.4. Configure by Port
10.6.4.1. Setup
This example assumes that Cloud Discovery Service runs on the same machine as either the publisher or subscriber application or both. If you want to test a Cloud Discovery Service instance running on a different machine, you can still use this example by just changing the IP address part in the peer descriptor or you can check out the simpler method of Configure by Domain ID.
10.6.4.2. Changing the default initial peer
We are going to change the initial peer for the publisher and the subscriber
applications so they won’t be able to discover each other. To demonstrate this
example on the same machine, we will have the publisher and subscriber applications
contact a specific participant index that doesn’t correspond to either of them.
This will allow Cloud Discovery Service to come into the picture. To do that, run the publisher and
subscriber applications as follows, using the -peer and -domain
command-line arguments.
CDSHelloWorld_publisher:
./objs/x64Linux3gcc5.4.0/CDSHelloWorld_publisher -peer [5]@_udp://127.0.0.1 \
        -domain 0
CDSHelloWorld_subscriber:
./objs/x64Linux3gcc5.4.0/CDSHelloWorld_subscriber -peer [5]@_udp://127.0.0.1 \
        -domain 0
At this point you should notice that the publisher and subscriber applications cannot discover each other.
10.6.4.3. Cloud Discovery Service in Action
To make the applications communicate, we need a special configuration for Cloud Discovery Service. We need a configuration where Cloud Discovery Service listens on the ports referred to by the combination of peer descriptor and domain ID for the publisher and the subscriber applications.
The configuration from file
rti_cds_example_micro.xml
required for this example is shown below:
    <cloud_discovery_service name="ExampleMicroByPort">
        <annotation>
            <documentation>
                <![CDATA[
                Example that configures CDS for Micro based on port numbers
                computed from the domain ID and participant index
                ]]>
            </documentation>
        </annotation>
        <transport>
            <element>
                <alias>udpv4</alias>
                <receive_port kind="PORT">7420</receive_port>
            </element>
        </transport>
    </cloud_discovery_service>
Here 7420 is the port number corresponding to participant index 5 on domain 0
when the RTPS well-known port mapping is kept to its default setting. You can read
more about the defaults in the API documentation. This allows Cloud Discovery Service to discover both the
publisher and subscriber applications and relay their announcements to each other.
Note
Assuming there are no other Connext Micro or Connext Professional applications running on the system, if we start the publisher first, it will take the participant index 0 and the subscriber will take the participant index 1 on domain 0. If you have more applications running on your system on the same domain, you will have to increase the participant index in the peer descriptor to be a higher number (than 5 which was used) to avoid port conflicts with other running DDS applications. At the same time you will have to change the port number Cloud Discovery Service binds to, based on the corresponding combination of participant index and domain ID.
From the terminal, you can run the following command to use the above configuration:
$NDDSHOME/bin/rticlouddiscoveryservice -cfgFile <working_dir>/rti_cds_example_micro.xml \
        -cfgName ExampleMicroByPort
Once Cloud Discovery Service starts, you should see the publisher and subscriber applications sending data to each other. You can stop Cloud Discovery Service and still see the applications continue to communicate.
10.6.5. Configure by Domain ID
10.6.5.1. Setup
This method assumes that Cloud Discovery Service runs on a separate machine. This is because if Cloud Discovery Service runs on the same machine as your publisher or subscriber application, you may end up with port conflicts depending on which application (the publisher, subscriber or Cloud Discovery Service) is started first. Cloud Discovery Service when working in this configuration tries to bind to the port corresponding to participant index 0. To see Cloud Discovery Service in action on the same machine as your Connext Micro publisher, subscriber or both, please refer to the Configure by Port section.
10.6.5.2. Changing the default initial peer
We are going to change the initial peer for the publisher and the subscriber
application such that they won’t be able to discover each other. To do that we
will be running the publisher and subscriber applications as follows using the
-peer and -domain command-line arguments.
In the example commands below, note that 10.10.10.10 is a hypothetical
address for the machine running Cloud Discovery Service. You may want to replace that with the
IP address of your machine that is running Cloud Discovery Service.
CDSHelloWorld_publisher:
./objs/x64Linux3gcc5.4.0/CDSHelloWorld_publisher -peer _udp://10.10.10.10 \
        -domain 0
CDSHelloWorld_subscriber:
./objs/x64Linux3gcc5.4.0/CDSHelloWorld_subscriber -peer _udp://10.10.10.10 \
        -domain 0
Note
Connext Micro generated applications have an option to specify the UDP
interface name to use for communication. The generated application will rely
on a well-known name like en1 or eth0 depending on the platform. However,
if your interface has a different name, use the command-line option -udp_intf
to specify it.
At this point you should notice that the publisher and subscriber applications cannot discover each other.
10.6.5.3. Cloud Discovery Service in Action
To make the applications communicate, we need a special configuration for Cloud Discovery Service. We need a configuration where Cloud Discovery Service listens on a port computed from the RTPS well-known port mapping for a given domain ID. Note that the participant index cannot be configured and defaults to 0.
The configuration from file
rti_cds_example_micro.xml
required for this example is shown below:
    <cloud_discovery_service name="ExampleMicroByDomainID">
        <annotation>
            <documentation>
                <![CDATA[
                Example that configures CDS for Micro based on domain ID since Micro
                doesn't allow a peer descriptor to have a port number
                ]]>
            </documentation>
        </annotation>
        <transport>
            <element>
                <alias>udpv4</alias>
                <receive_port kind="DOMAIN_ID_DERIVED">0</receive_port>
            </element>
        </transport>
    </cloud_discovery_service>
From the terminal, run the following command:
$NDDSHOME/bin/rticlouddiscoveryservice -cfgFile <working_dir>/rti_cds_example_micro.xml \
        -cfgName ExampleMicroByDomainID
Once Cloud Discovery Service starts you should see the publisher and subscriber applications sending data to each other. As before, you can stop Cloud Discovery Service and still see the applications continue to communicate.