3.6. Tutorials
3.6.1. Getting Started with Recording Service and Shapes Demo
In this tutorial, you will edit a Recording Service configuration file to record only specific topics. Then you will start the Shapes Demo application and publish multiple topics. You will then inspect the database to see that only the specified topics were recorded.
3.6.1.1. Edit the Configuration
The first time you run any RTI tools, an rti_workspace directory is created
in your home directory. (See Section 1.3 for the path to your
workspace).
Inside the workspace, you will find a directory called
user_config/recording_service. Open the USER_RECORDING_SERVICE.xml file
in an editor. Notice that there are two <recording_service> tags in this
file, one named UserRecorderService and one named UserRecorderServiceJson.
The UserRecorderServiceJson configuration is shown below.
<recording_service name="UserRecorderServiceJson">
    <!--  Top-level storage settings -->
    <storage>
        <sqlite>
            <storage_format>JSON_SQLITE</storage_format>
            <fileset>
                <workspace_dir></workspace_dir>
                <execution_dir_expression>json_recording</execution_dir_expression>
                <filename_expression>rti_recorder_default_json.db</filename_expression>
            </fileset>
        </sqlite>
    </storage>

    <!--  Top-level domain settings -->
    <domain_participant name="Participant0">
        <domain_id>0</domain_id>
    </domain_participant>

    <session name="DefaultSession">
        <topic_group name="RecordAll" participant_ref="Participant0">
            <allow_topic_name_filter>*</allow_topic_name_filter>
            <deny_topic_name_filter>rti/*</deny_topic_name_filter>
        </topic_group>
    </session>
</recording_service>
This configuration is recording all topics in domain 0 into a database file
named rti_recorder_default_json.db. It is recording in deserialized (JSON_SQLITE)
mode. In the configuration, change the value in <allow_topic_name_filter> from
* to Square. Now it will record only the Square topic.
<recording_service name="UserRecorderServiceJson">
    <!--  Top-level storage settings -->
    <storage>
        <sqlite>
            <storage_format>JSON_SQLITE</storage_format>
            <fileset>
                <workspace_dir></workspace_dir>
                <execution_dir_expression>json_recording</execution_dir_expression>
                <filename_expression>rti_recorder_default_json.db</filename_expression>
            </fileset>
        </sqlite>
    </storage>

    <!--  Top-level domain settings -->
    <domain_participant name="Participant0">
        <domain_id>0</domain_id>
    </domain_participant>

    <session name="DefaultSession">
        <topic_group name="RecordAll" participant_ref="Participant0">
            <allow_topic_name_filter>Square</allow_topic_name_filter>
            <deny_topic_name_filter>rti/*</deny_topic_name_filter>
        </topic_group>
    </session>
</recording_service>
3.6.1.2. Start Shapes Demo
Use Launcher to start Shapes Demo.
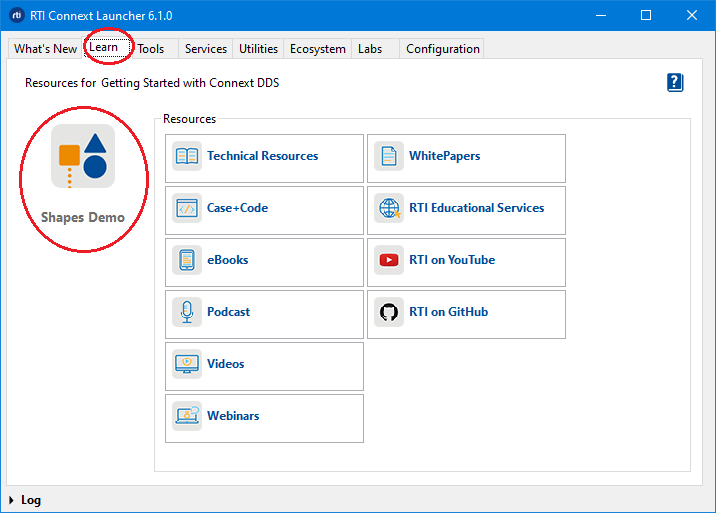
Figure 3.4 Open Shapes Demo from Launcher
In Shapes Demo, start two publishers: one Square publisher and one Circle publisher.

Figure 3.5 Create a new publisher in Shapes Demo
3.6.1.3. Start Recording Service
Start Recording Service with the UserRecorderServiceJson configuration and with verbosity level 3 by entering the following in a command shell:
cd <RTI_WORKSPACE>/user_config/recording_service
<NDDSHOME>/bin/rtirecordingservice -cfgName UserRecorderServiceJson -verbosity 3
See Section 1.3 for the path to your workspace and NDDSHOME.
You should see output indicating that the Square topic is being recorded:
[/recording_services/UserRecorderServiceJson/domain_participants/Participant0|STREAM_DISCOVERED name=Square|../../sessions/DefaultSession/topics/RecordAll@Square|CREATE]
[/recording_services/UserRecorderServiceJson/domain_participants/Participant0|STREAM_DISCOVERED name=Square|../../sessions/DefaultSession/topics/RecordAll@Square|ENABLE]
RTI Recording Service started
[/recording_services/UserRecorderServiceJson/sessions/DefaultSession/topics/RecordAll@Square|START]
[/recording_services/UserRecorderServiceJson/sessions/DefaultSession/topics/RecordAll@Square|RUN]
3.6.1.4. View the Data in Sqlite3
First, download the sqlite3 command-line browser from the SQLite download page. (If you are using a Linux or macOS system, you may already have this installed.)
Then open a command prompt and run the application:
sqlite3 json_recording/rti_recorder_default_json.db
Type the command .tables and you should see recorded data for topic Square:
sqlite> .tables
Square@0
Then you can view your recorded Square data by typing:
sqlite> select rti_json_sample from "Square@0";

{"color":"ORANGE","x":120,"y":195,"shapesize":30,"fillKind":"SOLID_FILL","angle":0}
{"color":"ORANGE","x":120,"y":197,"shapesize":30,"fillKind":"SOLID_FILL","angle":0}
{"color":"ORANGE","x":120,"y":199,"shapesize":30,"fillKind":"SOLID_FILL","angle":0}
{"color":"ORANGE","x":120,"y":201,"shapesize":30,"fillKind":"SOLID_FILL","angle":0}
3.6.2. Using Recording Service and Admin Console
You can use RTI Admin Console to monitor, pause and resume Recording Service.
3.6.2.1. Configuration
To use Recording Service with Admin Console, make sure that administration is enabled in the configuration. For example:
<recording_service name="AdminExample">
    <administration>
        <domain_id>0</domain_id>
    </administration>
    ...
</recording_service>
Note that enabling administration will also enable monitoring in the same domain by default. Admin Console cannot control the Recording Service instance unless monitoring is enabled.
3.6.2.2. Start Recording Service
Admin Console cannot start a new instance of Recording Service. It can only monitor and administer a instance of Recording Service that is already running.
To begin, start Recording Service with administration enabled:
<NDDSHOME>/bin/rtirecordingservice -cfgName AdminExample
3.6.2.3. Start Shapes Demo
Start Shapes Demo and publish Squares and Circles as described in Section 3.6.1.2.
3.6.2.4. Viewing with Admin Console
Use Launcher to start Admin Console (from the Tools tab).

Figure 3.6 Open Admin Console from Launcher
You will see the Recording Service appear in Admin Console’s Physical View and Processes View. Click on the Recording Service in either view and a Recording Service tab will appear.
The first tab, RTI Recording Service Entities, shows your Recording Service, the session(s) it is running, the topics and topic groups it is configured to record, and which topics are being recorded.
Note that topics that are being recorded as part of a topic_group will
appear side-by-side with topics that were configured individually.
You can tell they are part of a topic_group because the name of the
topic_group will appear along with the topic, such as RecordAll@Square.
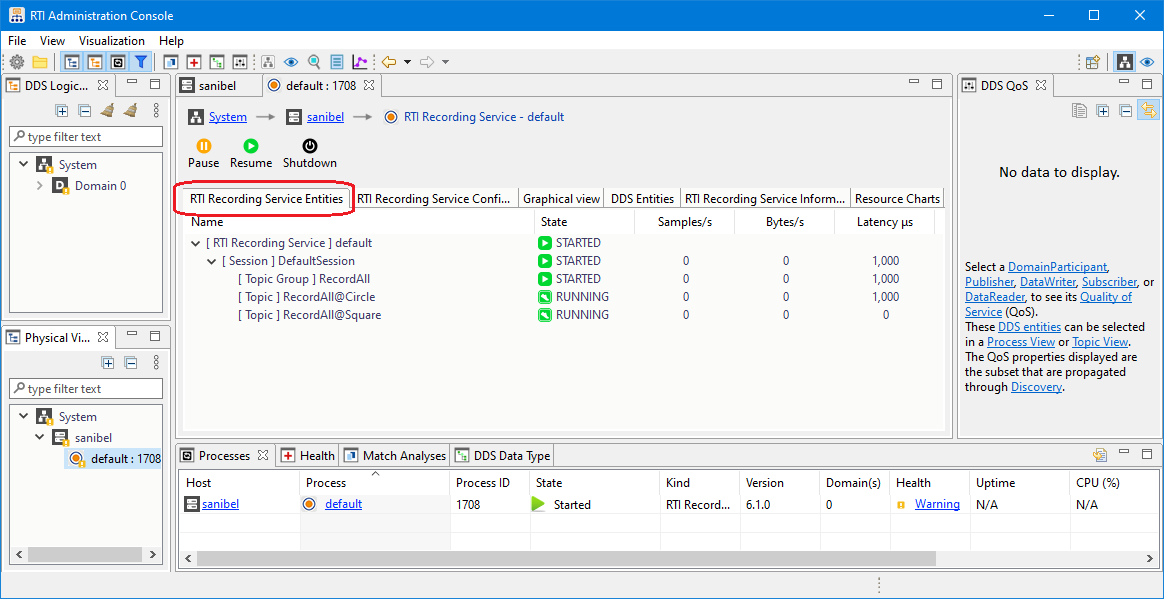
Figure 3.7 View the Recording Service information in Admin Console
The second tab, RTI Recording Service Configuration, displays the configuration that was used to configure the running Recording Service instance.
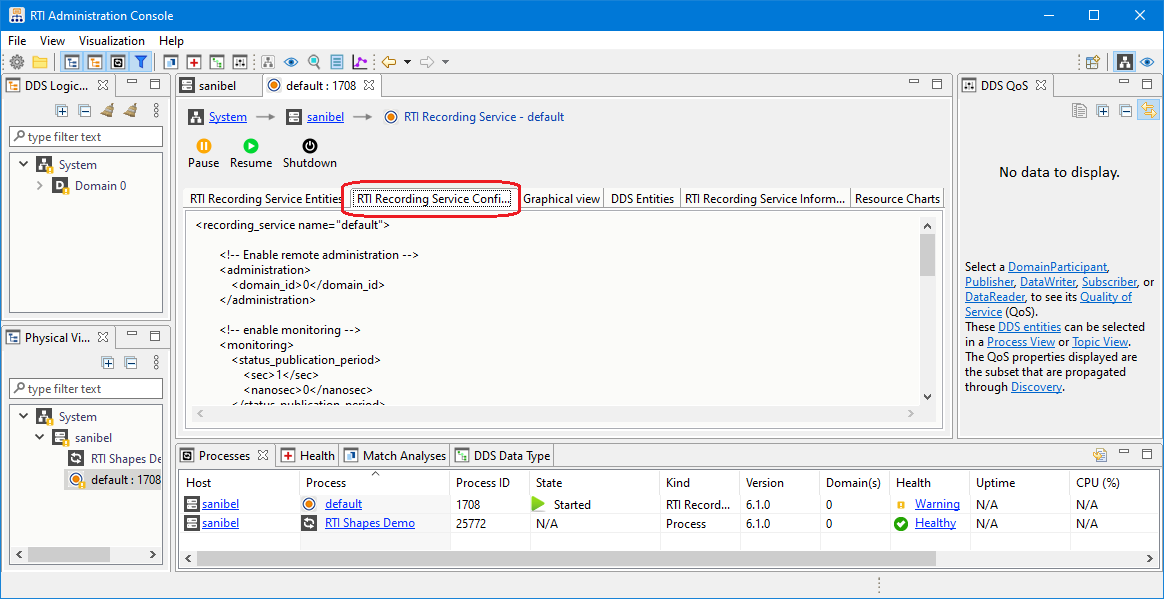
Figure 3.8 View the Recording Service Configuration tab in Admin Console
The third tab, Graphical view, displays the system in a graph. This allows you to visualize the entire system. You can see the DDS Entities that were discovered by Admin Console, including how they are connected and their matching endpoints.
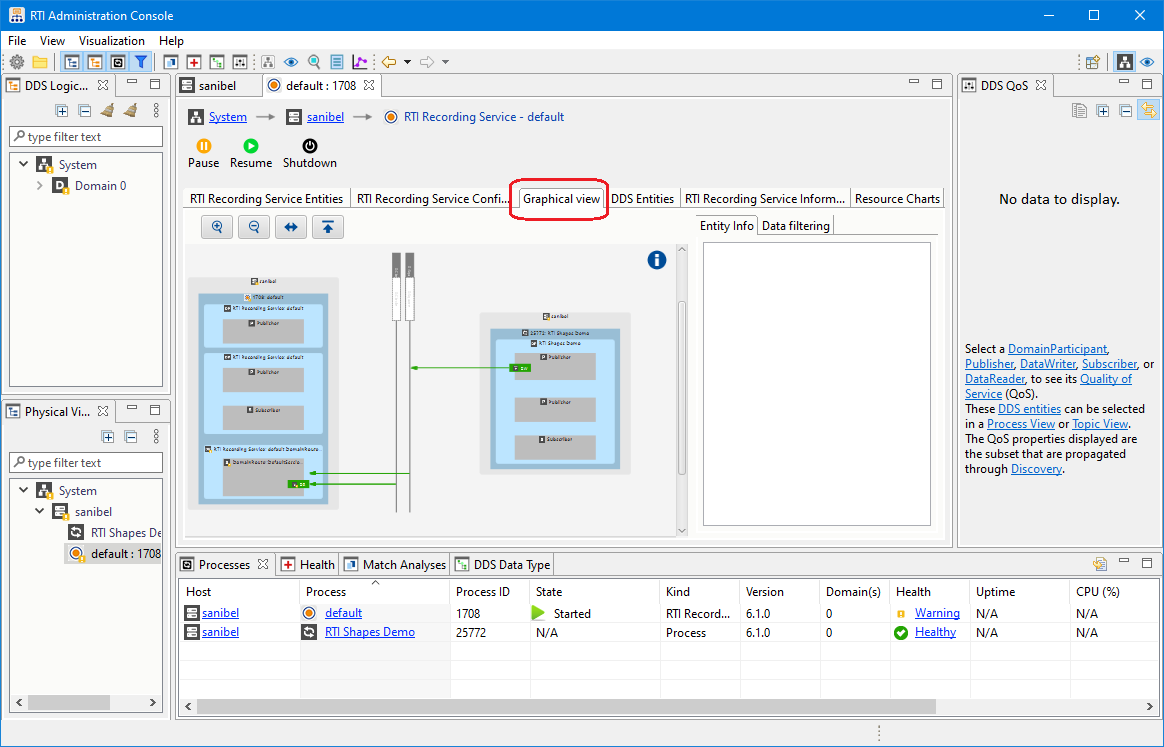
Figure 3.9 View the Graphical View tab in Admin Console
The fourth tab, DDS Entities, displays the DDS entities that have been created by the Recording Service. If you click on individual DataReaders, you can view their QoS in the DDS QoS view.
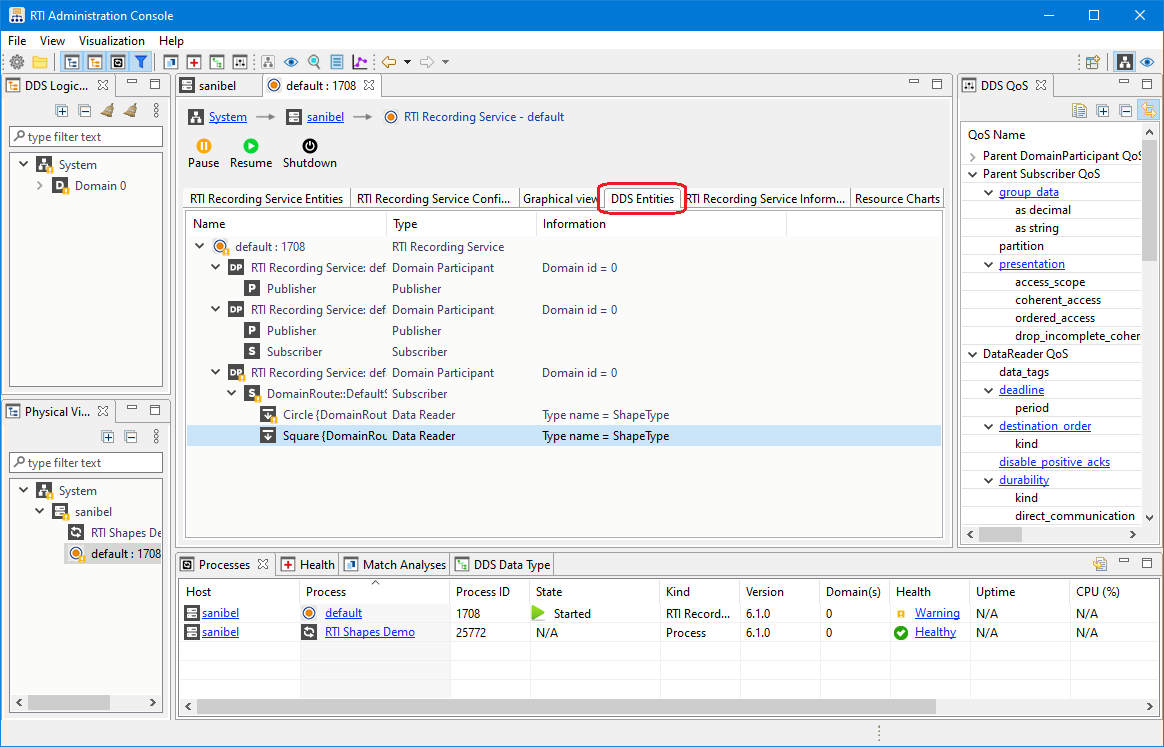
Figure 3.10 View the DDS Entities tab in Admin Console
The fifth tab, RTI Recording Service Information, shows details about the recording, such as:
The Connext DDS version number
The name of the database file it is recording (if you are using the builtin SQLite storage)
The current size of the database file you are recording (if you are using the builtin SQLite storage)
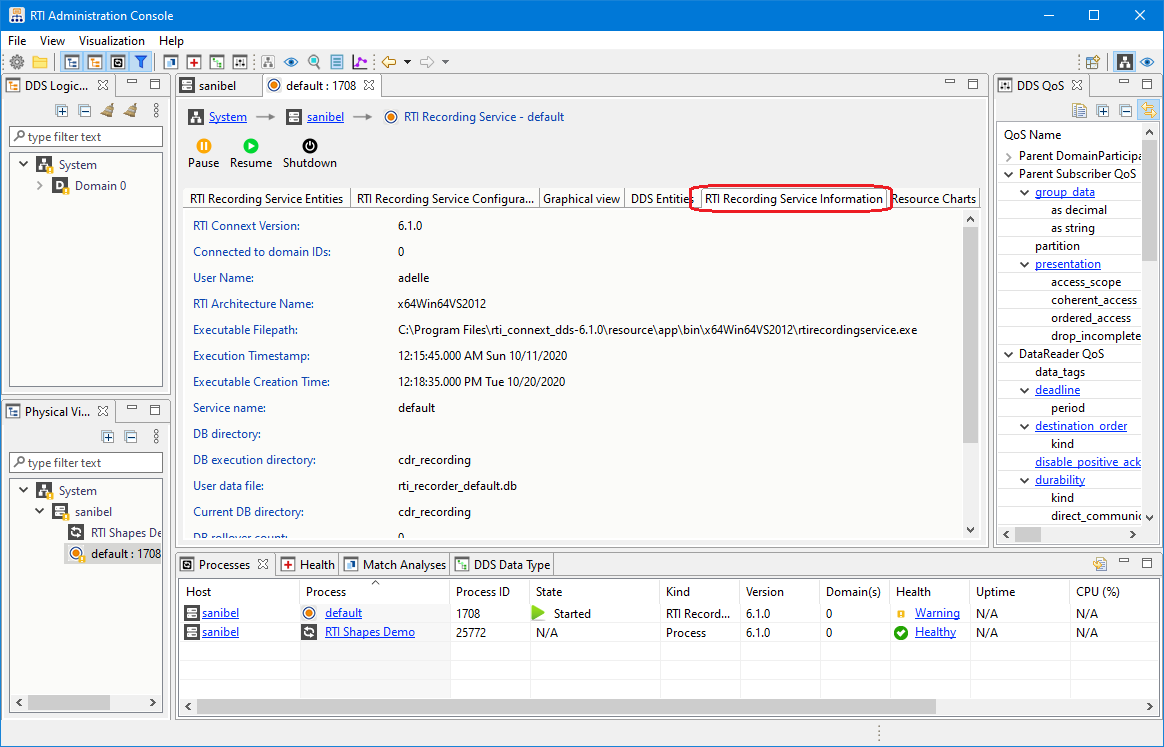
Figure 3.11 View the Recording Service Information tab in Admin Console
The final tab, Resource Charts, allows you to monitor Recording Service’s CPU and memory usage.

Figure 3.12 View the Resource Charts tab in Admin Console
3.6.2.5. Administering with Admin Console
- Recording Service allows the following commands:
Pause: This pauses all the topics in a running service.
Resume: This restarts the sessions and topics in a Recording Service application.
Shut down: This shuts down the Recording Service application. To restart the application, you must re-run from Launcher or the command line.
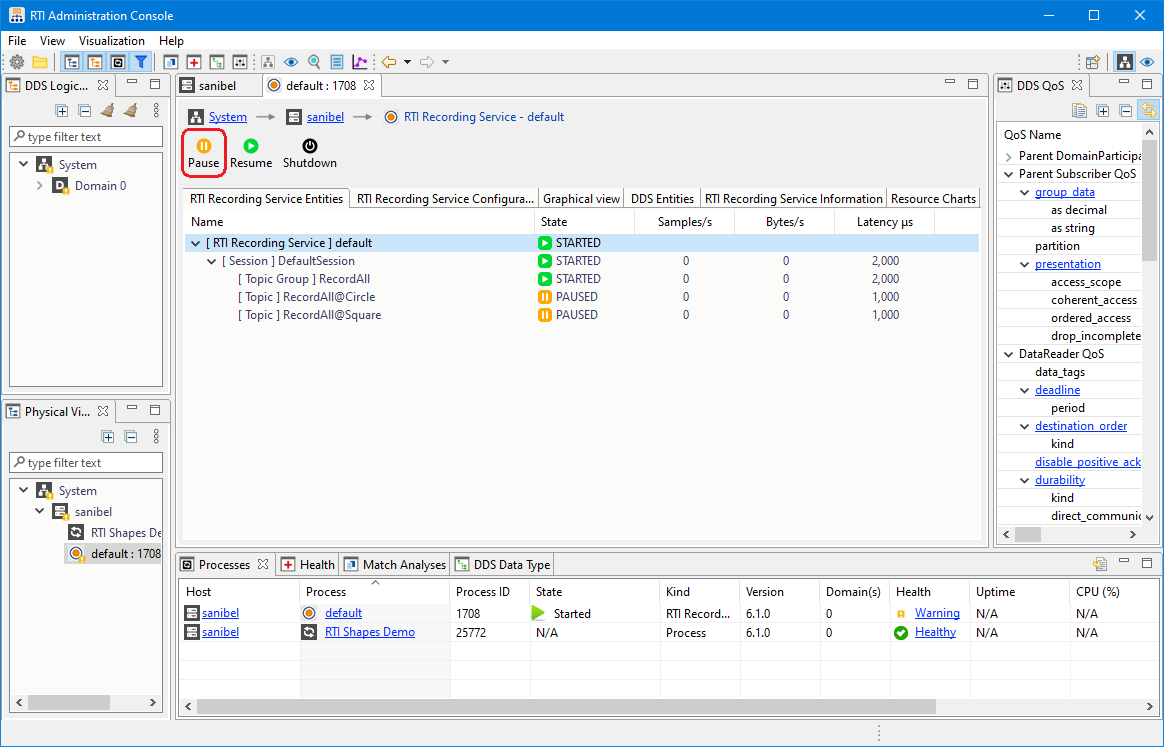
Figure 3.13 Pause the Recording Service in Admin Console
3.6.3. Using Recording Service as a Library
It is possible to use Recording Service as a library in your application. All
the necessary tools are included in the library rtirecordingservice
(librtirecordingservice.so on Linux systems, librtirecordingservice.dylib
on macOS systems,
and rtirecordingservice.dll on Windows systems).
The library can be used in any of the modes provided by Recording Service:
recording data, replaying data or converting data.
For more information, see:
Recording Service C++ API.
A simple C++ example of how to link the Recording Service library into your application is available here: RTI Community Recording Service examples: Service as a Library.
3.6.3.1. Include files
When using Recording Service as a library, you should include the following header in your application code:
#include <rti/recording/RecordingService.hpp>
3.6.3.2. Using the RecordingService class
The main class used to instantiate Recording Service as a library is called
RecordingService. To instantiate it, you need to define the properties to be
used by the service for its configuration. The class used to define these
properties is called ServiceProperty. Among the parameters that can be set
to control the service’s execution, you can find:
Application role: record, replay or convert.
Configuration control: configuration file as well as configuration name (service name).
Remote administration control: flag to enable or disable it as well as the domain ID to use.
Monitoring control: flag to enable or disable it as well as the domain ID to use.
DDS Domain ID control: the domain ID base parameter allows the user to apply an offset to the domain IDs specified in the XML configuration to be loaded.
XML control: whether to load the default Connext XML files or not or whether to enforce XSD validation of the supplied configuration file.
The following code snippet shows how to launch a Recording Service instance in
record mode. This instance will use an XML configuration called
MyRecorderConfig that can be found in file my_recording_service.xml.
Administration and monitoring will be enabled and attached to domain ID 5. By
using the domain ID base as well, all the domain IDs specified in the
aforementioned XML configuration will be offset by 6.
using namespace rti::recording;

// ...

ServiceProperty service_property;
service_property.application_role(ApplicationRoleKind::RECORD_APPLICATION).
        enable_administration(true).
        administration_domain_id(5).
        enable_monitoring(true).
        monitoring_domain_id(5).
        domain_id_base(6).
        cfg_file("my_recording_service.xml").
        service_name("MyRecorderConfig");
RecordingService recorder(service_property);
recorder.start();

// ...

// When it's time to stop the Recording Service instance, call the method
// below. The ``stop()`` method will also be called automatically by the
// RecordingService class destructor, so it will be called when the
// instance goes out of scope.
recorder.stop();
3.6.4. Plugging in Custom Storage
To configure a custom storage library, you must add the <plugin_library> tag
inside the <dds> tag. This allows you to define one or more storage
libraries that can be used to plug in custom storage.
In addition, you must associate the storage library with your
Recording Service instance by specifying the plugin and its name in
the <storage> tag.
You can pass custom properties to your plugin inside the <plugin> tag.
There are full examples written in C and C++ about plugging in custom storage in Recording Service, in: RTI Community Recording Service examples: C storage plugin and RTI Community Recording Service examples: C++ storage plugin.
3.6.4.1. Custom Storage API Overview
To store data, you must implement the following APIs:
RecordingServiceStorageWriter create function: A creation function for the StorageWriter structure or class. This allocates a StorageWriter object, which is used to allocate StorageStreamWriters.
- StorageWriter:
A function for creating StorageStreamWriters for user-data topics when Recording Service notifies the plugin about a new stream. The user-data streams represent samples as Dynamic Data objects.
Three functions for creating StorageStreamWriters for the builtin discovery topics:
DCPSParticipant,DCPSPublicationandDCPSSubscription. These topics are represented by their specific types (e.g.,DDS_ParticipantBuiltinTopicDatatype forDCPSParticipant). These functions are not required, thus when one of them is not implemented, no samples will be stored for that builtin topic.A function for deleting user-data StorageStreamWriters. Recording Service expects this function to be able to work with streams writers created for user-data samples only.
Three functions to delete the StorageStreamWriters representing the DDS builtin topics. These functions are not required, but if the creation function was defined for a topic, the deletion function must also be defined.
A function for deleting the StorageWriter instance.
- StorageStreamWriter:
A function for storing data associated with a stream. For the stored data to be compatible with Replay Service, the reception timestamp of every sample should be stored with the data. It is also recommended that the valid data flag is recorded. For Replay Service to be able to replay instance states, it’s also necessary for Recording Service to store the instance state and instance handle fields.
There are three specific classes for the three different builtin discovery topics:
StorageParticipantWriter,StoragePublicationWriterandStorageSubscriptionWriter. Each of them includes astore()function that is strongly typed to the topic’s type.
The C++ APIs provide a mechanism to have strongly typed StorageStreamWriter
classes.
There are four specific builtin StorageStreamWriter definitions to work with
the different types of streams:
A definition based on
dds::core::xtypes::DynamicData, which should be used to store samples for user-data topics.A definition based on
dds::topic::ParticipantBuiltinTopicData, which can be used to store samples of the builtin DDS discovery streamDCPSParticipant.A definition based on
dds::topic::PublicationBuiltinTopicData, which can be used to store samples of the builtin DDS discovery streamDCPSPublication.A definition based on
dds::topic::SubscriptionBuiltinTopicData, which can be used to store samples of the builtin DDS discovery streamDCPSSubscription.
- More detailed API documentation is here:
3.6.5. Accessing JSON samples through SQL
When using the builtin SQLite JSON storage format, data samples are stored
in the column called rti_json_sample using SQLite’s JSON extensions. The sample can thus be accessed using
these extensions, namely, the json_extract() function.
As an example, suppose we have the following IDL type:
struct BasicStruct {
    double member1;
    string member2;
};
We could access the sample’s data with a SQL query like this:
SELECT json_extract(rti_json_sample, '$.member2') FROM [MyTableName]
WHERE json_extract(rti_json_sample, '$.member1') > 2.0
3.6.6. Controlling Recording Service Remotely from an Application
Apart from the ability to use Admin Console to control a Recording Service instance, it is possible to control it using an application that issues command requests programmatically, using the Remote Administration Platform.
There is a C++ example in the RTI Community that provides an application that can produce command requests for Recording Service (or in general, for any RTI service that uses the common Remote Administration Platform): RTI Community Examples: C++ Service Administration.
3.6.7. Listing the Timestamp Tags in a Recording
If you are using the builtin SQLite plugin in Recording Service, and remote administration is enabled, then the remote administration exposes a command that allows you to tag timestamps with a symbolic name and description. These timestamp tags allow you to associate points in time in the recording with external events. The tags can be used later with Replay Service or Converter in place of timestamps to select what data to replay or convert.
The use case for timestamp tags is that they allow you to record, in a human-readable way, the time at which interesting events occur in your business processes along with the database that Recording Service is recording into. Later you can use these markers to replay data from (or up to) that point, instead of expressing start and end times in a numeric way.
For example, suppose you use Recording Service to record data while you are doing some business process. Then some event happens during the process that you want to somehow mark in the database. (Maybe this event marks the time at which some device starts behaving strangely during a troubleshooting session). If you create a custom GUI application that an operator can use, or any kind of application, you can use the timestamp tagging command described in this section. Then when that application sends the command, Recording Service will store in the database a record in which you can give the event a name and description. Later you can replay the recorded data starting (or ending) at that named event.
Note that you can use a time offset when submitting the timestamp tagging command. This allows you to create tags that refer to a time in the past or the future, relative to the time when you sent the tagging command.
Once you have a recorded database, you can list the timestamp tags that
are in the recording. Use the command rtirecordingservice_list_tags and
point it to the directory that contains your recorded database with
the -d argument.
For example:
<NDDSHOME>/bin/rtirecordingservice_list_tags -d /database/directory/
This command will analyze the recording in /database/directory/ and list the
details of any timestamp tags in the recording, including the tag names,
descriptions, and associated timestamps. For example:
tag_name                    timestamp_ms   tag_description
--------------------------  -------------  ------------------------
/my_example/my_events/tag1  1546484663309  first tag description
/my_example/my_events/tag2  1546484703360  a second tag description
For information on using timestamp tags with Replay Service, see Section 4.6.4. They can also be used with Converter, see Section 5.3.1.
A simple C++ example of how to use timestamp tags using remote administration is available here: RTI Community Examples: C++ Service Administration.