2.2.11. Step 11: Graphical Data Publishing
Admin Console can publish samples for an already discovered topic and, additionally, it is possible to create a publication for a not discovered topic. To do this, it is required to use XML file with the TypeCode definition.
Admin Console uses Python code to fill in the content of the samples and, once the code to fill in the samples is ready, you can choose how to execute that code. The code can be used to publish the sample, cache it in memory, or execute the code periodically caching and/or publishing the resulting samples.
In this step of the tutorial, we’ll see how to use Admin Console to publish samples for a specific topic.
2.2.11.1. Preparing Admin Console to publish
Before we can publish samples, we must prepare our system.
If you try to publish samples with Admin Console before following these steps, Admin Console will report a problem. It will indicate that it cannot publish samples and that the publication is disabled. You can see this in the Admin Console preferences panel, in the Python section.
For example, the following image shows an invalid configuration. The Python version is not valid and the Connext Python DDS API is not found. The Publication Status is set to disabled due to the wrong configuration:
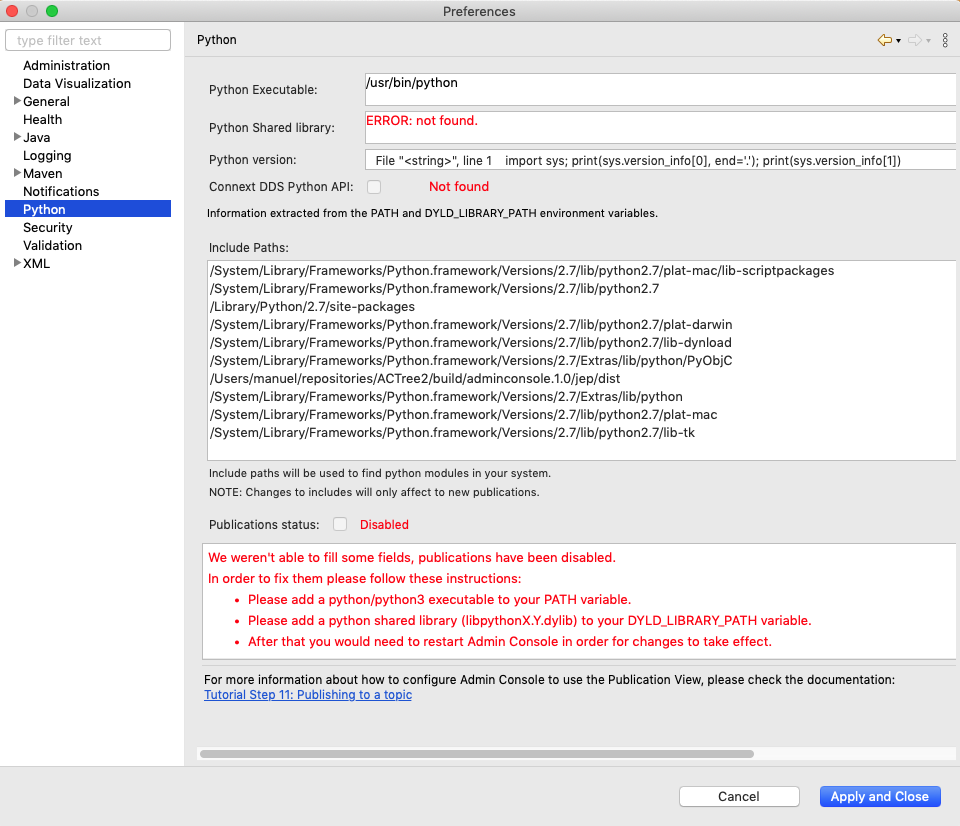
As seen in the above image, Admin Console is not ready to publish data. This happens because Admin Console relies on the Connext Python API to publish samples to a specific topic. To be able to publish to a topic, Admin Console checks that the system meets some specific requirements, including what Python version is installed in the machine and whether the Connext Python API binding is installed and available for Admin Console to use.
To make sure that Admin Console is ready to use Graphical Data Publishing and publish data for different topics, it is necessary to follow the instructions in Installing Connext, in the Connext Python Getting Started Guide to correctly install the Python API binding.
Note
For Windows users: The Python distribution available in the Windows Store has a specific folder configuration that may result in the OS denying access to the Python executable and the Python shared libraries from Admin Console.
Due to this, it is not recommended to use this distribution of Python. To use
Graphical Data Publishing in Admin Console, we recommend downloading Python
directly from the official Python page: https://www.python.org/.
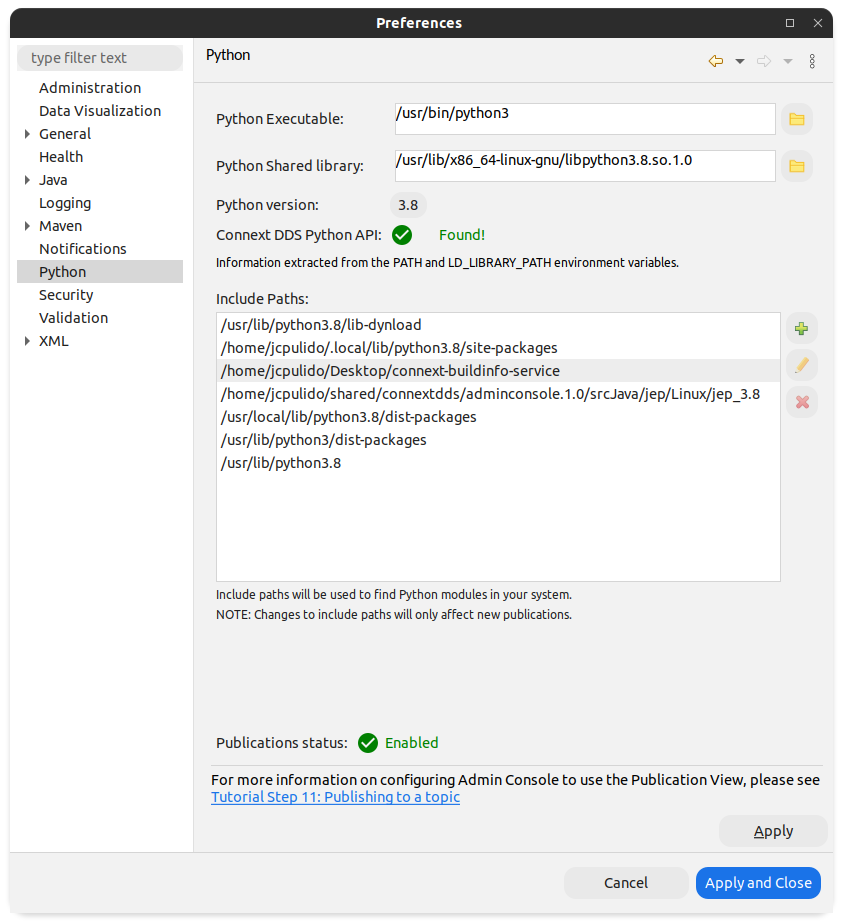
After following the instructions available in the Connext Python Getting Started Guide, everything should be ready for Admin Console to publish samples. In the Preferences panel, you will see that the Connext Python API has been found and the Publications status is enabled.
Note
Admin Console will automatically detect the Python version installed and use a valid configuration according to that Python version and the Python API wheels that are installed. If Admin Console cannot find the Python version automatically, you can specify it in the following ways:
- Through the file button
 :
: You can select which Python executable and shared library to use with the button
next to each field. You can also specify a path manually inside
the text fields. After selecting the file, press the Apply button.
You will see a warning that a reboot is required to apply the settings.Warning
On macOS systems, this dialog cannot be used to select Python shared libraries. This is due to a limitation in the system’s file dialog: it will not allow you to select a soft link. However, you can provide the path manually in the text field and it will work just fine.
- Through the file button
- Through environment variables:
The PATH environment variable should include the location of the Python executable. The library search path environment variable should include the location of the Python library files, as follows:
1. On Windows systems,
python<version>.dllcan be set using the PATH environment variable.1. On Linux systems,
libpython<version>.socan be set using the LD_LIBRARY_PATH environment variable.1. On macOS systems,
libpython<version>.dylibcan be set using the DYLD_LIBRARY_PATH environment variable. Please note that the DYLD_LIBRARY_PATH value can be removed by the operating system according to the Apple Runtime Protections.
If Admin Console is not able to find the python library files and this configuration is not correct, Admin Console will not be configured correctly and the Graphical Data Publishing feature will be disabled.
The values for the Python Executable file and the Python Shared libraries can be changed in this preference dialog. This will cause the values found in the environment variables to be overwritten. Additionally, changing those values will cause Admin Console to be restarted or it will not be able to use the provided values.
2.2.11.2. Configuring the scenario
First, let’s configure the testing scenario using Admin Console and Shapes Demo:
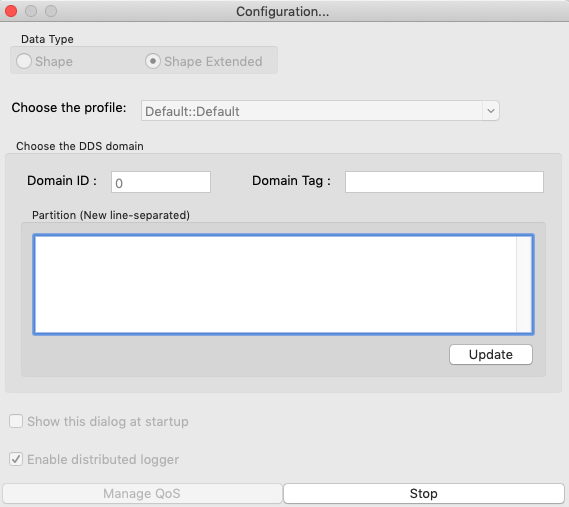
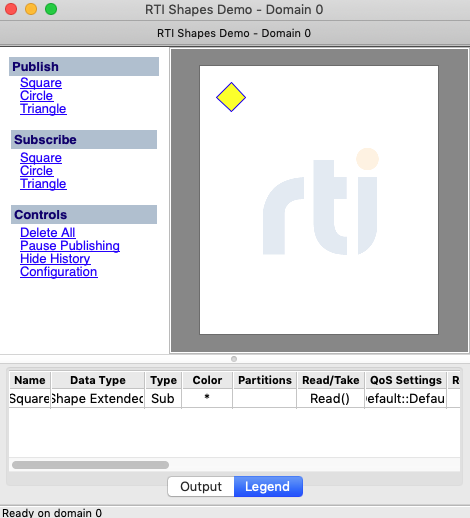
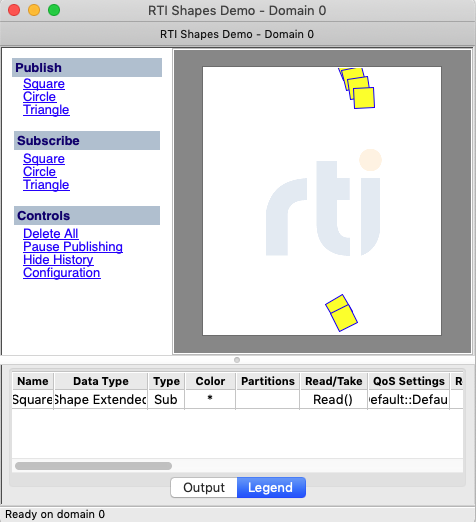
Use Launcher to start an instance of Shapes Demo. Make sure that this instance of Shapes Demo doesn’t use Partitions or Domain Tags. To do this, click on the Configuration button and make sure that the Domain Tag is empty and there are no partitions. Then create a Square subscriber with the default configuration.
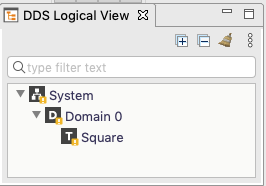
Open Admin Console and, using auto-join, wait until the instance of Shapes Demo is discovered and the topic Square is visible in the DDS Logical View. You will see a warning because the topic is currently read-only.
2.2.11.3. Creating an Admin Console publication
The process to create a Publication in Admin Console for a specific topic is very similar to creating a subscription. It can be done in two different ways:
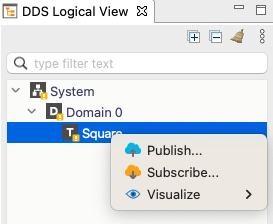
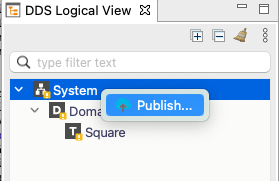
Using the context menu in the DDS Logical View: Right click on the topic Square in the DDS Logical View and select the option Publish…. Clicking on this option will open the dialog to create a publication in Admin Console.
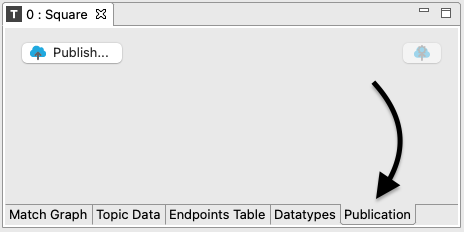
Using the Publication View: Select the topic Square in the DDS Logical View and open the Publication Tab. This will open the Publication View; it will be empty until you click the Publish… button. Then you will see the dialog to create the publication.
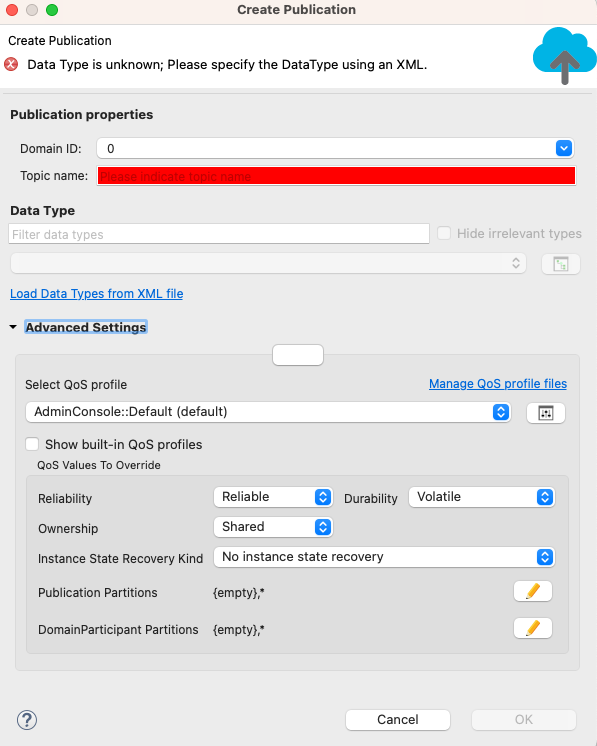
Both of the above options will open the Create Publication dialog. This dialog allows you to create a publication and configure its QoS. For now, we will use the default configuration, so you don’t need to change settings in this dialog.
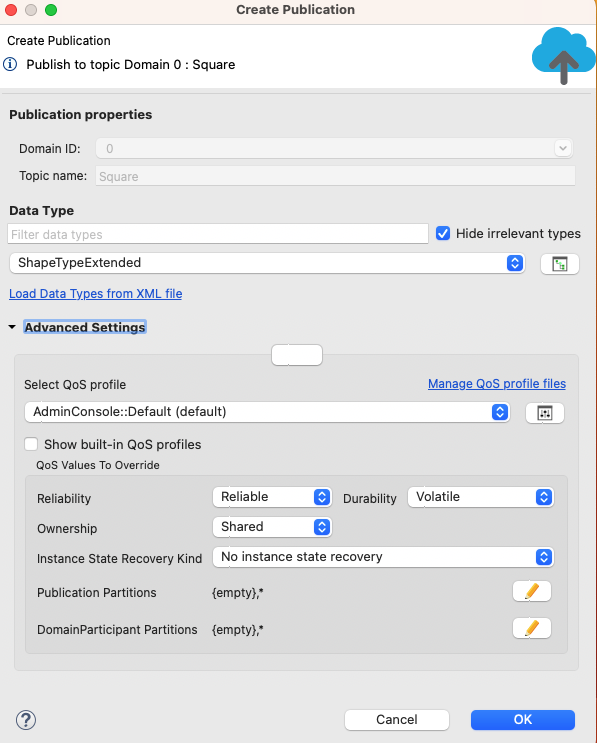
Please note that, as can be seen in the previous image, the Domain ID and Topic name fields are already completed and cannot be changed. This is because the Publication was created for a Topic that was already discovered in a certain domain.
Press OK in this dialog and the Publication will be created. Now Admin Console is able to publish samples.
2.2.11.4. Publication View
When the Admin Console publisher is created, the Publication View will open. This view contains all the elements required to publish samples of our topic.
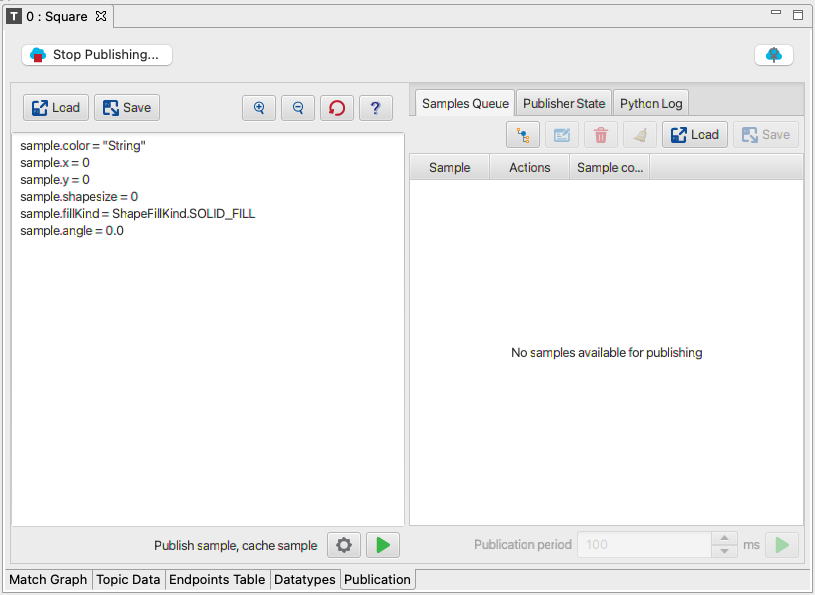
The Publication View has two areas: a code editing area on the left, and tabs with detailed information on the right.
The code editing area contains all the elements required to edit the code that will fill in the samples. In our example, we can see that the code editing area has been loaded with example code that fills in a sample for the Square topic.
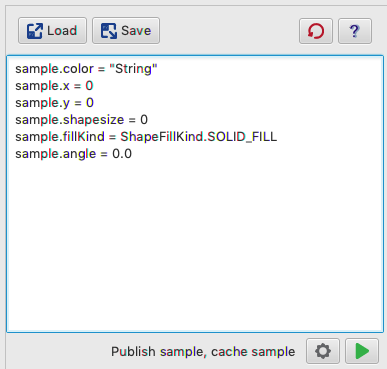
Let’s look at what actions you can take in the Publication View:
The Load button
 loads a previously stored script.
The Save button
 saves the current script in a Python file.
The Reset Code button
 resets the code in the code editing area
with the provided example code.
resets the code in the code editing area
with the provided example code.The Help button
 opens documentation about Graphical Data Publishing.
The Code Execution Preferences button
 controls how
the code will be run.
controls how
the code will be run.The Execute Code button
 runs the code, based on the
Preferences. The label before shows how
the code will be executed.
runs the code, based on the
Preferences. The label before shows how
the code will be executed.
The detailed information area on the right will show the results of the execution in two tabs: the Samples Queue and the Python Log.
The Samples Queue tab shows information about the samples that are cached. At this point in the tutorial, this will be empty because we haven’t cached any samples yet.
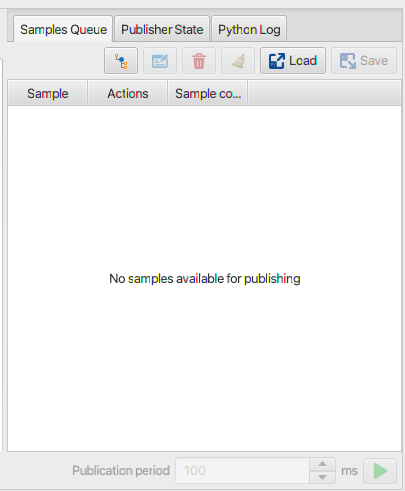
Let’s take a brief look at what you can do with samples stored in the Samples Queue:
Select the fields to show in the Sample Content section
 .
.Edit a selected sample
 .
.Remove selected samples
 .
.Clear the Samples Queue
 .
.Load a previously stored Python script
.Save the current Python script
.
We will use these buttons later in this tutorial.
Note
The Python file is stored in text format, so you can edit it outside of Admin Console to change the sample values, add new samples, or remove samples.
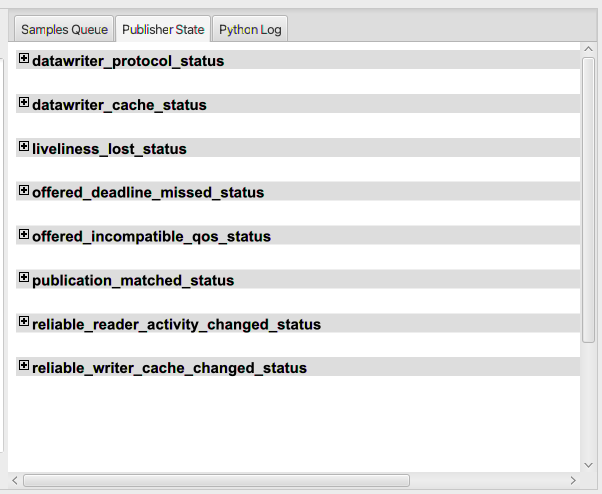
The Publisher State tab displays information about the Publisher generated by Admin Console Publisher, organized in sections.
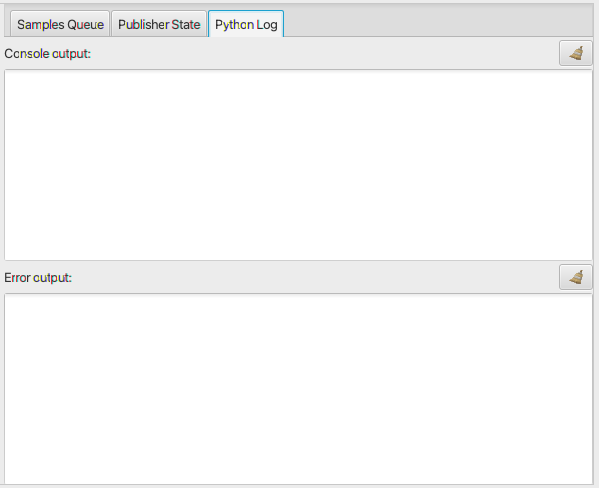
The Python Log tab shows the Python output from the executed code. The log has two categories, normal console output and errors.
2.2.11.5. Publishing samples
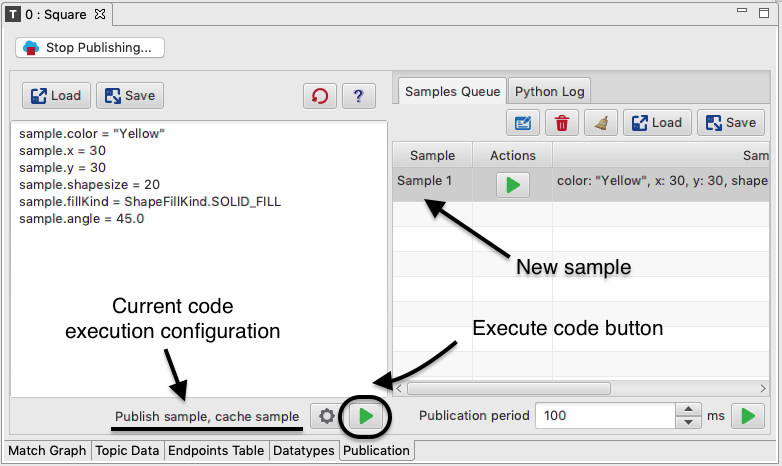
Now that we know the elements in the Publication View, it’s time to publish some samples. We will publish a Yellow square. Start by modifying the code in the code editing area as follows:
sample.color = "Yellow"
sample.x = 30
sample.y = 30
sample.shapesize = 20
sample.fillKind = ShapeFillKind.SOLID_FILL
sample.angle = 45.0
As you can see, we are filling in the sample with the color Yellow, at the X-Y position (30, 30), with a size of 20 units, solid fill, and an angle of 45º.
The label in front of shows how the code will be executed.
Since we didn’t modify the preferences, we will get the default behavior,
which is to publish the sample and cache its value, executing the code only once.
Press at the bottom of the text area.
Look in the Samples Queue tab and you’ll see our first sample.
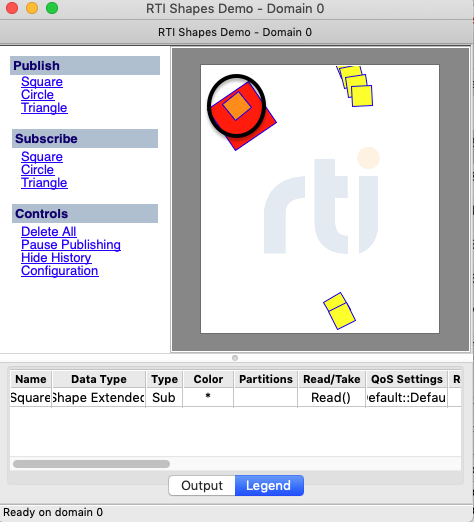
You will also see the published sample in Shapes Demo.
Before we publish more samples, change the position and rotation. Admin Console stores the value of the last published sample, which simplifies this task.
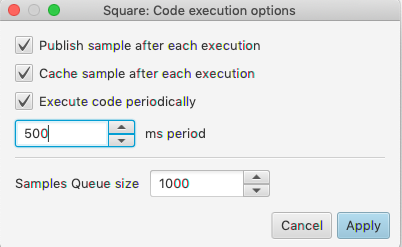
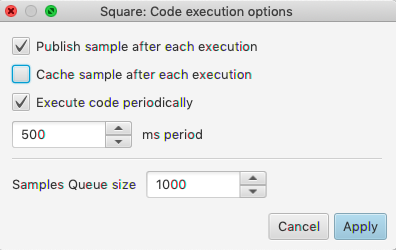
Press . A new dialog will open, where you can choose
how to publish the samples.
Check the “Execute code periodically” checkbox and fill in the period with a 500 ms delay between executions.
After doing this, notice that the label before
has changed. Now it shows that the code will be executed with a 500 ms period.

Let’s change the code to alter the position and angle of the square. In the code editing area, add the following code:
sample.x += 5
sample.y += 10
sample.angle += 5

if (sample.x > 250):
    sample.x = 0
if (sample.y > 250):
    sample.y = 0
The above code will cause each sample to move 5 units on the X axis and 10 units on the Y axis. At the same time, we will rotate the square 5 degrees, and, if it exceeds the limit of 250 units on either axis, the square will move back to the 0 position on that axis.
Run this code by pressing at the bottom of the text area.
Notice the following:
The Execute Code button
has been replaced with a
Stop Execution button  .
.The Sample Queue is being filled with all the published samples.
The code editing area has been disabled. This code cannot be modified while it is being used to publish samples.
Shapes Demo is receiving all the samples.
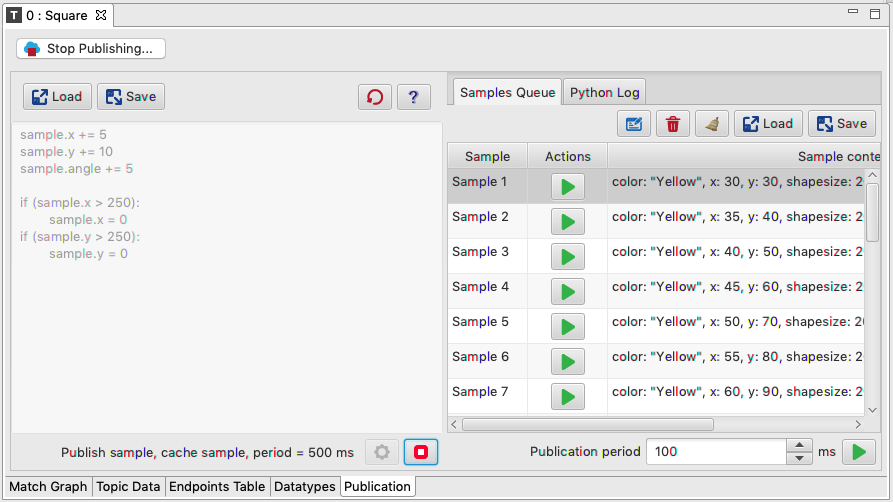
In Shapes Demo, you can see the last published samples. The number of samples that appear is based on the depth of the History QoS (by default, 6).
After some samples have been published, press .
Shapes Demo will stop receiving samples, the Samples Queue won’t show new samples being added, and the code editing area will be editable again.
Now let’s change the Code Execution Preferences so that samples will not be cached in the Samples Queue:
Press to open the Code Execution Preferences dialog.
Uncheck “Cache sample after each execution”.
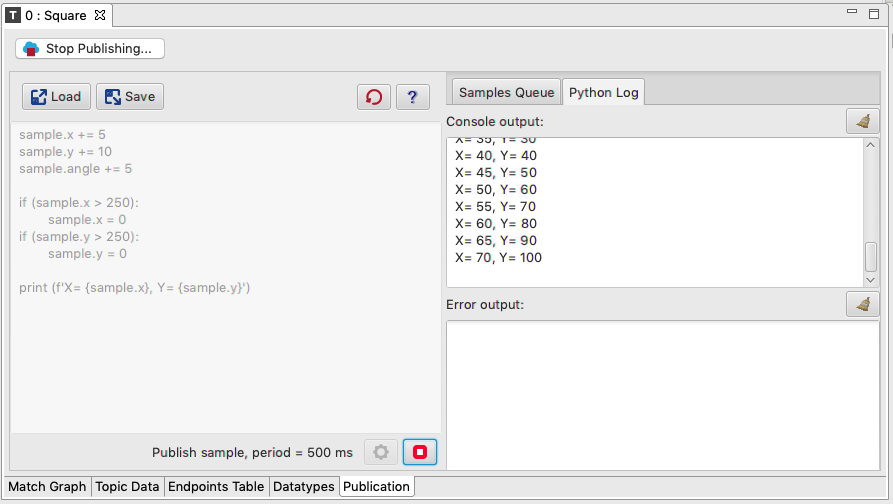
We also want to print the samples’ X and Y values in our Python Log. Change the code to add a print statement, like the last line here:
sample.x += 5
sample.y += 10
sample.angle += 5

if (sample.x > 250):
    sample.x = 0
if (sample.y > 250):
    sample.y = 0

print (f'X= {sample.x}, Y= {sample.y}')
Then run the code by pressing . As a result, Shapes Demo
will still receive the published samples, but those samples will
not be added to the Sample Queue, because we configured it to not cache samples.
Select the Python Log tab. You should see messages with X and Y positions in the “Console output” section.
Press to stop execution.
Reset the code in the code editor area by pressing .
This will remove our code changes and return to the provided
example code that fills in a generic sample for the specific topic.

2.2.11.6. Working with the Sample Queue
Now that our Sample Queue has some samples, we will make some changes to the already existing samples.
Select the third sample in the Sample Queue. Press the Edit Sample
button .
This button is only enabled when one sample is selected.
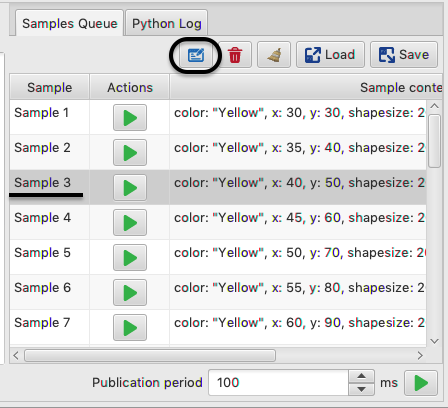
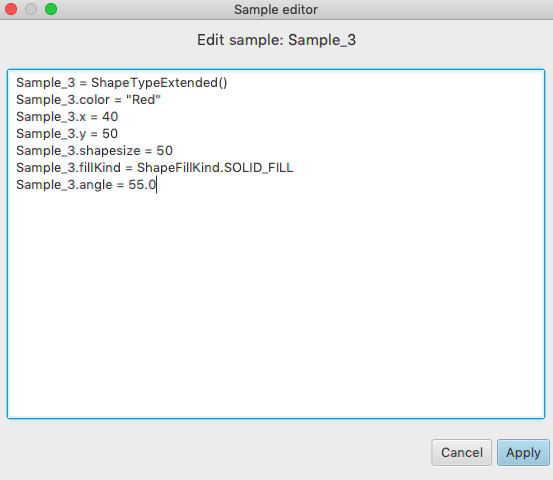
This will open a code editor dialog that allows you to modify the selected sample. This code can be used to create the selected sample. To modify the sample, let’s change the color to “Red” and the size to 50 and press Apply.
Sample_3 = ShapeTypeExtended()
Sample_3.color = "Red"
Sample_3.x = 40
Sample_3.y = 50
Sample_3.shapesize = 50
Sample_3.fillKind = ShapeFillKind.SOLID_FILL
Sample_3.angle = 55.0
It should look like this:
We can see that Sample 3 is updated in the Sample Queue. Now it has the color Red and its shapesize is 50.
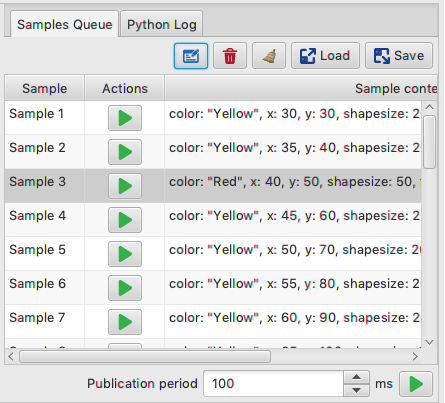
Next we want to publish all the samples that are in the Samples Queue.
Set the Publication period to 200 ms.
Press at the bottom of the dialog to publish all
the samples in the queue.
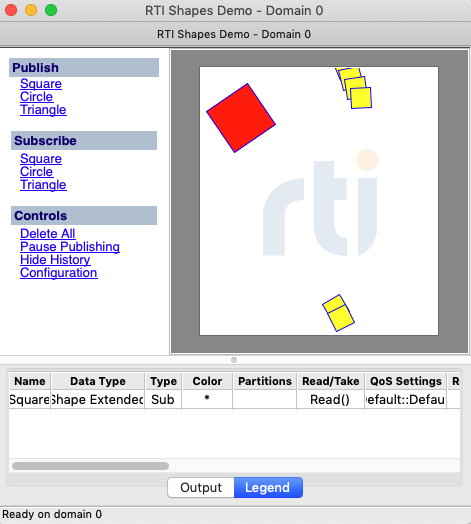
In Shapes Demo, you will see a red square with a size of 50.
Now let’s edit one sample and publish only that sample, not the full Sample Queue.
Select Sample 2 and press .
Change its color to “Orange”, then press the
that is next to the sample. This will publish only Sample 2.
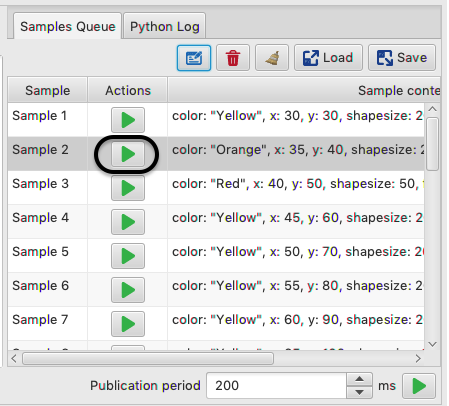
You will see the orange square in Shapes Demo.
Now save all the samples to a Python script by pressing .
In the resulting dialog, enter a file name and location.
This will open a dialog where you to fill with the
file name and location.
Save the script. We will load it later.
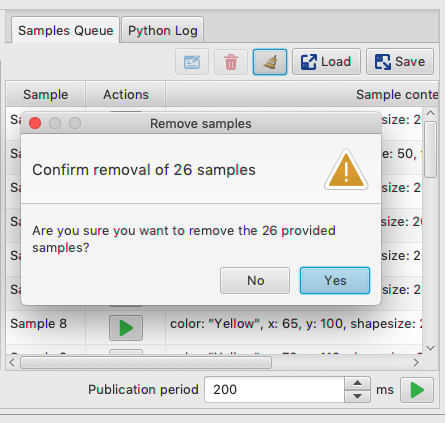
After that, clean up the sample queue by pressing .
A new dialog will open, showing you how many samples will be removed.
Press Yes to confirm the removal.
Now our Sample Queue is empty. Press on top of the Sample Queue
and select the stored file. This will reload the Sample Queue.
Finally, let’s change the maximum size of the Publication View.
Press , then change the Sample Queue size to 5.
If there are more than 5 samples in the Sample Queue, a new section will appear in this dialog, asking how you want to trim the Sample Queue. Choose “Trim the first elements of the queue” and press Apply.
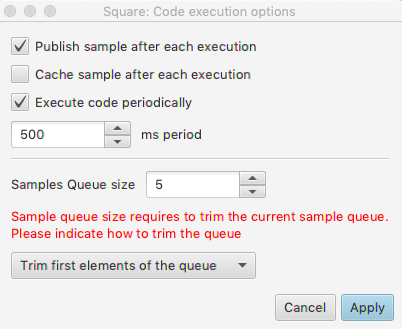
After doing this, the Sample Queue size will be reduced to 5 items, and if new samples are published, those samples will replace existing samples.
2.2.11.7. Interaction with Sample Log
Admin Console allows interaction between the Sample Log and the Publisher View. When a Sample Log is created for the same topic (or a topic with an equivalent Data Type), it is possibe to move samples from the Sample Log to the Sample Queue.
Before performing interactions between the Sample Log and the Publication View, clean
the Samples Queue. Select the in the
Samples Queue tab to make sure that there are no samples available. When
prompted, confirm that you want to remove all the samples.
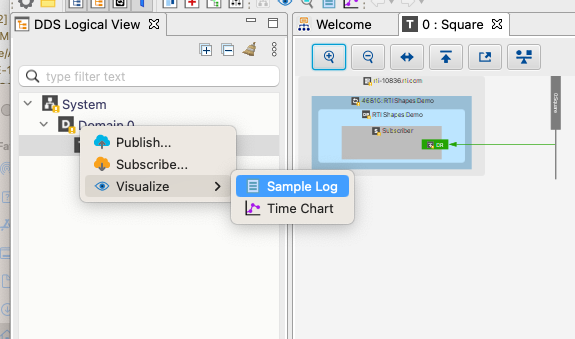
Next, create a Subscriber for our Square Topic and show a Sample Log for that Subscriber. To do this, right-click the Square Topic in the DDS Logical View and then select Visualize > Sample Log.
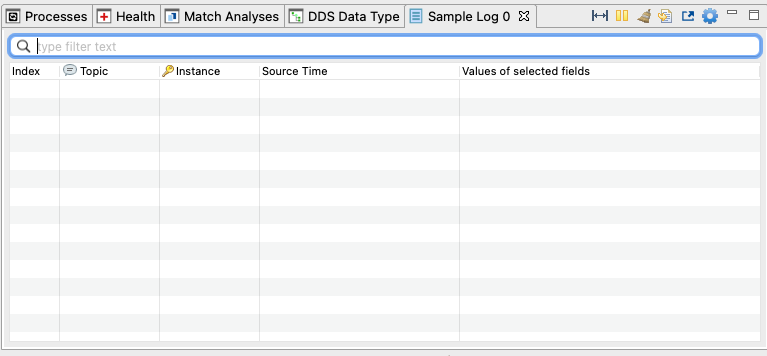
A Sample Log View should be created with no samples in it.
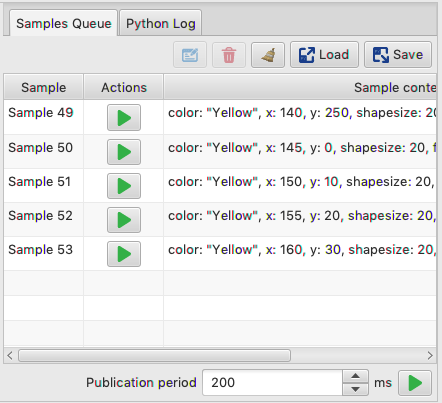
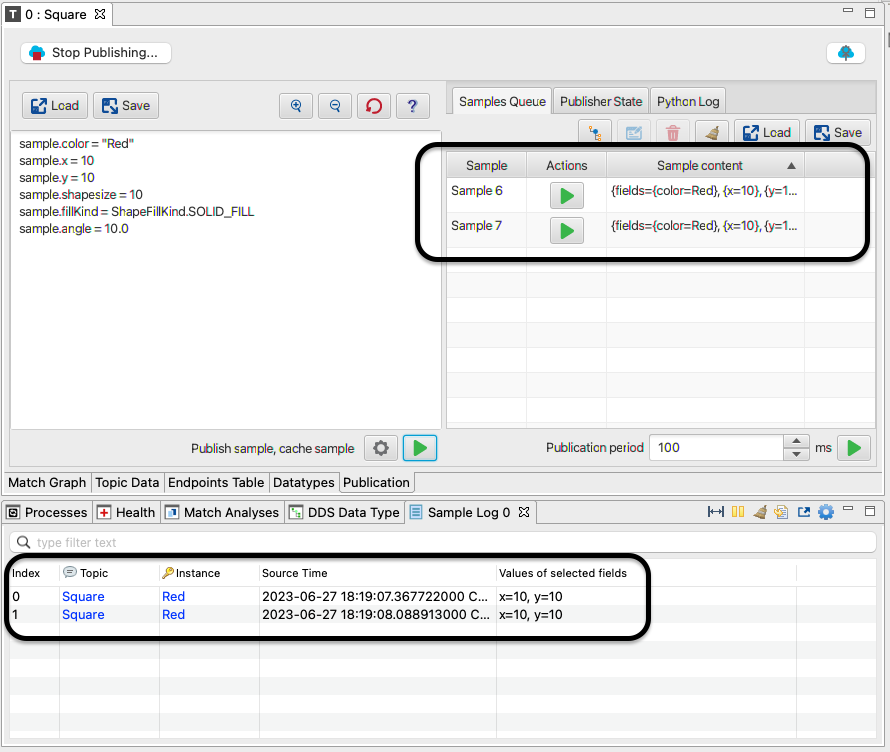
After this, publish two samples with the Publication View. The two published samples should appear both in the Publication View’s Sample Queue and in the Sample Log as seen in the following image.
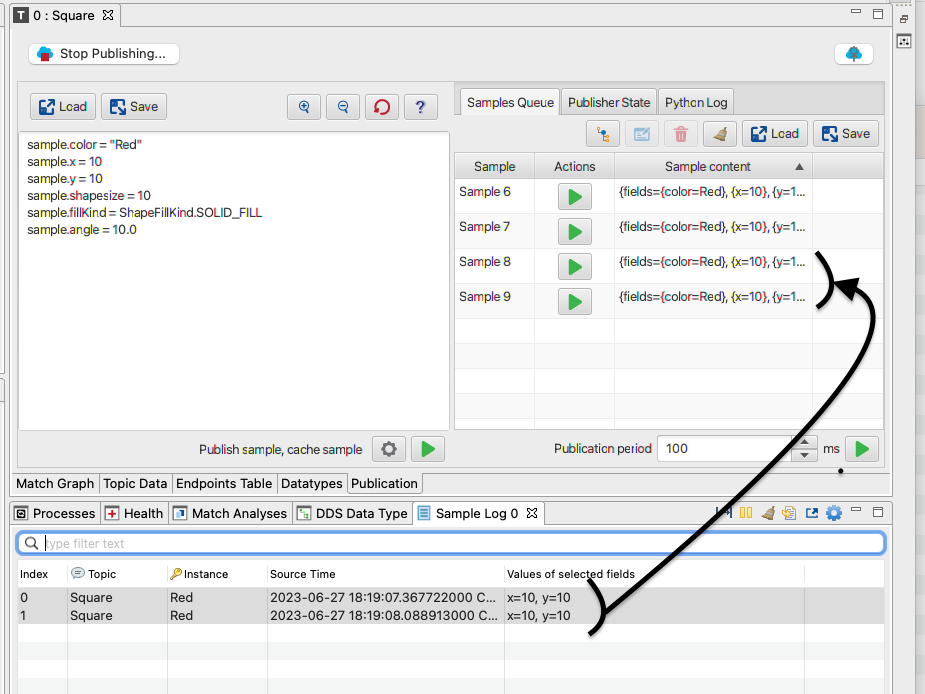
To move the samples from the Sample Log to the Publication View Sample Queue, select the two samples in the sample log, then drag and drop them in the Sample Queue tab. When the samples are moved, Admin Console will create a copy of them in the Sample Queue; these copies can be used like any other sample in that queue.
Note
Any sample that is stored in the Sample Log can be added to the Publication View Sample Queue, it is not necessary to create that sample from the Admin Console publisher.
2.2.11.8. Create an Admin Console publication for undiscovered topics
Admin Console allows you to create a Publisher for topics that have not yet been discovered.
To create the Publisher, right-click a System or Domain node in DDS Logical View, then select Publish… in the context menu. Only those domains to which Admin Console is joined are available.
When creating a Publisher for undiscovered topics, you can specify the Topic Name to which you want to publish data. Additionally, if the Publisher is created from a System node in DDS Logical View, you can also select the Domain you want to publish to. The list of available Domains is restricted to those to which Admin Console is joined.
In addition to Domain, the Topic Name and Data Type definition in XML format are required before you can create the Publisher. These requirements are similar to those used when creating a Subscription when the Data Type is unknown.
To create the Publisher, we must provide the Topic Name and the Data Type definition in XML format as we do with the Subscription when the Data Type is unknown.
2.2.11.9. Stopping the publication
Admin Console will keep the information about the current Publication configuration until the Publication is closed. If we close the Square view, the Publication will remain active, but if the code is being executed periodically, it will be stopped when the view is closed.
Additionally, the configuration is stored, so the next time we reopen the Publication View, it will contain the same samples and code that we had when the view was closed.
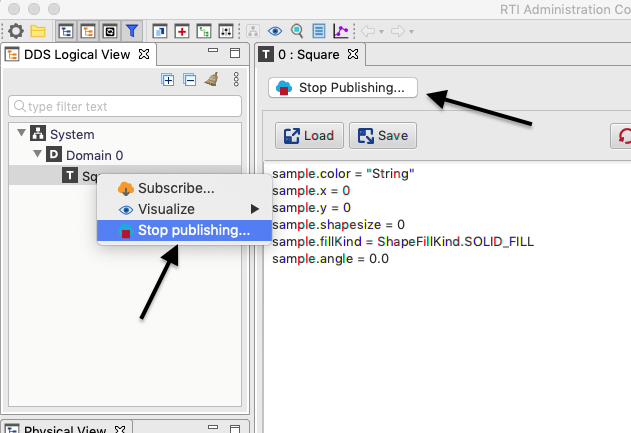
To completely close the Publication View, select the Stop Publishing button on top of the Publication View or stop it using the context menu in the DDS Logical View.
When you stop the Publication View, the publication will be completely destroyed, removing both the entities created by Admin Console and the stored information. When the Publication is stopped and the Publisher is regenerated, the code in the code editor area and the samples in the Sample Queue will not be restored.
To finish this tutorial, select the Stop Publishing button.