4. Hands-On 1: Securing Connext DDS Applications
Suppose you are the cybersecurity expert in a company called Patient Monitoring Innovations (PMI). In this exercise, we will secure a Connext project created with RTI Code Generator (rtiddsgen).
Tip
For a brief introduction to RTI Code Generator, see Run Code Generator, in the Introduction to Publish/Subscribe. Full details are in the RTI Code Generator User’s Manual.
As a first step, we will use some security artifacts provided with Connext. The applications in your project will use these artifacts to provide the required configuration and credentials to the Security Plugins, including the identity and permissions of the DomainParticipants. Then we will run the applications to check that we have communication. Finally, we will verify that eavesdropping is not possible with the configured level of security.
4.1. Generating a Connext DDS Project
Run rtisetenv_<architecture> in a new command prompt window, to avoid issues with paths and licensing.
Where <architecture> depends on your target machine (where you will deploy your completed application). Architecture strings are listed in the RTI Connext DDS Core Libraries Platform Notes. Examples are x64Win64VS2017 and x64Linux4gcc7.3.0.
(See Set Up Environment Variables, in Introduction to Publish/Subscribe.)
Generate an example from an IDL file. You may want to use the following type definition for this example project:
struct PatientMonitoring {
    string<128> patient_condition;
};
Put the IDL file in a directory called
patient_monitoring_project.
Run RTI Code Generator (rtiddsgen) from that directory:
$ cd patient_monitoring_project
$ rtiddsgen -example <architecture> -language C++ PatientMonitoring.idl
$ cd patient_monitoring_project
$ rtiddsgen -example <architecture> -language C++ PatientMonitoring.idl
> cd patient_monitoring_project
> rtiddsgen -example <architecture> -language C++ -ppDisable PatientMonitoring.idl
Note
We’ll use patient_monitoring_project as the working directory. Unless
otherwise indicated, we’ll run all commands from this directory.
The generated example will be composed of the following files:
Files |
Description |
|---|---|
|
Support for your types in C++ |
|
Example publisher/subscriber application.
|
Makefiles and |
Architecture-dependent build files |
|
QoS profiles |
|
See this README for instructions on how to open and modify the files. |
Our goal is to secure the generated publisher and subscriber applications (Alice and Bob, respectively, using the example from the previous sections).
4.2. Adding Security Artifacts to Your Project
We’ll rely on some files from the examples directory in
rti_workspace to define the security setup (see
Paths Mentioned in Documentation).
These files will provide the applications you’ll build with
the security configuration and credentials required by the Security Plugins.
For convenience, copy these files into your project’s top level:
$ cp -r <path to examples>/dds_security/* ./
Alternatively, copy/paste all the directories in
<path to examples>/dds_security/ to
patient_monitoring_project (the working directory).
$ cp -r <path to examples>/dds_security/* ./
Alternatively, copy/paste all the directories in
<path to examples>/dds_security/ to
patient_monitoring_project (the working directory).
> robocopy /E <path to examples>\dds_security\ .
Alternatively, copy/paste all the directories in
<path to examples>dds_security` to
:file:`patient_monitoring_project
(the working directory).
Note
These certificates and configuration XML files are provided only as examples and should not be used in production. These files are different between host platforms. If you are trying to communicate examples using different host platforms (e.g., Linux and Windows), you would need to copy over the files from one platform to the other so they are the same.
4.3. Enabling Security in Your QoS Profiles
Now modify the QoS profiles (XML) so that the applications will
load the security libraries and the required security artifacts.
To do so, define a profile named Alice in your USER_QOS_PROFILES.xml
by replacing the existing default profile with the following sample profile:
 <qos_profile name="Alice" base_name="BuiltinQosLib::Generic.Security" is_default_qos="true">
     <domain_participant_qos>
         <property>
             <value>
                 <!-- Certificate Authorities -->
                 <element>
                     <name>dds.sec.auth.identity_ca</name>
                     <value>file:./cert/ecdsa01/ca/ecdsa01RootCaCert.pem</value>
                 </element>
                 <element>
                     <name>dds.sec.access.permissions_ca</name>
                     <value>file:./cert/ecdsa01/ca/ecdsa01RootCaCert.pem</value>
                 </element>
                 <!-- Participant Public Certificate and Private Key -->
                 <element>
                     <name>dds.sec.auth.identity_certificate</name>
                     <value>file:./cert/ecdsa01/identities/ecdsa01Peer01Cert.pem</value>
                 </element>
                 <element>
                     <name>dds.sec.auth.private_key</name>
                     <value>file:./cert/ecdsa01/identities/ecdsa01Peer01Key.pem</value>
                 </element>
                 <!-- Signed Governance and Permissions Documents -->
                 <element>
                     <name>dds.sec.access.governance</name>
                     <value>file:./xml/signed/signed_Governance.p7s</value>
                 </element>
                 <element>
                     <name>dds.sec.access.permissions</name>
                     <value>file:./xml/signed/signed_PermissionsA.p7s</value>
                 </element>
             </value>
         </property>
     </domain_participant_qos>
 </qos_profile>
This profile inherits from the builtin BuiltinQosLib::Generic.Security
profile. This tells your DomainParticipant to use the Security Plugins as the
security plugin suite. (For further details, see Properties for
Enabling Security
in the RTI Security Plugins User’s Manual.)
Note that not indicating a security plugin suite will
result in a working but unsecure application.
The profile also configures the following properties:
dds.sec.auth.identity_ca
Configures the Identity CA certificate, used to verify that Identity Certificates from other DomainParticipants are legitimate. Usually, all the participants in your secure system will load the same Identity CA certificate. [1]
dds.sec.access.permissions_ca
Configures the Permissions CA certificate, used to verify that the Governance and Permissions Documents are legitimate. All the participants in your secure system must load the same Permissions CA certificate. [2]
dds.sec.auth.identity_certificate
Configures the Identity Certificate for the local DomainParticipant. Every secure participant should have its own unique Identity Certificate, signed by the Identity CA.
dds.sec.auth.private_key
Configures the Private Key for the local DomainParticipant, used during the authentication process. Every secure participant should have its own unique Private Key, only known to the local participant.
dds.sec.access.governance
Configures the Governance Document, which defines how your system is protected. All the participants in your secure system must load the same Governance Document [3], signed by the Permissions CA.
dds.sec.access.permissions
Configures the Permissions Document for the local DomainParticipant, which specifies what it is allowed to do in every Secure Domain. Every secure participant should have its own Permissions Document, signed by the Permissions CA.
Important
A participant that is not configured to use a security plugin
suite will omit any security-related properties, resulting in
a working but unsecure DomainParticipant. Make sure your QoS
profile inherits from the builtin
BuiltinQosLib::Generic.Security profile or refer to
Building and Running Security Plugins-Based Applications in the RTI Security Plugins User’s Manual.
In later hands-on exercises, you will learn how to generate all the files listed above. For now, we’ll use the example files you copied in the previous step.
4.4. Linking Your Applications Against Security Plugins and OpenSSL Libraries
So far, you have generated a Connext project and configured its QoS profiles to load the required security artifacts and enable the Security Plugins. Now we will build the applications, so you can see them in action. For convenience, we will link the applications dynamically to both Connext and the OpenSSL libraries (for other linking options, see Building and Running Security Plugins-Based Applications in the RTI Security Plugins User’s Manual.
Note
We use NDDSHOME to refer to the path where the
Connext bundle is installed in your system (in Connext
7.3.0, NDDSHOME is the path to
rti_connext_dds-7.3.0). The installation process is described in
the RTI Security Plugins Installation Guide [4].
4.4.1. Building the Application
Use the generated Makefile with the SHAREDLIB variable set
to 1 to force dynamic linking; set DEBUG=1 to build in debug mode:
$ make -f makefile_PatientMonitoring_<architecture> SHAREDLIB=1 DEBUG=1
Use the generated Makefile with the SHAREDLIB variable set
to 1 to force dynamic linking; set DEBUG=1 to build in debug mode:
$ make -f makefile_PatientMonitoring_<architecture> SHAREDLIB=1 DEBUG=1
We will build the solution generated by RTI Code Generator
with the Debug DLL configuration. You can do this by using the
msbuild command-line tool provided with Visual Studio.
To do this, open a Visual Studio command prompt and change to the
patient_monitoring_project directory (cd
patient_monitoring_project).
Then build the Debug DLL solution, which is configured for dynamic
linking:
> msbuild /property:Configuration="Debug DLL" PatientMonitoring-<architecture>.sln
Alternatively, you can open PatientMonitoring-<architecture>.sln
with Visual Studio, as shown in the following screenshot. If you
choose this method, select the Debug DLL option in the
Solution Configurations dropdown menu (1), then select
Build for both PatientMonitoring_publisher and
PatientMonitoring_subscriber (2).
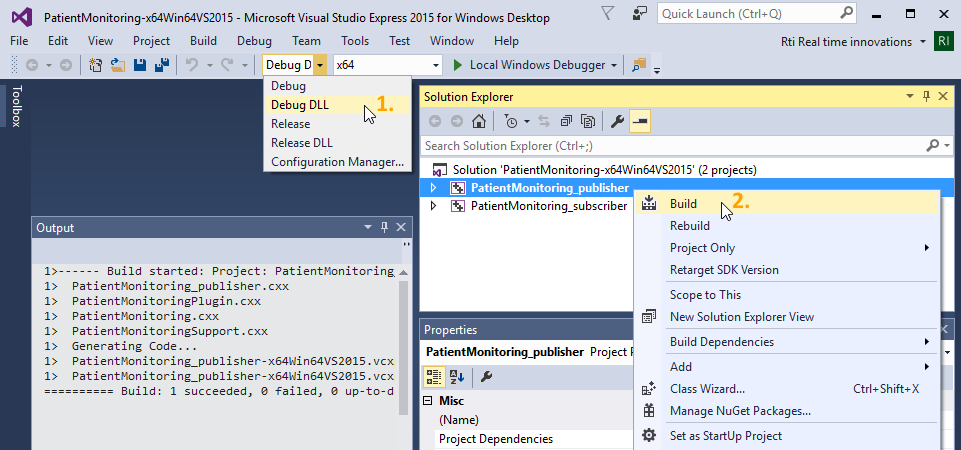
Figure 4.1 Building the application with Visual Studio 2015.
4.5. Running the Applications
It’s time to see your secure publisher and subscriber working together! Open two command prompts and configure the environment in both to point to the location of the dynamic libraries, as explained below.
4.5.1. Configuring the Environment in Both Command Prompts
Configure the environment for Connext by running rtisetenv_<architecture> from the Connext installation path.
For details, see Set Up Environment Variables, in Introduction to Publish/Subscribe.
This will update your PATH to include the location of the Connext binaries.
Update the shared library environment variable to include the directory where the OpenSSL libraries reside. For this example, you may want to use OpenSSL debug libraries.
$ export LD_LIBRARY_PATH=$NDDSHOME/third_party/openssl-3.0.12/<architecture>/debug/lib:$LD_LIBRARY_PATH
$ export DYLD_LIBRARY_PATH=$NDDSHOME/third_party/openssl-3.0.12/<architecture>/debug/lib:$DYLD_LIBRARY_PATH
> set PATH=%NDDSHOME%\third_party\openssl-3.0.12\<architecture>\debug\bin;%PATH%
If you run the applications from within Visual Studio, you need to set up the environment before opening the solution in Visual Studio.
Tip
Make sure you set the environment in both command prompts.
4.5.2. Checking Communication
Run the publisher in one of the command prompts and the subscriber in the other.
Do not provide any arguments to the applications, so that they communicate in Domain 0. This will be your Secure Domain.
You should see the message Received data in the subscriber’s command prompt, which indicates successful communication:
Publisher:
$ ./objs/<architecture>/PatientMonitoring_publisher
Writing PatientMonitoring, count 0
Writing PatientMonitoring, count 1
Writing PatientMonitoring, count 2
Writing PatientMonitoring, count 3
Subscriber:
$ ./objs/<architecture>/PatientMonitoring_subscriber
No data after 1 second
Received data

   patient_condition: ""
No data after 1 second
Received data

   patient_condition: ""
Publisher:
> objs\<architecture>\PatientMonitoring_publisher.exe
Writing PatientMonitoring, count 0
Writing PatientMonitoring, count 1
Writing PatientMonitoring, count 2
Writing PatientMonitoring, count 3
Subscriber:
> objs\<architecture>\PatientMonitoring_subscriber.exe
No data after 1 second
Received data

   patient_condition: ""
No data after 1 second
Received data

   patient_condition: ""
Congratulations! You have added Security Plugins to your applications.
4.6. Checking that Your Applications Communicate Securely
To check that communication is actually secure, now let’s have a non-secure Connext application try to subscribe to the PatientMonitoring Topic. For convenience, we will use RTI Admin Console as the non-secure subscriber.
4.6.1. Verifying that Eavesdropping Attempts are Frustrated
Open Admin Console and join Domain 0.
(For details on using Admin Console, see Viewing Your Data, in Introduction to Publish/Subscribe.
Notice that your secure DomainParticipants do not show up in Admin Console.
The security configuration of your Secure Domains requires DomainParticipants to authenticate in order to join the Domain. Any participant with wrong or no credentials will fail to authenticate and will be disallowed from communicating in the Domain. In this example, the Governance Document you copied into the project (and added to Alice’s XML QoS configuration) protects the endpoint discovery with encryption. As a result, intruders and eavesdroppers will not have any information regarding the Topics in your secure system. We will show the configuration values to force authentication and to enable encryption in Hands-On 2: Defining Your System’s Security Requirements.
4.6.2. Detecting Eavesdropping Attempts
When Admin Console runs in Domain 0, it sends discovery information to all other DomainParticipants in the same Domain. When your secure participants receive this information, they will require Admin Console to authenticate. However, Admin Console does not hold a valid credential and cannot authenticate, making discovery fail and preventing further communication.
You might want to detect that an unauthorized DomainParticipant tried to communicate in your secure system. To do this:
Modify your QoS profile to increase the verbosity of the Logging Plugin:
<qos_profile name="Alice" base_name="BuiltinQosLib::Generic.Security" is_default_qos="true">
    <domain_participant_qos>
        <property>
            <value>
                <!-- Logging Plugin setup -->
                <element>
                    <name>com.rti.serv.secure.logging.verbosity</name>
                    <value>WARNING</value>
                </element>
                ...
Rerun your secure publisher or/and subscriber.
A message like this should show up in its command prompt:
PRESParticipant_getRemoteParticipantInitialSecurityState:unauthenticated remote participant 1018db2.74f9482c.2712840d denied
This message indicates a failure during the authentication of a remote DomainParticipant. It will be logged every time an unauthenticated participant attempts to join a Secure Domain where
allow_unauthenticated_participantsis set toFALSE.
4.7. Further Exercises
So far, we have defined a single QoS profile named Alice to enable the
Security Plugins. Since this profile has the attribute is_default_qos=true, any
Connext application loading USER_QOS_PROFILES.xml will have the
same security artifacts. This makes it convenient to load the same
Governance Document and CA certificates in an example. However, all your
applications will have the same identity and permissions, which is
strongly discouraged. Please note that the authentication succeeds in
this situation since the DomainParticipants still have valid
credentials, i.e., the Identity CA has issued all the identities.
Also note that the Permissions Document the publisher and the subscriber
are loading gives them permission to publish and subscribe to any
Topic, making communication possible.
4.7.1. Give Different Credentials to Each Application in Your System
To maximize security, different applications should always have different identities and permissions. Write a second QoS profile for your project in the same XML QoS file. You should end up with the following:
A profile called
Alicefor the publisher applicationA profile called
Bobfor the subscriber application
Tip
You may want to have Bob’s profile inherit from Alice’s, with
base_name="Alice". This way, you don’t need to specify the CA certificates and the Governance Document twice inUSER_QOS_PROFILES.xml.Modify Bob’s identity and permissions.
For example, use
ecdsa01Peer02Cert.pem,ecdsa01Peer02Key.pem, andsigned_PermissionsB.p7s.Note that
ecdsa01Peer02Key.pemis password-protected, so use thedds.sec.auth.passwordproperty to specify the password in Bob’s QoS profile:<qos_profile name="Bob" base_name="Alice"> <domain_participant_qos> <property> <value> <!-- Participant Public Certificate and Private Key --> <element> <name>dds.sec.auth.identity_certificate</name> <value>file:./cert/ecdsa01/identities/ecdsa01Peer02Cert.pem</value> </element> <element> <name>dds.sec.auth.private_key</name> <value>file:./cert/ecdsa01/identities/ecdsa01Peer02Key.pem</value> </element> <element> <name>dds.sec.auth.password</name> <value>VG9tQjEy</value> </element> <!-- Signed Permissions Document --> <element> <name>dds.sec.access.permissions</name> <value>file:./xml/signed/signed_PermissionsB.p7s</value> </element> </value> </property> </domain_participant_qos> </qos_profile>
Modify the applications’ source code in
PatientMonitoring_publisher.cxxandPatientMonitoring_subscriber.cxxto use these QoS profiles. The publisher’s DomainParticipant should use theAliceQoS profile, and the subscriber’s DomainParticipant should use theBobQoS profile.To do so, you can create your DomainParticipants with
DDSDomainParticipantFactory::create_participant_with_profile(see DomainParticipantFactory in the Traditional C++ API Reference).
Rebuild your project and run your publisher and subscriber applications. You should see communication.
4.8. Troubleshooting
When I try to run Code Generator (rtiddsgen), my system does not recognize or find the command.
Make sure Connext is installed correctly.
Also make sure you’ve correctly set the PATH environment variable (your PATH should include
<NDDSHOME>/bin). You can run rtisetenv_<architecture> to add the location of the Connext binaries to your PATH (see Set Up Environment Variables, in Introduction to Publish/Subscribe).
When I run Code Generator (rtiddsgen), I get this error:
The preprocessor 'CL.EXE' cannot be found in your path.
Make sure your toolchain’s preprocessor is available. If you are using Visual Studio, make sure you are using a Visual Studio command prompt. Alternatively, run rtiddsgen with the -ppDisable option.
When I run Code Generator (rtiddsgen), I get warnings stating:
File exists and will not be overwritten
Some files that would normally be generated already exist and will not be overwritten. These errors are expected.
When I run the publisher/subscriber, I get this error:
error while loading shared libraries: libnddscpp.so
Make sure the shared library environment variable includes the directory where the Connext libraries reside. See Configuring the Environment in Both Command Prompts for a solution.
When I run the publisher/subscriber, I get this error:
!open library=libnddssecurity.so
Make sure the OpenSSL target bundle provided by RTI is installed correctly. [4]
Make sure the shared library environment variable includes the directory where OpenSSL libraries reside. See Configuring the Environment in Both Command Prompts for a solution.
Make sure your environment is pointing to the correct version of the OpenSSL libraries.
When I run the publisher and subscriber, communication does not occur.
Make sure you run both applications from the
patient_monitoring_projectdirectory, so they load the sameUSER_QOS_PROFILES.xmlfile. Note: If the project file for your IDE was auto-generated and you are running from within your IDE, it should run from that directory automatically.
Make sure your applications are loading the right security artifacts or artifacts combinations (that is, you don’t get a
!certificate verify failerror).
Be careful with Bob’s QoS profile depending on Alice’s — you may be changing properties in Alice’s profile and loading Bob’s, or the opposite.
When I run the publisher/subscriber, I get this error:
!certificate verify fail
Make sure your applications are loading the right security artifacts or artifacts combinations.