The first step in creating a DDS application is to define the interface
between applications. In DDS, the interface is the data itself rather
than the bits and bytes that make up a protocol. In DDS, the Topic
written by a DataWriter and read by a DataReader is associated with one
data type. For example, in Publish/Subscribe,
the data type was named HelloWorld and contained a single string. The
“HelloWorld Topic” was associated with the HelloWorld data type.
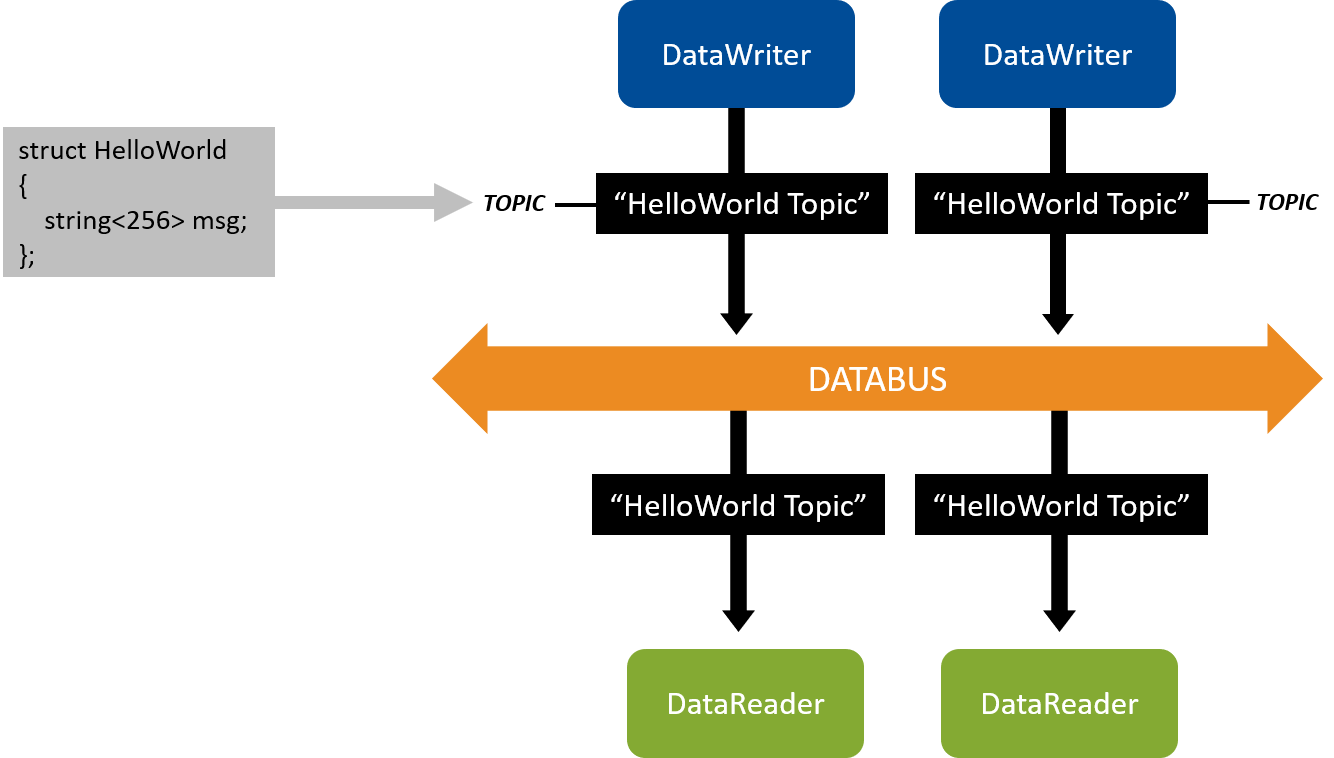
Figure 3.1 In Publish/Subscribe, you started two applications that published
the “HelloWorld Topic” and two that subscribed to the “HelloWorld Topic.” The
“HelloWorld Topic” uses the HelloWorld data type.
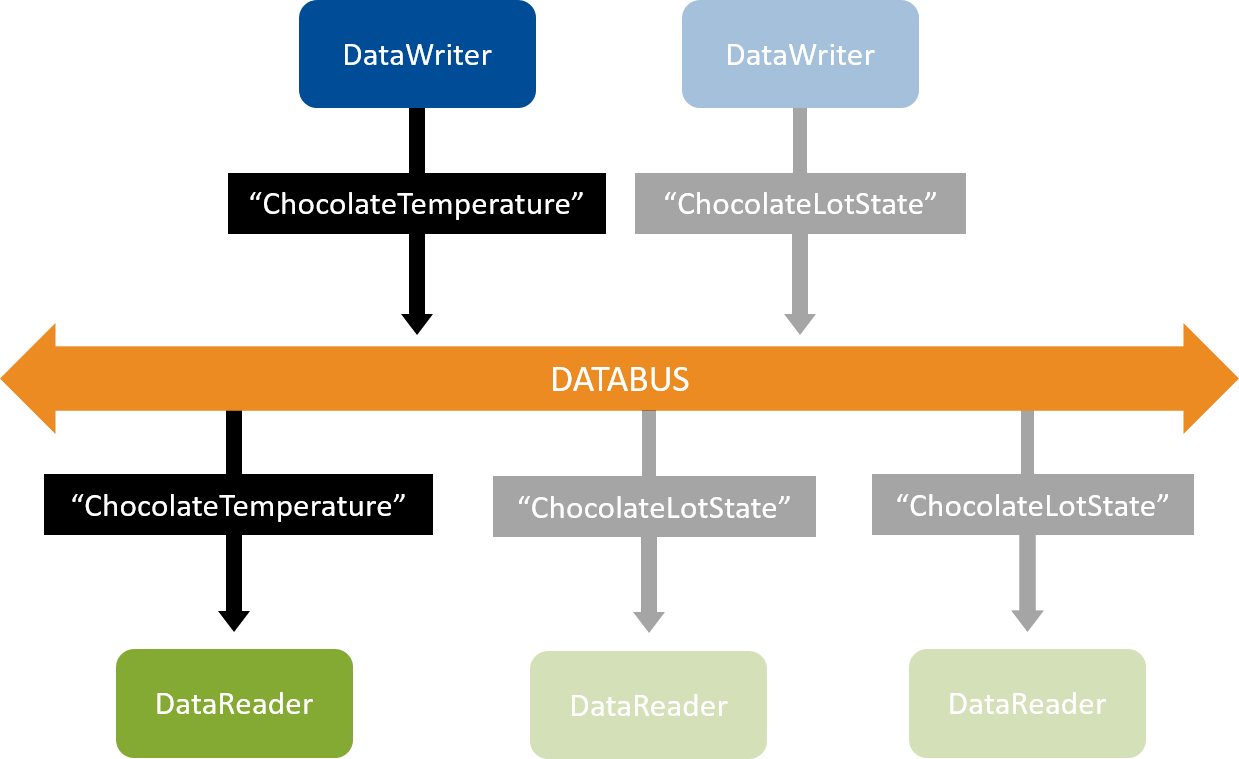
The same data type can be reused across multiple Topics. For example, a
data type named Temperature might be associated with the Topics
“ChocolateTemperature” and “FactoryTemperature.” Although “ChocolateTemperature”
and “FactoryTemperature” measure two different things, they are both
temperature data types. Thus, the data type can be reused for both of these
Topics.
Figure 3.2 Multiple Topics can share the same data type.
In Publish/Subscribe,
you opened an IDL (.idl) file that contained the HelloWorld data type.
IDL is the “Interface Definition Language,” defined by the Object
Management Group. It allows you to define data types in a way that is
not specific to the language your applications are written in, enabling
applications that are written in C, C++, Java, etc., to communicate.
To design your data types, decide how many you need and what each one
will be used for. Consider the relationships of all your application data.
Some questions to consider:
Is this data produced and consumed in the same places?
Can this data logically be described by the same Topic?
Does this data have the same data flow characteristics?
To answer the third question, it’s important to discuss what data flow
characteristics are. Some of these characteristics include:
How frequently data is sent
Whether data is sent periodically or asynchronously
Whether it is okay to miss an update
There are additional data flow characteristics that we will cover
later when we talk about Quality of Service (in Basic QoS).
An example of a common data flow pattern is “Streaming Sensor Data.”
Tip
Streaming sensor data:
Usually sent rapidly
Usually sent periodically
When data is lost over the network, it is more important to get the
next update rather than wait for the lost update
Other data flows include “State Data” and “Event and Alarm Data.”
All these data flows will be discussed in more detail in Basic QoS.
This Hands-On will use an example similar to the “Hello World” example in
Publish/Subscribe, but with a few modifications. (Instructions in the
following exercises are a little less detailed because we
assume you have already performed the exercises in Publish/Subscribe.)
The code for this example is in the directory 3_streaming_data.
(See Get Example Files.)
In 3_streaming_data, open chocolate_factory.idl to see the definition
for our temperature type. (There is also a ChocolateLotState type that we will
use later).
In the IDL file, we’ve changed the data type from a message
string to a Temperature that includes both a sensor ID and degrees:
// Temperature data typestructTemperature{// ID of the sensor sending the temperaturestring<256>sensor_id;// Degrees in Celsiusint32degrees;};
In the directory called c++11, open the chocolate_factory_publisher.cxx file
to see that we’ve changed the Topic to “ChocolateTemperature”:
// A Topic has a name and a datatype. Create a Topic named// "ChocolateTemperature" with type Temperaturedds::topic::Topic<Temperature>topic(participant,"ChocolateTemperature");
We have modified the application so that you can specify a “sensor ID”
at the command-line when running your application, by passing -i<somesensorname>.
In that file, we’ve also modified the data being sent so that it includes
both that sensor ID and a temperature ranging between 30 and 32 degrees:
// Modify the data to be written heresample.sensor_id(sensor_id);sample.degrees(rand()%3+30);// Random number between 30 and 32
Run Code Generator for this new example, but specify the
chocolate_factory.idl file instead.
-ppDisable disables the preprocessor. It is necessary for running rtiddsgen
on a Windows system if the preprocessor is not in your path. You can only use -ppDisable
if your IDL is simple, as it is here—otherwise you must add the preprocessor to your
path. See Command-Line Arguments for
rtiddsgen, in the RTI Code Generator User’s Manual
if you want more information.
In this step, you will modify your applications to support one of the
common design patterns that most applications need: Streaming Data. This
pattern is characterized by:
Data that is sent frequently and periodically.
No need for reliability: if a sample is lost on the network, it is
better to drop it than possibly delay the next one.
This pattern is usually seen with sensor data.
Definition
A sample is a single data update sent or received over DDS.
For example: temperature = 32.
Figure 3.3 DataWriter sending temperature samples
To make your application illustrate streaming data:
Change chocolate_factory_publisher.cxx from 4 seconds to 100 milliseconds,
as shown below:
writer.write(sample);// Exercise #1.1: Change this to sleep 100 ms in between writing temperaturesrti::util::sleep(std::chrono::milliseconds(100));
(If you’re using Windows and need help on modifying this file in your IDE,
see the README_<architecture>.txt file generated with the code, in the
3_streaming_data/<language> directory.)
Open the USER_QOS_PROFILES.xml file, in the same directory that contains
the chocolate_factory_publisher.cxx and chocolate_factory_subscriber.cxx files. We
will cover Quality of Service (QoS) in greater depth in a later module, but for
now we will use this file to change our DataWriter and DataReader to use QoS appropriate for
streaming data. Do this by changing the base_name attribute from
BuiltinQosLib::Generic.StrictReliable to BuiltinQosLib::Pattern.Streaming:
<!-- QoS profile used to configure reliable communication between the DataWriter and DataReader created in the example code. base_name: Communication is reliable because this profile inherits from the built-in profile "BuiltinQosLib::Generic.StrictReliable" is_default_qos: These QoS profiles will be used as the default, as long as this file is in the working directory when running the example.--><!-- Exercise #1.2: Use Streaming profile --><qos_profilename="ChocolateTemperatureProfile"base_name="BuiltinQosLib::Pattern.Streaming"is_default_qos="true">
Tip
This XML file is loaded from your working directory when you run your applications—this
is why we specify that you run your applications from the 3_streaming_data/<language> directory.
Notice that the profile contains the attribute is_default_qos—this means that this
profile will be used by default by the DataWriter and DataReader, as long as it is
in your working directory. Later when we talk about QoS, we will show you how to specify a
particular QoS profile instead of loading the default.
This modification to the QoS XML file will change the way Connext delivers your data
from being reliable to “best effort.” We will cover QoS in more depth in Basic QoS.
Build the example.
If you need help compiling, review the generated README_<architecture>.txt file in the
3_streaming_data/<language> directory.
Make sure you have run rtisetenv_<architecture> in any new command prompt
window, to avoid issues with paths and licensing. See Set Up Environment Variables (rtisetenv).
From within the 3_streaming_data/<language> directory, enter the following full path,
optionally specifying your own sensor ID to send with the data, such as “MySensor1”:
You must be in the 3_streaming_data/<language> directory and enter
the full path above. Do not run the publisher or subscriber application
from within objs/<architecture>. You should run from the
3_streaming_data/<language> directory because the examples
use Quality of Service (QoS) information from the file USER_QOS_PROFILES.xml
in that directory. We’ll talk more about QoS in a later module.
Open another command prompt window, run rtisetenv_<architecture> if you haven’t
already in that window, and from within the 3_streaming_data/<language>
directory, enter the following full path:
After modifying the publishing and subscribing applications as described
above, compiling, and running both applications from the 3_streaming_data/<language>
directory where you generated code, you should see data rapidly
arriving:
ChocolateTemperature subscriber sleeping for 4 sec...
[sensor_id: MySensor1, degrees: 32]
ChocolateTemperature subscriber sleeping for 4 sec...
[sensor_id: MySensor1, degrees: 32]
ChocolateTemperature subscriber sleeping for 4 sec...
[sensor_id: MySensor1, degrees: 30]
ChocolateTemperature subscriber sleeping for 4 sec...
[sensor_id: MySensor1, degrees: 31]
Figure 3.4 In this exercise, a DataWriter of the “ChocolateTemperature” Topic communicates with a DataReader
of the “ChocolateTemperature” Topic. In the next Hands-On, you will add a
“ChocolateLotState” Topic.
Congratulations! You now have streaming Temperature data.
3.4. Publishers, Subscribers, and DomainParticipants
Before we go any farther, it’s important that we define a few more objects
that you will see in your DDS applications. You may have noticed some of
these objects already in the code, and you’ll be using one of them in the next
Hands-On. These objects are: Publishers, Subscribers, and DomainParticipants. Most of
the time in these hands-on exercises we will ignore these, and focus on
DataWriters, DataReaders, and Topics. But it’s important to know that these other objects
exist in every application.
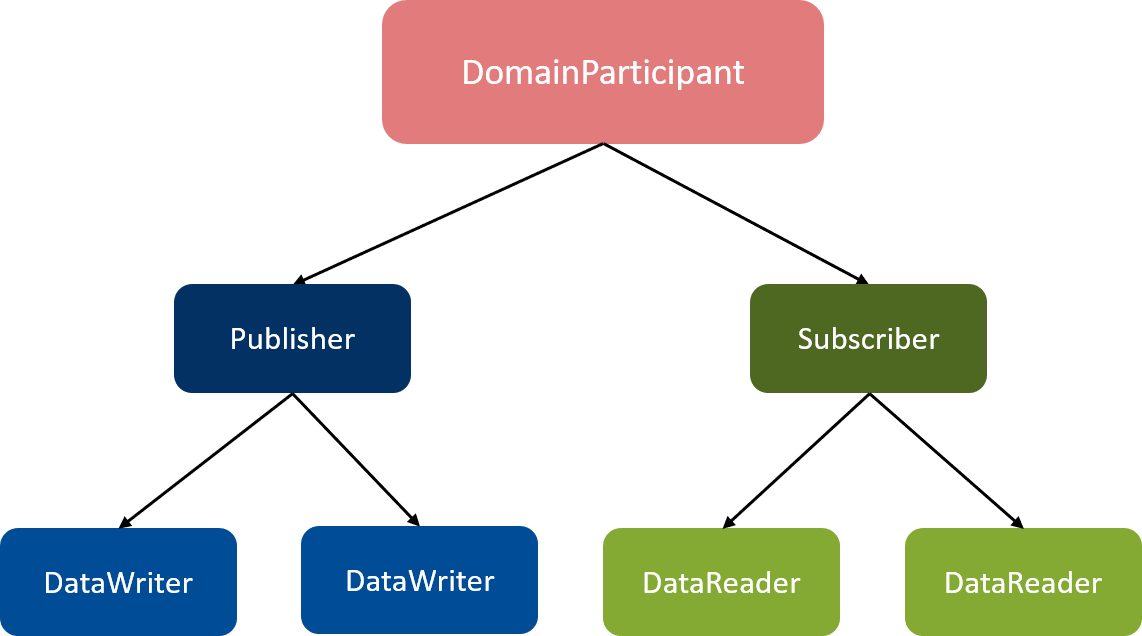
Figure 3.5 DomainParticipants create and manage Publishers and Subscribers. Publishers create
and manage DataWriters. Subscribers create and manage DataReaders. DataWriters and DataReaders
send and receive your data.
Definition
A DomainParticipant object in Connext is used to create and manage one or more Publishers
and Subscribers. The DomainParticipant is a container for most other objects, and is responsible
for the discovery process. In most applications, you will have only one DomainParticipant, even if you
have many DataWriters and DataReaders.
We will be using the Publisher object in your temperature_publisher application
to create a new DataWriter in the next Hands-On section.
We will see DomainParticipants again when we talk about QoS, and then when we talk about
discovery and domains. Since they are used to create nearly every other DDS
object in your system, they’re one of the first objects you create when creating
a DDS application. DomainParticipants also create Topics, which get used by your DataWriters and
DataReaders. You’ll see that when you add a second Topic in the next Hands-On.
Note
It’s a common beginner’s mistake to create one DomainParticipant per DataWriter or DataReader.
As you can see, it’s not necessary. You typically create one DomainParticipant
per application. It’s also a bad idea to use more than you need, because
DomainParticipants use significant resources such as threads, and they use network
bandwidth for discovery. We’ll talk more about DomainParticipants in a later
module on discovery.
Now that you have created your first streaming data, we will add another
DataWriter to the chocolate_factory_publisher application. This will give you an
idea how to add a new DataWriter or DataReader, which will be useful because the code
in the next module will have more-complex applications with multiple DataReaders and
DataWriters.
Every DataWriter needs to write on a Topic, and this new DataWriter
will use a different Topic and data type than the temperature DataWriter.
This new DataWriter will write the Topic “ChocolateLotState” with the data
type ChocolateLotState that is defined
in the IDL file. We will use this new “ChocolateLotState” Topic again in
the next module.
Stop running both of the applications from the previous Hands-On if you
haven’t already.
Add a new Topic.
Inside of chocolate_factory_publisher.cxx you should see this comment:
// Exercise #2.1: Add new Topic
Add the following code after the comment to create the new Topic:
Now, compile and run the chocolate_factory_publisher application
from the 3_streaming_data/<language>
directory where you generated code. You do not need to run the
chocolate_factory_subscriber application, because next we will show you
another way to visualize your data.
Figure 3.6 You added a second DataWriter that writes on the “ChocolateLotState” Topic.
Congratulations! You have added a second DataWriter that writes on a new Topic
with a new data type! In the next module, you will continue adding to these
applications to make them more complete.
The rtiddsspy utility is a quick way to visualize data when you just need
a simple text view. This utility does two things:
Displays the DataWriters and DataReaders in your system, but in a text
format rather than the graphical format of Admin Console.
Automatically creates DataReaders for any Topic being
written on the network and prints out messages when its DataReaders receive
data.
rtiddsspy does both of these without requiring very much configuration, making
it a convenient tool for debugging when your applications are not
communicating, or when you need to quickly see your data.
Unlike Admin Console, rtiddsspy can be run directly on an embedded machine,
which makes it useful if you need to debug applications that are not
on the same network as a Windows, Linux, or macOS machine.
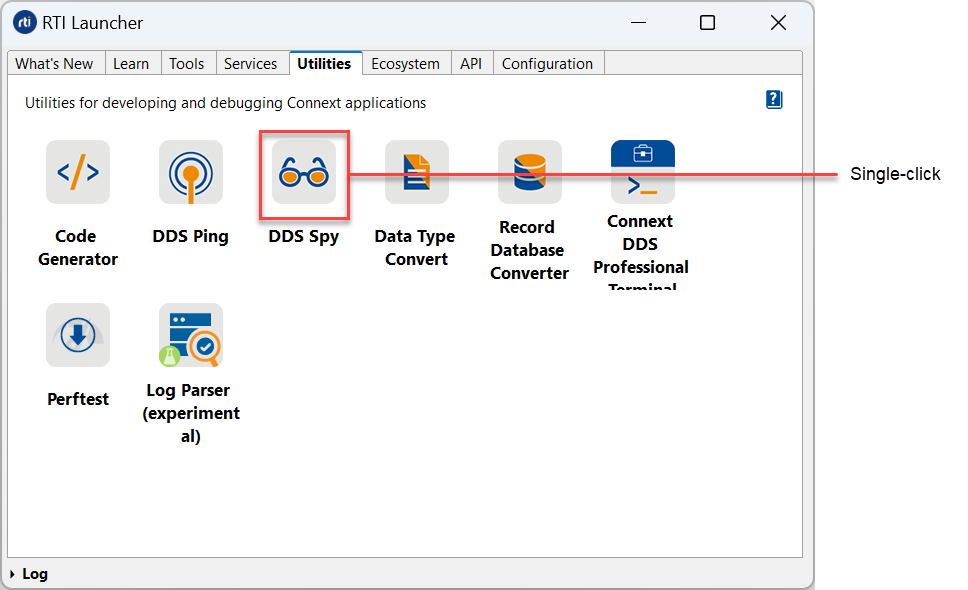
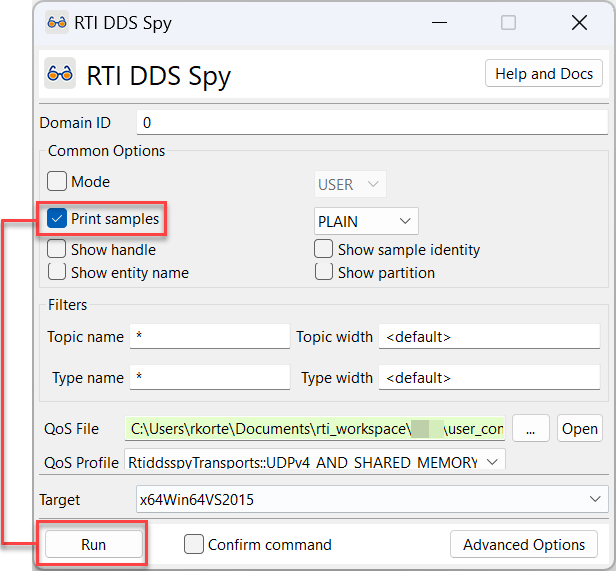
To open rtiddsspy, start by opening the Launcher tool. (rtiddsspy can
also be run from the command-line, but Launcher provides a useful
front-end).
Click on the Utilities tab.
Click on the DDS Spy icon.
In the dialog box that appears, select “Print samples” and click “Run.”
rtiddsspy will show you:
That it has discovered two DataWriters
The data being published by the two DataWriters
RTI DDS Spy built with RTI Connext version:
~~~~~~~~~~~~~~~~~~~~~~~~~~~~~~~~~~~
rtiddsspy is listening for data, press CTRL+C to stop it.

22:20:59 New writer        from 10.30.1.134     : topic="ChocolateTemperature" type="Temperature" name="ChocolateTemperatureDataWriter"
22:20:59 New writer        from 10.30.1.134     : topic="ChocolateLotState" type="ChocolateLotState" name="ChocolateTemperatureDataWriter"
22:21:37 New data          from 10.30.1.134     : topic="ChocolateLotState" type="ChocolateLotState"
lot_id: 46
lot_status: WAITING

22:21:37 New data          from 10.30.1.134     : topic="ChocolateTemperature" type="Temperature"
sensor_id: "MySensor1"
degrees: 30

22:21:38 New data          from 10.30.1.134     : topic="ChocolateLotState" type="ChocolateLotState"
lot_id: 47
lot_status: WAITING

22:21:38 New data          from 10.30.1.134     : topic="ChocolateTemperature" type="Temperature"
sensor_id: "MySensor1"
degrees: 31

22:21:38 New data          from 10.30.1.134     : topic="ChocolateLotState" type="ChocolateLotState"
lot_id: 48
lot_status: WAITING
The first two lines indicate that
rtiddsspy has discovered the two DataWriters in your chocolate_factory_publisher
application. The subsequent lines
indicate that rtiddsspy is receiving data. Since you selected the “Print
Samples” option in Launcher, you can also see the contents of the
ChocolateLotState data and the Temperature data your DataWriters are writing.
After you stop (CTRL+C) rtiddsspy, you will see the number of DataWriters and DataReaders
discovered, and samples received:
There are additional values that rtiddsspy can display if you
use keys and instances (which we haven’t talked about yet). For
an overview of all the output of rtiddsspy, see the
RTI DDS Spy documentation.