4.3.3 Building and Running an Application as a Real-Time Process
There are two ways to build and run your Connext RTP application:
4.3.3.1 Using the Command Line
- Generate the source files and the makefile with RTI Code Generator (rtiddsgen).
- Set up your environment with the wrenv.sh script or the wrenv.bat batch file in the VxWorks base directory. Execute the script with the -p parameter. For example:
- Set the NDDSHOME environment variable as described in Set Up Environment Variables (rtisetenv), in the RTI Connext Getting Started Guide.
- Build the Publisher and Subscriber modules using the generated makefile. You may need to modify the HOST_TYPE, compiler and linker paths to match your development setup.
Notes:
- Before launching the applications, change to the project root folder, since the applications will look for the generated USER_QOS_PROFILES.xml file in their current directory.
- Steps 5-12 can be replaced by establishing a telnet connection to the VxWorks target. In that case, Workbench does not need to be used and both the Host Shell and Target Console will be redirected to the telnet connection. Once in the C interpreter (you will see a prompt '->' in the shell) you can type cmd and then help for more information on how to load and run applications on your target.)
- If you want to dynamically link your RTP to the RTI libraries, make the following modifications the generated makefile:
Using rtpSp:
telnet raytheon-guy
cd " <PROJECT ROOT FOLDER>"
rtpSp "objs/<arch>/Foo_subscriber.vxe -domainId XX"
Or using rtp exec:
telnet raytheon-guy
cd " <PROJECT ROOT FOLDER>"
rtp exec objs/<arch>/Foo_subscriber.vxe – -domainId XX
LIBS = -L$(NDDSHOME)/lib/<architecture> -non-static -lnddscpp \-lnddsc -lnddscore $(syslibs_<architecture>)
- Add to the LD_LIBRARY_PATH environment variable the path to your RTI libraries as well as the path to libc.so.1 of your VxWorks installation to launch your RTP successfully.
- Launch Workbench.
- Make sure your target is running VxWorks.
- Connect to the target with the target manager and open a host shell and a Target Console Tool to look at the output. Both are found by right-clicking the connected target in the Target Tools sub-menu.
- Right-click on your target in the Target Manager window, then select Run, Run RTP on Target.
- Set the Exec Path on Target to the HelloWorld_subscriber.vxe or the HelloWorld_publisher.vxe file created by the build.
- Set the arguments (domain ID and number of samples, using -d <domain ID> and -s <number of samples>).
- Click Run.
Note: The architecture names for Kernel Mode and RTP Mode are different.
Please refer to the RTI Code Generator User’s Manual for more information on how to use rtiddsgen.
wrenv.sh -p vxworks
A Stack size of 0x100000 should be sufficient. If your application doesn't run, try increasing this value.
4.3.3.2 Using Workbench
Note: The following steps might vary slightly depending on your chosen version of VxWorks.
- Start Workbench.
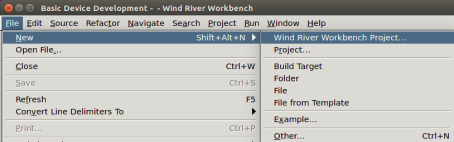
- Select File, New, Wind River Workbench Project.
- Select the desired Target Operating System; click Next.
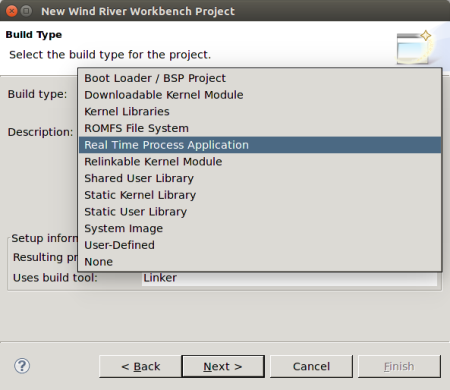
- When prompted to choose a Build Type, select Real Time Process Application; click Next.
- Give your project a name; click Next.
- Leave everything else at its default setting; click Finish.
- Copy the source and header files generated by rtiddsgen in 4.3.1 Generate Example Code and Makefile with rtiddsgen into the project directory. There can only be one main() in your project, so you must choose either a subscriber or a publisher. If you want to run both, you will need to create two separate projects.
- View the added files by right-clicking on the project in Project Explorer, then selecting Refresh to see the files.
- Open the project Properties by right-clicking on the project in Project Explorer and selecting Properties.
- In the dialog box that appears, select Build Properties in the navigation pane on the left.
- In the Build Support and Specs tab, select the desired build spec from the Active build spec drop-down menu; click Apply to save the changes.
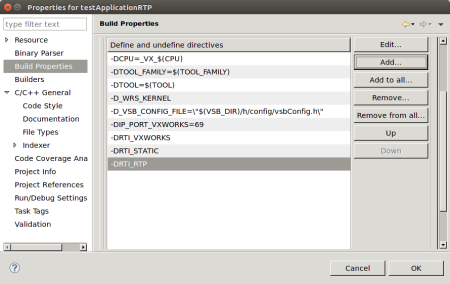
- In the Build Macros or Defines tab, add the following to DEFINES in the Build macro definitions:
- In the Variables tab, add to LIBPATH:
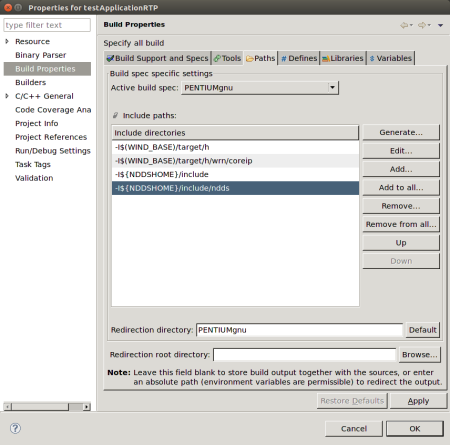
- In the Build Paths or Paths tab, add:
- Click OK to exit the Properties menu.
- Build the project by right-clicking on the project in Project Explorer, then selecting Build Project.
- Run the application as described starting in Step 5 in the Command Line section above.

Your project will be created at this time.
-DRTI_VXWORKS
-DRTI_STATIC
-DRTI_RTP
-L/(NDDSHOME)/lib/<architecture>
If you are using static linking, add to LIBS:
-lnddscppz -lnddscz -lnddscorez (in that order)
If you are using dynamic linking, add to LIBS:
-lnddscpp -lnddsc -lnddscore (in that order)
Click Apply to save the changes.
-I$(NDDSHOME)/include
-I$(NDDSHOME)/include/ndds
Click Apply to save the changes.