5. Porting
Building RTI Connext TSS for a new platform or architecture requires
creating or updating files in the CMake resource directory
(${RTITSSHOME}/resource/cmake).
The CMake resource directory contains Toolchains and Modules directories. Toolchains contains CMake toolchain files. Modules contains RTI-specific CMake scripts, including additional platform and toolchain-specific files.
5.1. New CMake platform
A platform may need a corresponding platform file in the
Toolchains directory
(${RTITSSHOME}/resource/cmake/Toolchains/Platform). While
a host platform likely will not need one, a cross-compiled
platform likely will. Follow the CMake toolchain
documentation to create new platform files. Alternatively,
contact RTI and ask about the availability of new CMake platforms
or toolchains.
A platform must have a CMake platform file in the Modules
directory
(${RTITSSHOME}/resource/cmake/Modules/ProjectOptions/Platform)
to set RTI-specific compiler options. These options depend
on the platform defined by CMAKE_SYSTEM_NAME in a toolchain
file (or guessed by CMake). We include these files from our
top-level CMakeList file, based on the RTI TSS architecture name.
These files may enable or disable
features and products depending on CMake
variables defined by the user or the toolchain file.
5.1.1. Cross-compilation
In addition, a cross-compiled platform must have another
platform file in
${RTITSSHOME}/resource/cmake/Modules/Platform to set
the target platform. You need to create at least a file
with name ${CMAKE_SYSTEM_NAME}.cmake. Other files are optional.
General rules for the cross-compiled platform file:
The file must start with the name of the platform to support (
${CMAKE_SYSTEM_NAME}).These files must not contain anything RTI-specific; that should go to the ProjectOptions folder (
${RTITSSHOME}/resource/cmake/Modules/ProjectOptions).Hard-coded paths are not allowed; you need to use relative paths to CMake variables or environment variables.
5.2. New CMake architecture
While the Platform directories contain CMake files with shared settings
between the toolchains of a platform family, the toolchain file of a
specific architecture is in the Architecture directory
(${RTITSSHOME}/resource/cmake/Toolchains/Architecture).
A basic toolchain file, for example, could just be the following:
# Toolchain file for Linux x64 with GCC 4.8.2

include("${CMAKE_CURRENT_LIST_DIR}/../Common.cmake")
platform_setup()

set(PLATFORM_C_COMPILER_EXPECTED_VERSION 4.8.2)
set(PLATFORM_CXX_COMPILER_EXPECTED_VERSION 4.8.2)

set(CMAKE_C_FLAGS "-m64 ${COMPILER_WARNING_FLAGS_C}")
set(CMAKE_CXX_FLAGS "${COMPILER_WARNING_FLAGS_CXX}")
set(CMAKE_EXE_LINKER_FLAGS "-static-libgcc ${CMAKE_EXE_LINKER_FLAGS}")

set(SYSLIBS_ARCH "-ldl -lnsl -lm -lpthread -lrt")
5.2.1. Variable definition
5.2.1.1. General
CMAKE_<LANG>_COMPILER: Full path for the compiler.
CMAKE_AR: Full path for the archiving tool for static libraries.
CMAKE_RANLIB: Full path for the randomizing tool for static libraries.
CMAKE_LINKER: Full path for the linker. Note that for most platforms, CMake uses the compiler for linking. This can be changed in the platform files overriding the linking rules.
CMAKE_<LANG>_FLAGS_INIT: Flags for the compiler.
CMAKE_SHARED_LINKER_FLAGS_INIT: Flags for the linker.
COMPILER_WARNING_FLAGS_C: Flags to enable warnings in the C compiler.
COMPILER_WARNING_FLAGS_CXX: Flags to enable warnings in the C++ compiler.
WARNING_AS_ERROR_FLAG: Flags to enable treat warnings as errors.
Usually it’s enough to specify the compilers. CMake will internally search for the tools: ar, ranlib and the linker from the directory containing the compiler.
5.2.1.2. Cross-compiling
CMAKE_SYSTEM_NAME: Target platform name. Usually output from uname -s. Used by CMake to load the platform configuration files under Platform/${CMAKE_SYSTEM_NAME}. Setting this variable means cross-compiling and CMake sets CMAKE_CROSSCOMPILING.
CMAKE_SYSTEM_VERSION: Target platform version. Usually output from uname -r. Not used by CMake.
CMAKE_SYSTEM_PROCESSOR: Target CPU name. Usually output from uname -p. Used to load options for the compiler.
CMAKE_SYSROOT: Path to pass to the compiler in the –sysroot flag.
5.2.1.3. VxWorks® 7 System Example
For reference, an experimental toolchain file for cross-compiling a VxWorks 7 architecture (pentium64Vx7.0gcc4.8.1_rtp) is provided with Connext TSS.
Some variables specific to building VxWorks:
VXWORKS_SYSTEM_MAJOR_VERSION and VXWORKS_SYSTEM_MINOR_VERSION: Version of the target VxWorks system. This is used to validate the toolchain loaded and as part of some flags.
VXWORKS_SYSTEM_PROCESSOR_TYPE: Type of the processor to be used as part of the toolchain paths and tools name. For instance: ppc for PPC32 and arm for ARMARCH7.
VXWORKS_RTP: If the target architecture is RTP or Kernel (default).
VXWORKS_VFP: If the target contains a VFP module like for armv7aVx6.9gcc4.3.3.
VXWORKS_MUNCH: Munch tool path or binary name. Default value is wtxtcl.ex.
VXWORKS_MUNCH_FLAGS: Munch tool flags. Default value set internally.
VXWORKS_EXE_LINKER_${lang}_FLAGS: Where ${lang} can be C or CXX. Since we need different linker flags for C and C++ in some VxWorks, we use this variable because CMake does not provide a CMAKE_${lang}_LINKER_FLAGS. This variable must be set through VXWORKS_EXE_LINKER_${lang}_FLAGS_INIT.
VSB_DIR: Path to the VxWorks Source Build directory. It is mandatory in VxWorks 7 and optional in prior versions.
5.3. Porting Connext TSS to VxWorks® 653 Systems
5.3.1. Building Connext TSS
This section explains how to create a Connext TSS library for a VxWorks 653 3.0.1.1 target platform using CMake.
Make sure CMake is in the PATH environment variable.
Set the following environment variables:
RTIMEARCH=ppce6500Vx653-3.0.1.1gcc4.3.3
RTIMEHOME=<path/to/connextmicro lib and include folder>
RTITSSARCH=ppce6500Vx653-3.0.1.1gcc4.3.3
RTITSSHOME=<path/to/face_tss>
Set the environment for VxWorks 653 3.0.1.1:
<Path to VxWorks 653 3.0.1.1 installation>/wrenv.sh -p vxworks653-3.0.1
Change directory to RTITSSHOME.
Create a build directory and change to it. For example
mkdir $RTITSSHOME/build
cd $RTITSSHOME/build
Execute the following command to configure CMake and generate the Makefile:
cmake -DRTI_CONNEXT_TYPE=micro -DRTI_TSS_ENABLE_FACE_COMPLIANCE=SafetyBase -DCMAKE_BUILD_TYPE=<Debug|Release> ..
Execute the following command to build the libraries:
cmake --build .
The Connext TSS libraries will be available at the following location:
$RTITSSHOME/lib/$RTITSSARCH/micro
5.3.2. Create and set up an application project
This section will guide you through the process of creating Connext TSS VxWorks 653 application projects on Wind River® Workbench.
Ensure that the Connext TSS and Connext DDS Micro libraries are built.
Open Wind River Workbench.
Create a new Module Integration Project:
Click on File → New → Wind River Workbench Project.
Select target operating system: “VxWorks 653 3.0.1.1”.
Select “Module Integration Project”.
Type in a project name.
Select board support package: “fsl_t2080_qds”.
Recommended: Add partitions here by clicking on Add and select “Independent Cert OS”. The application configuration and operating system projects are created automatically and steps 2 - 5 can be omitted.
Click Finish.
Create a new Partition Application Project:
Click on File → New → Wind River Workbench Project.
Select target operating system: “VxWorks 653 3.0.1.1”.
Select “Partition Application”.
Type in an application name, e.g. “part1_app”.
Click Finish.
Drag the new application project into the Module Integration Project.
Create a new Partition Configuration Project:
Same as the previous step, but select “Partition Configuration” and, for instance, “part1_cfg” as an application name.
Create a new Partition Operating System Project:
Click on File → New → Wind River Workbench Project.
Select target operating system: “VxWorks 653 3.0.1.1”.
Select “Partition Operating System”.
Type in a name, e.g. “part1_pos”.
Select Based on: “a board support package”.
Select BSP: “fsl_t2080_qds”.
Select “Independent Cert OS”.
Click Finish.
Drag the new POS project into the Module Integration Project.
Right-click on the application project → Properties → Project References, check the box of the new POS project and click OK.
Repeat the previous three steps for all applications that are needed.
5.3.3. Create partitions, ports, and channels
Add Partitions (If all partitions were created during the creation of the Module Integration Project, this step can be omitted)
Open “Module Configuration”, click on the Partitions tab and click Add → Partition.
Select a name.
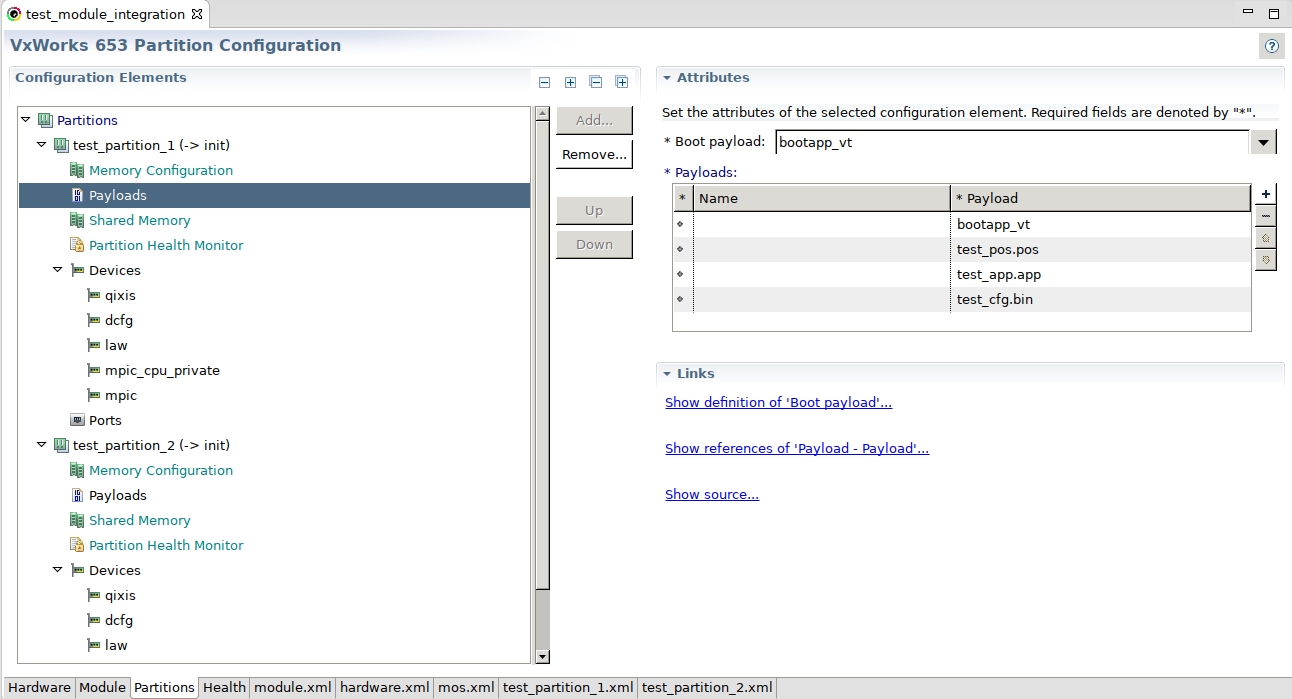
In Payloads, add the application, configuration, and operating system projects created above. This can be done directly when creating the partition or in the module configuration, as shown below:
Repeat for as many partitions as needed.
Create Ports
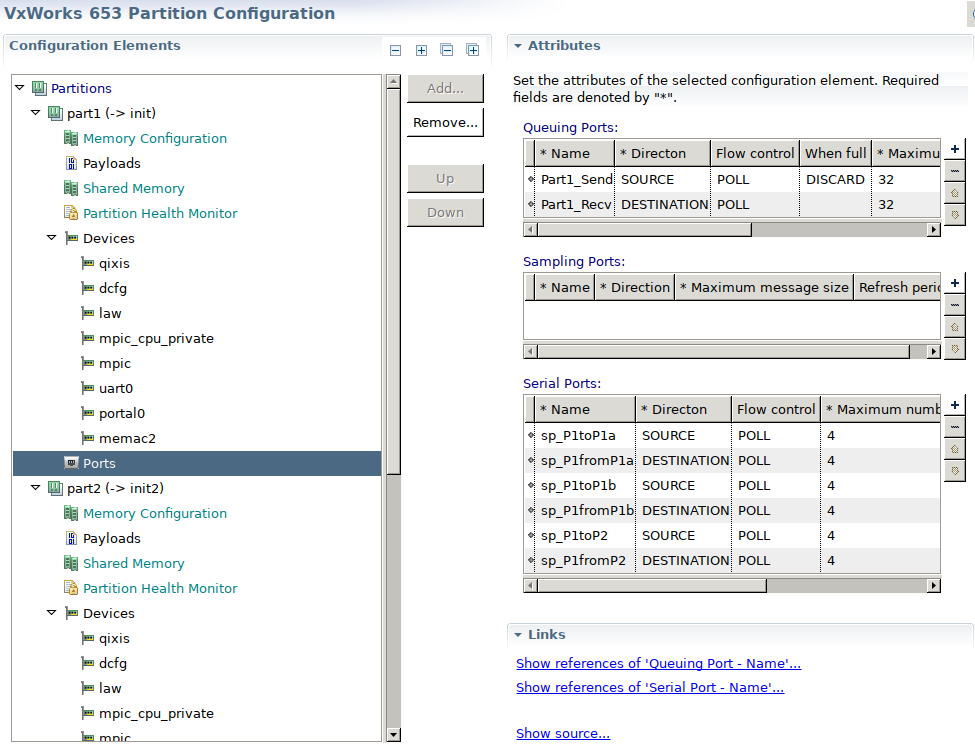
In the Partitions tab, click on Ports for one of the new partitions.
Add ports by clicking on the + sign.
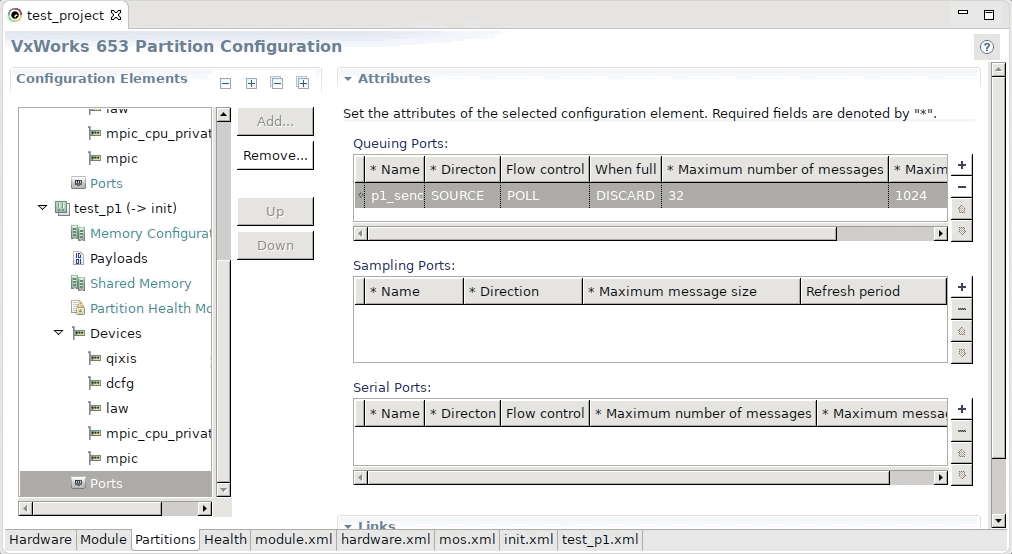
Queuing ports are used for inter- or intra-partition communication. Serial ports are used to log output to the AMIO console. For the partition that is used for communication, two intra send and receive serial ports are needed as well as one send and receive serial port for channels to the other partitions. For instance (two partitions):
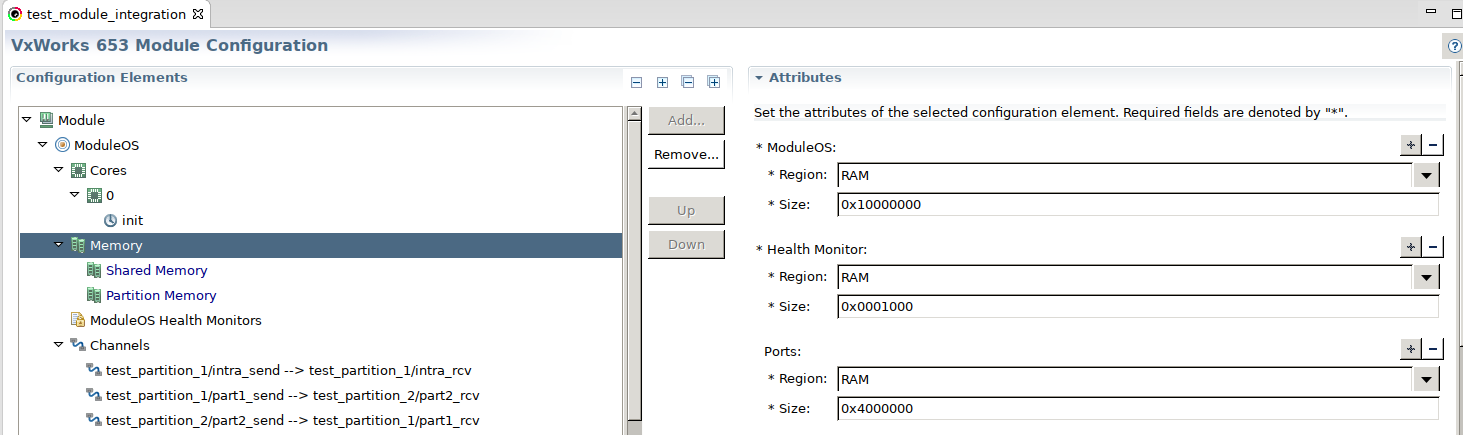
Go to the Module tab and set the Memory configuration for the ports:
Create Channels
In the Module tab click on Channels → Add and select the source and destination partition and ports:
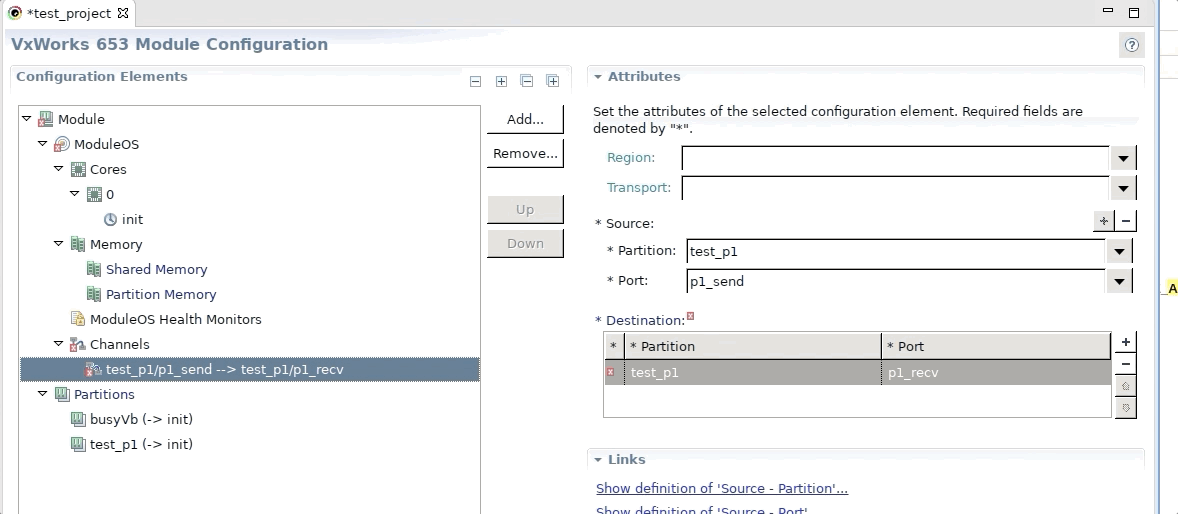
Create channels between the serial ports used to view output with the AMIO console.
Kernel Configuration
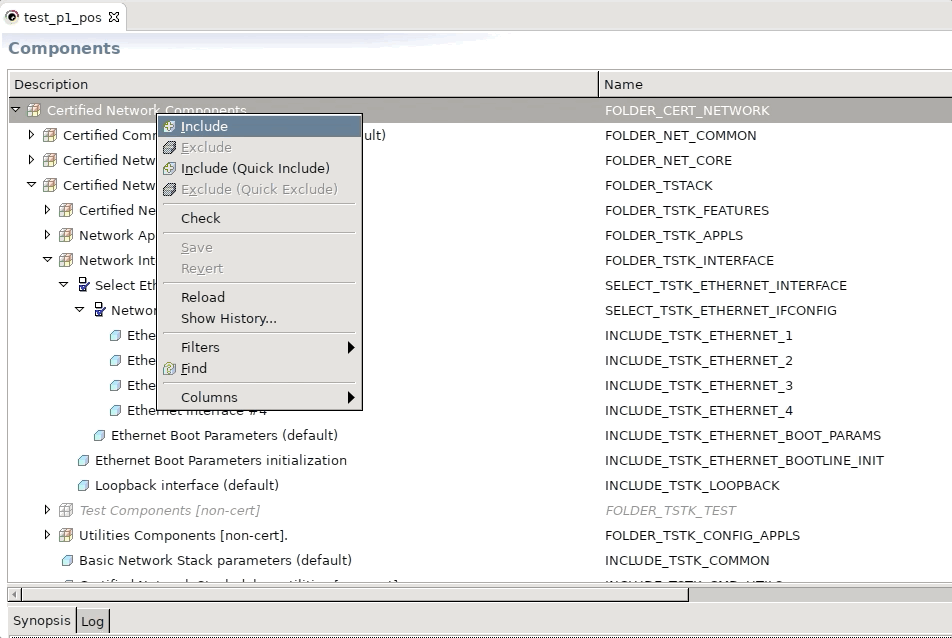
Open the Kernel configuration of the POS project.
Right-click on “Certified Network Components” and click Include → Next → Finish
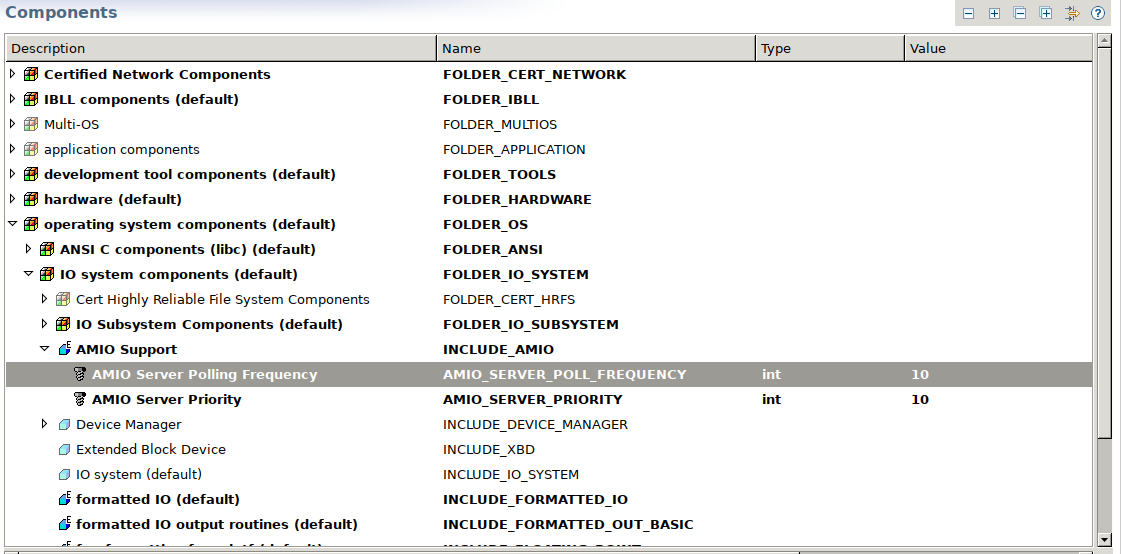
For one of the partitions, set AMIO_SERVER_POLL_FREQUENCY to a non zero value (e.g., 10) and add the serial device, e.g., “uart0” (in module configuration → Partitions → Devices).
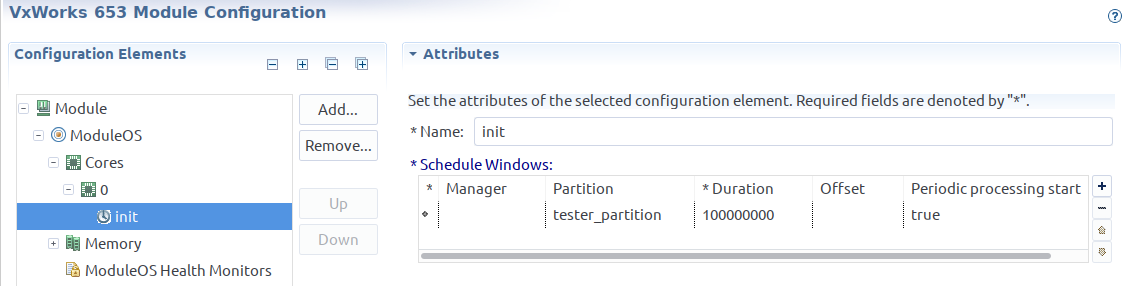
In the module configuration, set “Periodic processing start” to true.
Note
We recommended testing the configuration at this point (before adding any application code and dependencies). To do so, add a print command in the function “_653AppEntry” (653Application.c) and check the output on the AMIO console.
5.3.4. Add dependencies and defines
Add Include Paths to Build Properties:
Right-click on Application project → Properties → Build Properties → Paths.
Add
-I<Absolute path to TSS installation directory>/include. Click OK.
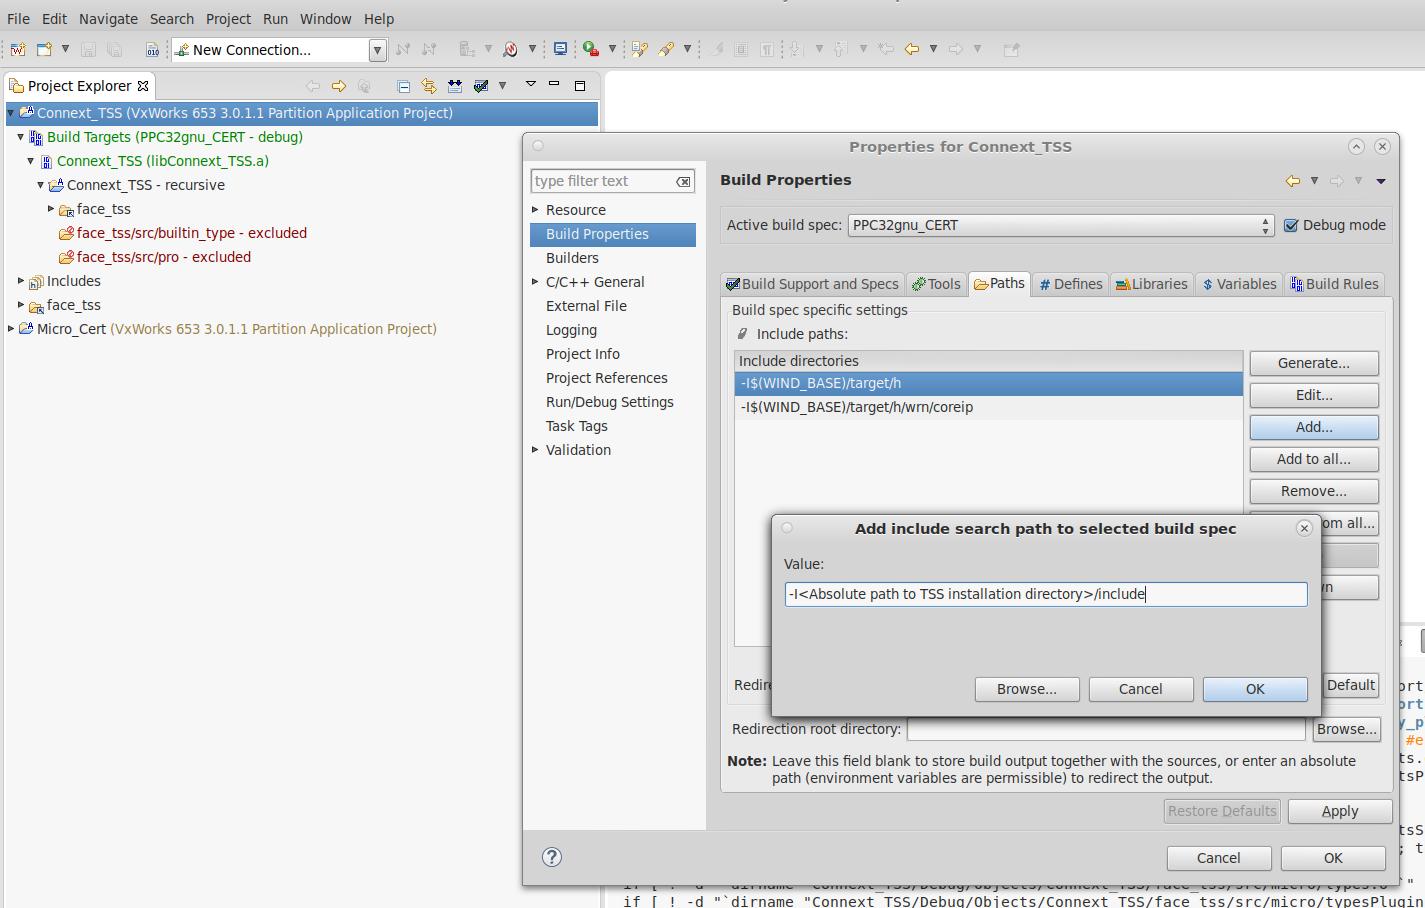
Repeat the previous two steps for the following:
-I<Absolute path to TSS installation directory>/include/micro.-I<Absolute path to TSS installation directory>/include/micro/FACE.-I<Absolute path to Micro installation directory>/include/rti_me.
Add Defines to Build Properties:
Right-click on Connext_TSS project → Properties → Build Properties → Defines.
Add
-DRTI_ARINC653=1. Click OK.
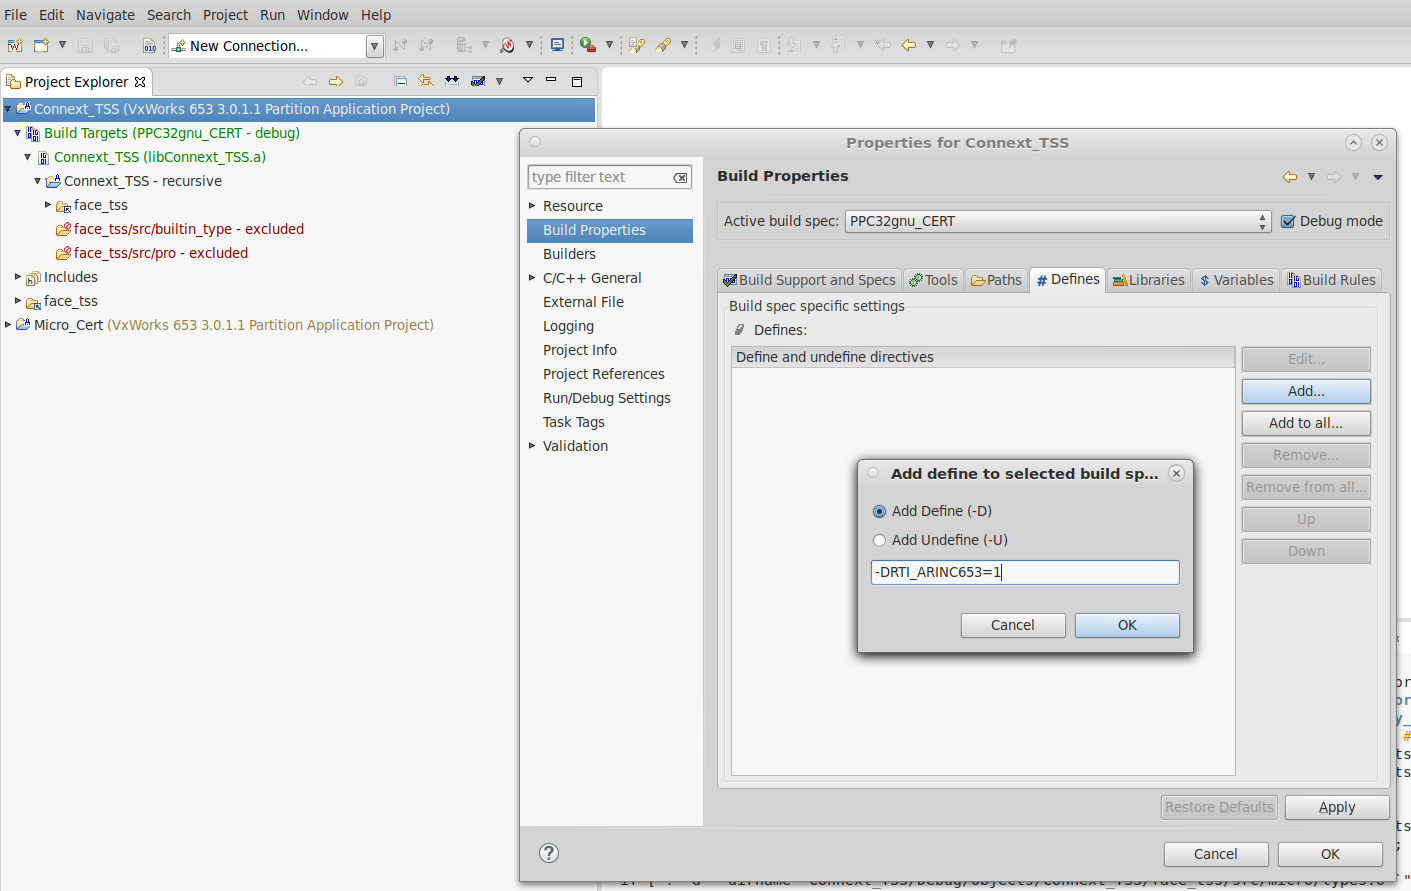
Repeat the previous two steps for the following:
-DRTI_VXWORKS.-DRTI_VX653=3011.-DRTI_ENDIAN_BIG.-DRTI_DPSE.-DRTI_APP_ENABLE_UDP=1.-DRTIME_TARGET_NAME='"ARINC653"'.-DRTI_CERT.-DOSAPI_INCLUDE_ARINC653=1.-DENABLE_FACE_COMPLIANCE=FACE_COMPLIANCE_LEVEL_SAFETY_BASE.-DLOG_FILE_TYPE=LOG_FILE_STDOUT.-DRTI_CONNEXT_MICRO.-DRTI_STATIC_BUILD.-DFACE_SEQUENCE_AND_STRING_IMPLEMENTED.
Add Micro Library to Build Properties:
Right-click on Connext_TSS project → Properties → Build Properties → Libraries.
Select “Add fully qualified library file” and input the path to the Connext DDS Micro library, i.e.
Absolute path to Micro installation directory>/lib/ppce6500Vx653-3.0.1.1gcc4.3.3/librti_mez[d].a.

Repeat the previous step for the Connext TSS library
Absolute path to TSS installation directory>/lib/ppce6500Vx653-3.0.1.1gcc4.3.3/micro/librti_tsscppz[d].a.Click OK.
5.4. Porting Connext TSS to Deos™ ARINC™ 653 Systems
This section explains how to create a Connext TSS Shared Object library for a Deos ARINC 653 target platform using CMake.
Make sure CMake is in the PATH environment variable.
Open the build environment by opening DDC-I DESK Console.
Before building the Connext TSS libraries, make sure you have already built the Connext DDS Micro library. For more information, see section “5.5. Compiling the Connext DDS Micro Source for Deos 653” in the Connext DDS Micro Platform Notes.
Set the following environment variables:
set RTIMEARCH=ppce6500Deos653-10.3.1gcc7.3.0
set RTIMEHOME=<path\to\connextmicro lib and include folder>
set RTITSSARCH=ppce6500Deos653-10.3.1gcc7.3.0
set RTITSSHOME=<path\to\face_tss>
Change directory to
%RTITSSHOME%.Create a build directory and change to it. For example
mkdir %RTITSSHOME%\build
cd %RTITSSHOME%\build
Execute the following command to configure CMake and generate the Makefile :
cmake -DRTI_CONNEXT_TYPE=micro -DRTI_TSS_ENABLE_FACE_COMPLIANCE=SafetyBase -DCMAKE_BUILD_TYPE=Release -G "Unix Makefiles" -DCMAKE_VERBOSE_MAKEFILE:BOOL=ON -DRTI_EXCLUDE_UDP=TRUE -DBUILD_SHARED_LIBS=FALSE -DBUILD_STATIC_LIBS=TRUE -DFACE_SEQUENCE_AND_STRING_IMPLEMENTED=False ..
Note
If building the SafetyBase libraries to use external or third party versions of the string and sequence classes, see Section 4.6 Using third-party strings and sequences for instructions to add a build flag and setup the appropriate directories with the third party files.
Execute the following command to build the libraries :
cmake --build .
The Connext TSS libraries will be available at the following location in a Deos search path configuration:
%RTITSSHOME%\lib\%RTITSSARCH%\micro
5.5. Porting Connext TSS to VxWorks® 7 Systems
This section describes how to build Connext TSS for Wind River® VxWorks 7, as well as how to build and run Connext TSS applications in that OS.
Before starting to build Connext TSS, Connext DDS Pro must be installed.
5.5.1. Set up the environment
There are multiple environment variables that need to be set in order to build Connext TSS.
First, the ones needed by Wind River VxWorks 7:
WIND_HOME: path to the machine’s toolchain. Usually, it’s inside
/opt/toolchains.RTITSSARCH: the Connext TSS architecture to build for.
NDDSARCH: the Connext DDS Professional architecture to build for.
WIND_PLATFORM: the Wind River platform you are building for, e.g.: vxworks-dkm-llvm-7 for DKM mode or vxworks-rtp-llvm-7 for RTP mode.
WIND_LLVM_PATH: the llvm compiler that will be used, usually inside
${WIND_HOME}/compilers.WIND_HOST_TYPE: the platform of the host of the cross-compilation, e.g.: LINUX64.
WIND_LLVM_HOST_TYPE: the platform used by the compiler. It can be the same as WIND_HOST_TYPE.
WIND_BASE: the folder that contains the VxWorks7 host.
WIND_UTIL_PATH: path to Wind River utilities, usually inside
${WIND_HOME}/utilities.VSB_DIR: path to the VSB to use.
WIND_FOUNDATION_PATH: path to the VxWorks7 host folder.
WIND_VX7_HOST_TYPE: the host platform in VxWorks7 format, e.g.: 86_64-linux.
LD_LIBRARY_PATH: updated to also include
${WIND_FOUNDATION_PATH}/${WIND_VX7_HOST_TYPE}/lib.
Then, the ones needed for Connext TSS. They are also described in Section 4.2 Configure build environment.
NDDSHOME: path to Connext DDS Pro’s root folder.
NDDSARCH: Target architecture for Connext DDS Pro
RTITSSHOME: path to face_tss root folder.
RTITSSARCH: Target architecture.
And, finally:
PATH: must be updated to also include
${WIND_LLVM_PATH}/${WIND_HOST_TYPE}/binand${NDDSHOME}/bin.
5.5.2. Build Connext TSS
Follow these steps:
Export the mentioned environment variables according to the architecture you are building for.
Go to the Connext TSS root folder.
Create a build directory.
Go inside the build folder.
Configure the cmake build specifying Pro as the Connext DDS type by means of the RTI_CONNEXT_TYPE define and specifying FACE compliance by setting the RTI_TSS_ENABLE_FACE_COMPLIANCE.
Build with cmake.
Here’s an example of steps 5 and 6:
cmake -DRTI_CONNEXT_TYPE=pro -DCMAKE_BUILD_TYPE=<Debug/Release> -DRTI_TSS_ENABLE_FACE_COMPLIANCE=GeneralPurpose ..
cmake --build .
In order to build for an specific architecture, dedicated cmake files are needed.
They can be found in resource/cmake/Toolchains/Architecture and
resource/cmake/Modules/ProjectOptions/Architecture. The Connext TSS bundle currently
provides the cmake files for armv8Vx7SR0660llvm10.0.1.cortex-a53 and
armv8Vx7SR0660llvm10.0.1.cortex-a53_rtp.
5.5.3. Compile the TSS application
In the example folder of the Connext TSS bundle, there are three example applications for VxWorks7:
hello_goodbye_dkm_static: an adaptation of the hello_goodbye example to work with VxWorks7 in DKM mode.
hello_goodbye_rtp_static: also an adaptation of the hello_goodbye example, this time to work for VxWorks7 on RTP mode.
hello_goodbye_rtp_dynamic: same as * hello_goodbye_rtp_static, but using shared linking with Connext DDS Pro libraries.
Specific details about how to build and run each one of these examples can be found in the README file located inside the folder of each example.
rtiddsgen, the tool used to generate code, uses Java to work. Therefore, it’s
necessary to specify a path to a Java installation by means of the JREHOME environment
variable. For example, the Connext DDS Pro installation comes with a Java executable in
it, which can be found at: <Pro installation path>/resource/app/jre/<host architecture>.
As long as your app is prepared for building through cmake, you can follow these steps:
If not done before, export the necessary environment variables listed in Section 5.5.1 Set up the environment, as well as the above-mentioned JREHOME environment variable.
Create a build directory.
Get inside the build directory.
Configure the build through cmake pointing to the parent folder.
Build with cmake.
The build process of an app is the same as for Connext TSS:
cmake -DRTI_CONNEXT_TYPE=pro -DCMAKE_BUILD_TYPE=<Debug/Release> -DRTI_TSS_ENABLE_FACE_COMPLIANCE=GeneralPurpose ..
cmake --build .
5.5.4. Run the TSS application
5.5.4.1. In DKM mode
Building an application for DKM mode produces a shared object library (.so file) that can be loaded into the kernel space from the target machine. Once this is done, you can invoke any of its functions from any directory as long as you’re in the same session. In order to avoid errors, all the files needed by the application (such as the QoS XML file or the security files) have to be in the working directory when executing the function.
To load the modules of a shared library, the ld command is used:
ld 1< <shared object library to load>
Once they are loaded, you can invoke the entry function by means of the
taskSpawn command. This command receives a series of possitional arguments:
taskSpawn "<name to give to the task>", <priority>, <flags>, <stack size>, <function to execute>, <input parameters for the function>
<priority>: the priority assigned to the task. It has to be within the range [0, 255], 0 being maximum priority and 255 minimum priority.
<flags>: flags to pass to
taskSpawnto configure its execution. They have to be expressed in hexadecimal format. It is recommended to use 0x1000000, which corresponds to VX_FP_TASK, which means that the task is going to be executed in floating point mode.<stack size>: size of the stack that the app is going to use, expressed in bytes.
<function to execute>: the name of the function to execute.
<input parameters for the function>: input parameters to pass to the function being called, separated by commas.
The following snippet shows an example call to taskSpawn:
taskSpawn "hello_world_publisher", 100, 0x1000000, 250000, hello_goodbye_publisher, 10, 131
Where 10, 131 are input parameters for the entry function hello_world_publisher.
It’s important to note that, when a .so file is loaded, its modules will stay loaded
even after that same file is reloaded. For this reason, it is relevant to always
check which modules are loaded, and to unload any modules that could cause conflicts.
For this reason, it is recommended to invoke moduleShow to check which modules
are currently loaded.
The command unld let’s you unload a module:
unld <ID of the module to unload>
The ID of the module is the value indicated in the second column of the output of
moduleShow, MODULE ID.
5.5.4.2. In RTP mode
The biggest difference with respect to DKM mode is that the build process doesn’t yield a .so file as a result, but a .vxe one. This kind of executable needs several libraries at runtime:
First, OS libraries for C, C++, cryptography, and compilation are needed. These
files are usually located under <path to VSB>/usr/lib/common:
libc.so.1
libcplusplus.so.1
libnet.so.1
libcrypto.so.1
libllvm.so.1
libllvmcplus.so.1
If the Connext DDS Pro libraries are linked dynamically, the following libraries are also needed:
libnddsc.so
libnddscore.so
libnddssecurity.so (only if security plugins are used).
They can be found under lib/armv8Vx7SR0660llvm10.0.1.cortex-a53_rtp inside
your Connext DDS Pro installation.
It is recommended to copy these libraries to a common directory that can be referenced during the execution.
A .vxe file is a regular executable file, which means that it can only be executed from the directory it is placed in. As in DKM mode, every file needed by the application has to be in the working directory during the execution to avoid errors.
In order to run an app in RTP mode, it’s recommended to use the command rtp exec:
[cmd] rtp exec -e "<environment variables>" -u <stack size> <.vxe file to execute> -- <app arguments>
You only need to preceed this command with cmd if you are not in
command-interpreter mode.
Regarding the arguments:
<environment variables>: environment variables to define for the executable, such as LD_LIBRARY_PATH, which has to point to the directory where the listed libraries are located.
<stack size>: size of the app’s stack, expressed in bytes.
<app arguments>: arguments to pass to the app. Note that, contrary to DKM mode, you are not calling a function, which means that the regular command line input can be used and there’s no need to use commas between the arguments.
rtp exec is parallel to the function rtpSpawn() from rtpLib. This way, the
same values used for the input parameter options can be used for -o, and the
same applies to uStackSize and -u. Also, additional and optional parameters,
such as priority or options, can be used in rtp exec if needed.
The following snippet shows an example of how to exeucte an app in RTP mode:
cmd rtp exec -e "LD_LIBRARY_PATH=<path to directory with needed libraries>" -u 0x50000 hello_goodbye_app.vxe -- -pub -id 131
Where -pub -id 131 are the command line arguments of the executable.