5. Advanced Configuration of the RTI Connext DDS Plugin for PlotJuggler
5.1. The RTI Connext DDS Configuration Dialog
The RTI Connext DDS Configuration Dialog opens each time that you start the RTI Plugin. This window provides most of the configuration options allowing the RTI Plugin to join the DDS domain, selecting the Topics to subscribe, and so on.
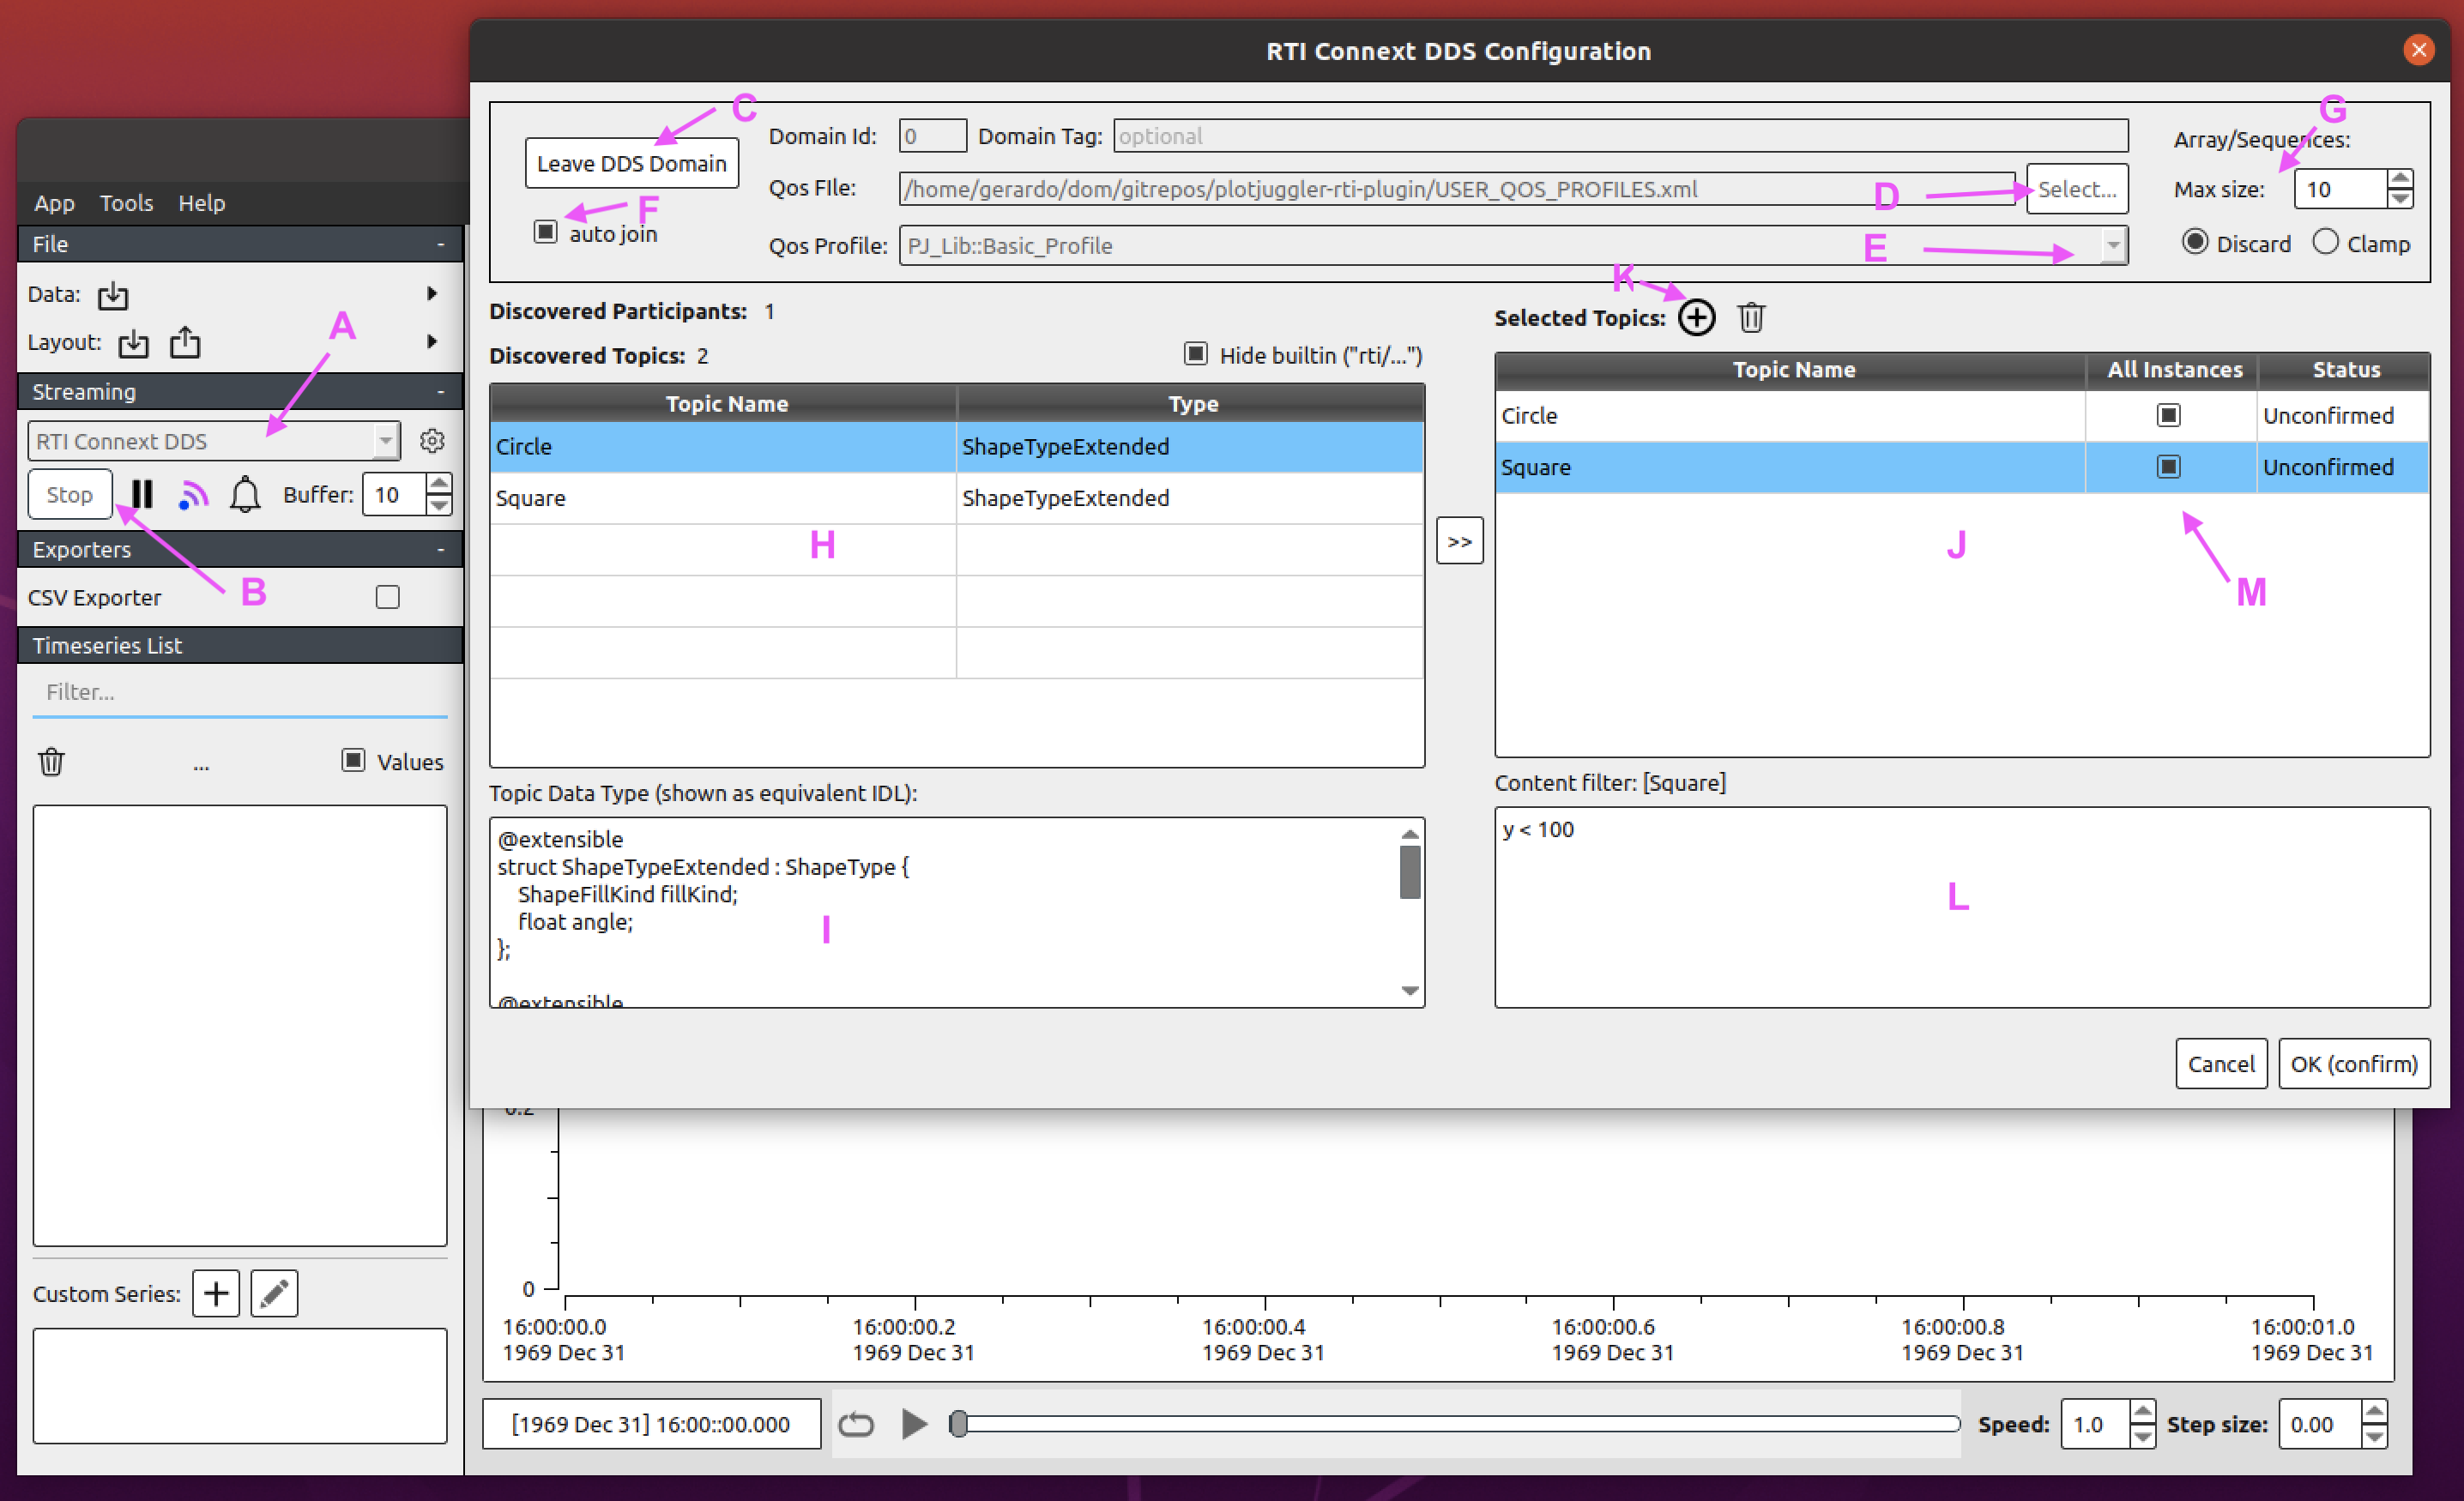
Figure 5.1 RTI Connext DDS Configuration Dialog
5.1.1. Choosing the DomainId, DomainTag, and Qos Profile
The first thing to do is create the DDS DomainParticipant in order to join a DDS Domain. This is done by clicking in the “Join DDS Domain” button (C). Before doing it, you may want to change the “Domain Id”, “Domain Tag”, and “Qos Profile” from their default values.
Once the DomainParticipant has been created the button changes to “Leave DDS Domain”. If you want to join a different DDS Domain you must first leave the DDS Domain (which will delete the DDS DomainParticipant), change the Domain Id, optionally the Domain Tag and Qos Profile, and join the DDS Domain again.
By default the DomainParticipant will use a builtin profile called “PJ_Lib::Basic_Profile.” To use a different profile, use the “Select…” button (D) to select a XML file containing additional Qos profiles.
The XML file will be parsed and any QoS profiles found in the file will appear in the “Qos Profile” pulldown menu (E) and you can select one of them.
5.1.2. Autojoin option
You may check the “auto join” checkbox (F) to join the DDS Domain automatically whenever you open the RTI Connext DDS Configuration dialog. PlotJuggler will remember the last configuration used and join the DDS Domain using the same settings.
5.1.3. Maximum size of arrays and sequences
PlotJuggler limits the maximum size of the arrays and sequences that appear inside DDS Topics. If your Topic contains arrays or sequences, you may want to change the default value of the maximum. The value of the maximum can specified in the Max Size spin box found under the “Array/Sequence settings” (G). When data is received containing an array or sequence that exceeds the specified maximum size, the behavior depends on the setting of the Discard and Clamp choice buttons.
If the clamp choice is selected, the array (or sequence) will be truncated leaving only the elements below the maximum which will appear in the time-series.
If the discard choice is selected, the whole array (or sequence) will be discarded and none of the elements will appear in the time series.
The value of maximum size is interpreted differently for multi-dimensional arrays and sequences:
For
arraysthe maximum size applies across all dimensions (i.e. as if the array was flattened into a single dimension). For example, assume clamp is chosen, the maximum size is set to 6, and PlotJuggler receives a 4x4 two-dimensional array (e..int32 a[4][4];) you will get the following 6 elements in the time-series:
a[0][0], a[0][1], a[0][2], a[0][3],
a[1][0], a[1][1]
For
sequencesthe maximum size applies independently to each dimension (i.e. there is no flattening). For example, assume clamp is chosen, the maximum size is set to 6, and PlotJuggler receives a 10x10 two-dimensional sequence (e.g.sequence<sequence<int32, 10>, 10> seq;) you will get the following 60 elements in the time-series:
seq[0][0], ... seq[0][5],
seq[1][0], ... seq[1][5],
...
seq[9][0], ... seq[9][5]
5.2. Discovered versus Selected Topics
At the center of the dialog you will notice two main tables: - The “Discovered Topics” table (H), on the left side. - The “Selected Topics” table (J), on the right side.
5.2.1. Discovered Topics Table
The “Discovered Topics” table (H), contains the DDS Topics that are
(fully) discovered in the DDS Domain.
This table will be empty if you have still not joined the DDS Domain.
Each time you select a Topic in this table you will see the associated
Data Type in the “Topic Data type (shown as equivalent IDL)” area below
(I). Only “fully discovered” topics are shown. To be “fully discovered” DDS
must have discovered a DataWriter for the Topics as well as the data-type
associated with the Topic.
If you have joined a domain and do not see some of the Topics that are being published, you can use RTI Admin Console to check whether the type information is being propagated or not.
For each Discovered Topics you can see the current number of discovered DataWriter for the Topic. Once fully discovered the Topic is remembered and kept in the table even if all DataWriters go away. In this case you will see the number shown the Writers column become 0.
5.2.2. Selected Topics Table
The “Selected Topics” table (J), contains all the topics that are either subscribed or are intended to be subscribed.
Topics are placed into the “Selected Topics” the following ways:
Double-clicking on the Topic name on the “Discovered Topics” table.
Selecting a set of topics in the “Discovered Topics” table and then clicking the “>>” arrow between the two tables in order to “push” the topic(s) to the “Selected Topics” table.
Type the Topic name manually using the “(+)” to the right of “Selected Topics” label (K). This method is useful to add topics that have not been discovered yet.
Upon re-start PlotJuggler remembers the set of topics that were selected the last time the tool was run and automatically adds them to the “Selected Topics” table.
Regardless of the method, when a topic is first added to the “Selected Topics” table, it is always placed in the Unconfirmed state. PlotJuggler will not try to subscribe to the Topic until you “confirm” this selection by clicking on the OK (Confirm) button. See below.
The second column of the “Selected Topics” table, called “All Instances” contains a checkbox (M). The use if this checkbox is explained later in section “Instance filtering.”
The third column of the “Selected Topics” table, called “Status” indicates the status of each selected topic:
Unconfirmed. The Topic was added to the “Selected Topics” table but the “OK (Confirm)” button has no been pressed to confirm the addition. These Topics are retained in the “Selected Topics” table but PlotJuggler will not try to subscribe to them until they are ‘confirmed’ by pressing the “OK (Confirm)” button at the bottom of the dialog.
Undiscovered. The Topic selection has been confirmed, but the Topic has not been fully discovered yet. PlotJuggler will subscribe to it soon as a the Topic is “fully discovered” meaning both a DataWriter of the Topic and the corresponding Data Type have been discovered.
Subscribed. The Topic is subscribed to and its data is visible to PlotJuggler, subject to any specified instance and content filters. In this case the number of matched writers is indicated as well.
In some cases you may observe that even if a Topic is subscribed, the number of matched writers shown in the “Selected Topics” table, is not the same as the number of writers in the “Discovered Topics” table. This indicates that is some incompatibility between some of the DataWriters and the DataReader that PlotJuggler has created. Those “incompatible” DataWriters will not be counted in the “Selected Topics” ‘matches’. If you observe this, you may use
RTI Admin Console to determine the reason for the incompatibility.
Additionally, you can add a Content Filter to your topics in “Content Filter” area (L). In order to enter a Content Filter you must select the corresponding Topic in the “Selected Topics” table.
5.3. Instance filtering
If the data-type associated with a Topic has annotated any field(s) as “key”, then the Topic can have multiple instances associated with it.
In the example above, we can see how the topic “nested_keys” has two key fields called “code” and “key”. For these “keyed” Topics, PlotJuggler will create a separate time series for each Topic Instance.
In the example shown we see that the left time series area (A) has 4 labels created to identify the 4 different instances discovered:
[code=1; key=10;]
[code=1; key=20;]
[code=2; key=10;]
[code=2; key=20;]
By pressing the gear button (B) and selecting “Configure topic instance (key) filters”, you will open the “Topic instance (key) filters” dialog C, that allows configuring the set of instances that are read by PlotJuggler.
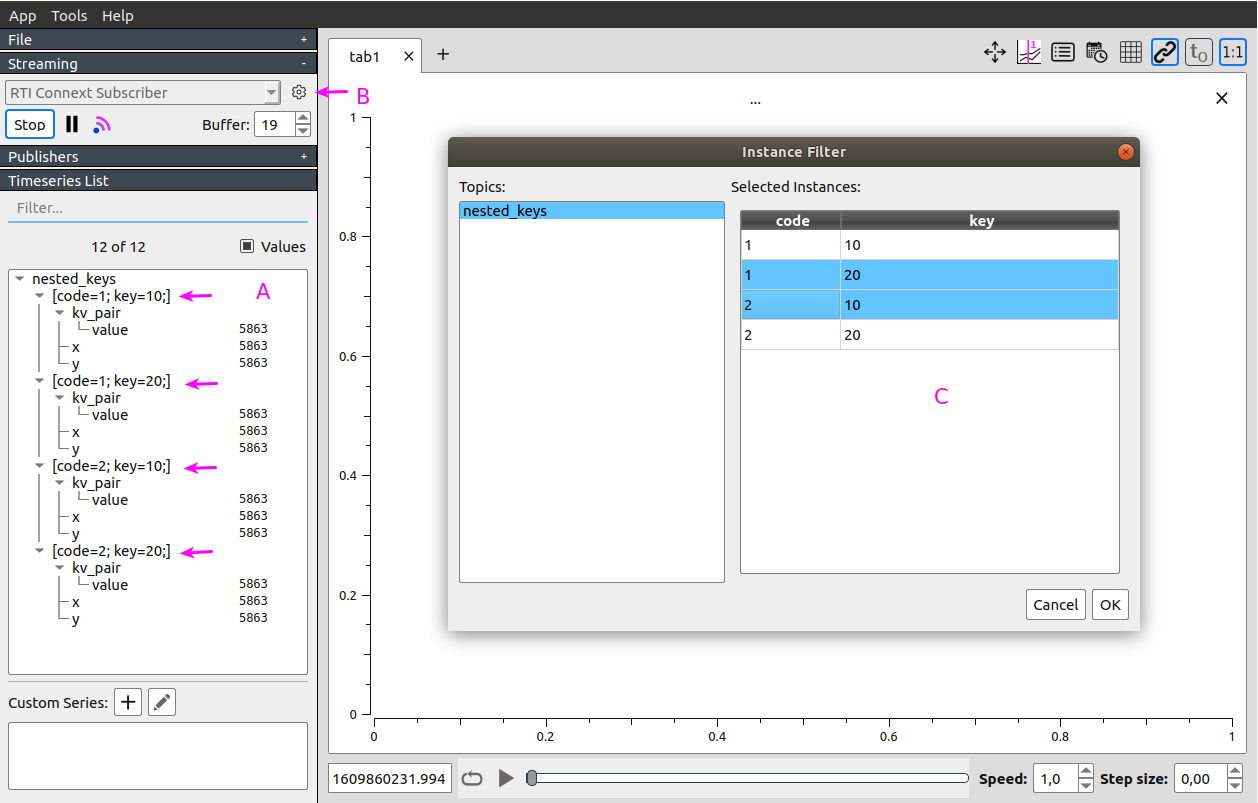
Figure 5.2 Instance Filter
The default behavior of PlotJuggler when new instances are discovered for subscribed topics depends on whether the checkbox “All Instances” was checked for the corresponding Topic:
If the checkbox was checked, newly discovered instances will be read by default (subject to passing the content-filter specified on the Topic, if any).
If the checkbox was not checked, newly discovered instances will be not read by default.
Independent of the default behavior, you can always select manually which instances are read. This is also done using the “Topic instance (key) filters” dialog.
Note that if the data-type associated with a Topic does not define any key fields, then the “All Instances” checkbox is ignored and the Topic will not appear in the “Topic instance (key) filters” dialog.
## Instance lifecycle
For topics that defined some fields as “key” the corresponding instances can
transition from being ALIVE to being NOT_ALIVE.
An instance is ALIVE when it has a matched DDS DataWriter that is actively writing it. It initially becomes
ALIVEwhen it is first discovered and remains in that state until there is an event that causes it to becomeNOT_ALIVE.- An instance becomes NOT_ALIVE when one of two things happen:
A DDS DataWriter “disposes” it. That happens if it calls the
DataWriter::dispose()operation on the instance. In this case the instance is transitioned to theNOT_ALIVE_DISPOSEDstate.All the DDS DataWriters that were writing the instance either unregister the instance (i.e. call the
DataWriter::unregister()operation on the instance) or, alternatively, “disappear from the system”. A DataWriter “disappears” if is deleted or loses its liveliness. In this case the instance is transitioned to theNOT_ALIVE_NOWRITERstate.
If data is received on an instance that is in a NOT_ALIVE state it will
transition back to the ALIVE state.
Note that DDS DataWriters may configured with a QoS setting that specifies to
“auto dispose unregistered instances” in this case when the DataWriter is
deleted, it will automatically dispose all the instances the DataWriter was
writing. In this case so you may see transitions to the NOT_ALIVE_DISPOSED
when those DataWriters are deleted even if they never called
DataWriter::dispose() explicitly.
When an instance transitions to a NOT_ALIVE state, all the associated
time-series are colored in red to indicate that there the instance is not
alive and no data will be received. Hovering the mouse cursor over the time
series brings up a tooltip that indicates whether the instance is in the state
NOT_ALIVE_DISPOSED or NOT_ALIVE_NOWRIT0ERS.
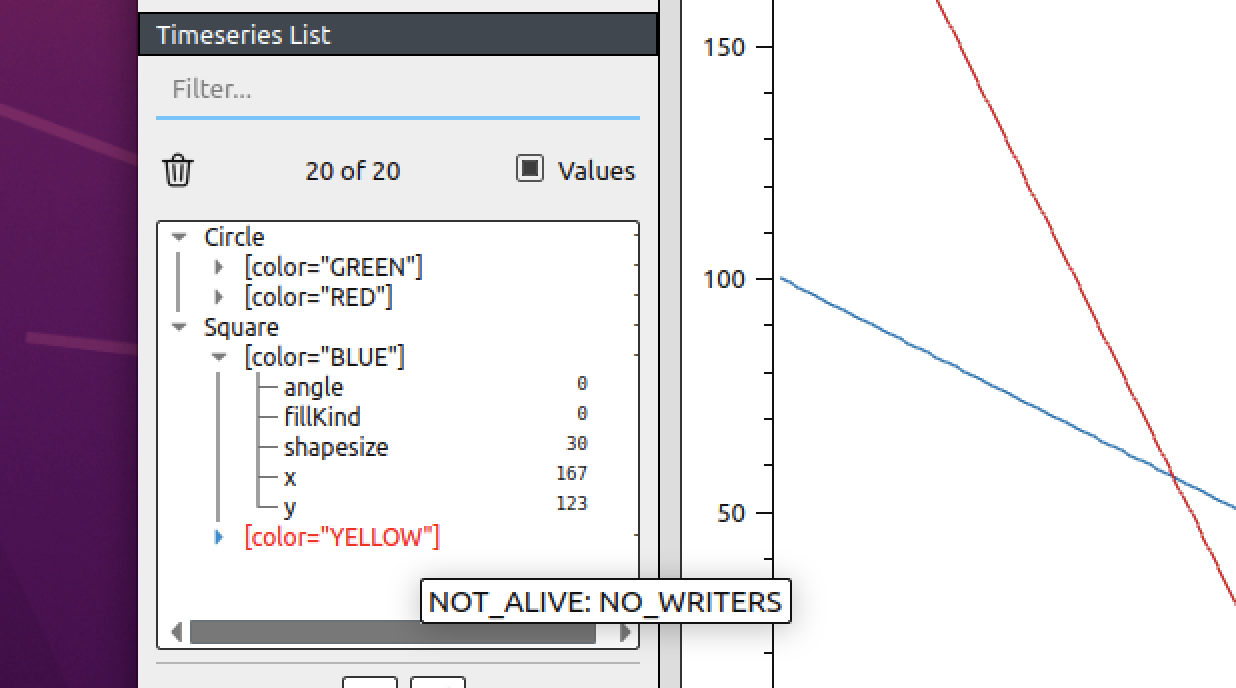
Figure 5.3 Tree View Not Alive
The “Topic instance (key) filters” dialog shows instances even if they are
in a NOT_ALIVE state. This allows you to select the behavior in case the
instance transitions to ALIVE again.
5.4. Connext DDS Notifications
The RTI Plugin generates notifications and log messages informing the user of events of interest, such as, discovery of new Topics and Instances, addition or removal of content filters, etc.
The presence of notifications is indicated by a bell button on the main window below the combobox showing “RTI Connext DDS” (A). Note that the bell button will only be visible if there are any outstanding notifications.
Clicking on the bell button will open the RTI Connext Notifications Dialog. Alternatively the dialog may also be opened pressing the gear button in the main window (B) and selecting the Show Notifications Messages option.
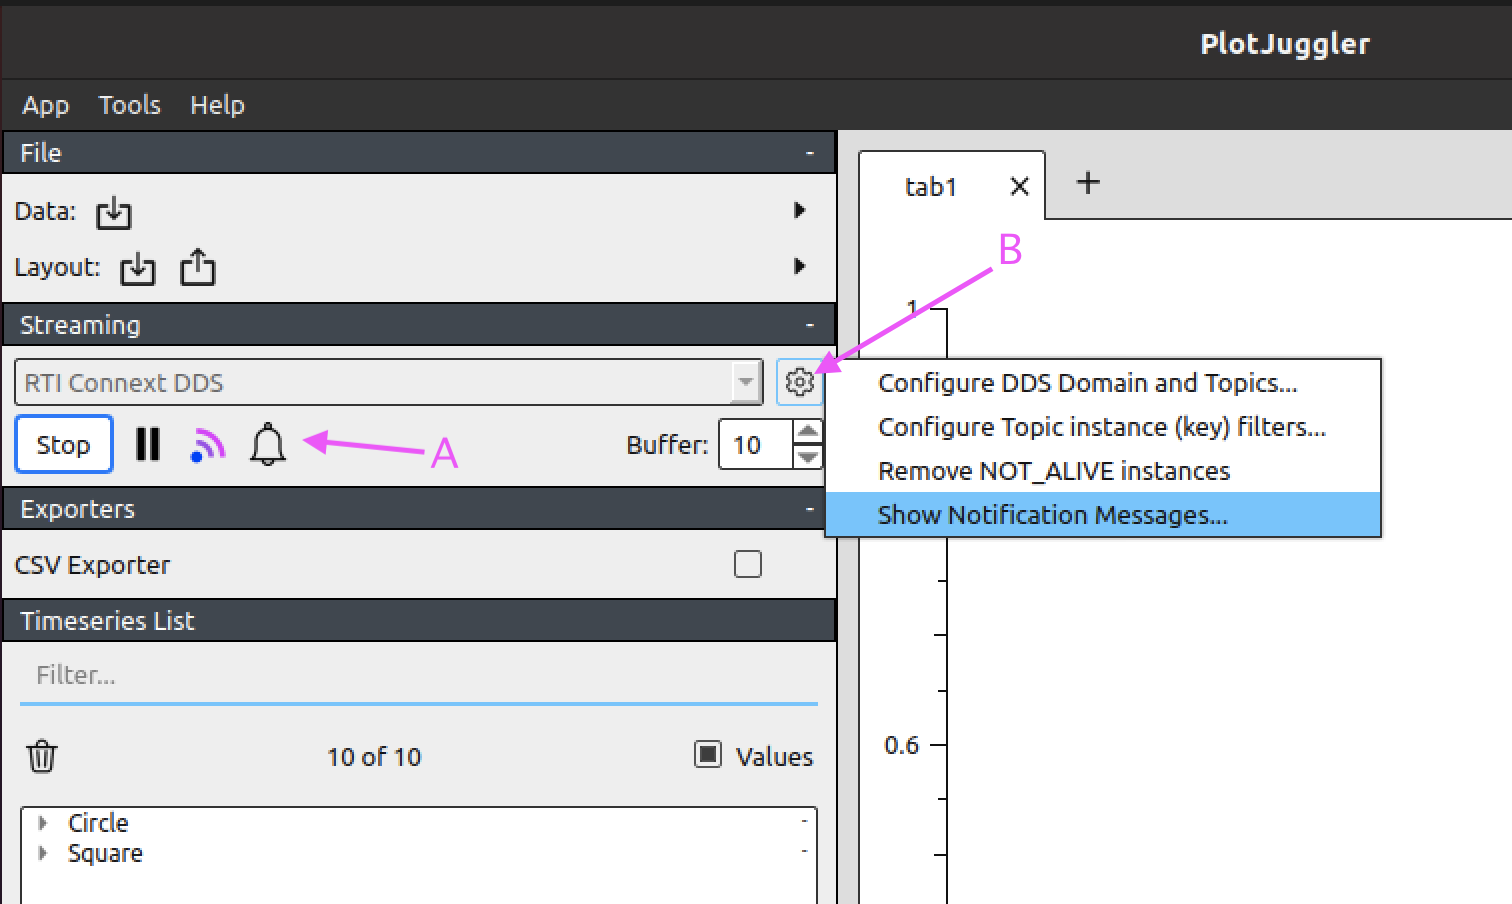
Figure 5.4 Notifications Menu
The RTI Connext Notifications Dialog (see below) shows the notifications produced by the RTI Plugin ordered by timestamp.
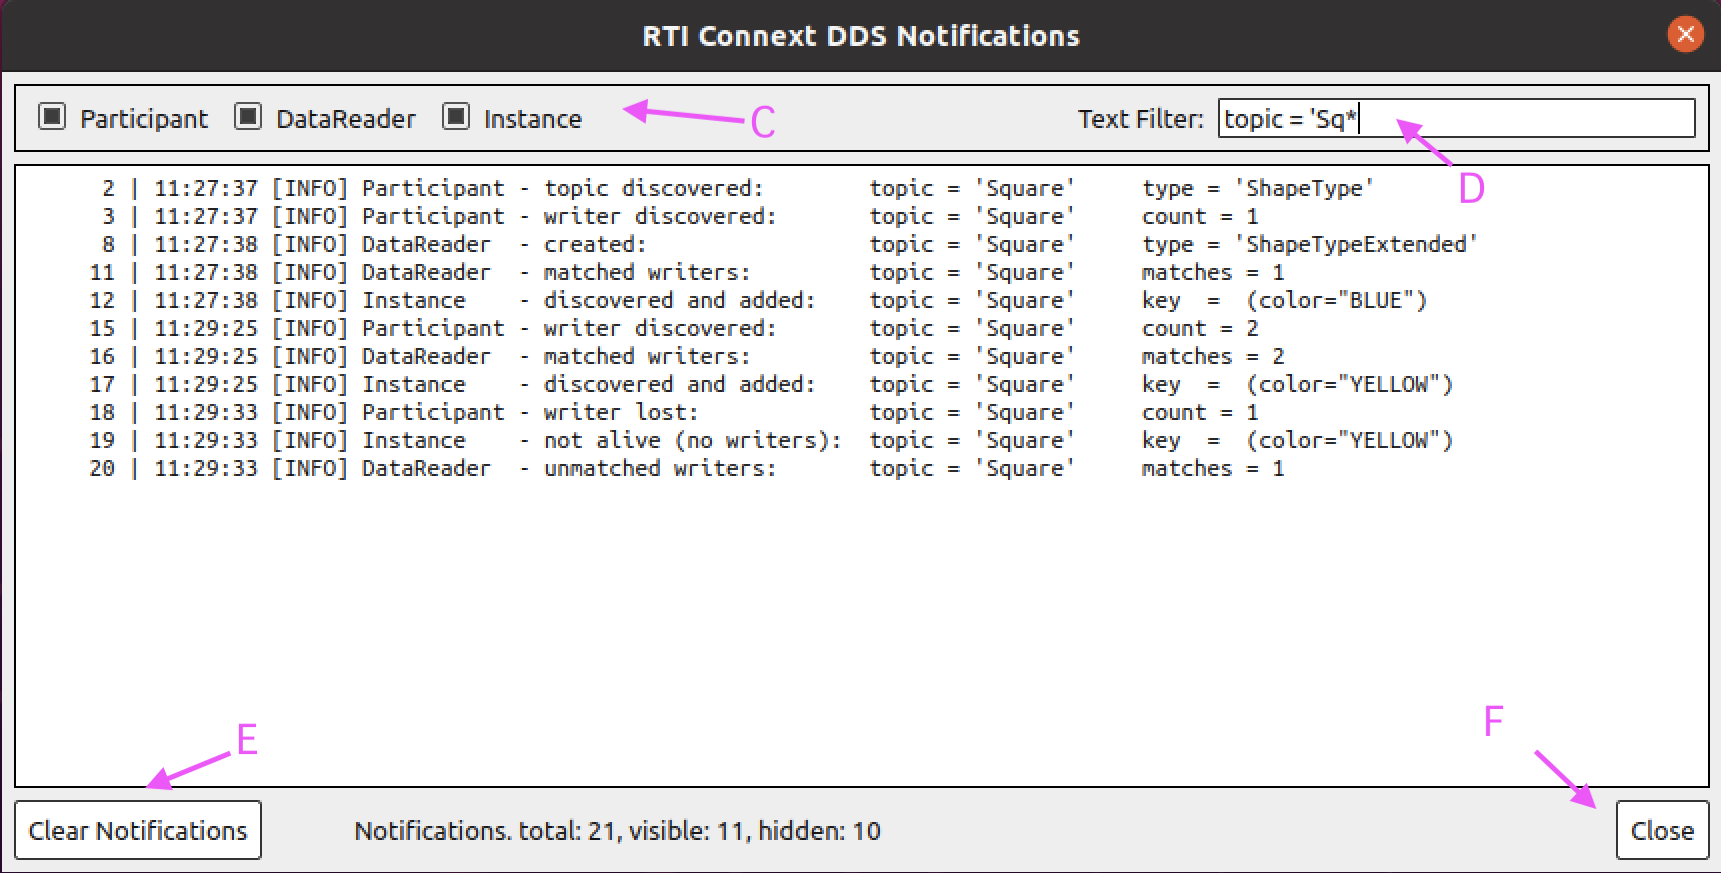
Figure 5.5 Notifications Dialog
You may choose the type of notifications displayed on the window by checking the various checkboxes in the header (C).
You may also enter a regular expression on the Text Filter text box (D) to temporarily hide log messages that do not match the expression.
Clicking on the Clear Notifications button (E) removes all the log messages produced so far. Clicking on the Close button (F) will close the dialog without clearing any messages.