RTI Connext
Core Libraries and Utilities
User’s Manual
Parts
Chapters
Version 5.0
RTI Connext
Core Libraries and Utilities
User’s Manual
Parts
Chapters
Version 5.0

© 2012
All rights reserved.
Printed in U.S.A. First printing.
August 2012.
Trademarks
Copy and Use Restrictions
No part of this publication may be reproduced, stored in a retrieval system, or transmitted in any form (including electronic, mechanical, photocopy, and facsimile) without the prior written permission of Real- Time Innovations, Inc. The software described in this document is furnished under and subject to the RTI software license agreement. The software may be used or copied only under the terms of the license agreement.
Note: In this section, "the Software" refers to
This product implements the DCPS layer of the Data Distribution Service (DDS) specification version 1.2 and the DDS Interoperability Wire Protocol specification version 2.1, both of which are owned by the Object Management, Inc. Copyright
Portions of this product were developed using ANTLR (www.ANTLR.org). This product includes software developed by the University of California, Berkeley and its contributors.
Portions of this product were developed using AspectJ, which is distributed per the CPL license. AspectJ source code may be obtained from Eclipse. This product includes software developed by the University of California, Berkeley and its contributors.
Portions of this product were developed using MD5 from Aladdin Enterprises.
Portions of this product include software derived from Fnmatch, (c) 1989, 1993, 1994 The Regents of the University of California. All rights reserved. The Regents and contributors provide this software "as is" without warranty.
Portions of this product were developed using EXPAT from Thai Open Source Software Center Ltd and Clark Cooper Copyright (c) 1998, 1999, 2000 Thai Open Source Software Center Ltd and Clark Cooper Copyright (c) 2001, 2002 Expat maintainers. Permission is hereby granted, free of charge, to any person obtaining a copy of this software and associated documentation files (the "Software"), to deal in the Software without restriction, including without limitation the rights to use, copy, modify, merge, publish, distribute, sublicense, and/or sell copies of the Software, and to permit persons to whom the Software is furnished to do so, subject to the following conditions: The above copyright notice and this permission notice shall be included in all copies or substantial portions of the Software.
Technical Support
232 E. Java Drive
Sunnyvale, CA 94089
Phone: |
(408) |
Email: |
support@rti.com |
Website: |
Contents, Parts
Part 4:
Introduction to the |
|||||
|
The |
||||
|
|
||||
|
|||||
|
|||||
|
Combining |
||||
Using the |
|||||
|
|
||||
|
|
||||
|
|
||||
|
|
||||
|
|
||||
|
|
||||
|
|
||||
|
|
|
|||
|
|
|
|||
|
|
|
|||
|
|
||||
|
|
||||
|
|
||||
|
|
||||
|
|
||||
|
|
||||
|
|
|
|||
|
|
|
|||
|
|
|
|||
|
|
||||
|
|
||||
|
|
||||
|
|
||||
|
|
||||
|
|
23.3.4 Getting Requests and Sending Replies with a SimpleReplierListener ......................... |
|||
iii
Part 5: RTI Secure WAN Transport
25 Configuring RTI Secure WAN Transport ......................................... |
|||
|
|||
|
|||
|
|||
Part 6: RTI Persistence Service
Introduction to RTI Persistence Service......................................... |
|||||
Configuring Persistence Service.................................................... |
|||||
|
|||||
|
|||||
|
|
||||
|
|
||||
|
|
|
|||
|
|
|
|||
|
|||||
|
|||||
|
|||||
|
|||||
|
|||||
|
|||||
|
|
|
|||
iv
|
|
|||
|
|
|||
|
|
|||
|
|
|||
|
||||
|
|
Sample Memory Management With Durable Subscriptions ......................................... |
||
|
||||
|
||||
|
||||
|
||||
|
|
|||
Running RTI Persistence Service .................................................... |
||||
|
||||
|
||||
Administering Persistence Service from a Remote Location...... |
||||
|
||||
|
||||
|
|
|||
|
|
|||
|
|
|||
|
|
|||
|
||||
Advanced Persistence Service Scenarios ................................... |
||||
|
Scenario: |
|||
|
||||
|
||||
Part 7: RTI CORBA Compatibility Kit
Introduction to RTI CORBA Compatibility Kit ................................ |
|||
Generating |
|||
|
|||
|
|||
v
33 Supported IDL Types ....................................................................... |
Part 8: RTI RTSJ Extension Kit
Introduction to RTI RTSJ Extension Kit............................................. |
||
Using RTI RTSJ Extension Kit ............................................................ |
vi

Part 4:
Important! The Request/Reply communication pattern is only available with RTI Connext Mes- saging.
As
❏Chapter 22: Introduction to the
Chapter 22 Introduction to the
Important! This chapter describes the
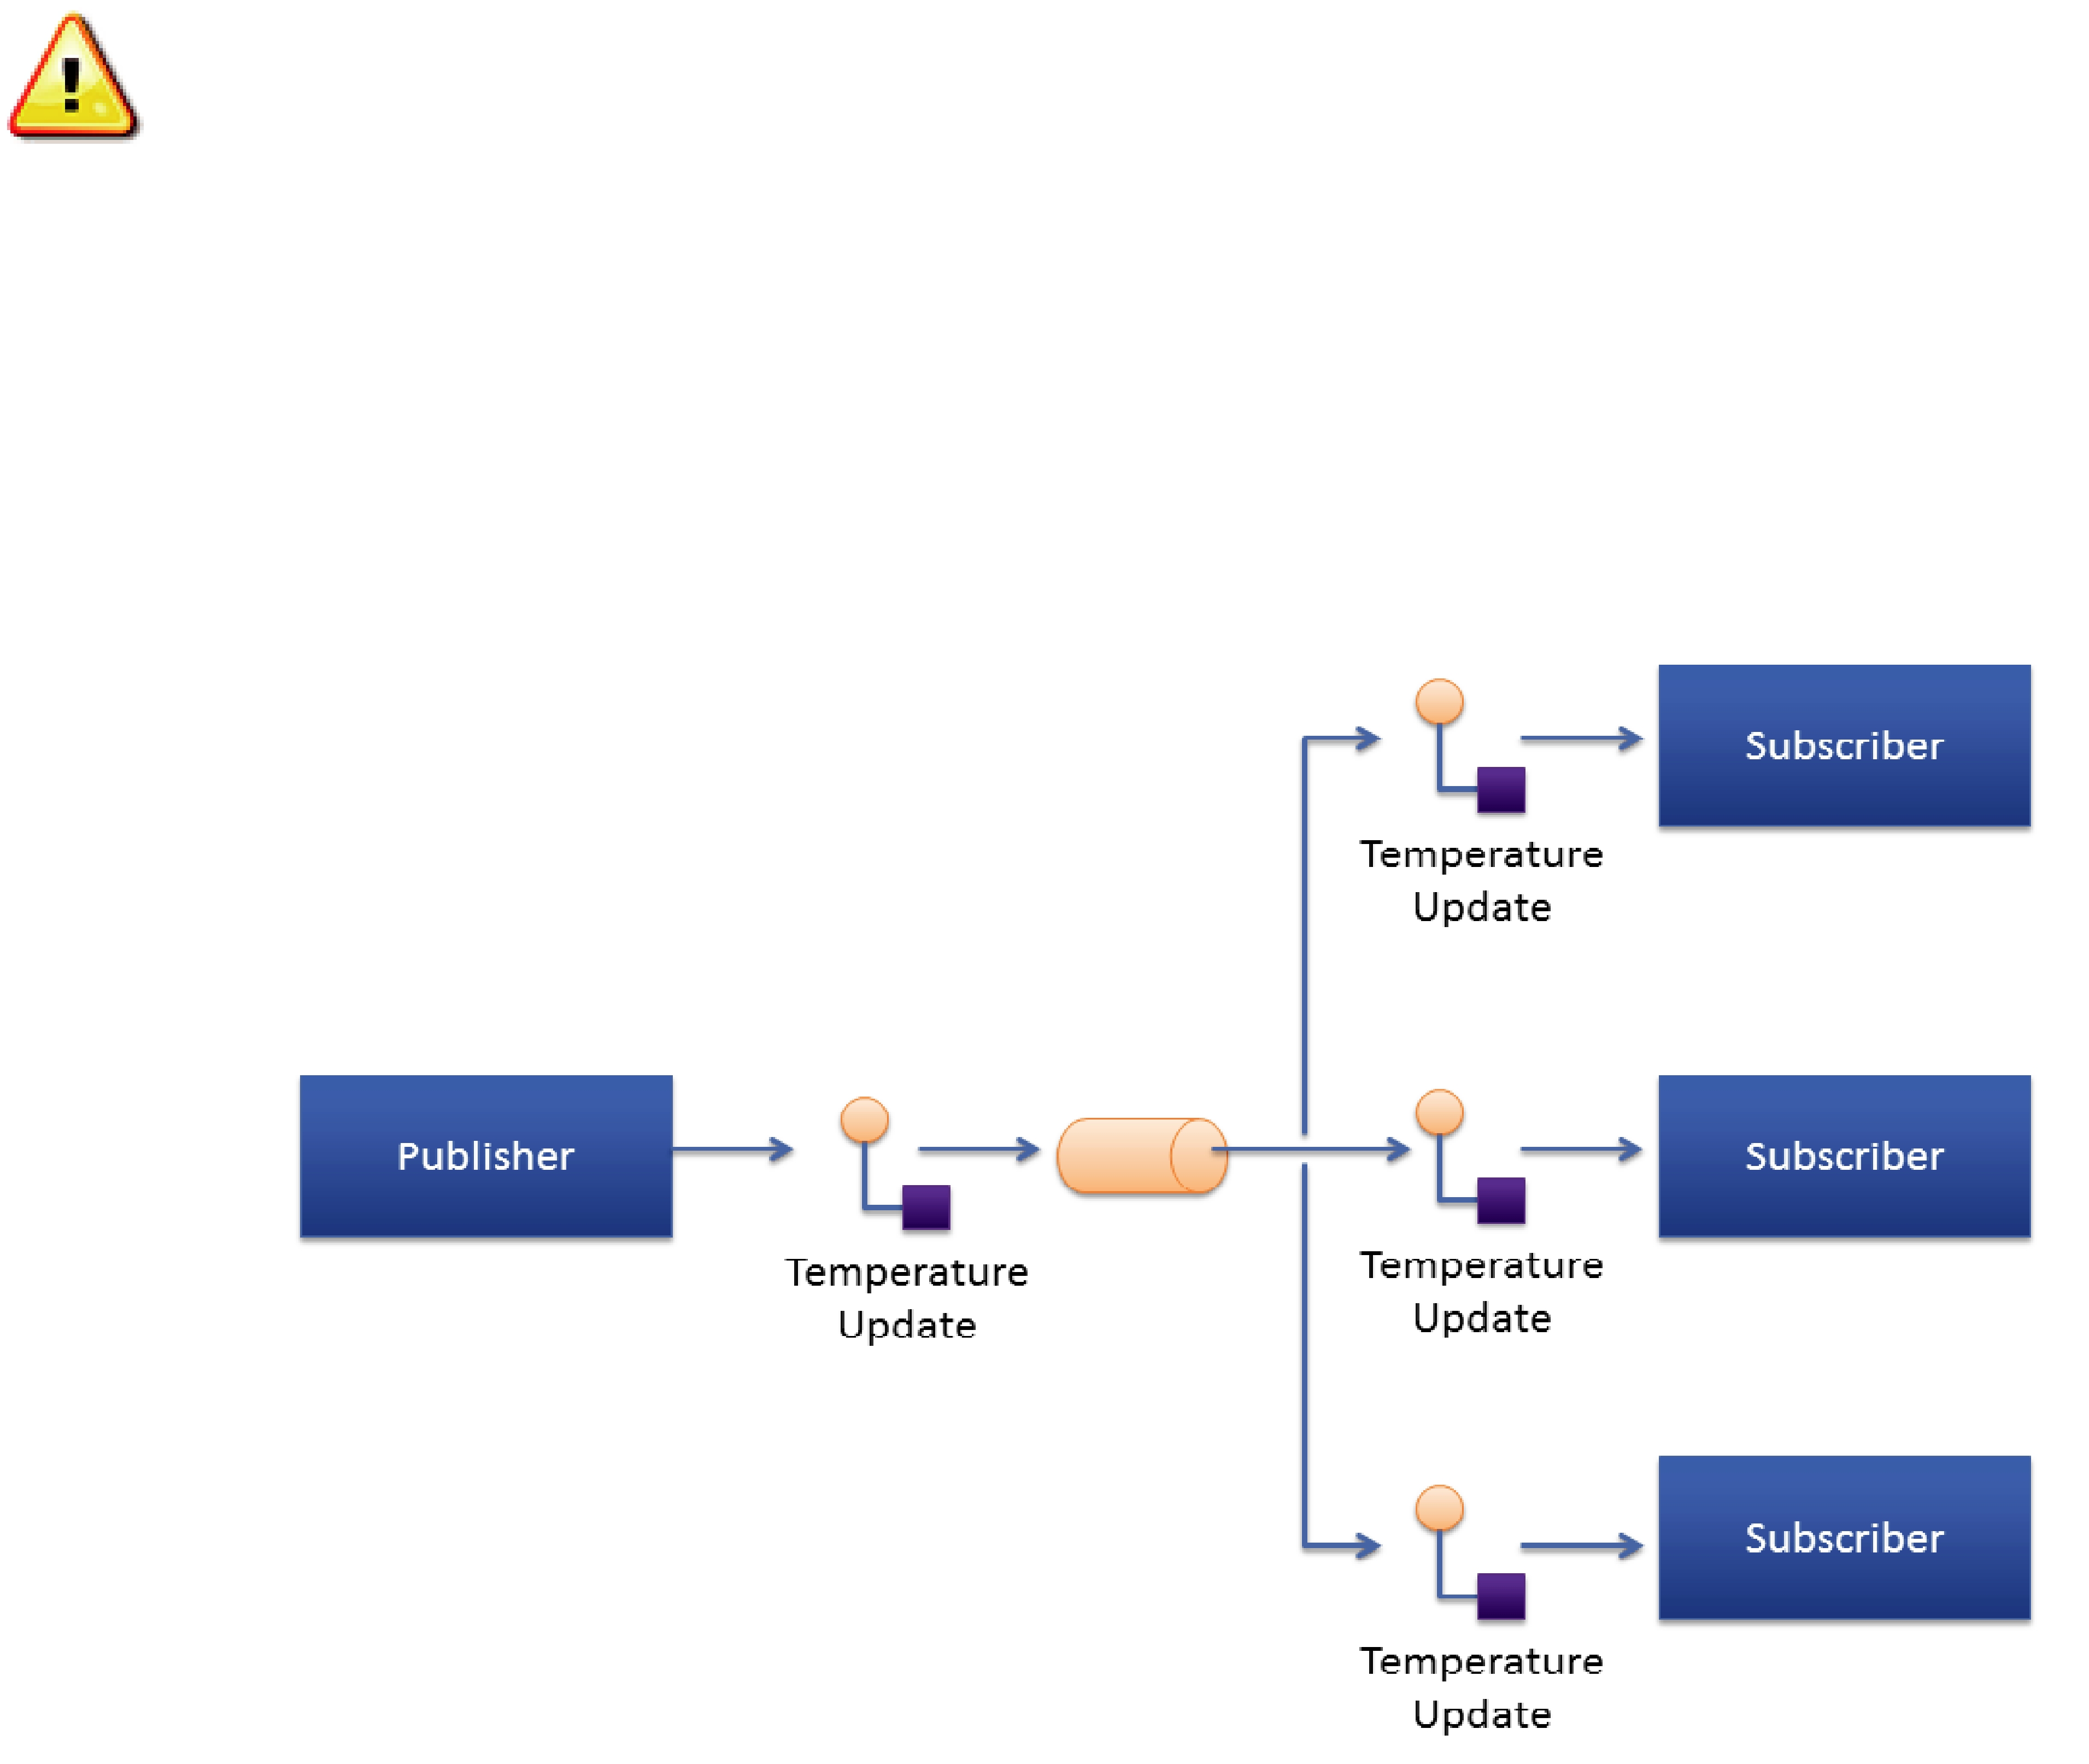
The fundamental communication pattern provided by Connext is known as DDS
Figure 22.1
Sending temperature updates using the
The
access to the latest data, with minimum delays, and without incurring the overhead of periodically polling what may be stale data. This efficient,
22.1The
As applications become more complex, it often becomes necessary to use other communication patterns in addition to
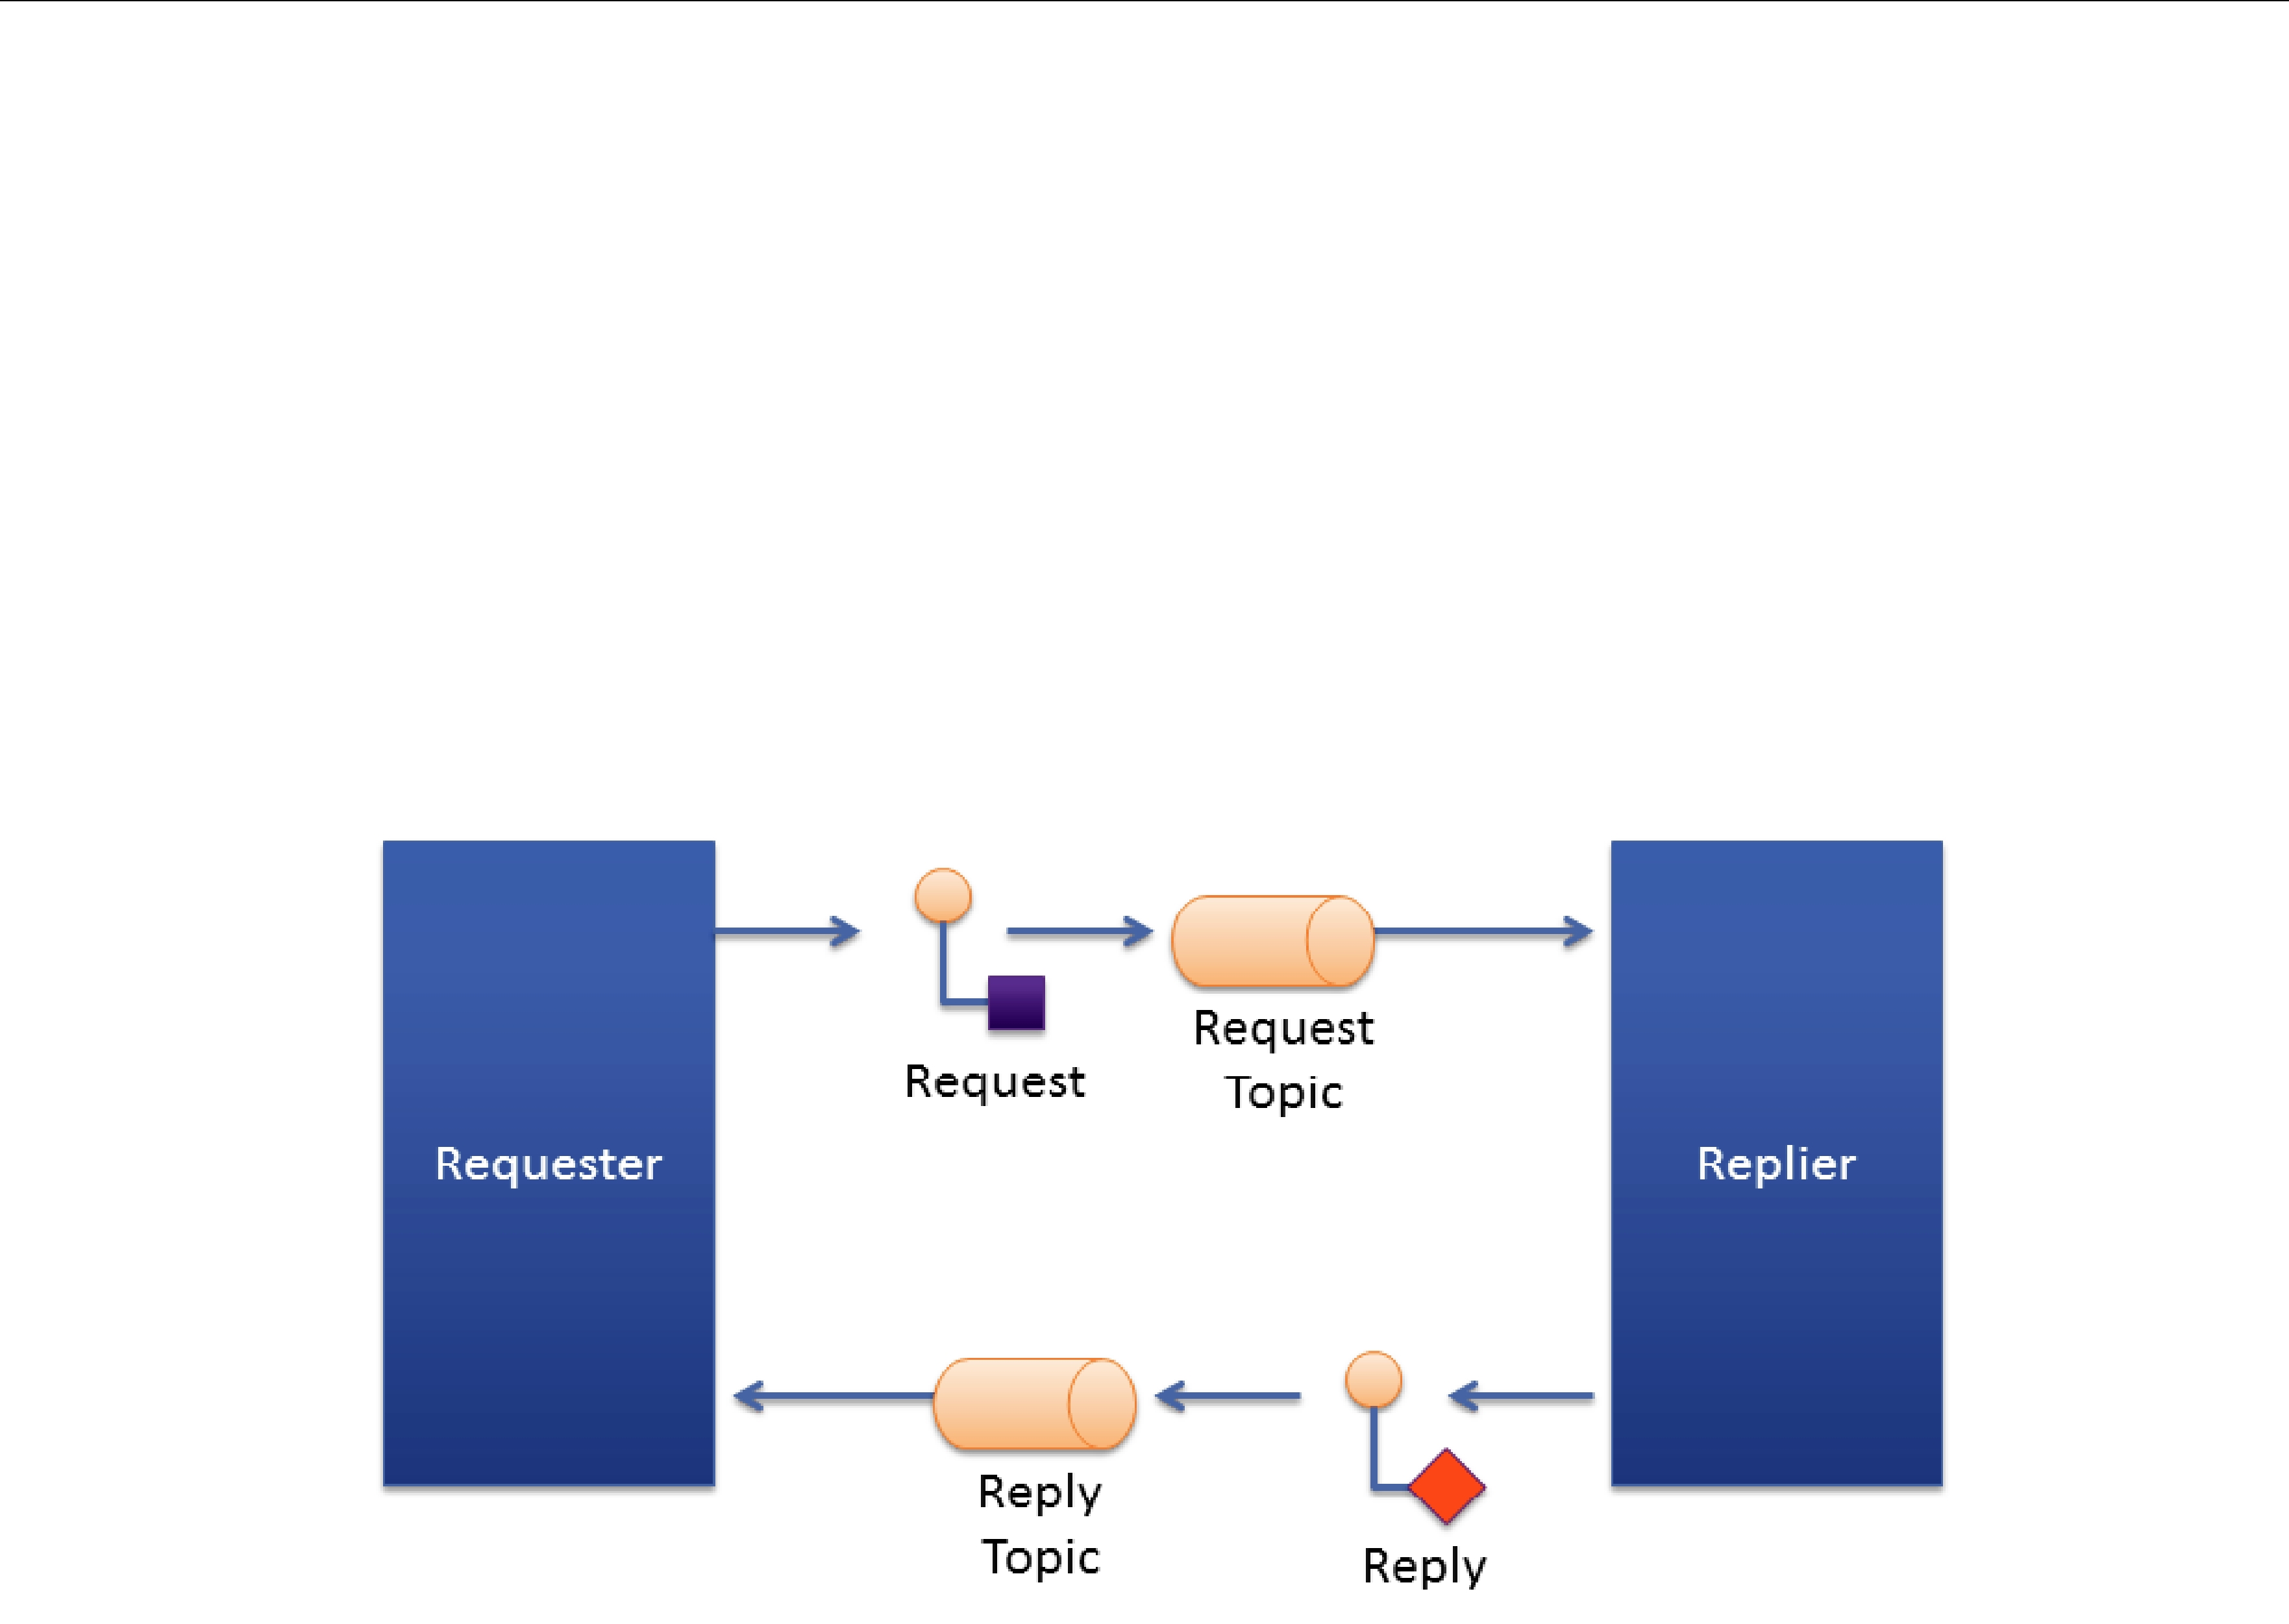
To support these scenarios, Connext includes support for the
Figure 22.2
The
Using the
Connext supports both blocking and
❏In a blocking (a.k.a. synchronous) interaction, the requesting application blocks while waiting for the reply. This is typical of applications desiring
❏In a
Later this chapter explains how an application can use the methods provided by the Requester and the Replier to perform both blocking and
The implementation of
the original Requester, allowing the number of Requesters to grow without significantly impacting each other.
22.1.1
An application might have multiple outstanding requests, all originating from the same Requester. This can be as a result of using a
When using a blocking request operation, Connext provides an
22.2
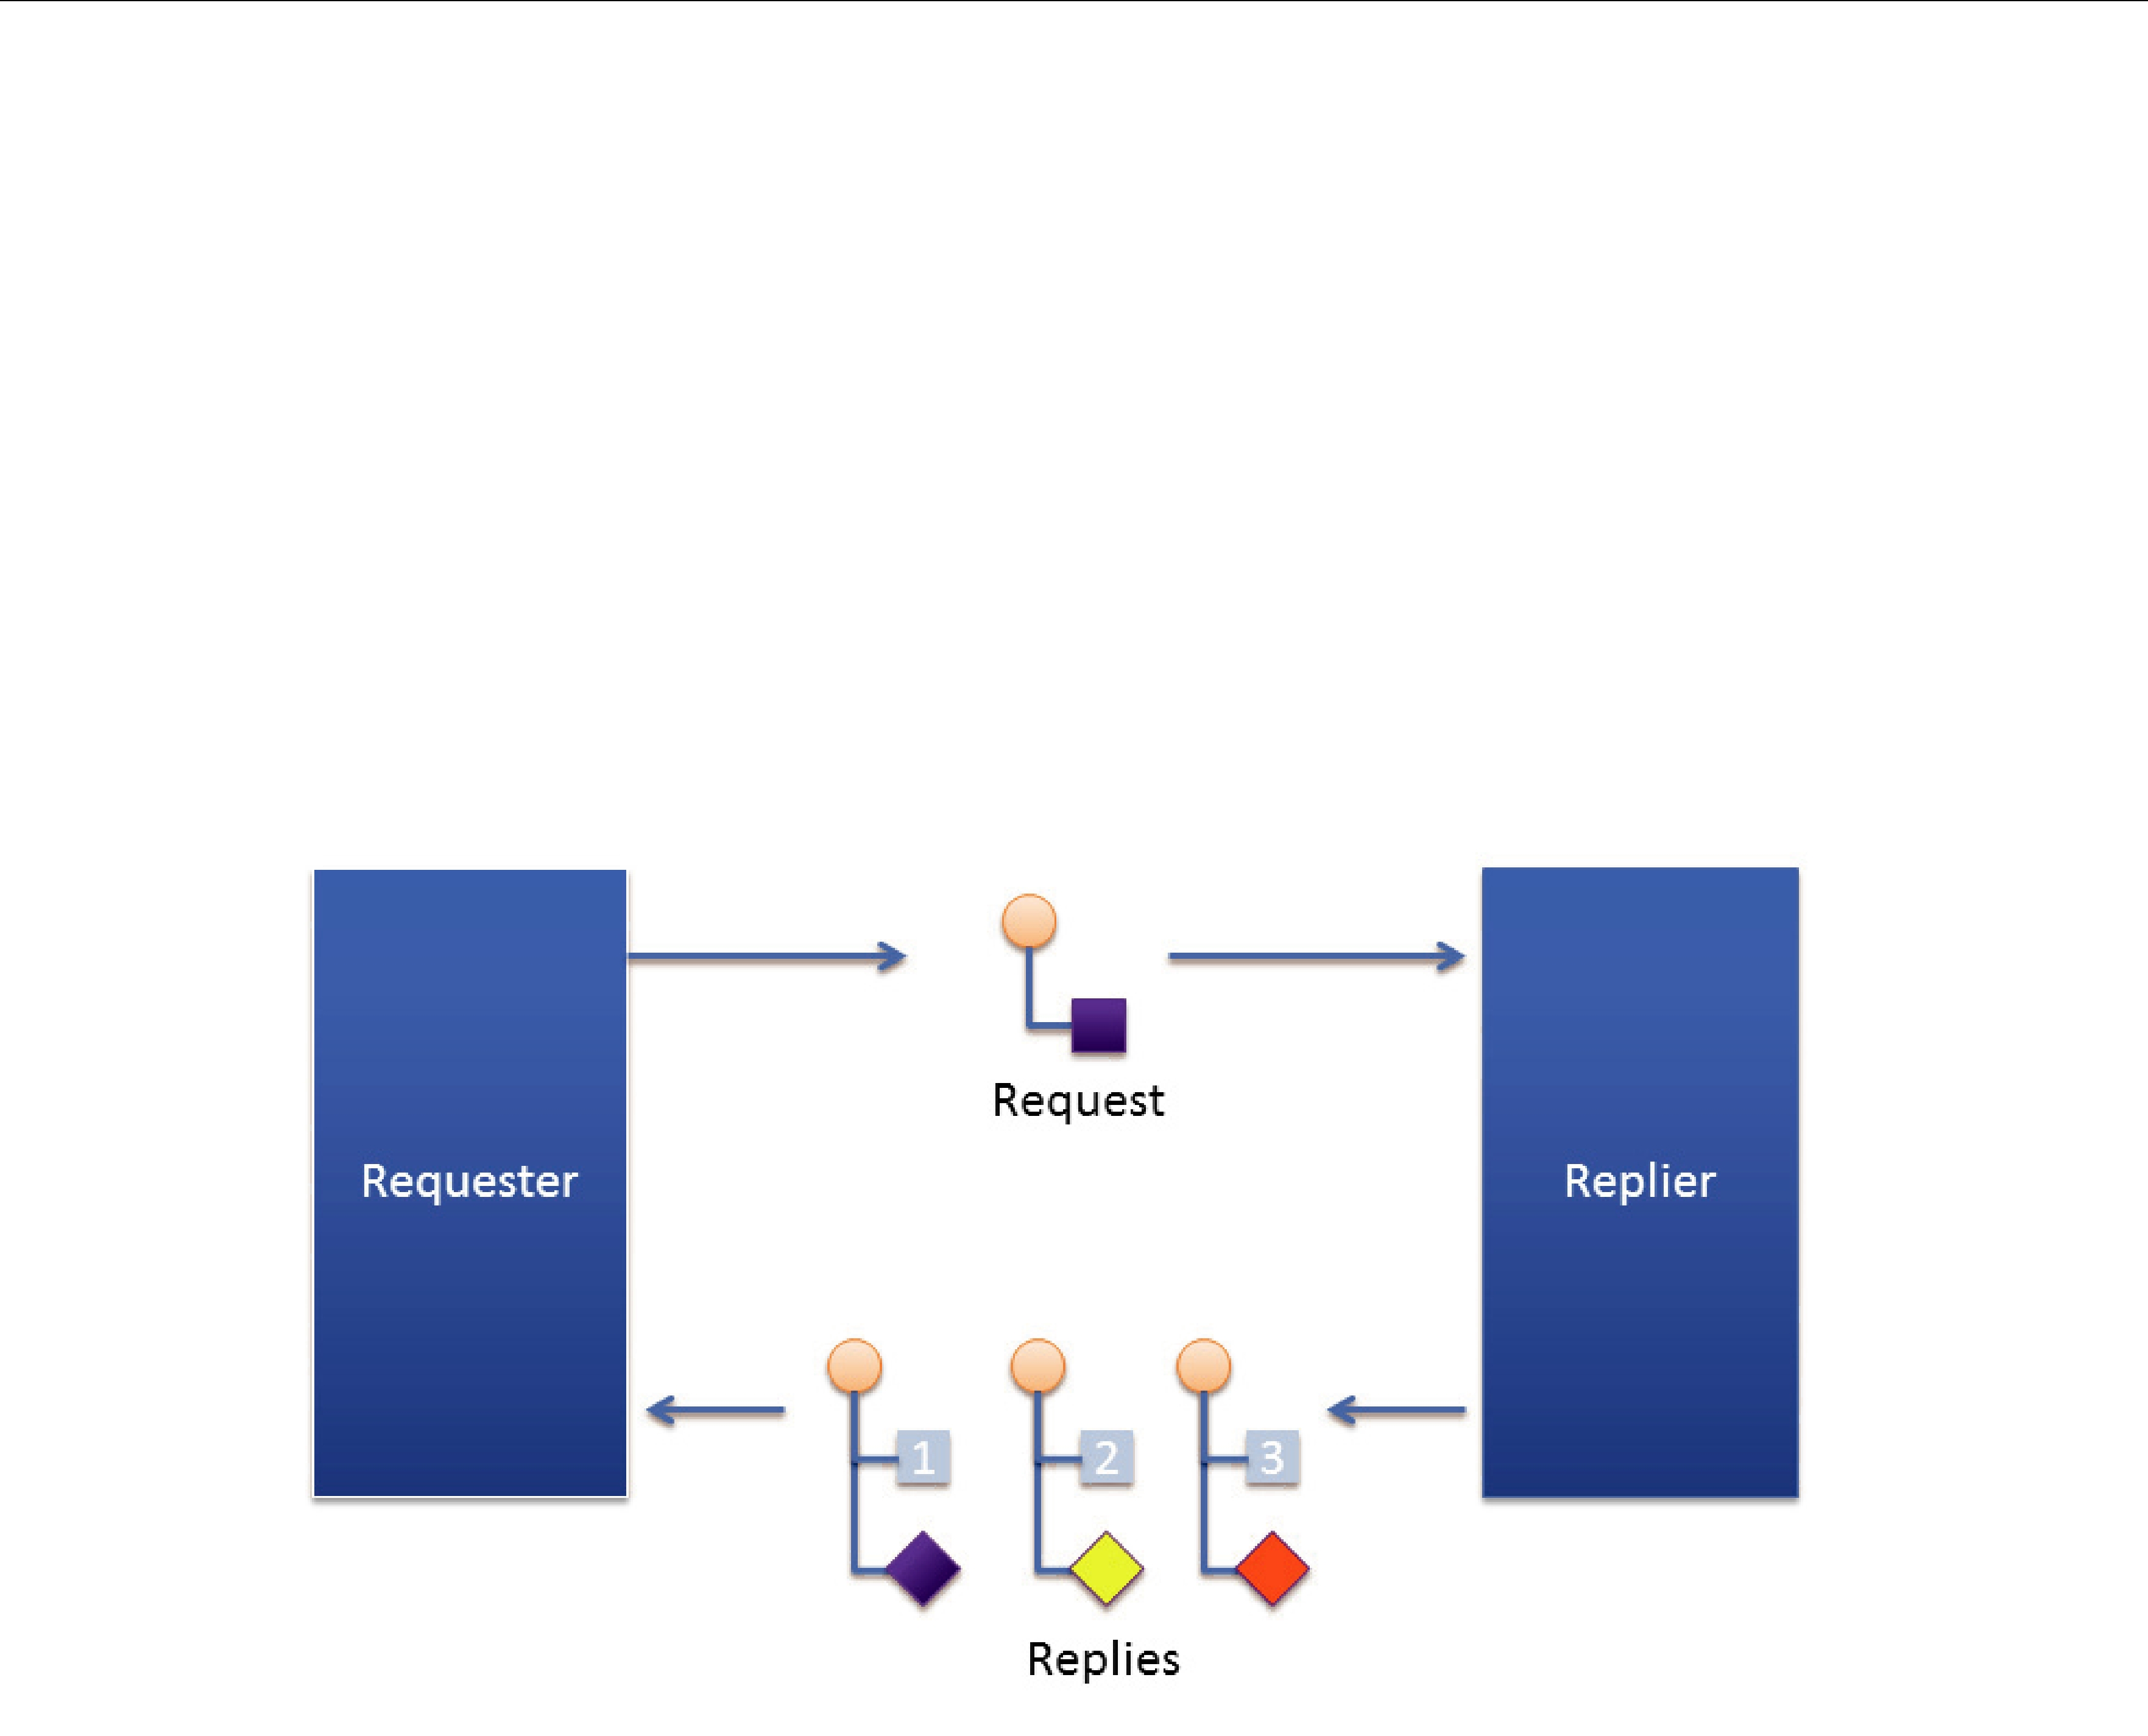
Connext also supports the
The
Figure 22.3 Single Request, Multiple Replies
Request/Reply communication pattern with multiple replies resulting from a single request
For example, a mobile asset management system may need to locate a particular asset (truck, locomotive, etc.). The system sends out the request. The first reply that comes back will read “locating.” The service has not yet determined the position, but it notifies the requester that the search operation has started. The second reply might provide a status update on the search, perhaps including a rough area of location. The third and final reply will have the exact location of the asset.
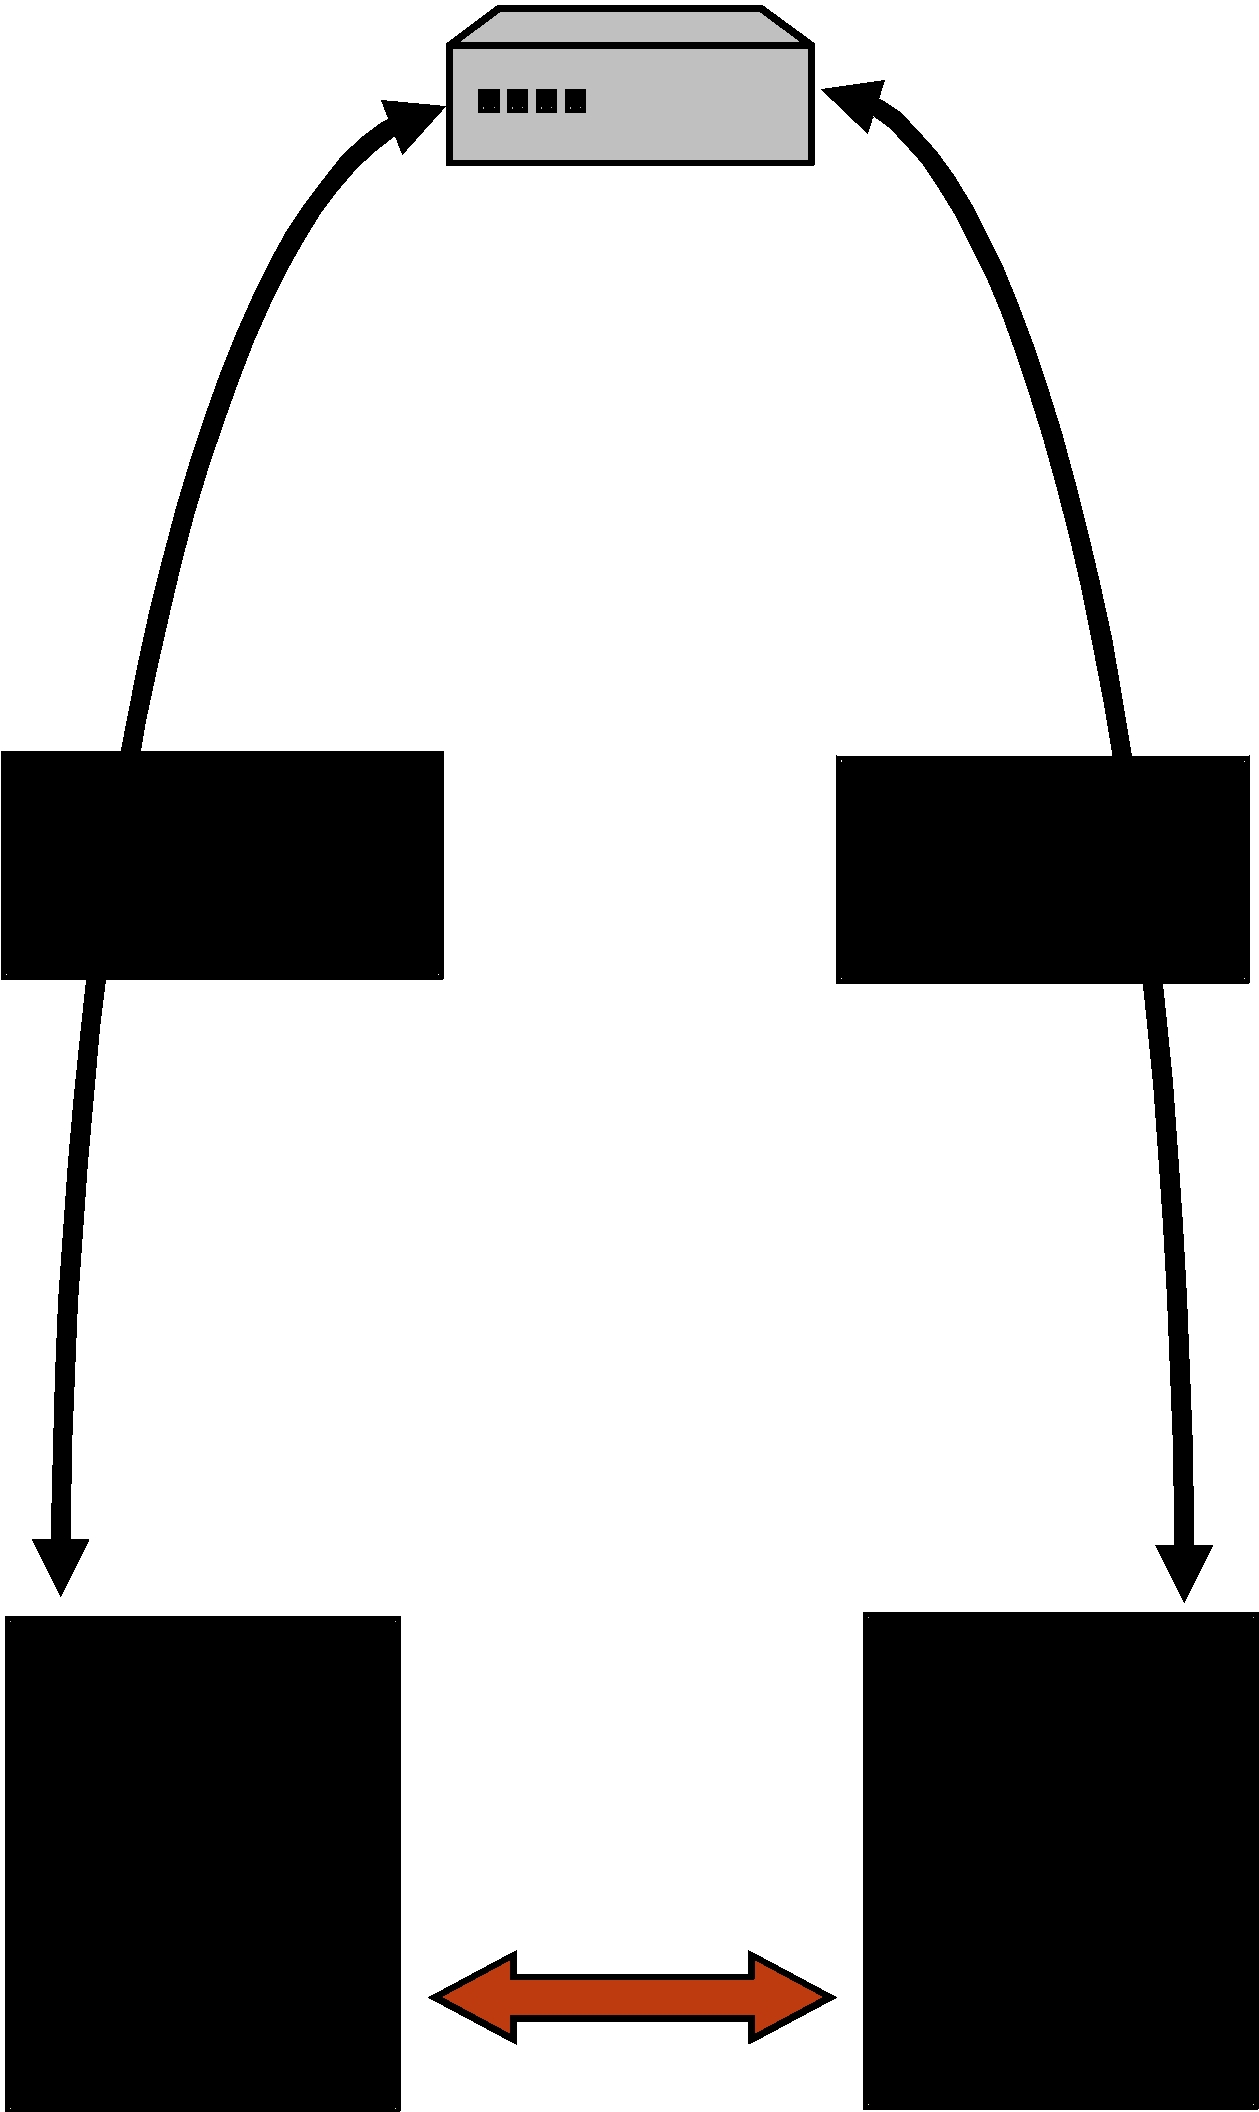
22.3Multiple Repliers
Connext directly supports applications that obtain results from multiple providers in parallel instead of in sequence, basically implementing functional parallelism.
To illustrate, consider a system managing a fleet of drones, like unmanned aerial vehicles (UAVs). Using the single
As another example, consider a system that would like to locate the best printer to perform a particular job. The application can use a Requester to query all the printers that are
Figure 22.4 Multiple Repliers
Request/Reply communication pattern with a single Requester and multiple Repliers
22.4Combining
Under the hood Connext implements
For example, a pair of applications may be involved in a

Figure 22.5 Combining Patterns
Combining
Since Connext implements requests and replies using DDS

Chapter 23 Using the
Pattern
Important! This chapter explains how to use and configure the
There are two basic Connext entities used by the
Requester and Replier.
❏A Requester publishes a request Topic and subscribes to a reply Topic. See Requesters (Section 23.1).
❏A Replier subscribes to the request Topic and publishes the reply Topic. See Repliers (Section 23.2).
There is an alternate type of replier known as a SimpleReplier:
•A SimpleReplier is useful for cases where there is a single reply to each request and the reply can be generated quickly, such as looking up some data from memory.
•A SimpleReplier is used in combination with a
•The SimpleReplier is not suitable if the replier needs to generate more than one reply for a single request or if generating the reply can take significant time or needs to occur asynchronously. For more information, see SimpleRepliers (Section 23.3).
Additional resources. In addition to the information in this chapter, you can find more information and example code at the following locations:
❏The Connext API Reference HTML documentation1 contains example code that will show you how to use API: From the Modules tab, navigate to Programming How To’s,
❏The Connext API Reference HTML documentation also contains the full API documentation for the Requester, Replier, and SimpleReplier. Under the Modules tab, navigate to RTI Connext
1. The API Reference documentation is available for all supported programming languages. Open <installation direc- tory>/ReadMe.html.

23.1Requesters
A Requester is an entity with two associated DDS Entities: a DDS DataWriter bound to a request Topic and a DDS DataReader bound to a reply Topic. A Requester sends requests by publishing samples of the request Topic, and receives replies for those requests by subscribing to the reply
Topic.
Valid types for request and reply Topics can be:
❏For the C API:
•DDS types generated by rtiddsgen
❏For all other APIs:
•DDS types generated by rtiddsgen
•
•DDS DynamicData Types
To communicate, a Requester and Replier must use the same request Topic name, the same reply Topic name, and be associated with the same DDS domain_id.
A Requester has an associated DomainParticipant, which can be shared with other requesters or Connext entities. All the other entities required for
Connext guarantees that a Requester will only receive replies associated with the requests it sends.
The Requester uses the underlying DataReader not only to receive the replies, but also as a cache that can hold replies to multiple outstanding requests or even multiple replies to a single request. Depending on the HistoryQoSPolicy configuration of the DataReader, the Requester may allow replies to replace previous replies based on the reply data having the same value for the Key fields (see Samples, Instances, and Keys (Section 2.2.2)). The default configuration of the Requester does not allow replacing.
You can configure the QoS for the underlying DataWriter and DataReader in a QoS profile. By default, the DataWriter and DataReader are created with default values (DDS_DATAWRITER_QOS_DEFAULT and DDS_DATAREADER_QOS_DEFAULT, respectively) except for the following:
❏RELIABILITY QosPolicy (Section 6.5.19): kind is set to RELIABLE.
❏HISTORY QosPolicy (Section 6.5.10): kind is set to KEEP_ALL.
❏Several other
23.1.1Creating a Requester
Before you can create a Requester, you need a DomainParticipant and a service name.
Note: The example code snippets in this section use the C++ API. You can find more complete examples in all the supported programming languages (C, C++, Java, C#) in the Connext API Reference HTML documentation and in the “example” directory found in your Connext installation.
To create a Requester with the minimum set of parameters, you can use the basic constructor that receives only an existing DDS DomainParticipant and the name of the service:
Requester <MyRequestType, MyReplyType> *requester =
new Requester <MyRequestType,MyReplyType> (participant, “ServiceName”);
To create a Requester with specific parameters, you may use a different constructor that receives a RequesterParams structure (described in Section 23.1.3):
Requester (const RequesterParams ¶ms)
The ServiceName parameter is used to generate the names of the request and reply Topics that the Requester and Replier will use to communicate. For example, if the service name is “MyService”, the topic names for the Requester and Replier will be “MyServiceRequest” and “MyServiceReply”, respectively. Therefore, for communication to occur, you must use the same service name when creating the Requester and the Replier entities.
If you want to use topic names different from the ones that would be derived from the ServiceName, you can override the default names by setting the actual request and reply Topic names using the request_topic_name() and reply_topic_name() accessors to the RequesterParams structure prior to creating the Requester.
Example: To create a Requester with default QoS and topic names derived from the service name, you may use the following code:
Requester<Foo, Bar> * requester =
new Requester<Foo, Bar>(participant,"MyService");
Example: To create a Requester with a specific QoS profile with library name “MyLibrary” and profile “MyProfile” defined inside USER_QOS_PROFILES.xml in the current working directory, you may use the following code:
Requester<Foo, Bar> * requester = new Requester<Foo, Bar>( RequesterParams(participant).service_name("MyService")
.qos_profile("MyLibrary", "MyProfile"));
Once you have created a Requester, you can use it to perform the operations in Table 23.2, “Requester Operations”.
23.1.2Destroying a Requester
To destroy a Requester and free its underlying entities you may use the destructor:
virtual ~Requester ()
23.1.3Setting Requester Parameters
To change the RequesterParams that can be used when creating a Requester, you can use the operations listed in Table 23.1, “Operations to Set Requester Parameters”.
Table 23.1 Operations to Set Requester Parameters
Operation |
Description |
|
|
|
|
datareader_qos |
Sets the QoS of the reply DataReader. |
|
|
datawriter_qos |
Sets the QoS of the request DataWriter. |
|
|
publisher |
Sets a specific Publisher. |
|
|
qos_profile |
Sets a QoS profile for the DDS entities in this requester. |
|
|
|
Sets the name of the Topic used for the request. If this parameter is set, then you |
request_topic_name |
must also set the reply_topic_name parameter and you should not set the |
|
service_name parameter. |
|
|
|
Sets the name of the Topic used for the reply. If this parameter is set, then you |
reply_topic_name |
must also set the request_topic_name parameter and you should not set the |
|
service_name parameter. |
|
|
reply_type_support |
Sets the type support for the reply type. |
|
|
Table 23.1 Operations to Set Requester Parameters
Operation |
Description |
|
|
request_type_support |
Sets the type support for the request type. |
|
|
|
Sets the service name. This will automatically set the name of the request Topic |
service_name |
and the reply Topic. If this parameter is set you should not set the |
|
request_topic_name or the reply_topic_name. |
|
|
subscriber |
Sets a specific Subscriber. |
|
|
23.1.4Summary of Requester Operations
There are several kinds of operations an application can perform using the Requester:
❏Sending requests (i.e., publishing request samples on the request Topic)
❏Waiting for replies to be received back.
❏Taking the reply data. This gets the reply data from the Requester and removes from the
Requester cache.
❏Reading the reply data. This gets the reply data from the Requester but leaves it in the Requester cache so it remain accessible to future operations on the Requester.
❏Receiving replies (a convenience operation that is a combination of ‘waiting’ and ‘taking’ the data in a single operation)
These operations are summarized in Requester Operations (Table 23.2)
Table 23.2 Requester Operations
|
Operation |
Description |
Reference |
|
|
|
|
|
|
Sending |
send_request |
Sends a request. |
||
Requests |
||||
|
|
|
||
|
|
|
|
|
Waiting for |
wait_for_replies |
Waits for replies to any request or to a specific |
||
Replies |
|
request. |
|
|
|
|
Copies a single reply into a Sample container. |
|
|
|
|
There are variants that allow getting the next reply |
|
|
|
take_reply |
available or the next reply to a specific request. |
|
|
|
This operation removes the reply from the |
|
||
|
|
|
||
|
|
Requester cache. So subsequent calls to take or read |
|
|
|
|
replies will not get the same reply again. |
|
|
Taking |
|
|
|
|
|
Returns a LoanedSamples container with the |
|||
Reply Data |
|
|||
|
collection of replies received by the Requester. |
|
||
|
|
There are variants that allow accessing all the |
|
|
|
take_replies |
replies available or only the replies to a specific |
|
|
|
request. |
|
||
|
|
|
||
|
|
This operation removes the returned replies from |
|
|
|
|
the Requester cache. So subsequent calls to take or |
|
|
|
|
read replies will not get the same replies again. |
|
|
|
|
|
|
Table 23.2 Requester Operations
|
Operation |
|
|
Description |
|
|
|
Reference |
||
|
|
|
|
|
|
|
|
|
|
|
|
|
Copies a single reply into a Sample container. |
|
|||||||
|
|
There are variants that allow getting the next reply |
|
|||||||
|
read_reply |
available or the next reply to a specific request. |
|
|
||||||
|
This operation leaves the reply on the Requester |
|
||||||||
|
|
|
||||||||
|
|
cache. So subsequent calls to take or read replies |
|
|||||||
|
|
can get the same reply again. |
|
|
|
|
|
|||
Reading |
|
|
|
|
|
|
|
|
|
|
|
Returns |
a |
LoanedSamples |
container |
with |
the |
||||
Reply Data |
|
|||||||||
|
collection of replies received by the Requester. |
|
||||||||
|
|
There are variants that allow accessing all the |
|
|||||||
|
read_replies |
replies available or only the replies to a specific |
|
|||||||
|
request. |
|
|
|
|
|
|
|
||
|
|
|
|
|
|
|
|
|
||
|
|
This operation leaves the returned replies in the |
|
|||||||
|
|
Requester cache. So subsequent calls to take or read |
|
|||||||
|
|
replies can get the same replies again. |
|
|
|
|
||||
|
|
|
|
|
|
|
|
|
||
|
receive_reply |
Convenience |
function that |
combines |
a |
call |
to |
|
||
Receiving |
wait_for_replies with a call to take_reply. |
|
|
|
||||||
|
|
|
||||||||
Replies |
receive_replies |
Convenience |
function that |
combines |
a |
call |
to |
|||
|
||||||||||
|
wait_for_replies with a call to take_replies. |
|
|
|
||||||
|
|
|
|
|
||||||
|
|
|
|
|||||||
Getting |
get_request_datawriter |
Retrieves the underlying DataWriter that writes |
|
|||||||
Underlying |
|
requests. |
|
|
|
|
|
|
||
|
Retrieves |
the underlying DataReader |
that reads |
|||||||
Entities |
get_reply_datareader |
|
||||||||
replies. |
|
|
|
|
|
|
|
|||
|
|
|
|
|
|
|
|
|
||
|
|
|
|
|
|
|
|
|
|
|
23.1.5Sending Requests
To send a request, use the send_request() operation on the Requester. There are three variants of this operation, depending on the parameters that are passed in:
1.send_request (const TRequest &request)
2.send_request (WriteSample<TRequest> &request)
3.send_request (WriteSampleRef<TRequest> &request)
The first way simply sends a request.
The second way sends a request and gets back information about the request in a WriteSample container. This information can be used to correlate the request with future replies.
The third way is just like the second, but puts the information in a WriteSampleRef, which holds references to the data and parameters. Both WriteSample and WriteSampleRef provide information about the request that can be used to correlate the request with future replies.
23.1.6Processing Incoming Replies with a Requester
The Requester provides several operations that can be used to wait for and access replies:
❏wait_for_replies(), see Waiting for Replies (Section 23.1.6.1)
❏take_reply(), take_replies(), read_reply() and read_replies(), see Getting Replies (Section 23.1.6.2)
❏receive_reply() and receive_replies(), see Receiving Replies (Section 23.1.6.3)
The wait_for_replies operations are used to wait until the replies arrive.
The take_reply, take_replies, read_reply, and read_replies() operations access the replies once they have arrived.
The receive_reply and receive_replies are convenience functions that combine waiting and accessing the replies and are equivalent to calling the ‘wait’ operation followed by the corresponding take_reply or take_replies operations.
Each of these operations has several variants, depending on the parameters that are passed in.
23.1.6.1Waiting for Replies
Use the wait_for_replies() operation on the Requester to wait for the replies to previously sent requests. There are three variants of this operation, depending on the parameters that are passed in. All these variants block the calling thread until either there are replies or a timeout occurs.
1.wait_for_replies (const DDS_Duration_t &max_wait)
2.wait_for_replies (int min_count,
const DDS_Duration_t &max_wait)
3. wait_for_replies (int min_count,
const DDS_Duration_t &max_wait,
const SampleIdentity_t &related_request_id)
The first variant (only passing in max_wait) blocks until a reply is available or until max_wait time has elapsed, whichever comes first. The reply can be to any of the requests made by the
Requester.
The second variant (passing in min_count and max_wait) blocks until at least min_count replies are available or until max_wait time has elapsed, whichever comes first. These replies may all be to the same request or to different requests made by the Requester.
The third variant (passing in min_count, max_wait, and related_request_id) blocks until at least min_count replies to the request identified by the related_request_id are available, or until max_wait time has passed, whichever comes first. Note that unlike the previous variants, the replies must all be to the same single request (identified by the related_request_id) made by the
Requester.
Typically after waiting for replies, you will call take_reply, take_replies, read_reply, or read_replies(), see Repliers (Section 23.2).
If you call wait_for_replies() several times without ‘taking’ the replies (using the take_reply or take_replies operation), future calls to wait_for_replies() will return immediately and will not wait for new replies.
23.1.6.2Getting Replies
You can use the following operations to access replies: take_reply, take_replies, read_reply, and read_replies().
As mentioned in Summary of Requester Operations (Section 23.1.4), the difference between the ‘take’ operations (take_reply, take_replies) and the ‘read’ operations (read_reply, read_replies) is that ‘take’ operations remove the replies from the Requester cache. This means that future calls to take_reply, read_reply, read_reply, and read_reply will not get the same reply again.
The take_reply and read_reply operations access a single reply, whereas the take_replies and read_replies can access a collection of replies.
There are four variants of the take_reply and read_reply operations, depending on the parameters that are passed in:
1.take_reply (Sample<TReply> &reply) read_reply (Sample<TReply> &reply)
2.take_reply (SampleRef<TReply> reply) read_reply (SampleRef<TReply> reply)
3. |
take_reply |
(Sample<TReply> &reply, |
|
|
const SampleIdentity_t &related_request_id) |
|
read_reply |
(Sample<TReply> &reply, |
|
|
const SampleIdentity_t &related_request_id) |
4. |
take_reply |
(SampleRef<TReply> reply, |
|
|
const SampleIdentity_t &related_request_id) |
|
read_reply |
(SampleRef<TReply> reply, |
|
|
const SampleIdentity_t &related_request_id) |
The first two variants provide access to the next reply in the Requester cache. This is the earliest reply to any previous requests sent by the Requester that has not been ‘taken’ from the Requester cache. The remaining two variants provide access to the earliest
Notice that some of these variants use a Sample, while other use a SampleRef. A SampleRef can be used much like a Sample, but it holds references to the reply data and DDS SampleInfo, so there is no additional copy. In contrast using the Sample obtains a copy of both the data and DDS SampleInfo.
The take_replies and read_replies operations access a collection of (one or more) replies to previously sent requests. These operations are convenient when you expect multiple replies to a single request, or when issuing multiple requests concurrently without waiting for intervening replies.
The take_replies and read_replies operations return a LoanedSamples container that holds the replies. To increase performance, the LoanedSamples does not copy the reply data. Instead it ‘loans’ the necessary resources from the Requester. The resources loaned by the LoanedSamples container must be eventually returned, either explicitly calling the return_loan() operation on the LoanedSamples or through the destructor of the LoanedSamples.
There are three variants of the take_replies and read_replies operations, depending on the parameters that are passed in:
1.take_replies (int max_count=DDS_LENGTH_UNLIMITED) read_replies (int max_count=DDS_LENGTH_UNLIMITED)
2.take_replies (int max_count,
const SampleIdentity_t &related_request_id) read_replies (int max_count,
const SampleIdentity_t &related_request_id)
3.take_replies (const SampleIdentity_t &related_request_id) read_replies (const SampleIdentity_t &related_request_id)
The first variant (only passing in max_count) returns a container holding up to max_count replies.
The second variant (passing in max_count and related_request_id) returns a LoanedSamples container holding up to max_count replies that correspond to the request identified by the related_request_id.
The third variant (only passing in related_request_id) returns a LoanedSamples container holding an unbounded number of replies that correspond to the request identified by the related_request_id. This is equivalent to the second variant with max_count = DDS_LENGTH_UNLIMITED.
The resources for the LoanedSamples container must be eventually be returned, either by calling the return_loan() operation on the LoanedSamples or through the LoanedSamples destructor.

23.1.6.3Receiving Replies
The receive_reply() operation is a shortcut that combines calls to wait_for_replies() and to take_reply(). Similarly the receive_replies() operation combines wait_for_replies() and take_replies().
There is only one variant of the receive_reply() operation:
1.receive_reply (Sample<TReply> &reply, const DDS_Duration_t &timeout)
This operation blocks until either a reply is received or a timeout occurs. The contents of the reply are copied into the provided sample (reply).
There are two variants of the receive_replies() operation, depending on the parameters that are passed in:
1.receive_replies (const DDS_Duration_t &max_wait)
2.receive_replies (int min_count, int max_count,
const DDS_Duration_t &max_wait)
These two variants block until multiple replies are available or a timeout occurs.
The first variant (only passing in max_wait) blocks until at least one reply is available or until max_wait time has passed, whichever comes first. The operation returns a LoanedSamples container holding the replies. Note that there could be more than one reply. This can occur if, for example, there were already replies available in the Requester from previous requests that were not processed. This operation does not limit the number of replies that can be returned on the
LoanedSamples container.
The second variant (passing in min_count, max_count, and max_wait) will block until min_count replies are available or until max_wait time has passed, whichever comes first. Up to max_count replies will be stored into the LoanedSamples container which is returned to the caller.
The resources held in the LoanedSamples container must eventually be returned, either with an explicit call to return_loan() on the LoanedSamples or through the LoanedSamples destructor.
23.2Repliers
A Replier is an entity with two associated DDS Entities: a DDS DataReader bound to a request Topic and a DDS DataWriter bound to a reply Topic. The Replier receives requests by subscribing to the request Topic and sends replies to those requests by publishing on the reply Topic.
Valid data types for these topics are the same as specified for the Requester, see Requesters (Section 23.1).
Much like a Requester, a Replier has an associated DDS DomainParticipant which can be shared with other Connext entities. All the other entities required for the
You can configure the QoS for the underlying DataWriter and DataReader in a QoS profile. By default, the DataWriter and DataReader are created with default QoS values (using DDS_DATAWRITER_QOS_DEFAULT and DDS_DATAREADER_QOS_DEFAULT, respectively) except for the following:
❏RELIABILITY QosPolicy (Section 6.5.19): kind is set to RELIABLE
❏HISTORY QosPolicy (Section 6.5.10): kind is set to KEEP_ALL
The Replier API supports several ways in which the application can be notified of, and process requests:
❏Blocking: The application thread blocks waiting for requests, processes them, and dispatches the reply. In this situation, if the computation necessary to process the request and produce the reply is small, you may consider using the SimpleReplier, which offers a simplified API.
❏Polling: The application thread checks (polls) for request periodically but does not block to wait for them.
❏Asynchronous notification: The application installs a ReplierListener to receive notifications whenever a request is received.
23.2.1Creating a Replier
To create a Replier with the minimum set of parameters you can use the basic constructor that receives only an existing DDS DomainParticipant and the name of the service:
Replier (DDSDomainParticipant * participant, const std::string & service_name)
Example:
Replier<Foo, Bar> * replier =
new Replier<Foo, Bar>(participant, "MyService");
To create a Replier with specific parameters you may use a different constructor that receives a
ReplierParams structure:
Replier (const ReplierParams<TRequest, TReply> ¶ms)
Example:
Replier<Foo, Bar> * replier = new Replier<Foo, Bar>( ReplierParams(participant).service_name("MyService")
.qos_profile("MyLibrary", "MyProfile"));
The service_name is used to generate the names of the request and reply Topics that the Requester and Replier will use to communicate. For example, if the service name is “MyService”, the topic names for the Requester and Replier will be “MyServiceRequest” and “MyServiceReply”, respectively. Therefore it is important to use the same service_name when creating the Requester and the Replier.
If you need to specify different Topic names, you can override the default names by setting the actual request and reply Topic names using request_topic_name() and reply_topic_name() accessors to the ReplierParams structure prior to creating the Replier.
23.2.2Destroying a Replier
To destroy a Replier and free its underlying entities:
virtual ~Replier ()
23.2.3Setting Replier Parameters
To change the ReplierParams that are used to create a Replier, use the operations listed in Table 23.3, “Operations to Set Replier Parameters”.
Table 23.3 Operations to Set Replier Parameters
Operation |
Description |
|
|
|
|
datareader_qos |
Sets the quality of service of the request DataReader. |
|
|
datawriter_qos |
Sets the quality of service of the reply DataWriter. |
|
|
Table 23.3 Operations to Set Replier Parameters
Operation |
Description |
|
|
publisher |
Sets a specific Publisher. |
|
|
qos_profile |
Sets a QoS profile for the entities in this replier. |
|
|
replier_listener |
Sets a listener that is called when requests are available. |
|
|
reply_topic_name |
Sets a specific reply topic name. |
|
|
reply_type_support |
Sets the type support for the reply type. |
|
|
request_topic_name |
Sets a specific request topic name. |
|
|
request_type_support |
Sets the type support for the request type. |
|
|
service_name |
Sets the service name the Replier offers and Requesters use to match. |
|
|
subscriber |
Sets a specific Subscriber. |
|
|
23.2.4Summary of Replier Operations
There are four kinds of operations an application can perform using the Replier:
❏Waiting for requests to be received
❏Reading/taking the request data and associated information
❏Receiving requests (a convenience operation that combines waiting and getting the data into a single operation)
❏Sending a reply for received request (i.e., publishing a reply sample on the reply Topic with special
The Replier operations are summarized in Table 23.4, “Replier Operations”.
Table 23.4 Replier Operations
|
Operation |
Description |
|
Reference |
|
|
|
|
|
|
|
Waiting for |
wait_for_requests |
Waits for requests. |
|
||
Requests |
|
|
|
|
|
|
take_request |
Copies the contents of a single request into a |
|
||
|
Sample and removes it from the Replier cache. |
|
|||
Taking |
|
|
|||
|
|
|
|
||
|
Returns a LoanedSamples to access |
multiple |
|
||
Requests |
|
|
|||
take_requests |
requests and removes the requests from the |
|
|||
|
|
||||
|
|
Replier cache. |
|
||
|
read_request |
Copies the contents of a single request into a |
|
||
Reading |
Sample, leaving it in the Replier cache |
|
|
||
|
|
|
|||
Requests |
read_requests |
Returns a LoanedSamples to access |
multiple |
|
|
|
requests, leaving them in the Replier cache. |
|
|||
|
|
|
|||
|
|
|
|
||
|
receive_request |
Waits for a single request and copies its contents |
|
||
Receiving |
into a Sample container. |
|
|
||
|
|
||||
Requests |
receive_requests |
Waits for multiple requests and provides a |
|||
|
|||||
|
LoanedSamples container to access them. |
|
|
||
|
|
|
|
||
|
|
|
|
|
|
Sending |
send_reply |
Sends a reply for a previous request. |
|
||
Replies |
|
||||
|
|
|
|
||
|
|
|
|
|
|
Getting |
get_request_datareader |
Retrieves the underlying DataReader. |
|
|
|
Underlying |
|
|
|
||
get_reply_datawriter |
Retrieves the underlying DataWriter. |
|
|||
Entities |
|
|
|
|
|
23.2.5Processing Incoming Requests with a Replier
The Replier provides several operations that can be used to wait for and access the requests:
❏wait_for_requests(), see Waiting for Requests (Section 23.2.5.1)
❏take_request(), take_requests(), read_request(), and read_requests(), see Reading and Taking Requests (Section 23.2.5.2)
❏receive_request() and receive_requests(), see Receiving Requests (Section 23.2.5.3)
The wait_for_requests() operations are used to wait until requests arrive.
The take_request(), take_requests(), read_request(), and read_requests() operations access the requests, once they have arrived.
The receive_request() and receive_requests() operations are convenience functions that combine waiting for and accessing requests and are equivalent to calling the ‘wait’ operation followed by the corresponding take_request() or take_requests() operations.
Each of these operations has several variants, depending on the parameters that are passed in.
23.2.5.1Waiting for Requests
Use the wait_for_requests() operation on the Replier to wait for requests. There are two variants of this operation, depending on the parameters that are passed in. All these variants block the calling thread until either there are replies or a timeout occurs.:
1.wait_for_requests (const DDS_Duration_t &max_wait)
2.wait_for_requests (int min_count, const DDS_Duration_t &max_wait)
The first variant (only passing in max_wait) blocks until one request is available or until max_wait time has passed, whichever comes first.
The second variant blocks until min_count number of requests are available or until max_wait time has passed.
Typically after waiting for requests, you will call take_request, take_requests, read_request, or read_requests, see Sending Replies (Section 23.2.6).
23.2.5.2Reading and Taking Requests
You can use the following four operations to access requests: take_request, take_requests, read_request, or read_requests.
As mentioned in Summary of Replier Operations (Section 23.2.4), the difference between the ‘take’ operations (take_request, take_requests) and the ‘read’ operations (read_request, read_requests) is that ‘take’ operations remove the requests from the Replier cache. This means that future calls to take_request, take_requests, read_request, or read_requests will not get the same request again.
The take_request and read_request operations access a single reply, whereas the take_requests and read_requests can access a collection of replies.
There are two variants of the take_request and read_request operations, depending on the parameters that are passed in:
1.take_request (connext::Sample<TRequest> & request) read_request (connext::Sample<TRequest> & request)
2.take_request (connext::SampleRef<TRequest request) read_request (connext::SampleRef<TRequest request)
The first variant returns the request using a Sample container. The second variant uses a SampleRef container instead. A SampleRef can be used much like a Sample, but it holds references to the request data and DDS SampleInfo, so there is no additional copy. In contrast, using the Sample makes a copy of both the data and DDS SampleInfo.
The take_requests and read_requests operations access a collection of (one or more) requests in the Replier cache. These operations are convenient when you want to
The take_requests and read_requests operations return a LoanedSamples container that holds the requests. To increase performance, the LoanedSamples does not copy the request data. Instead it ‘loans’ the necessary resources from the Replier. The resources loaned by the LoanedSamples container must be eventually returned, either explicitly by calling the return_loan() operation on the LoanedSamples or through the destructor of the LoanedSamples.
There is only one variant of these operations:
1.take_requests (int max_samples = DDS_LENGTH_UNLIMITED) read_requests (int max_samples = DDS_LENGTH_UNLIMITED)
The returned container may contain up to max_samples number of requests.
23.2.5.3Receiving Requests
The receive_request() operation is a shortcut that combines calls to wait_for_requests() and take_request(). Similarly, the receive_requests() operation combines wait_for_requests() and take_requests().
There are two variants of the receive_request() operation:
1. receive_request (connext::Sample<TRequest> & request, const DDS_Duration_t & max_wait)
2. receive_request (connext::SampleRef<TRequest> request, const DDS_Duration_t & max_wait)
The receive_request operation blocks until either a request is received or a timeout occurs. The contents of the request are copied into the provided container (request). The first variant uses a Sample container, whereas the second variant uses a SamepleRef container. A SampleRef can be used much like a Sample, but it holds references to the request data and DDS SampleInfo, so there is no additional copy. In contrast, using the Sample obtains a copy of both the data and the DDS SampleInfo.
There are two variants of the receive_requests() operation, depending on the parameters that are passed in:
1.receive_requests (const DDS_Duration_t & max_wait)
2.receive_requests (int min_request_count,
int max_request_count,
const DDS_Duration_t & max_wait)
The receive_requests operation blocks until one or more requests are available, or a timeout occurs.
The first variant (only passing in max_wait) blocks until one request is available or until max_wait time has passed, whichever comes first. The contents of the request are copied into a LoanedSamples container which is returned to the caller. An unlimited number of replies can be copied into the container.
The second variant blocks until min_request_count number of requests are available or until max_wait time has passed, whichever comes first. Up to max_request_count number of requests will be copied into a LoanedSamples container which is returned to the caller.
The resources for the LoanedSamples container must eventually be returned, either with return_loan() or through the LoanedSamples destructor.

23.2.6Sending Replies
There are three variants for send_reply(), depending on the parameters that are passed in:
1. send_reply (const TReply & reply,
const SampleIdentity_t & related_request_id)
2. send_reply (WriteSample<TReply> & reply,
const SampleIdentity_t & related_request_id)
3. send_reply (WriteSampleRef<TReply> & reply,
const SampleIdentity_t & related_request_id)
This operation sends a reply for a previous request. The related request ID can be retrieved from an existing request Sample.
The first variant is recommended if you do not need to change any of the default write parameters.
The other two variants allow you to set custom parameters for writing a reply. Unlike the Requester, where retrieving the sample ID for correlation is common, on the Replier side using a WriteSample or WriteSampleRef is only necessary when you need to overwrite the default write parameters. If that’s not the case, use the first variant.
23.3SimpleRepliers
The SimpleReplier offers a simplified API to receive and process requests. The API is based on a
The SimpleReplier is recommended if each request generates a single reply and computing the reply can be done quickly with very little CPU resources and without calling any operations that may block the processing thread. For example, looking something up in an internal memory- based data structure would be a good use case for using a SimpleReplier.
23.3.1Creating a SimpleReplier
To create a SimpleReplier with the minimum set of parameters, you can use the basic constructor:
SimpleReplier (DDSDomainParticipant *participant, const std::string &service_name,
SimpleReplierListener<TRequest, TReply> &listener)
To create a SimpleReplier with specific parameters, you may use a different constructor that receives a SimpleReplierParams structure:
SimpleReplier (const SimpleReplierParams<TRequest, TReply> ¶ms)
23.3.2Destroying a SimpleReplier
To destroy a SimpleReplier and free its resources use the destructor:
virtual ~SimpleReplier ()

23.3.3Setting SimpleReplier Parameters
To change the SimpleReplierParams used to create a SimpleReplier, use the operations in Table 23.5, “Operations to Set SimpleReplier Parameters”.
Table 23.5 Operations to Set SimpleReplier Parameters
Operation |
Description |
|
|
datareader_qos |
Sets the quality of service of the reply DataReader. |
|
|
datawriter_qos |
Sets the quality of service of the reply DataWriter. |
|
|
publisher |
Sets a specific Publisher. |
|
|
qos_profile |
Sets a QoS profile for the entities in this replier. |
|
|
reply_topic_name |
Sets a specific reply topic name. |
|
|
reply_type_support |
Sets the type support for the reply type. |
|
|
request_topic_name |
Sets a specific request topic name. |
|
|
request_type_support |
Sets the type support for the request type. |
|
|
service_name |
Sets the service name the Replier offers and Requesters use to match. |
|
|
subscriber |
Sets a specific Subscriber. |
|
|
23.3.4Getting Requests and Sending Replies with a SimpleReplierListener
The on_request_available() operation on the SimpleReplierListener receives a request and returns a reply.
on_request_available(TRequest &request)
This operation gets called when a request is available. It should immediately return a reply. After calling on_request_available(), Connext will call the operation return_loan() on the SimpleReplierListener; this gives the
retun_loan(TReply &reply)
23.4Accessing Underlying DataWriters and DataReaders
Both Requester and Replier entities have underlying DDS DataWriter and DataReader entities. These are created automatically when the Requester and Replier are constructed.
Accessing the DataWriter used by a Requester may be useful for a number of advanced use cases, such as:
❏Finding matching subscriptions (e.g., Replier entities), see Finding Matching Subscriptions (Section 6.3.16.1)
❏Setting a DataWriterListener, see Setting Up DataWriterListeners (Section 6.3.4)
❏Getting DataWriter protocol or cache statuses, see Statuses for DataWriters (Section 6.3.6)
❏Flushing a data batch after sending a number of request samples, see Flushing Batches of Data Samples (Section 6.3.9)
❏Modifying the QoS.
Accessing the reply DataReader may be useful for a number of advanced use cases, such as:
❏Finding matching publications (e.g., Requester entities), see Navigating Relationships Among Entities (Section 7.3.9)
❏Getting DataReader protocol or cache statuses, see Checking DataReader Status and StatusConditions (Section 7.3.5) and Statuses for DataReaders (Section 7.3.7).
❏Modifying the QoS.
To access these underlying objects:
RequestDataWriter * get_request_datawriter()
RequestDataReader * get_request_datareader()
ReplyDataWriter * get_reply_datawriter()
ReplyDataReader * get_reply_datareader()
Part 5: RTI Secure WAN Transport
The material in this part of the manual is only relevant if you have installed Secure WAN Trans- port.
This feature is not part of the standard Connext package; it must be downloaded and installed separately. It is only available on specific architectures. See the Secure WAN Transport Release Notes and Installation Guide for details.
Secure WAN Transport is an optional package that enables participant discovery and data exchange in a secure manner over the public WAN. Secure WAN Transport enables Connext to address the challenges in NAT traversal and authentication of all participants. By implementing UDP hole punching using the STUN protocol and providing security to channels by leveraging DTLS (Datagram TLS), you can securely exchange information between different sites separated by firewalls.
Chapter 24 Secure WAN Transport
Secure WAN Transport provides transport plugins that can be used by developers of Connext applications. These transport plugins allow Connext applications running on private networks to communicate securely over a
The Connext core is
The basic problem to overcome in a WAN environment is that messages sent from an application on a private
Once the transport has enabled traffic to cross the NAT gateway to the WAN, it is flowing on network hardware that is shared (in some cases, over the public internet). In this context, it is important to consider the security of data transmission. There are three primary issues involved:
❏Authenticating the communication peer (source or destination) as a trusted partner;
❏Encrypting the data to hide it from other parties that may have access to the network;
❏Validating the received data to ensure that it was not modified in transmission.
Secure WAN Transport addresses these problems by wrapping all
In summary, the package includes two transports:
❏The WAN Transport is for use on a WAN and includes security. It must be used with the WAN Server, a rendezvous server that provides the ability to discover public addresses and to register and look up peer addresses based on a unique WAN ID. The WAN Server is based on the STUN (Session Traversal Utilities for NAT) protocol

application and its peers has been obtained and connections have been initiated, the server is no longer required to maintain communication with a peer. (Note: security is disabled by default.)
❏The Secure Transport is an alternate transport that provides security on an untrusted LAN. Use of the RTI WAN Server is not required.
Multicast communication is not supported by either of these transports.
This chapter provides a technical overview of:
❏WAN Traversal via UDP
❏Datagram
❏Certificate Support (Section 24.4)
For information on how to use Secure WAN Transport with your Connext application, see Chapter 25: Configuring RTI Secure WAN Transport.
24.1WAN Traversal via UDP
In order to resolve the problem of communication across NAT boundaries, the WAN Transport implements a UDP
Once information about public addresses for the application and its peers has been obtained, and connections have been initiated, the server is no longer required to maintain communication with a peer. However, if communication fails, possibly due to changes in
Figure 24.1 shows the RTI WAN transport architecture.
24.1.1Protocol Details
The UDP
❏Registration Phase
The RTI WAN Server application runs on a machine that resides on the WAN network (i.e., not in a private LAN). It has to be globally accessible to LAN applications. It is started by a script and acts as a rendezvous point for LAN applications. During the registration phase, each transport locator is registered with the RTI WAN Server using a STUN binding request message.
The RTI WAN Server associates RTPS locators with their corresponding public IPv4 transport addresses (a combination of IP address and port) and stores that information in an internal table. Figure 24.2 illustrates the registration phase.
Figure 24.1 RTI WAN Transport Architecture
|
RTI WAN Rendezvous Server |
|
|
|
STUN traffic |
|
|
|
|
|
|
DomainParticipant 1 |
Server |
DomainParticipant 2 |
|
STUN traffic |
|
Register |
|
|
DTLS traffic |
|
|
Register |
NAT |
|
Connect to DP 2 |
|
|
|
NAT |
|
|
|
|
|
|
|
|
|
|
DP 2 public address |
DP 1 public address |
|
|
|
|
Connect |
|
STUN |
|
STUN |
DTLS handshaking |
|
|
|
|
||
DTLS |
DTLS handshaking |
DTLS |
RTPS discovery |
|
|
|
|
|
|
|
Encrypted RTPS |
|
|
|
|
|
|
RTPS user traffic |
|
Connext |
RTPS Discovery Traffic |
Connext |
|
|
|
|
|
|
|
|
RTPS User Traffic |
|
|
|
Application 1 |
|
Application 2 |
|
|
Figure 24.2 Registration Phase
RTI WAN Server
(18.181.0.31)
(2) From server to locator A |
(2) From server to locator B |
||
BIND RESPONSE |
|
|
BIND RESPONSE |
Mapped Address Attribute: |
Mapped Address Attribute: |
||
155.99.25.11:8001 |
|
|
138.76.29.7:7001 |
|
NAT |
NAT |
|
|
(155.99.25.11) |
(138.76.29.7) |
|
(1) From locator A to server |
|
|
(1) From locator B to server |
BIND REQUEST |
|
|
BIND REQUEST |
Src Locator Attribute: |
|
|
Src Locator Attribute: |
other.com#192.168.15.100:8000 |
|
|
rti.com#192.168.1.100:7000 |
Liveliness Period: |
|
|
Liveliness Period: |
60000 |
|
|
60000 |
Locator A |
NAT |
NAT |
Locator B |
other.com#192.168.15.100:8000 |
Transport |
Transport |
rti.com#192.168.1.100:700 |
|
Plugin |
Plugin |
0 |
|
|
RTPS |
|
|
Connext |
Connext |
|
❏Connection Phase
The connection phase starts when locator A wants to establish a connection with locator B. Locator A obtains information about locator B via Connext discovery traffic or the initial NDDS_DISCOVERY_PEERS list. To establish a connection with locator B, locator A sends a STUN connect request to the RTI WAN server. The server sends a STUN connect response to locator A, including information about the public IP transport
address (IP address and port) of locator B. In parallel, the RTI WAN server contacts locator B using another STUN connect request to let it know that locator A wants to establish a connection with it.
When locator A receives the public IP address of locator B, it will try to contact B using two STUN binding request messages. The first message is sent to the public address of B and the second message is sent to the private address of B. The private address was obtained using the last 32 bits of the locator address of B. The STUN binding request message directed to the public transport address of B sent by locator A will open a hole in A's NAT to receive messages from B.
When locator B receives the public address of locator A, it will try to contact A sending a STUN binding request message to that public address. This message will open a hole in B's NAT to receive messages from A. When locator A receives the first STUN binding response from locator B, it starts sending RTPS traffic.
The connection phase includes two processes: the connect process (Figure 24.3 on page
Figure 24.3 Connect Process
|
RTI WAN Server |
|
(18.181.0.31) |
(2) From server to locator A |
(3) From server to locator B |
CONNECT REQUEST |
|
CONNECT RESPONSE |
Src Locator Attribute: |
Mapped Address Attribute: |
rti.com#192.168.1.100:7000 |
138.76.29.7:7001 |
Dst Locator Attribute |
|
other.com#192.168.15.100:8000 |
|
Mapped Address Attribute: |
|
155.99.25.11:8001 |
NAT |
NAT |
(155.99.25.11) |
(138.76.29.7) |
(1)From locator A to server CONNECT REQUEST
Src Locator Attribute: |
|
|
(4) From locator B to server |
other.com#192.168.15.100:8000 |
|
|
CONNECT RESPONSE |
Dst Locator Attribute |
|
|
|
rti.com#192.168.1.100:7000 |
|
|
|
Locator A |
WAN |
WAN |
Locator B |
other.com#192.168.15.100:8000 |
Transport |
Transport |
rti.com#192.168.1.100:7000 |
|
Plugin |
Plugin |
|
|
|
RTPS |
|
|
Connext |
Connext |
|
❏STUN Liveliness
Finally, since bindings allocated by NAT expire unless refreshed, the clients (locators) must generate binding request messages for the server and other clients to refresh the bindings. The RTI STUN protocol implementation uses the attribute LIVELINESS- PERIOD in the STUN binding request to indicate the period in milliseconds at which a client will assert its liveliness. The WAN Server will remove a locator from its mapping table when the liveliness contract is not met. Likewise, a transport instance will remove a STUN connection with a locator when this locator does not assert its liveliness as indicated in the last binding request.
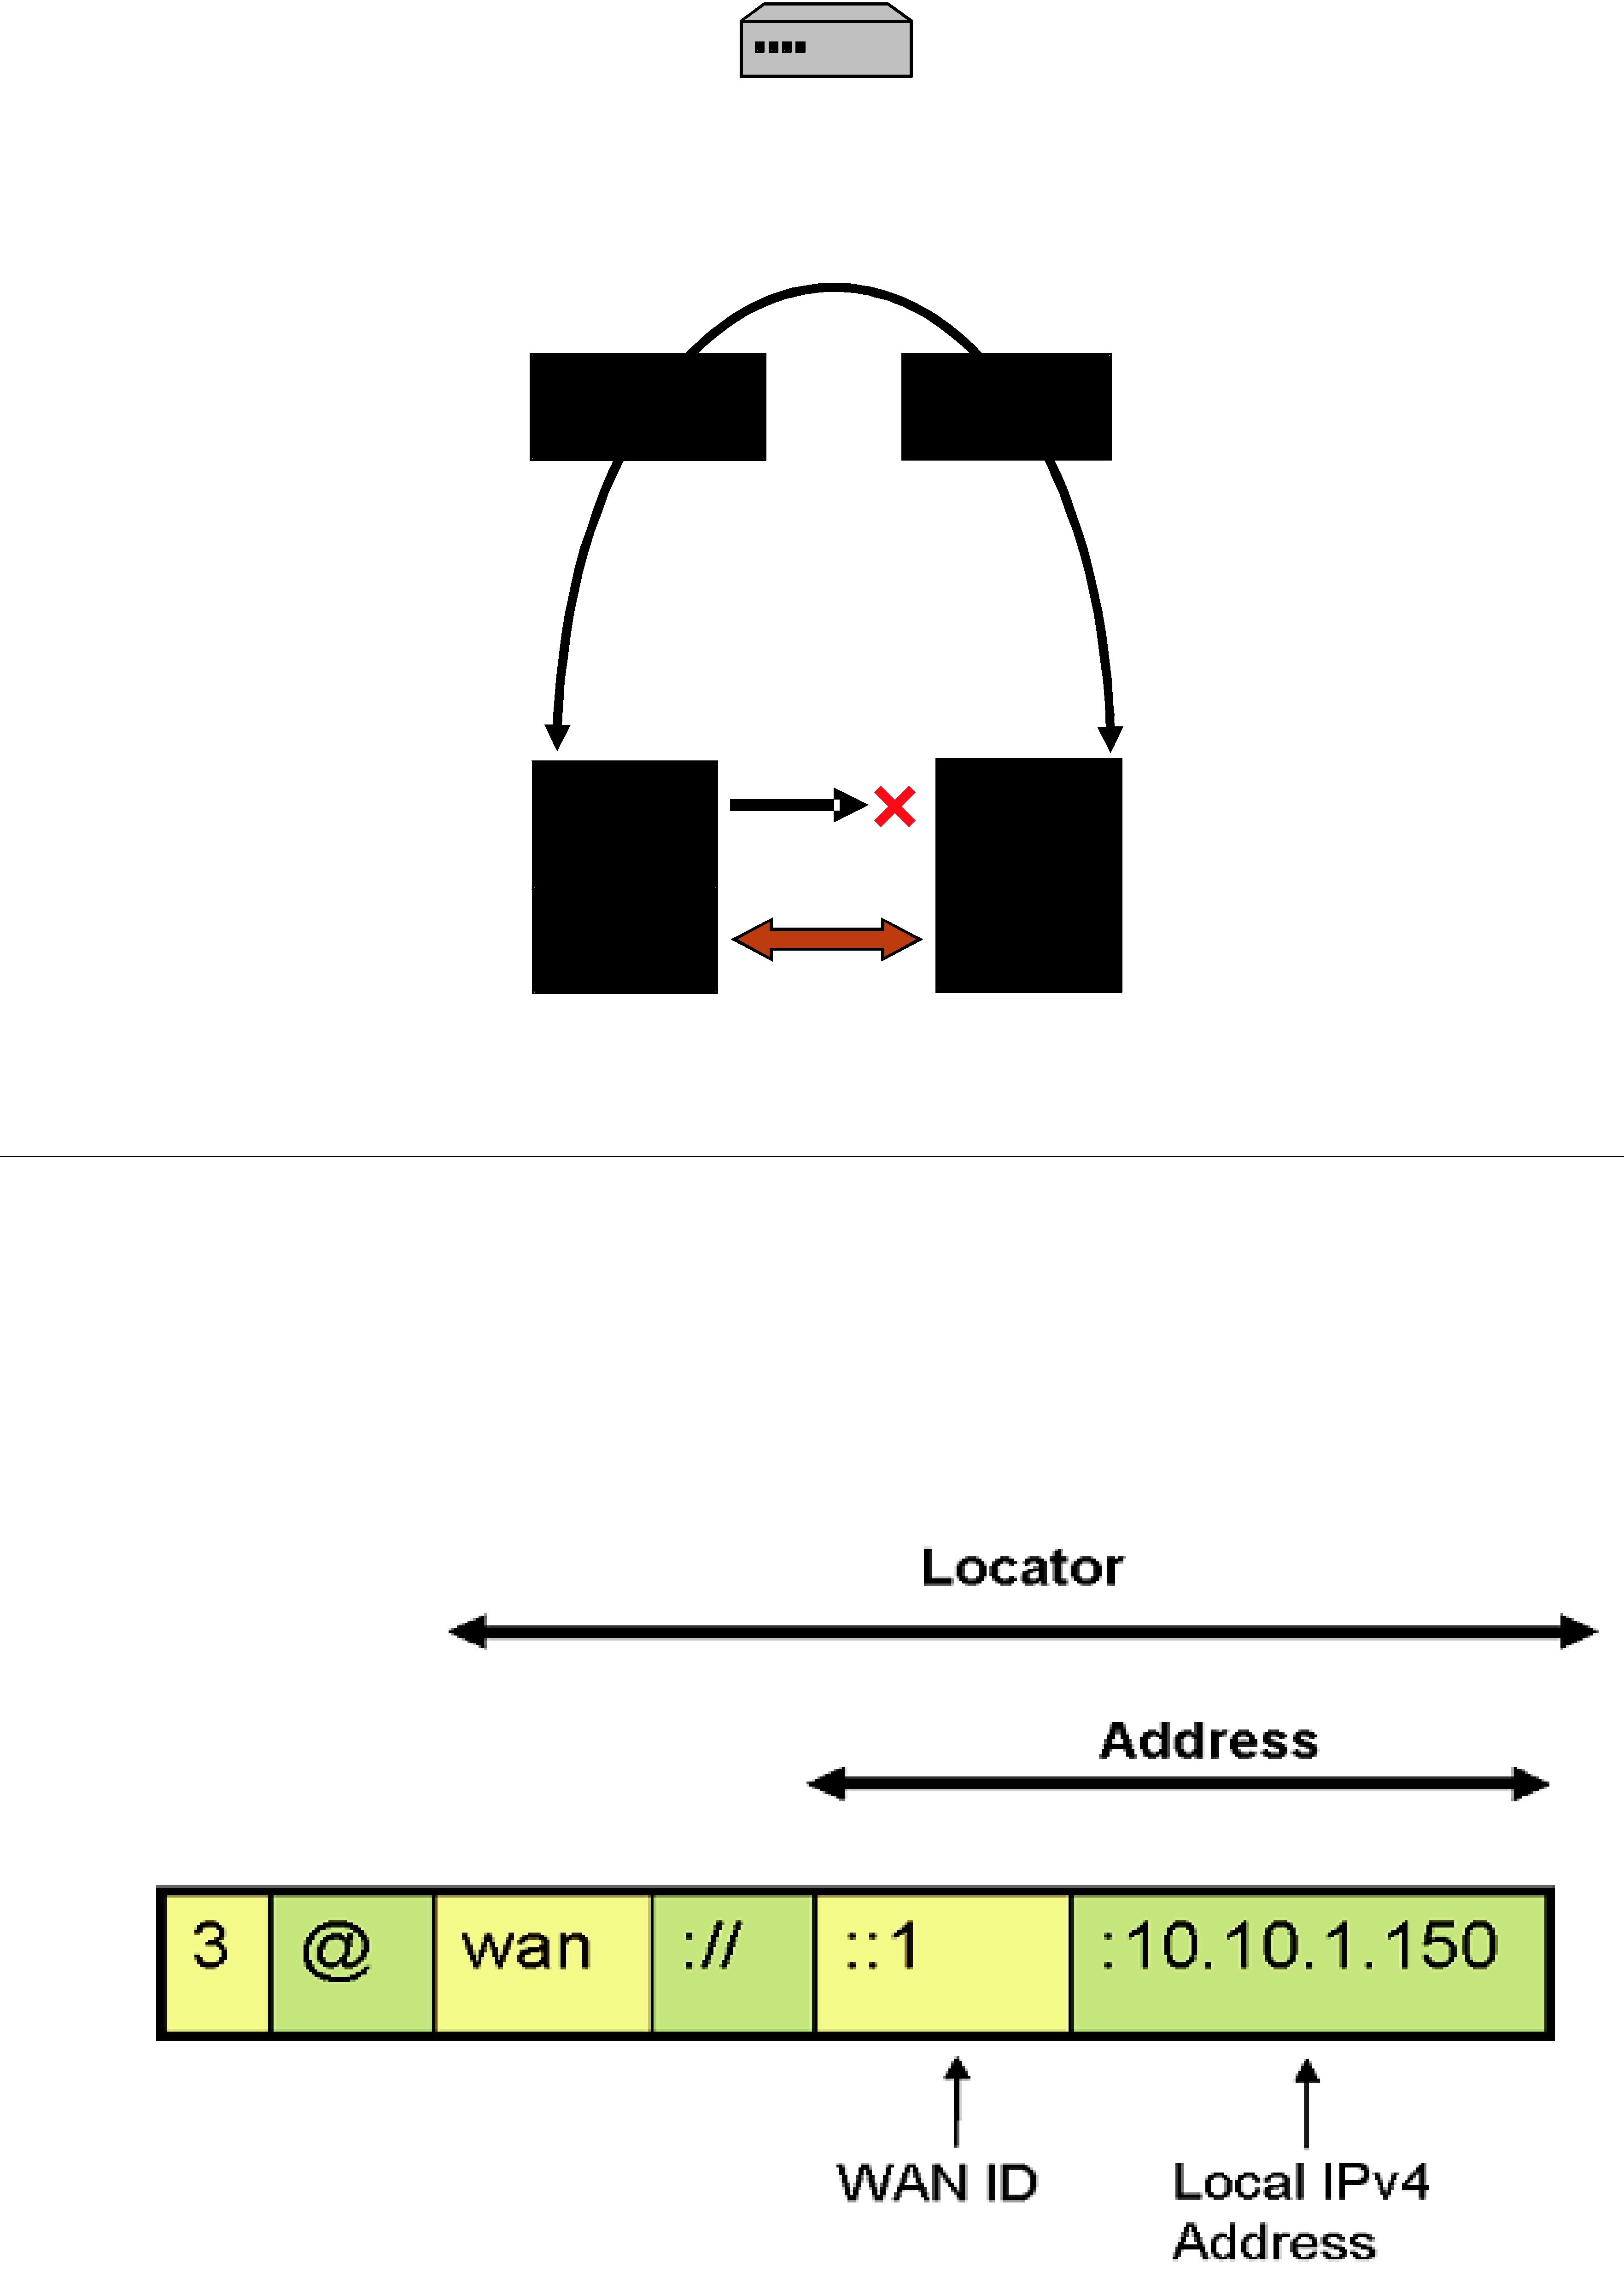
Figure 24.4 NAT Hole Punching Process
RTI WAN Server
(18.181.0.31)
(2) From locator A to public address of locator B
BIND RESPONSE
Mapped Address Attribute:
138.76.29.7:7001
(2) From locator B to public address of locator A
BIND RESPONSE
Mapped Address Attribute:
155.99.25.11:8001
NAT |
NAT |
(155.99.25.11) |
(138.76.29.7) |
(1) From locator A to public address of locator B
BIND REQUEST
Src Locator Attribute: other.com#192.168.15.100:8000
Liveliness Period:
60000
Locator A other.com#192.168.15.100:8000
(1) From locator A to private address of locator B
BIND REQUEST
Src Locator Attribute: other.com#192.168.15.100:8000
Liveliness Period:
|
60000 |
WAN |
WAN |
Transport |
Transport |
Plugin |
Plugin |
|
RTPS |
Connext |
Connext |
(1) From locator B to public address of locator A
BIND REQUEST
Src Locator Attribute: rti.com#192.168.1.100:7000
Liveliness Period:
60000
Locator B rti.com#192.168.1.100:7000
24.2WAN Locators
The WAN transport does not use simple IP addresses to locate peers. A WAN transport locator consists of a WAN ID, which is an arbitrary

❏The address is a
❏The "wan://" part specifies that the address is for the WAN transport.
❏The next part, "::1", specifies the top 12 bytes of the address to be 11 zero bytes, followed by a byte with value 1 (this corresponds to the peer's WAN ID).
❏The last part, "10.10.1.150" refers to the peers local IPv4 address, which will be used if the peers are on the same local network.
A DomainParticipant using the WAN transport will have to initialize the DDS_DiscoveryQosPolicy’s initial_peers field with the WAN locator addresses corresponding to the peers to which it wants to connect to. The value of initial_peers can be set using the environment variable NDDS_DISCOVERY_PEERS or the NDDS_DISCOVERY_PEERS configuration file. (See Configuring the Peers List Used in Discovery (Section 14.2).)
24.3Datagram
Data security is provided by wrapping all Connext network traffic with the Datagram Transport Layer Security (DTLS) protocol (IETF RFC 4347). DTLS is a relatively recent variant of the mature SSL/TLS family of protocols which adds the capability to secure communication over a connectionless
Secure protocol support is provided by the open source OpenSSL library, which has supported the DTLS protocol since the release of OpenSSL 0.9.8. Note however that many critical issues in DTLS were resolved by the OpenSSL 0.9.8f release. For more detailed information about available ciphers, certificate support, etc. please refer to the OpenSSL documentation. The DTLS protocol securely authenticates with each individual peer; as such, multicast communication is not supported by the Secure Transport. There is also a FIPS
The Secure Transport protocol stack is similar to the Secure WAN transport stack, but without the STUN layer and server. See Figure 24.1 on page
24.3.1Security Model
In order to communicate securely, an instance of the secure plugin requires: 1) a certificate authority (shared with all peers), 2) an identifying certificate which has been signed by the authority, 3) the private key associated with the public key contained in the certificate.
The Certificate Authority (CA) is specified by using a PEM format file containing its public key or by using a directory of PEM files following standard OpenSSL naming conventions. If a single CA file is used, it may contain multiple CA keys. In order to successfully communicate with a peer, the CA keys that are supplied must include the CA that has signed that peer's identifying certificate.
The identifying certificate is specified by using a PEM format file containing the chain of CAs used to authenticate the certificate. The identifying certificate must be signed by a CA. It will either be directly signed by a root CA (one of the CAs supplied above), by an authority whose certificate has been signed by the root CA, or by a longer chain of certificate authorities. The file must be sorted starting with the certificate to the highest level (root CA). If the certificate is directly signed by a root CA, then this file will only contain the root CA certificate followed by the identity certificate.

Finally, a private key is required. In order to avoid impersonation of an identity, this should be kept private. It can be stored in its own PEM file specified in one of the private key properties, or it can be appended to the certificate chain file.
One complication in the use of DTLS for communication by Connext is that even though DTLS is a connectionless protocol, it still has client/server semantics. The RTI Secure Transport maps a bidirectional communication channel between two peer applications into a pair of unidirectional encrypted channels. Both peers are playing the part of a client (when sending data) and a server (when receiving).
24.3.2Liveliness Mechanism
When a peer shuts down cleanly, the DTLS protocol ensures that resources are released. If a peer crashes or otherwise stops responding, a liveliness mechanism in the DTLS transport cleans up resources. You can configure the DTLS handshake retransmission interval and the connection liveliness interval.
24.4Certificate Support
Cryptographic certificates are required to use the security features of the WAN transport. This section describes a mechanism to use the OpenSSL command line tool to generate a simple private certificate authority. For more information, see the manual page for the openssl tool (http://www.openssl.org/docs/apps/openssl.html) or the book, "Network Security with OpenSSL" by Viega, Messier, & Chandra (O'Reilly 2002), or other references on Public Key Infrastructure.
1.Initialize the Certificate Authority:
a.Create a copy of the openssl.cnf file and edit fields to specify the proper default names and paths.
b.Create the required CA directory structure:
mkdir myCA
mkdir myCA/certs mkdir myCA/private mkdir myCA/newcerts mkdir myCA/crl
touch myCA/index.txt
c. Create a
openssl req
2.For each identifying certificate:
a.You may want to create a copy of your customized openssl.cnf file with default identi- fying information to be used as a template for certificate request creation; the com- mands below refer to this file as template.cnf.
b.Generate a certificate request and private key:
openssl req
c. Use the CA to sign the certificate request to generate certificate:
openssl ca

d. Optionally, append the private key to the peer certificate:
cat myCA/newcerts/peer1cert.pem peer1key.pem \ $>${private location}/ peer1.pem
24.5License Issues
The OpenSSL toolkit stays under a dual license, i.e., both the conditions of the OpenSSL License and the original SSLeay license apply to the toolkit. See below for the actual license texts. Actually both licenses are
/* ====================================================================
*Copyright (c)
*Redistribution and use in source and binary forms, with or without
*modification, are permitted provided that the following conditions
*are met:
*
*1. Redistributions of source code must retain the above copyright
*notice, this list of conditions and the following disclaimer.
*2. Redistributions in binary form must reproduce the above copyright
*notice, this list of conditions and the following disclaimer in
*the documentation and/or other materials provided with the
*distribution.
*
*3. All advertising materials mentioning features or use of this
*software must display the following acknowledgment:
*"This product includes software developed by the OpenSSL Project
*for use in the OpenSSL Toolkit. (http://www.openssl.org/)"
*4. The names "OpenSSL Toolkit" and "OpenSSL Project" must not be used to
*endorse or promote products derived from this software without
*prior written permission. For written permission, please contact
*
*
*5. Products derived from this software may not be called "OpenSSL"
*nor may "OpenSSL" appear in their names without prior written
*permission of the OpenSSL Project.
*
*6. Redistributions of any form whatsoever must retain the following
*acknowledgment:
*"This product includes software developed by the OpenSSL Project
*for use in the OpenSSL Toolkit (http://www.openssl.org/)"
*
*THIS SOFTWARE IS PROVIDED BY THE OpenSSL PROJECT ``AS IS'' AND ANY
*EXPRESSED OR IMPLIED WARRANTIES, INCLUDING, BUT NOT LIMITED TO, THE
*IMPLIED WARRANTIES OF MERCHANTABILITY AND FITNESS FOR A PARTICULAR
*PURPOSE ARE DISCLAIMED. IN NO EVENT SHALL THE OpenSSL PROJECT OR
*ITS CONTRIBUTORS BE LIABLE FOR ANY DIRECT, INDIRECT, INCIDENTAL,
*SPECIAL, EXEMPLARY, OR CONSEQUENTIAL DAMAGES (INCLUDING, BUT
*NOT LIMITED TO, PROCUREMENT OF SUBSTITUTE GOODS OR SERVICES;
*LOSS OF USE, DATA, OR PROFITS; OR BUSINESS INTERRUPTION)
*HOWEVER CAUSED AND ON ANY THEORY OF LIABILITY, WHETHER IN CONTRACT,
*STRICT LIABILITY, OR TORT (INCLUDING NEGLIGENCE OR OTHERWISE)
*ARISING IN ANY WAY OUT OF THE USE OF THIS SOFTWARE, EVEN IF ADVISED
*OF THE POSSIBILITY OF SUCH DAMAGE.
*====================================================================
*This product includes cryptographic software written by Eric Young
*(eay@cryptsoft.com). This product includes software written by Tim
*Hudson (tjh@cryptsoft.com).
*
*/
Original SSLeay License
/* Copyright (C)
*All rights reserved.
*This package is an SSL implementation written
*by Eric Young (eay@cryptsoft.com).
*The implementation was written so as to conform with Netscapes SSL.
*This library is free for commercial and
*the following conditions are aheared to. The following conditions
*apply to all code found in this distribution, be it the RC4, RSA,
*lhash, DES, etc., code; not just the SSL code. The SSL documentation
*included with this distribution is covered by the same copyright terms
*except that the holder is Tim Hudson (tjh@cryptsoft.com).
*
*Copyright remains Eric Young's, and as such any Copyright notices in
*the code are not to be removed.
*If this package is used in a product, Eric Young should be given
*attribution
*as the author of the parts of the library used.
*This can be in the form of a textual message at program startup or
*in documentation (online or textual) provided with the package.
*
*Redistribution and use in source and binary forms, with or without
*modification, are permitted provided that the following conditions
*are met:
*1. Redistributions of source code must retain the copyright
*notice, this list of conditions and the following disclaimer.
*2. Redistributions in binary form must reproduce the above copyright
*notice, this list of conditions and the following disclaimer in the
*documentation and/or other materials provided with the distribution.
*3. All advertising materials mentioning features or use of this software
*must display the following acknowledgement:
*"This product includes cryptographic software written by
*Eric Young (eay@cryptsoft.com)"
*The word 'cryptographic' can be left out if the routines from the
*library
*being used are not cryptographic
*4. If you include any Windows specific code (or a derivative thereof)
*from
*the apps directory (application code) you must include an
*acknowledgement:
*"This product includes software written by Tim Hudson
*(tjh@cryptsoft.com)"
*
*THIS SOFTWARE IS PROVIDED BY ERIC YOUNG ``AS IS'' AND
*ANY EXPRESS OR IMPLIED WARRANTIES, INCLUDING, BUT NOT LIMITED TO, THE
*IMPLIED WARRANTIES OF MERCHANTABILITY AND FITNESS FOR A PARTICULAR
*PURPOSE
*ARE DISCLAIMED. IN NO EVENT SHALL THE AUTHOR OR CONTRIBUTORS BE LIABLE
*FOR ANY DIRECT, INDIRECT, INCIDENTAL, SPECIAL, EXEMPLARY, OR
*CONSEQUENTIAL
*DAMAGES (INCLUDING, BUT NOT LIMITED TO, PROCUREMENT OF SUBSTITUTE GOODS
*OR SERVICES; LOSS OF USE, DATA, OR PROFITS; OR BUSINESS INTERRUPTION)
*HOWEVER CAUSED AND ON ANY THEORY OF LIABILITY, WHETHER IN CONTRACT,
*STRICT
*LIABILITY, OR TORT (INCLUDING NEGLIGENCE OR OTHERWISE) ARISING IN ANY WAY
*OUT OF THE USE OF THIS SOFTWARE, EVEN IF ADVISED OF THE POSSIBILITY OF
*SUCH DAMAGE.
*
*The licence and distribution terms for any publicly available
*version or
*derivative of this code cannot be changed. i.e. this code cannot
*simply be
*copied and put under another distribution licence
*[including the GNU Public Licence.]
*/

Chapter 25 Configuring RTI Secure WAN Transport
The Secure WAN Transport package includes two transports:
❏The WAN Transport is for use on a WAN and includes security.1 It must be used with the WAN Server, a separate application that provides additional services needed for Connext applications to communicate with each other over a WAN.
❏The Secure Transport is an alternate transport that provides security on an untrusted LAN. Use of the RTI WAN Server is not required.
There are two ways in which these transports can be configured:
❏By setting up predefined strings in the Property QoS Policy of the DomainParticipant (on UNIX, Solaris and Windows systems only). This process is described in Setting Up a Transport with the Property QoS (Section 25.2).
❏By instantiating a new transport (Section 25.5) and then registering it with the DomainParticipant, see Section 15.7 (not available in Java API).
Refer to the API Reference HTML documentation for details on these two approaches.
25.1Example Applications
A simple example is available to show how to configure the WAN transport. It includes example settings to enable communication over WAN, and optional settings to enable security (along with example certificate files to use for secure communication). The example is located in <Connext installation directory>/example/<language>/HelloWorldWAN.
As seen in the example, you can configure the properties of either transport by setting the appropriate name/value pairs in the DomainParticipant’s PropertyQoS, as described in Section 25.2. This will cause Connext to dynamically load the WAN or Secure Transport libraries at run time and then implicitly create and register the transport plugin.
Another way to use the WAN or Secure transports is to explicitly create the plugin and use register_transport() to register the transport with Connext (see Section 15.7). This way is not shown in the example. See Explicitly Instantiating a WAN or Secure Transport Plugin (Section 25.5).
1. Security is disabled by default.

25.2Setting Up a Transport with the Property QoS
The PROPERTY QosPolicy (DDS Extension) (Section 6.5.17) allows you to set up name/value pairs of data and attach them to an entity, such as a DomainParticipant. This will cause Connext to dynamically load the WAN or Secure Transport libraries at run time and then implicitly create and register the transport plugin.
Please refer to Setting Builtin Transport Properties with the PropertyQosPolicy (Section 15.6).
To assign properties, use the add_property() operation:
DDS_ReturnCode_t DDSPropertyQosPolicyHelper::add_property (DDS_PropertyQosPolicy policy,
const char * name, const char * value, DDS_Boolean propagate)
For more information on add_property() and the other operations in the DDSPropertyQosPolicyHelper class, please see Table 6.56, “PropertyQoSPolicyHelper Operations,” on page
The ‘name’ part of the name/value pairs is a predefined string, described in WAN Transport Properties (Section 25.3) and Secure Transport Properties (Section 25.4).
Here are the basic steps, taken from the example Hello World application (for details, please see the example application.)
1. Get the default DomainParticipant QoS from the DomainParticipantFactory.
participant_qos);
2. Disable the builtin transports.
participant_qos.transport_builtin.mask = DDS_TRANSPORTBUILTIN_MASK_NONE;
3. Set up the DomainParticipant’s Property QoS.
a. Load the plugin.
DDSPropertyQosPolicyHelper::add_property (participant_qos.property, "dds.transport.load_plugins", "dds.transport.wan_plugin.wan", DDS_BOOLEAN_FALSE);
b. Specify the transport plugin library.
DDSPropertyQosPolicyHelper::add_property (participant_qos.property, "dds.transport.wan_plugin.wan.library", "libnddstransportwan.so",
DDS_BOOLEAN_FALSE);
c. Specify the transport’s ‘create’ function.
DDSPropertyQosPolicyHelper::add_property (participant_qos.property, "dds.transport.wan_plugin.wan.create_function",
"NDDS_Transport_WAN_create",
DDS_BOOLEAN_FALSE);
d. Specify the WAN Server and instance ID.
DDSPropertyQosPolicyHelper::add_property (participant_qos.property, "dds.transport.wan_plugin.wan.server", "192.168.1.1", DDS_BOOLEAN_FALSE);
DDSPropertyQosPolicyHelper::add_property (participant_qos.property, "dds.transport.wan_plugin.wan.transport_instance_id", 1, DDS_BOOLEAN_FALSE);
e. Specify any other properties, as needed.
4.Create the DomainParticipant, using the modified QoS.
participant =
Important! Property changes should be made before the transport is loaded: either before the DomainParticipant is enabled, before the first DataWriter/DataReader is created, or before the builtin topic reader is looked up, whichever one happens first.
25.3WAN Transport Properties
Table 25.1 lists the properties that you can set for the WAN Transport.
Table 25.1 Properties for NDDS_Transport_WAN_Property_t
Property Name |
|
|
|
|
|
|
|
|
|
|
|
(prefix with |
|
|
Property Value Description |
|
|
|
|||||
‘dds.transport.WAN.wan1.’)a |
|
|
|
|
|
|
|
|
|
|
|
|
|
||||||||||
|
Required |
||||||||||
dds.transport.load_plugins |
plugins that will be loaded by Connext. For example: |
||||||||||
(note: this does not take a prefix) |
“dds.transport.WAN.wan1". You will use this string as the prefix to the |
||||||||||
|
property names. See a. Note: You can load up to 8 plugins. |
|
|
||||||||
|
Required |
Must set to "libnddstransportwan.so" |
(for |
UNIX/Solaris |
|||||||
|
systems) or "nddstransportwan.dll" (for Windows system). |
|
|||||||||
library |
This library and the dependent OpenSSL libraries need to be in the path |
||||||||||
during run time for use by Connext (in the LD_LIBRARY_PATH |
|||||||||||
|
|||||||||||
|
environment variable on UNIX/Solaris systems, in Path for Windows |
||||||||||
|
systems). |
|
|
|
|
|
|
|
|
|
|
|
|
|
|
|
|||||||
create_function |
Required |
Must be "NDDS_Transport_WAN_create" |
|
|
|||||||
|
|
|
|
|
|
|
|
|
|||
|
Used |
to |
register |
the |
transport |
plugin |
returned |
by |
|||
|
NDDS_Transport_WAN_create() |
|
(as |
|
specified |
by |
|||||
aliases |
<WAN_prefix>.create_function) to the DomainParticipant. Aliases should |
||||||||||
be specified as a |
|||||||||||
|
|||||||||||
|
alias. If it is not specified, the prefixa is used as the default alias for the |
||||||||||
|
plugin. |
|
|
|
|
|
|
|
|
|
|
|
|
|
|
||||||||
|
Specifies the verbosity of log messages from the transport. |
|
|
||||||||
|
Possible values: |
|
|
|
|
|
|
|
|||
verbosity |
|
|
|
|
|
|
|
|
|
||
0 (default): errors only |
|
|
|
|
|
|
|
||||
|
1: errors and warnings |
|
|
|
|
|
|
|
|||
|
2: local status |
|
|
|
|
|
|
|
|
||
|
5 or higher: all messages |
|
|
|
|
|
|
|
|||
|
|
||||||||||
|
Number of bits in a |
||||||||||
parent.parent.address_bit_count |
be between 0 and 128. For example, for an address range of |
||||||||||
|
address_bit_count should be set to 8. |
|
|
|
|
|
|||||
|
|
||||||||||
|
A bitmap that defines various properties of the transport to the Connext |
||||||||||
parent.parent.properties_bitmap |
core. Currently, the only |
property |
supported is |
whether or not |
the |
||||||
transport plugin will always loan a buffer when Connext tries to receive a |
|||||||||||
|
|||||||||||
|
message using the plugin. This is in support of a |
|
|||||||||
|
|
|
|
|
|
|
|
|
|
|
|
Table 25.1 Properties for NDDS_Transport_WAN_Property_t
Property Name |
|
|
|
|
|
|
|
|
(prefix with |
|
|
Property Value Description |
|
|
|||
‘dds.transport.WAN.wan1.’)a |
|
|
|
|
|
|
|
|
|
|
|||||||
|
Specifies the maximum number of buffers that Connext can pass to the |
|||||||
|
send() function of the transport plugin. |
|
|
|
|
|||
|
The transport plugin send() API supports a |
|||||||
|
the send() call can take several discontiguous buffers, assemble and send |
|||||||
|
them in a single message. This enables Connext to send a message from |
|||||||
|
parts obtained from different sources without first having to copy the parts |
|||||||
|
into a single contiguous buffer. |
|
|
|
|
|||
parent.parent.gather_send_ |
However, most transports that support a |
|||||||
buffer_count_max |
upper limit on the number of buffers that can be gathered and sent. Setting |
|||||||
|
this value will prevent Connext from trying to gather too many buffers into |
|||||||
|
a send call for the transport plugin. |
|
|
|
|
|||
|
Connext requires all |
|||||||
|
send of least a minimum number of buffers. This minimum number is |
|||||||
|
defined as |
|
|
|
|
|
|
|
|
NDDS_TRANSPORT_PROPERTY_GATHER_SEND_BUFFER_COUNT_ |
|||||||
|
MIN. |
|
|
|
|
|
|
|
|
|
|||||||
|
The maximum size of a message in bytes that can be sent or received by |
|||||||
|
the transport plugin. |
|
|
|
|
|
||
|
This value must be set before the transport plugin is registered, so that |
|||||||
parent.parent.message_size_max |
Connext can properly use the plugin. |
|
|
|
|
|||
|
If you set this higher than the default, the DomainParticipant’s buffer_size |
|||||||
|
(in the RECEIVER_POOL QosPolicy (DDS Extension) (Section 8.5.6)) |
|||||||
|
should also be changed. |
|
|
|
|
|||
|
|
|
||||||
|
A list of strings, each identifying a range of interface addresses. |
|
||||||
|
Interfaces must be specified as |
|||||||
|
comma delimiting an interface. |
|
|
|
|
|||
|
If the list is |
|||||||
|
|
|
|
|
||||
parent.parent.allow_interfaces |
It is up to the transport plugin to interpret the list of strings passed in. |
|||||||
Usually |
this |
interpretation |
will |
be |
consistent |
with |
||
|
NDDS_Transport_String_To_Address_Fcn_cEA(). |
|
|
|||||
|
This property is not interpreted by the Connext core; it is provided merely |
|||||||
|
as a convenient and standardized way to specify the interfaces for the |
|||||||
|
benefit of the transport plugin developer and user. |
|
|
|||||
|
You must manage the memory of the list. The memory may be freed after |
|||||||
|
the DomainParticipant is enabled. |
|
|
|
|
|||
|
|
|||||||
|
A list of strings, each identifying a range of interface addresses. If the list is |
|||||||
|
|
|
|
|||||
|
Interfaces must be specified as |
|||||||
|
comma delimiting an interface. |
|
|
|
|
|||
|
This "black" list is applied after the parent.parent.allow_interfaces list and |
|||||||
|
filters out the interfaces that should not be used. |
|
|
|
||||
parent.parent.deny_interfaces |
It is up to the transport plugin to interpret the list of strings passed in. |
|||||||
Usually |
this |
interpretation |
will |
be |
consistent |
with |
||
|
||||||||
|
NDDS_Transport_String_To_Address_Fcn_cEA(). |
|
|
|||||
|
This property is not interpreted by the Connext core; it is provided merely |
|||||||
|
as a convenient and standardized way to specify the interfaces for the |
|||||||
|
benefit of the transport plugin developer and user. |
|
|
|||||
|
You must manage the memory of the list. The memory may be freed after |
|||||||
|
the DomainParticipant is enabled. |
|
|
|
|
|||
|
|
|
|
|
|
|
|
|

Table 25.1 Properties for NDDS_Transport_WAN_Property_t
Property Name |
|
(prefix with |
Property Value Description |
‘dds.transport.WAN.wan1.’)a
Size in bytes of the send buffer of a socket used for sending. On most operating systems, setsockopt() will be called to set the SENDBUF to the value of this parameter.
|
This value must be greater than or equal to |
|
|
|
|
|||||
parent.send_socket_buffer_size |
|
|
|
|
|
|||||
|
The maximum value is operating |
|
|
|
||||||
|
If NDDS_TRANSPORT_UDPV4_SOCKET_BUFFER_SIZE_OS_DEFAULT, |
|||||||||
|
then setsockopt() (or equivalent) will not be called to size the send buffer |
|||||||||
|
of the socket. |
|
|
|
|
|
|
|
||
|
|
|
||||||||
|
Size in bytes of the receive buffer of a socket used for receiving. |
|
||||||||
|
On most operating systems, setsockopt() will be called to set the |
|||||||||
|
RECVBUF to the value of this parameter. |
|
|
|
|
|||||
parent.recv_socket_buffer_size |
This |
value |
must |
be |
greater |
than |
or |
equal |
to |
|
parent.parent.message_size_max. The maximum value is operating |
||||||||||
|
|
|
|
|
|
|
||||
|
If NDDS_TRANSPORT_UDPV4_SOCKET_BUFFER_SIZE_OS_DEFAULT, |
|||||||||
|
then setsockopt() (or equivalent) will not be called to size the receive |
|||||||||
|
buffer of the socket. |
|
|
|
|
|
|
|||
|
|
|||||||||
|
Allows the transport plugin to use unicast UDP for sending and receiving. |
|||||||||
parent.unicast_enabled |
By default, it will be turned on. Also by default, it will use all the allowed |
|||||||||
network interfaces that it finds up and running when the plugin is |
||||||||||
|
||||||||||
|
instanced. |
|
|
|
|
|
|
|
||
|
|
|||||||||
|
Prevents the transport plugin from using the IP loopback interface. Three |
|||||||||
|
values are allowed: |
|
|
|
|
|
|
|||
|
0: Enable local traffic via this plugin. This plugin will only use and report |
|||||||||
|
the IP loopback interface only if there are no other network interfaces |
|||||||||
|
(NICs) up on the system. |
|
|
|
|
|
|
|||
parent.ignore_loopback_interface |
1: Disable local traffic via this plugin. Do not use the IP loopback interface |
|||||||||
even if no NICs are discovered. This is useful when you want |
||||||||||
|
applications running on the same node to use a more efficient plugin |
|||||||||
|
like Shared Memory instead of the IP loopback. |
|
|
|
||||||
|
||||||||||
|
shared memory transport plugin is available for local traffic, the |
|||||||||
|
effective value is 1 (i.e., disable UDPv4 local traffic). Otherwise, the |
|||||||||
|
effective value is 0, i.e., use UDPv4 for local traffic also. |
|
|
|||||||
|
|
|||||||||
|
Prevents the transport plugin from using a network interface that is not |
|||||||||
|
reported as RUNNING by the operating system. |
|
|
|
||||||
|
The transport checks the flags reported by the operating system for each |
|||||||||
|
network interface upon initialization. An interface which is not reported as |
|||||||||
|
UP will not be used. This property allows the same check to be extended to |
|||||||||
|
the IFF_RUNNING flag implemented by some operating systems. The |
|||||||||
parent.ignore_nonrunning_ |
RUNNING flag is defined to mean that "all resources are allocated", and |
|||||||||
may be off if there is no link detected, e.g., the network cable is unplugged. |
||||||||||
interfaces |
||||||||||
Two values are allowed: |
|
|
|
|
|
|
||||
|
|
|
|
|
|
|
||||
|
0: Do not check the RUNNING flag when enumerating interfaces, just |
|||||||||
|
make sure the interface is UP. |
|
|
|
|
|
||||
|
1: Check the flag when enumerating interfaces, and ignore those that are |
|||||||||
|
not reported as RUNNING. This can be used on some operating |
|||||||||
|
systems to cause the transport to ignore interfaces that are enabled but |
|||||||||
|
not connected to the network. |
|
|
|
|
|
||||
Table 25.1 Properties for NDDS_Transport_WAN_Property_t
Property Name |
|
|
|
|
|
|
(prefix with |
Property Value Description |
|
|
|||
‘dds.transport.WAN.wan1.’)a |
|
|
|
|
|
|
|
|
|
|
|||
|
Prevents the transport plugin from doing a zero copy. |
|
|
|||
|
By default, this plugin will use the zero copy on OSs that offer it. While |
|||||
|
this is good for performance, it may sometime tax the OS resources in a |
|||||
|
manner that cannot be overcome by the application. |
|
|
|||
|
The best example is if the hardware/device driver lends the buffer to the |
|||||
parent.no_zero_copy |
application itself. If the application does not return the loaned buffers soon |
|||||
enough, the node may error or malfunction. In case you cannot |
||||||
|
||||||
|
reconfigure the H/W, device driver, or the OS to allow the zero copy |
|||||
|
feature to work for your application, you may have no choice but to turn |
|||||
|
off zero copy use. |
|
|
|
|
|
|
By default this is set to 0, so Connext will use the |
|||||
|
by the OS. |
|
|
|
|
|
|
|
|||||
|
Controls the blocking behavior of send sockets. CHANGING THIS |
|||||
|
FROM THE DEFAULT CAN CAUSE SIGNIFICANT PERFORMANCE |
|||||
|
PROBLEMS. |
|
|
|
|
|
|
Currently two values are defined: |
|
|
|
||
parent.send_blocking |
NDDS_TRANSPORT_UDPV4_BLOCKING_ALWAYS: |
Sockets |
are |
|||
blocking (default socket options for Operating System). |
|
|
||||
|
|
|
||||
|
NDDS_TRANSPORT_UDPV4_BLOCKING_NEVER: Sockets are modified |
|||||
|
to make them |
|||||
|
CONFIGURATION |
AND MAY |
CAUSE |
SIGNIFICANT |
||
|
PERFORMANCE PROBLEMS. |
|
|
|
||
|
|
|||||
|
Mask for the transport priority field. This is used in conjunction with |
|||||
|
transport_priority_mapping_low/high to define the mapping from DDS |
|||||
|
transport priority to the IPv4 TOS field. Defines a contiguous region of bits |
|||||
|
in the |
|||||
parent.transport_priority_mask |
IPv4 TOS field on an outgoing socket. |
|
|
|
||
For example, the value 0x0000ff00 causes bits |
||||||
|
||||||
|
mapping. The value will be scaled from the mask range (0x0000 - 0xff00 in |
|||||
|
this case) to the range specified by low and high. |
|
|
|||
|
If the mask is set to zero, then the transport will not set IPv4 TOS for send |
|||||
|
sockets. |
|
|
|
|
|
|
|
|
||||
parent.transport_priority_ |
Sets the low and high values of the output range to IPv4 TOS. |
|
||||
mapping_low |
These values are used in conjunction with transport_priority_mask to |
|||||
parent.transport_priority_ |
define the mapping from DDS transport priority to the IPv4 TOS field. |
|||||
Defines the low and high values of the output range for scaling. |
|
|||||
mapping_high |
|
|||||
Note that IPv4 TOS is generally an |
|
|
|
|||
|
|
|
|
|||
|
|
|
|
|
||
enable_security |
Required if you want to use security. |
|
|
|
||
|
|
|||||
recv_decode_buffer_size |
Size of buffer for decoding packets from wire. An extra buffer is required |
|||||
for storage of encrypted data. |
|
|
|
|||
|
|
|
|
|||
|
|
|
||||
port_offset |
Port offset to allow coexistence with |
|
||||
|
|
|
|
|||
dtls_handshake_resend_interval |
DTLS handshake retransmission interval in milliseconds |
|
|
|||
|
|
|||||
|
A string that specifies the name of file containing Certificate Authority |
|||||
|
certificates. File should be in PEM format. See the OpenSSL manual page |
|||||
tls.verify.ca_file |
for SSL_load_verify_locations for more information. |
|
|
|||
|
If you want to use security, ca_file or ca_path must be specified; both may |
|||||
|
be specified. |
|
|
|
|
|
|
|
|
|
|
|
|
Table 25.1 Properties for NDDS_Transport_WAN_Property_t
Property Name |
|
|
|
|
|
|
(prefix with |
|
Property Value Description |
|
|||
‘dds.transport.WAN.wan1.’)a |
|
|
|
|
|
|
|
|
|||||
|
A string that specifies paths to directories containing Certificate Authority |
|||||
|
certificates. Files should be in PEM format, and follow the OpenSSL- |
|||||
tls.verify.ca_path |
required naming |
conventions. |
See the |
OpenSSL manual |
page for |
|
SSL_CTX_load_verify_locations for more information. |
|
|||||
|
|
|||||
|
If you want to use security, ca_file or ca_path must be specified; both may |
|||||
|
be specified. |
|
|
|
|
|
|
|
|
||||
tls.verify.verify_depth |
Maximum certificate chain length for verification. |
|
||||
|
|
|||||
|
If |
|||||
tls.verify.verify_peer |
(default). If zero, only the reader side will present a certificate, which will |
|||||
|
be verified by the writer side. |
|
|
|
||
|
|
|
|
|||
|
This can be set to one of three values: |
|
|
|||
|
"default" |
selects |
the |
default |
callback |
|
tls.verify.verify_callback |
NDDS_Transport_TLS_default_verify_callback() |
|
||||
verbose" |
selects |
the |
verbose |
callback |
||
|
||||||
|
NDDS_Transport_TLS_verbose_verify_callback() |
|
||||
|
"none" requests no callback be registered |
|
|
|||
|
|
|
|
|
||
tls.cipher.cipher_list |
List of available |
(D)TLS ciphers. See the |
OpenSSL manual |
page for |
||
SSL_set_cipher_list for more information on the format of this string. |
||||||
|
||||||
|
|
|||||
|
List of available |
|||||
|
"foo.h:512,bar.h:256" means: |
|
|
|
||
tls.cipher.dh_param_files |
dh_param_files[0].file = foo.pem, |
|
|
|
||
dh_param_files[0].bits = 512, |
|
|
|
|||
|
|
|
|
|||
|
dh_param_files[1].file = bar.pem, |
|
|
|
||
|
dh_param_files[1].bits = 256 |
|
|
|
||
|
|
|
||||
tls.cipher.engine_id |
String ID of OpenSSL cipher engine to request. |
|
||||
|
|
|||||
|
Required if you want to use security. A string that specifies the name of a |
|||||
|
file containing an identifying certificate chain (in PEM format). An |
|||||
tls.identity.certificate_chain_file |
identifying certificate is required for secure communication. The file must |
|||||
be sorted starting with the certificate to the highest level (root CA). If no |
||||||
|
||||||
|
private key is specified, this file will be used to load a |
|||||
|
key. |
|
|
|
|
|
|
|
|
||||
tls.identity.private_key_password |
A string that specifies the password for private key. |
|
||||
|
|
|||||
|
A string that specifies that name of a file containing private key (in PEM |
|||||
tls.identity.private_key_file |
format). If no private key is specified (all values are NULL), this value will |
|||||
|
default to the same file as the specified certificate chain file. |
|
||||
|
|
|||||
tls.identity.rsa_private_key_file |
A string that specifies that name of a file containing an RSA private key (in |
|||||
PEM format). |
|
|
|
|
||
|
|
|
|
|
||
|
|
|||||
|
Required A set of |
|||||
transport_instance_id[0] to |
array. This value must be unique for all transport instances |
|||||
[NDDS_TRANSPORT_ |
communicating with the same WAN Rendezvous Server. |
|
||||
WAN_TRANSPORT_ |
If less than the full array is specified, it will be |
|||||
INSTANCE_ID_LENGTH] |
the string "01,02" results in the array being set to: |
|
||||
|
{0,0,0,0,0,0,0,0,0,0,1,2} |
|
|
|
||
|
|
|
|
|
||
interface_address |
Locator, as a string |
|
|
|
||
|
|
|
|
|||
server |
Required Server locator, as a string. |
|
|
|||
|
|
|
|
|
||
server_port |
Server port number. |
|
|
|
||
|
|
|||||
stun_retransmission_interval |
STUN request messages requiring a response are resent with this interval. |
|||||
The interval is doubled after each retransmission. Specified in msec. |
||||||
|
||||||
|
|
|
|
|
|
|

Table 25.1 Properties for NDDS_Transport_WAN_Property_t
Property Name |
|
|
(prefix with |
Property Value Description |
|
‘dds.transport.WAN.wan1.’)a |
|
|
|
|
|
stun_number_of_retransmissions |
Maximum number of times STUN messages are resent unless a response is |
|
received. |
||
|
||
|
|
|
stun_liveliness_period |
Period at which messages are sent to peers to keep NAT holes open; and to |
|
the WAN server to refresh bound ports. Specified in msec. |
||
|
||
|
|
a. Assuming you used ‘dds.transport.WAN.wan1’ as the alias to load the plugin. If not, change the prefix to match the string used with dds.transport.load_plugins. This prefix must begin with 'dds.transport.'
25.4Secure Transport Properties
Table 25.2 lists the properties that you can set for the Secure Transport.
Table 25.2 Properties for NDDS_Transport_DTLS_Property_t
Property Name |
|
|
|
|
|
|
|
|
|
|
|
(prefix with |
|
|
Property Value Description |
|
|
|
|||||
‘dds.transport.DTLS.dtls1’)a |
|
|
|
|
|
|
|
|
|
|
|
|
|
||||||||||
|
Required |
||||||||||
dds.transport.load_plugins |
plugins |
that |
will |
be loaded |
by |
Connext. |
For |
example: |
|||
“dds.transport.DTLS.dtls1". You will use this string as the prefix to the |
|||||||||||
(note: this does not take a prefix) |
|||||||||||
property names. See a. |
|
|
|
|
|
|
|
||||
|
Note: you can load up to 8 plugins. |
|
|
|
|
|
|||||
|
|
|
|
|
|||||||
|
Required |
Must set to "libnddstransporttls.so" (for |
UNIX/Solaris) |
or |
|||||||
|
"nddstransporttls.dll" (for Windows). |
|
|
|
|
|
|||||
library |
This library and the dependent Openssl libraries need to be in the path |
||||||||||
during run time for use by Connext (in the LD_LIBRARY_PATH |
|||||||||||
|
|||||||||||
|
environment variable on UNIX/Solaris systems, in PATH for Windows |
||||||||||
|
systems). |
|
|
|
|
|
|
|
|
|
|
|
|
|
|
|
|
||||||
create_function |
Required |
Must be "NDDS_Transport_DTLS_create" |
|
|
|
||||||
|
|
|
|
|
|
|
|
|
|||
|
Used |
to |
register |
the |
transport |
plugin |
returned |
by |
|||
|
NDDS_Transport_DTLS_create() |
|
(as |
specified |
|
by |
|||||
aliases |
<DTLS_prefix>.create_function) |
to |
the DomainParticipant. |
Aliases |
|||||||
should be specified as comma separated string, with each comma |
|||||||||||
|
|||||||||||
|
delimiting an alias. If it is not specified, the prefix (see a) is used as the |
||||||||||
|
default alias for the plugin. |
|
|
|
|
|
|
||||
|
|
|
|
||||||||
|
The network address at which to register this transport plugin. |
|
|
||||||||
|
The least significant transport_in.property.address_bit_count will be |
||||||||||
|
truncated. The remaining bits are the network address of the transport |
||||||||||
network_address |
plugin. |
|
|
|
|
|
|
|
|
|
|
|
This value overwrites the value returned by the output parameter in |
||||||||||
|
NDDS_Transport_create_plugin |
function |
as |
specified |
in |
||||||
|
"<DTLS_prefix>.create_function". |
|
|
|
|
|
|
||||
|
|
|
|
||||||||
|
Specifies the verbosity of log messages from the transport. |
|
|
||||||||
|
Possible values: |
|
|
|
|
|
|
|
|||
verbosity |
|
|
|
|
|
|
|
|
|
||
0 (default): errors only |
|
|
|
|
|
|
|
||||
|
1: errors and warnings |
|
|
|
|
|
|
|
|||
|
2: local status |
|
|
|
|
|
|
|
|
||
|
5 or higher: all messages |
|
|
|
|
|
|
|
|||
|
|
|
|
|
|
|
|
|
|
|
|
Table 25.2 Properties for NDDS_Transport_DTLS_Property_t
Property Name |
|
|
(prefix with |
Property Value Description |
|
‘dds.transport.DTLS.dtls1’)a |
|
|
|
|
|
|
Number of bits in a |
|
parent.address_bit_count |
be between 0 and 128. For example, for an address range of |
|
|
address_bit_count should be set to 8. |
|
|
|
|
|
A bitmap that defines various properties of the transport to the Connext |
|
parent.properties_bitmap |
core. Currently, the only property supported is whether or not the |
|
transport plugin will always loan a buffer when Connext tries to receive a |
||
|
||
|
message using the plugin. This is in support of a |
|
|
|
|
parent.gather_send_buffer_ |
Specifies the maximum number of buffers that Connext can pass to the |
|
count_max |
transport plugin’s send() function. |
|
|
|
|
|
The maximum size of a message in bytes that can be sent or received by |
|
|
the transport plugin. |
|
parent.message_size_max |
Note: If you use a value greater than the default, the DomainParticipant’s |
|
|
buffer_size (in the RECEIVER_POOL QosPolicy (DDS Extension) |
|
|
(Section 8.5.6)) should also be changed. |
|
|
|
|
|
A list of strings, each identifying a range of interface addresses. |
|
|
Interfaces must be specified as |
|
|
comma delimiting an interface. |
|
parent.allow_interfaces |
If the list is |
|
|
parent.deny_interfaces list. |
|
|
You must manage the memory of the list. The memory may be freed after |
|
|
the DomainParticipant is enabled. |
|
|
|
|
|
A list of strings, each identifying a range of interface addresses. |
|
|
Interfaces should be specified as |
|
|
comma delimiting an interface. |
|
parent.deny_interfaces |
This "black" list is applied after the parent.allow_interfaces list and filters |
|
|
out the interfaces that should not be used. |
|
|
You must manage the memory of the list. The memory may be freed after |
|
|
the DomainParticipant is enabled. |
|
|
|
|
send_socket_buffer_size |
Size in bytes of the send buffer of a socket used for sending. |
|
|
|
|
recv_socket_buffer_size |
Size in bytes of the receive buffer of a socket used for sending. |
|
|
|
|
ignore_loopback_interface |
Prevents the Transport Plugin from using the IP loopback interface. |
|
|
|
|
|
Prevents the transport plugin from using a network interface that is not |
|
|
reported as RUNNING by the operating system. |
|
|
The transport checks the flags reported by the operating system for each |
|
|
network interface upon initialization. An interface which is not reported |
|
|
as UP will not be used. This property allows the same check to be |
|
|
extended to the IFF_RUNNING flag implemented by some operating |
|
|
systems. The RUNNING flag is defined to mean that "all resources are |
|
ignore_nonrunning_interfaces |
allocated", and may be off if there is no link detected, e.g., the network |
|
cable is unplugged. |
||
|
||
|
Two values are allowed: |
|
|
0: Do not check the RUNNING flag when enumerating interfaces, just |
|
|
make sure the interface is UP. |
|
|
1: Check the flag when enumerating interfaces, and ignore those that are |
|
|
not reported as RUNNING. This can be used on some operating |
|
|
systems to cause the transport to ignore interfaces that are enabled but |
|
|
not connected to the network. |
|
|
|
|
transport_priority_mask |
Mask for use of transport priority field. |
|
|
|
|
transport_priority_mapping_low |
Low and high values of output range to IPv4 TOS. |
|
|
||
transport_priority_mapping_high |
||
|
||
|
|
Table 25.2 Properties for NDDS_Transport_DTLS_Property_t
Property Name |
|
|
|
|
|
|
(prefix with |
|
Property Value Description |
|
|||
‘dds.transport.DTLS.dtls1’)a |
|
|
|
|
|
|
|
|
|||||
recv_decode_buffer_size |
Size of buffer for decoding packets from wire. An extra buffer is required |
|||||
for storage of encrypted data. |
|
|
|
|||
|
|
|
|
|||
|
|
|||||
port_offset |
Port offset to allow coexistence with |
|||||
|
|
|
||||
dtls_handshake_resend_interval |
DTLS handshake retransmission interval in milliseconds |
|
||||
|
|
|
|
|||
|
Liveliness interval (multiple of resend interval) |
|
|
|||
dtls_connection_liveliness_ |
The connection will be dropped if no message from the peer is received in |
|||||
this amount of time. This enables cleaning up state for peers that are no |
||||||
interval |
longer responding. A secure |
|||||
|
interval if no other sends have occurred for a given DTLS connection |
|||||
|
during that time. |
|
|
|
||
|
|
|||||
|
A string that specifies the name of file containing Certificate Authority |
|||||
tls.verify.ca_file |
certificates. File should be in PEM format. See the OpenSSL manual page |
|||||
for SSL_load_verify_locations for more information. |
|
|||||
|
|
|||||
|
ca_file or ca_path must be specified; both may be specified. |
|||||
|
|
|||||
|
A string that specifies paths to directories containing Certificate |
|||||
|
Authority certificates. Files should be in PEM format, and follow the |
|||||
tls.verify.ca_path |
||||||
|
for SSL_CTX_load_verify_locations for more information. |
|
||||
|
ca_file or ca_path must be specified; both may be specified. |
|||||
|
|
|
||||
tls.verify.verify_depth |
Maximum certificate chain length for verification. |
|
||||
|
|
|||||
|
If |
|||||
tls.verify.verify_peer |
(default). If zero, only the reader side will present a certificate, which will |
|||||
|
be verified by the writer side. |
|
|
|
||
|
|
|
|
|||
|
This can be set to one of three values: |
|
|
|||
|
"default" |
selects |
the |
default |
callback |
|
tls.verify.verify_callback |
NDDS_Transport_TLS_default_verify_callback() |
|
||||
"verbose" |
selects |
the |
verbose |
callback |
||
|
||||||
|
NDDS_Transport_TLS_verbose_verify_callback() |
|
||||
|
"none" requests no callback be registered |
|
|
|||
|
|
|
||||
tls.cipher.cipher_list |
List of available (D)TLS ciphers. |
See the OpenSSL manual page for |
||||
SSL_set_cipher_list for more information on the format of this string. |
||||||
|
||||||
|
|
|||||
|
List of available |
|||||
|
"foo.h:512,bar.h:256" means: |
|
|
|
||
tls.cipher.dh_param_files |
dh_param_files[0].file = foo.pem, |
|
|
|
||
dh_param_files[0].bits = 512, |
|
|
|
|||
|
|
|
|
|||
|
dh_param_files[1].file = bar.pem, |
|
|
|
||
|
dh_param_files[1].bits = 256 |
|
|
|
||
|
|
|
|
|||
tls.cipher.engine_id |
String ID of OpenSSL cipher engine to request. |
|
|
|||
|
|
|
|
|
||
|
Required |
A string that specifies the name |
of a file |
containing an |
||
|
identifying certificate chain (in PEM format). An identifying certificate is |
|||||
tls.identity.certificate_chain_file |
required for secure communication. The file must be sorted starting with |
|||||
|
the certificate to the highest level (root CA). If no private key is specified, |
|||||
|
this file will be used to load a |
|
||||
|
|
|
||||
tls.identity.private_key_password |
A string that specifies the password for private key. |
|
||||
|
|
|||||
|
A string that specifies that name of a file containing private key (in PEM |
|||||
tls.identity.private_key_file |
format). If no private key is specified (all values are NULL), this value |
|||||
|
will default to the same file as the specified certificate chain file. |
|||||
|
|
|||||
tls.identity.rsa_private_key_file |
A string that specifies that name of a file containing an RSA private key |
|||||
(in PEM format). |
|
|
|
|||
|
|
|
|
|||
|
|
|
|
|
|
|

a. Assuming you used ‘dds.transport.DTLS.dtls1’ as the alias to load the plugin. If not, change the prefix to match the string used with dds.transport.load_plugins. This prefix must begin with 'dds.transport.'
25.5Explicitly Instantiating a WAN or Secure Transport Plugin
As described on page
Notes:
❏This way of instantiating a transport is not supported in the Java API. If you are using Java, use the Property QoS mechanism, described in Section 25.2.
❏To use this mechanism, there are extra libraries that you must link into your program and an additional header file that you must include. Please see the Section 25.5.1 and Section 25.5.2 for details.
To instantiate a WAN or Secure Transport prior to explicitly registering it with
NDDSTransportSupport::register_transport(), use one of the following functions:
NDDS_Transport_Plugin* NDDS_Transport_WAN_new (
const struct NDDS_Transport_WAN_Property_t * property_in)
NDDS_Transport_Plugin* NDDS_Transport_DTLS_new (
const struct NDDS_Transport_DTLS_Property_t * property_in)
See the API Reference HTML documentation for details on these functions.
25.5.1Additional Header Files and Include Directories
❏ To use the Secure WAN Transport API, you must include an extra header file (in addition to those in Table 9.1, “Header Files to Include for Connext (All Architectures),” on page
#include "ndds/ndds_transport_secure_wan.h"
Assuming that Secure WAN Transport is installed in the same directory as Connext (see Table 9.2, “Include Paths for Compilation (All Architectures),” on page
❏If you want to access OpenSSL data structures, add the OpenSSL include directory,
<openssl install dir>/<arch>/include, and include the OpenSSL headers before ndds_transport_secure_wan.h:
#include <openssl/ssl.h>
#include <openssl/x509.h> (if accessing certificate functions) etc.
On Windows systems, if you are loading statically: you should also include the OpenSSL file, applink.c, in your application. It can be found in the OpenSSL include directory, or included as <openssl/applink.c>.
25.5.2Additional Libraries
To use the Secure WAN Transport API, you must link in additional libraries, which are listed in the Platform Notes (in the appropriate section for your architecture). Refer to Section 9.3.1 for differences between shared and static libraries.
25.5.3Compiler Flags
No additional compiler flags are required.
Part 6: RTI Persistence Service
The material in this part of the manual describes Persistence Service, which is included with Con- next Messaging. It saves data samples so they can be delivered to subscribing applications that join the system at a later
❏Chapter 26: Introduction to RTI Persistence Service
❏Chapter 27: Configuring Persistence Service
❏Chapter 28: Running RTI Persistence Service
❏Chapter 29: Administering Persistence Service from a Remote Location
Chapter 26 Introduction to RTI Persistence Service
Persistence Service is a Connext application that saves data samples to transient or permanent storage, so they can be delivered to subscribing applications that join the system at a later time— even if the publishing application has already terminated.
Persistence Service runs as a separate application; you can run it on the same node as the publishing application, the subscribing application, or some other node in the network.
When configured to run in PERSISTENT mode, Persistence Service can use the filesystem or a relational database that provides an ODBC driver. For each persistent topic, it collects all the data written by the corresponding persistent DataWriters and stores them into persistent storage. See the Persistence Service Release Notes for the list of platforms and relational databases that have been tested.
When configured to run in TRANSIENT mode, Persistence Service stores the data in memory.
The following chapters assume you have a basic understanding of DDS terms such as
DomainParticipants, Publishers, DataWriters, Topics, and Quality of Service (QoS) policies. For an overview of DDS terms, please see Chapter 2:

Chapter 27 Configuring Persistence Service
To use Persistence Service:
1.Modify your Connext applications.
•The DURABILITY QosPolicy (Section 6.5.7) controls whether or not, and how, published samples are stored by Persistence Service for delivery to
•For each DataWriter whose data must be stored, set the Durability QosPolicy’s kind to DDS_PERSISTENT_DURABILITY_QOS or DDS_TRANSIENT_DURABILITY_QOS.
•For each DataReader that needs to receive stored data, set the Durability QosPol- icy’s kind to DDS_PERSISTENT_DURABILITY_QOS or DDS_TRANSIENT_DURABILITY_QOS.
•Optionally, modify the DURABILITY SERVICE QosPolicy (Section 6.5.8), which can be used to configure Persistence Service.
By default, the History and ResourceLimits QosPolicies for a Persistence Service DataReader (PRSTDataReader) and Persistence Service DataWriter (PRSTDataWriter) with topic 'A' will be configured using the DurabilityService QosPolicy of the first- discovered DataWriter publishing 'A'. (For more information on the PRSTDataReader and PRSTDataWriter, see RTI Persistence Service (Section 12.5.1).) These values will overwrite the values specified in the XML file (unless you use the tag <use_durability_service> in the persistence group definition, see Section 27.8).
2.Create a configuration file or edit an existing file, as described in XML Configuration File (Section 27.2).
3.Start Persistence Service with your configuration file, as described in Starting Persistence Service (Section 28.1). You can start it on either application’s node, or even an entirely different node (provided that node is included in one of the applications’ NDDS_DISCOVERY_PEERS lists).
27.1How to Load the XML Configuration
Persistence Service loads its XML configuration from multiple locations. This section presents the various approaches, listed in load order.
The first three locations only contain QoS Profiles and are inherited from Connext (see Chapter 17: Configuring QoS with XML).

❏$NDDSHOME/resource/qos_profiles_5.0.x1/xml/NDDS_QOS_PROFILES.xml
This file contains the DDS default QoS values; it is loaded automatically if it exists. (First to be loaded.)
❏File specified in NDDS_QOS_PROFILES Environment Variable
The files (or XML strings) separated by semicolons referenced in this environment variable are loaded automatically.
❏<working directory>/USER_QOS_PROFILES.xml
This file is loaded automatically if it exists.
The next locations are specific to Persistence Service.
❏<Persistence Service executable location>/../../resource/xml/ RTI_PERSISTENCE_SERVICE.xml
This file contains the default Persistence Service configurations; it is loaded if it exists. There are two default configurations: default and defaultDisk. The default configuration persists all the topics into memory. The defaultDisk configuration persists all the topics into files located in the current working directory.
❏<working directory>/USER_PERSISTENCE_SERVICE.xml
This file is loaded automatically if it exists.
❏File specified using the command line option,
The
27.2XML Configuration File
The configuration file uses XML format. Let's look at a very basic configuration file, just to get an idea of its contents. You will learn the meaning of each line as you read the rest of this chapter:
❏QoS Configuration (Section 27.3)
❏Configuring the Persistence Service Application (Section 27.4)
❏Configuring Remote Administration (Section 27.5)
❏Configuring Persistent Storage (Section 27.6)
❏Configuring Participants (Section 27.7)
❏Creating Persistence Groups (Section 27.8)
❏Enabling RTI Distributed Logger in Persistence Service (Section 27.11)
❏Enabling RTI Monitoring Library in Persistence Service (Section 27.12)
Example Configuration File
<?xml version="1.0"
<qos_profile name="QosProfile1">
1. x stands for the version number of the current release.
<datawriter_qos name="WriterQos1"> <history>
<kind>DDS_KEEP_ALL_HISTORY_QOS</kind> </history>
</datawriter_qos>
<datareader_qos name="ReaderQos1"> <reliability>
<kind>DDS_RELIABLE_RELIABILITY_QOS</kind> </reliability>
<history> <kind>DDS_KEEP_ALL_HISTORY_QOS</kind>
</history> </datareader_qos>
</qos_profile> </qos_library>
<domain_id>72</domain_id> <distributed_logger>
<enabled>true</enabled> </distributed_logger>
</administration>
<filesystem>
<directory>/tmp</directory> <file_prefix>PS</file_prefix>
</filesystem> </persistent_storage>
<domain_id>71</domain_id>
<single_publisher>true</single_publisher> <single_subscriber>true</single_subscriber> <datawriter_qos base_name="QosLib1::QosProfile1"/> <datareader_qos base_name="QosLib1::QosProfile1"/>
</persistence_group>
</participant> </persistence_service>
</dds>
27.2.1Configuration File Syntax
The configuration file must follow these syntax rules:
❏The syntax is XML and the character encoding is
❏Opening tags are enclosed in <>; closing tags are enclosed in </>.
❏A value is a
For example, " <tag> value </tag>" is the same as "<tag>value</tag>".
❏All values are
❏Comments are enclosed as follows:
❏The root tag of the configuration file must be <dds> and end with </dds>.
❏The primitive types for tag values are specified in Table 27.1.
Table 27.1 Supported Tag Values
Type |
|
|
|
Format |
|
Notes |
|
|
|
|
|
|
|
|
|
|
|
|
|
|
|
|
|
|
yes, |
1, |
true, |
BOOLEAN_TRUE |
or |
|
|
DDS_Boolean |
DDS_BOOLEAN_TRUE: these all mean TRUE |
|
Not |
||||
|
|
|
|
|
|||
no, |
0, |
false, |
BOOLEAN_FALSE |
or |
|||
|
|
||||||
|
DDS_BOOLEAN_FALSE: these all mean FALSE |
|
|
||||
|
|
|
|||||
DDS_Enum |
A string. Legal values are those listed in the C or Java |
Must be specified as a string. |
|||||
API Reference HTML documentation. |
|
(Do not use numeric values.) |
|||||
|
|
||||||
|
|
|
|
||||
|
|
|
|||||
DDS_Long |
or 0x80000000 to 0x7fffffff |
|
A |
||||
or LENGTH_UNLIMITED |
|
||||||
|
|
|
|||||
|
or DDS_LENGTH_UNLIMITED |
|
|
||||
|
|
|
|
|
|
||
DDS_ |
0 to 4294967296 |
|
|
|
|
||
or |
|
|
|
|
A |
||
UnsignedLong |
|
|
|
|
|||
0 to 0xffffffff |
|
|
|
|
|||
|
|
|
|
|
|||
|
|
|
|
|
|
|
|
String |
|
|
All leading and trailing spaces |
||||
|
|
are ignored between two tags |
|||||
|
|
|
|
|
|
||
|
|
|
|
|
|
|
|
27.2.2XML Validation
27.2.2.1Validation at Run Time
Persistence Service validates the input XML files using a builtin Document Type Definition (DTD). You can find a copy of the builtin DTD in $(NDDSHOME)/resource/ rtipersistenceservice/schema/rti_persistence_service.dtd. (This is only a copy of what the
Persistence Service core uses. Changing this file has no effect unless you specify its path with the DOCTYPE tag, described below.)
You can overwrite the builtin DTD by using the XML tag, <!DOCTYPE>. For example, the following indicates that Persistence Service must use a different DTD file to perform validation:
<!DOCTYPE dds SYSTEM "/local/usr/rti/dds/modified_rtipersistenceservice.dtd">
If you do not specify the DOCTYPE tag in the XML file, the builtin DTD is used.
The DTD path can be absolute, or relative to the application's current working directory.
27.2.2.2Validation During Editing
Persistence Service provides DTD and XSD files that describe the format of the XML content. We recommend including a reference to one of these documents in the XML file that contains the persistence service’s
The DTD and XSD definitions of the XML elements are in $(NDDSHOME)/resource/rtipersistenceservice/schema/rti_persistence_service.dtd and $(NDDSHOME)/resource/rtipersistenceservice/schema/rti_persistence_service.xsd, respectively.

To include a reference to the XSD document in your XML file, use the attribute xsi:noNamespaceSchemaLocation in the <dds> tag. For example (in the following, replace <NDDSHOME> with the Connext installation directory):
<?xml version="1.0"
<dds
...
</dds>
To include a reference to the DTD document in your XML file, use the <!DOCTYPE> tag. For example (in the following, replace <NDDSHOME> with the Connext installation directory):
<?xml version="1.0"
"<NDDSHOME>/resource/rtipersistenceservice/schema/ rti_persistence_service.dtd">
<dds>
...
</dds>
27.3QoS Configuration
Each persistence group and participant has a set of DDS QoSs. There are six tags:
❏<participant_qos>
❏<publisher_qos>
❏<subscriber_qos>
❏<topic_qos>
❏<datawriter_qos>
❏<datareader_qos>
Each QoS is identified by a name. The QoS can inherit its values from other QoSs described in the XML file. For example:
<datawriter_qos name="DerivedWriterQos" base_qos_name="Lib::BaseWriterQos"> <history>
<kind>DDS_KEEP_ALL_HISTORY_QOS</kind> </history>
</datawriter_qos>
In the above example, the writer QoS named 'DerivedWriterQos' inherits the values from the writer QoS 'BaseWriterQos' contained in the library 'Lib'. The HistoryQosPolicy kind is set to DDS_KEEP_ALL_HISTORY_QOS.
Each XML tag with an associated name can be uniquely identified by its fully qualified name in C++ style. For more information on tags, see Chapter 17: Configuring QoS with XML
The persistence groups and participants can use QoS libraries and profiles to configure their QoS values. For example:
<dds>
<!- QoS LIBRARY SECTION
<qos_library name="QosLib1"> <qos_profile name="QosProfile1">
<datawriter_qos name="WriterQos1"> <history>
<kind>DDS_KEEP_ALL_HISTORY_QOS</kind>

</history> </datawriter_qos>
</qos_profile> </qos_library>
...
<persistence_group name="PerGroup1" filter="*"> <single_publisher>true</single_publisher> <single_subscriber>true</single_subscriber> <datawriter_qos base_name="QosLib1::QosProfile1"/>
</persistence_group> </persistence_service>
</dds >
For more information about QoS libraries and profiles see Chapter 17: Configuring QoS with XML.
27.4Configuring the Persistence Service Application
Each execution of the Persistence Service application is configured using the content of a tag: <persistence_service>. When you start Persistence Service (described in Section 28.1), you must specify which <persistence_service> tag to use to configure the service.
For example:
<dds>
<persistence_service name="Srv1">
...
</persistence_service> </dds>
If you do not specify a service name when you start Persistence Service, the service will print the list of available configurations and then exit.
Because a configuration file may contain multiple <persistence_service> tags, one file can be used to configure multiple Persistence Service executions.
Table 27.2 lists the tags you can specify for a persistence service. For default values, please see the API Reference HTML documentation.
Table 27.2 Persistence Service Application Tags
Tags within |
|
Number |
|
Description |
of Tags |
||
<persistence_service> |
|||
|
Allowed |
||
|
|
||
|
|
|
|
<administration> |
Enables and configures remote administration. See Configuring |
0 or 1 |
|
|
|
||
|
Provides a description for the persistence service configuration. |
|
|
|
Example: |
|
|
|
<annotation> |
|
|
<annotation> |
<documentation> |
0 or 1 |
|
Persists in the file system all topics |
|||
|
|
||
|
published with PERSISTENT durability |
|
|
|
</documentation> |
|
|
|
</annotation> |
|
|
|
|
|

Table 27.2 Persistence Service Application Tags
Tags within |
|
Number |
|
Description |
of Tags |
||
<persistence_service> |
|||
|
Allowed |
||
|
|
||
|
|
|
|
|
A DDS_Boolean that indicates whether or not a PRSTDataWriter will |
|
|
|
purge a sample from its cache once it is acknowledged by all the |
|
|
<purge_samples_after |
matching/active DataReaders and all the Durable Subscriptions. |
0 or 1 |
|
_acknowledgment> |
Default: 0 |
||
|
|||
|
See Configuring Durable Subscriptions in Persistence Service (Section |
|
|
|
|
||
|
|
|
|
|
For each <participant> tag, Persistence Service creates two |
|
|
|
DomainParticipants on the same domain ID: |
|
|
|
one to subscribe to changes and one to publish changes. |
|
|
<participant> |
The QoS values used to configure both participants are the same, |
1 or more |
|
except for WireProtocol.domain_id. |
|||
|
If WireProtocol.domain_id is not |
|
|
|
Service uses WireProtocol.domain_id for the first domain |
|
|
|
DomainParticipant and WireProtocol.domain_id+1 for the second |
|
|
|
DomainParticipant. |
|
|
|
|
|
|
|
When this tag is present, the topic data will be persisted to disk. You |
|
|
<persistent_storage> |
can select between file storage and relational database storage. See |
0 or 1 |
|
|
|
||
|
|
|
|
|
Enables synchronization in redundant persistence service instances. |
|
|
<synchronization> |
See Synchronizing of Persistence Service Instances (Section 27.10). |
0 or 1 |
|
|
Default: Synchronization is not enabled |
|
|
|
|
|
27.5Configuring Remote Administration
You can create a Connext application that can remotely control Persistence Service. The <administration> tag is used to enable remote administration and configure its behavior.
By default, remote administration is turned off in Persistence Service.
When remote administration is enabled, Persistence Service will create a DomainParticipant,
Publisher, Subscriber, DataWriter, and DataReader. These Entities are used to receive commands and send responses. You can configure these entities with QoS tags within the <administration> tag.
Table 27.3 lists the tags allowed within <administration> tag. Notice that the <domain_id> tag is required.
For more details, please see Chapter 29: Administering Persistence Service from a Remote Location.
Note: The
27.6Configuring Persistent Storage
The <persistent_storage> tag is used to persist samples into permanent storage. If the <persistence_storage> tag is not specified, the service will operate in TRANSIENT mode and all the data will be kept in memory. Otherwise, the persistence service will operate in PERSISTENT mode and all the topic data will be stored into the filesystem or into a relational database that provides an ODBC driver.
Table 27.3 Remote Administration Tags
Tags within |
|
Number |
|
Description |
of Tags |
||
<administration> |
|||
|
Allowed |
||
|
|
||
|
|
|
|
|
Configures the DataReader QoS for remote administration. |
|
|
|
If the tag is not defined, Persistence Service will use the DDS defaults |
|
|
|
with the following changes: |
|
|
<datareader_qos> |
reliability.kind = DDS_RELIABLE_RELIABILITY_QOS (this value |
0 or 1 |
|
|
cannot be changed) |
|
|
|
history.kind = DDS_KEEP_ALL_HISTORY_QOS |
|
|
|
resource_limits.max_samples = 32 |
|
|
|
|
|
|
|
Configures the DataWriter QoS for remote administration. |
|
|
|
If the tag is not defined, Persistence Servicewill use the DDS defaults |
|
|
<datawriter_qos> |
with the following changes: |
0 or 1 |
|
|
history.kind = DDS_KEEP_ALL_HISTORY_QOS |
|
|
|
resource_limits.max_samples = 32 |
|
|
|
|
|
|
|
Configures RTI Distributed Logger. |
|
|
<distributed_logger> |
See Enabling RTI Distributed Logger in Persistence Service (Section |
0 or 1 |
|
|
|
||
|
|
|
|
<domain_id> |
Specifies which domain ID Persistence Service will use to enable remote |
1 |
|
administration. |
(required) |
||
|
|||
|
|
|
|
<participant_qos> |
Configures the DomainParticipant QoS for remote administration. |
0 or 1 |
|
If the tag is not defined, Persistence Service will use the DDS defaults. |
|||
|
|
||
|
|
|
|
<publisher_qos> |
Configures the Publisher QoS for remote administration. |
0 or 1 |
|
If the tag is not defined, Persistence Service will use the DDS defaults. |
|||
|
|
||
|
|
|
|
<subscriber_qos> |
Configures the Subscriber QoS for remote administration. |
0 or 1 |
|
If the tag is not defined, Persistence Service will use the DDS defaults. |
|||
|
|
||
|
|
|
Table 27.4 lists the tags that you can specify in <persistent_storage>.
Relational Database Limitations: The ODBC storage does not support BLOBs. The maximum size for a serialized sample is 65535 bytes in MySQL.
Table 27.4 Persistent Storage tags
Tags within |
|
Number |
|
Description |
of Tags |
||
<persistent_storage> |
|||
|
Allowed |
||
|
|
||
|
|
|
|
|
|
|
|
|
When this tag is present, the topic data will be persisted in a relational |
|
|
<external_database> |
database. |
0 or 1 |
|
This tag is required if <filesystem> is not specified. |
|||
|
|
||
|
|
|
|
|
When this tag is present, the topic data will be persisted into files. |
|
|
<filesystem> |
This tag is required if <external_database> is not specified. |
0 or 1 |
|
|
|
||
|
|
|
|
|
This DDS_Boolean (see Table 27.1) indicates if the topic data associated |
|
|
|
with a previous execution of the persistence service must be restored or |
|
|
<restore> |
not. If the topic data is not restored, it will be deleted from the persistent |
0 or 1 |
|
|
storage. |
|
|
|
Default: 1 |
|
|
|
|
|
|
|
Defines the length in bytes of the database column used to store the |
|
|
<type_object_max_ |
TypeObjects associated with PRSTDataWriters and PRSTDataReader. |
|
|
For additional information on TypeObjects, see the Core Libraries and |
0 or 1 |
||
serialized_length> |
|||
Utilities Getting Started Guide Addendum for Extensible Types. |
|
||
|
|
||
|
Default: 10488576 |
|
|
|
|
|
Table 27.5 External Database Tags
|
Tags within |
|
|
|
|
|
Number |
|
|
|
Description |
|
|
of Tags |
|
|
<external_database> |
|
|
|
|||
|
|
|
|
|
Allowed |
||
|
|
|
|
|
|
|
|
|
|
|
|
|
|
|
|
|
|
|
DSN used to connect to the database using ODBC. You should create |
|
|
|
|
|
<dsn> |
|
this DSN through the ODBC settings on Windows systems, or in your |
|
1 |
||
|
|
.odbc.ini file on UNIX/Linux systems. |
|
(required) |
|||
|
|
|
|
||||
|
|
|
This tag is required. |
|
|
|
|
|
|
|
|
|
|
|
|
|
|
|
Specifies the ODBC driver to load. By default, Connext will try to use |
|
|
|
|
|
<odbc_library> |
|
the standard ODBC driver manager library (UnixOdbc on UNIX/ |
|
0 or 1 |
||
|
|
|
Linux systems, the Windows ODBC driver manager on Windows |
|
|
|
|
|
|
|
systems). |
|
|
|
|
|
|
|
|
|
|
|
|
|
<password> |
|
Password to connect to the database. |
|
0 or 1 |
||
|
|
Default: no username is used |
|
||||
|
|
|
|
|
|
||
|
|
|
|
|
|
|
|
|
<username> |
|
Username to connect to the database. |
|
0 or 1 |
||
|
|
Default: no username is used |
|
||||
|
|
|
|
|
|
||
|
|
|
|
|
|
|
|
Table 27.6 Filesystem tags |
|
|
|
|
|
|
|
|
|
|
|
|
|
|
|
|
Tags within |
|
|
|
|
|
Number |
|
|
|
Description |
|
of Tags |
||
|
<filesystem> |
|
|
|
|||
|
|
|
|
|
|
Allowed |
|
|
|
|
|
|
|
|
|
|
|
|
|
|
|||
|
|
Specifies the directory of the files in which topic data will be persisted. |
|
|
|||
|
<directory> |
There will be one file per PRSTDataWriter/PRSTDataReader pair. |
|
0 or 1 |
|||
|
|
Default: current working directory |
|
|
|||
|
|
|
|
|
|||
|
<file_prefix> |
A name prefix associated with all the files created by Persistence Service. |
|
0 or 1 |
|||
|
Default: PS |
|
|||||
|
|
|
|
||||
|
|
|
|
|
|||
|
|
Sets the journal mode of the persistent storage. This tag can take these |
|
|
|||
|
|
values: |
|
|
|||
|
|
|
• DELETE: Deletes the rollback journal at the conclusion of each |
|
|
||
|
|
|
• |
transaction. |
|
|
|
|
|
|
TRUNCATE: Commits transactions by truncating the rollback |
|
|
||
|
|
|
|
journal to |
|
|
|
|
|
|
• PERSIST: Prevents the rollback journal from being deleted at the end |
|
|
||
|
|
|
|
of each transaction. Instead, the header of the journal is overwritten |
|
|
|
|
<journal_mode> |
|
|
with zeros. |
|
0 or 1 |
|
|
|
|
• MEMORY: Stores the rollback journal in volatile RAM. This saves |
|
|
||
|
|
|
• |
disk I/O. |
|
|
|
|
|
|
WAL: Uses a |
|
|
||
|
|
|
|
implement transactions. |
|
|
|
|
|
|
• OFF: Completely disables the rollback journal. If the application |
|
|
||
|
|
|
|
crashes in the middle of a transaction when the OFF journaling mode |
|
|
|
|
|
|
|
is set, the files containing the samples will very likely be corrupted. |
|
|
|
|
|
Default: DELETE |
|
|
|||
|
|
|
|
|
|||
|
|
Determines the level of synchronization with the physical disk. |
|
|
|||
|
|
This tag can take three values: |
|
|
|||
|
|
|
• FULL: Every sample is written into physical disk as Persistence |
|
|
||
|
<synchronization> |
|
|
Service receives it. |
|
0 or 1 |
|
|
|
• NORMAL: Samples are written into disk at critical moments. |
|
||||
|
|
|
|
|
|||
|
|
|
• |
OFF: No synchronization is enforced. Data will be written to |
|
|
|
|
|
|
|
physical disk when the OS flushes its buffers. |
|
|
|
|
|
Default: OFF |
|
|
|||
|
|
|
|
|
|
|
|
Table 27.6 Filesystem tags
Tags within |
|
Number |
|
Description |
of Tags |
||
<filesystem> |
|||
|
Allowed |
||
|
|
||
|
|
|
|
|
Specifies the name of the trace file for debugging purposes. The trace file |
|
|
<trace_file> |
contains information about all SQL statements executed by the persistence |
0 or 1 |
|
|
service. |
|
|
|
Default: No trace file is generated |
|
|
|
|
|
|
|
Sets the |
|
|
|
• NONE: When data is deleted from the storage files, the files remain |
0 or 1 |
|
<vacuum> |
the same size. |
||
|
• FULL: The storage files are compacted every transaction. |
|
|
|
Default: FULL |
|
|
|
|
|

27.7Configuring Participants
An XML <persistence_service> tag will contain a set of domain participants. The persistence service will persist topics published in the domainIDs associated with these participants. For example:
<persistence_service name="Srv1"> <participant name="Part1">
<domain_id>71</domain_id>
...
</participant> <participant name="Part2">
<domain_id>72</domain_id>
...
</participant> </persistence_service>
Using the above example, the persistence service will create two domain participants on domains 71 and 72. After the domain participants are created, the persistence service will monitor the discovery traffic looking for topics to persist.
The <domain_id> tag can be specified alternatively as an attribute of <participant>. For example:
<persistence_service name="Srv1"> <participant name="Part1" domain_id="71">
...
</participant> </persistence_service>
Table 27.7 further describes the participant tags. Notice that <persistence_group> is required.
Table 27.7 Participant Tags
Tags within |
|
Number |
|
Description |
of Tags |
||
<participant> |
|||
|
Allowed |
||
|
|
||
|
|
|
|
|
|
|
|
|
Domain ID associated with the Participant. The domain ID can be |
|
|
<domain_id> |
specified as an attribute of the participant tag. |
0 or 1 |
|
|
Default: 0 |
|
|
|
|
|
|
|
Configures a set of Durable Subscriptions for a given topic. This is a |
|
|
|
sequence of <element> tags, each of which has a <name>, a |
|
|
|
<topic_name>, and a <quorum>. For example: |
|
|
|
<durable_subscriptions> |
|
|
|
<element> |
|
|
|
<name>DurSub1</name> |
|
|
|
<topic_name>Example MyType</topic_name> |
|
|
<durable_ |
<quorum>2</quorum> |
0 or 1 |
|
subscriptions> |
</element> |
||
|
|||
|
<element> |
|
|
|
<name>DurSub2</name> |
|
|
|
<topic_name>Example MyType</topic_name> |
|
|
|
</element> |
|
|
|
</durable_subscriptions> |
|
|
|
Default: Empty list |
|
|
|
See Section 27.9 for additional information |
|
|
|
|
|
|
<participant_qos> |
Participant QoS. |
0 or 1 |
|
Default: DDS defaults |
|||
|
|
||
|
|
|
|
<persistence_group> |
A persistence group describes a set of topics whose data that must be |
1 or more |
|
|
persisted by the persistence service. |
(required) |

27.8Creating Persistence Groups
The topics that must be persisted in a specific domain ID are specified using <persistence_group> tags. A <persistence_group> tag defines a set of topics identified by a POSIX expression.
For example:
<participant name="Part1"> <domain_id>71</domain_id>
<persistence_group name="PerGroup1" filter="H*">
...
</persistence_group> </participant>
In the previous example, the persistence group 'PerGroup1' is associated with all the topics published in domain 71 whose name starts with 'H'.
When a participant discovers a topic that matches a persistence group, it will create a PRSTDataReader and a PRSTDataWriter. The PRSTDataReader and PRSTDataWriter will be configured using the QoS policies associated with the persistence group. The samples received by the PRSTDataReader will be persisted in the queue of the corresponding PRSTDataWriter.
A <participant> tag can contain multiple persistence groups; the set of topics that each one represents can intersect.
Table 27.8 further describes the persistence group tags. For default values, please see the API Reference HTML documentation.
Table 27.8 Persistence Group Tags
Tags within |
|
Number |
|
<persistence_ |
Description |
of Tags |
|
group> |
|
Allowed |
|
|
|
|
|
|
A DDS_Boolean (see Table 27.1) that enables support for durable |
|
|
<allow_durable_ |
subscriptions in the PRSTDataWriters created in a persistence group. |
|
|
When Durable Subscriptions are not required, setting this property to 0 will |
0 or 1 |
||
subscriptions> |
|||
increase performance. |
|
||
|
|
||
|
Default: 1 |
|
|
|
|
|
|
|
Content filter topic expression. A persistence group can subscribe to a |
|
|
|
specific set of data based on the value of this expression. |
|
|
|
A filter expression is similar to the WHERE clause in SQL. For more |
|
|
<content_filter> |
information on the syntax, please see the API Reference Documentation |
0 or 1 |
|
|
(from the Modules page, select RTI Connext API Reference, Queries and |
|
|
|
Filters Syntax). |
|
|
|
Default: no expression |
|
|
|
|
|
|
<datareader_qos> |
PRSTDataReader QoSa. See QoSs (Section 27.8.1). |
0 or 1 |
|
Default: DDS defaults |
|||
|
|
|
|
<datawriter_qos> |
PRSTDataWriter QoSa. See QoSs (Section 27.8.1). |
0 or 1 |
|
Default: DDS defaults |
|||
|
|
||
|
|
|
|
|
Specifies a list of POSIX expressions separated by commas that describe the |
|
|
|
set of topics to be denied in the persistence group. |
|
|
<deny_filter> |
This "black" list is applied to the topics that pass the filter specified with the |
0 or 1 |
|
|
<filter> tag |
|
|
|
Default: * |
|
|
|
|
|
|
|
Specifies a list of POSIX expressions separated by commas that describe the |
|
|
<filter> |
set of topics associated with the persistence group. |
0 or 1 |
|
The filter can be specified as an attribute of <persistence_group> as well. |
|||
|
|
||
|
Default: * |
|
|
|
|
|
Table 27.8 Persistence Group Tags
Tags within |
|
|
|
Number |
|
<persistence_ |
Description |
|
|
of Tags |
|
group> |
|
|
|
Allowed |
|
|
|
|
|
|
|
<memory_ |
This flag configures the memory allocation |
policy for samples |
in |
|
|
PRSTDataReaders and PRSTDataWriters. |
|
|
0 or 1 |
||
management> |
|
|
|||
|
|
|
|||
|
|
|
|
||
|
|
|
|||
<propagate_ |
A DDS_Boolean (see Table 27.1) that controls whether or not the persistence |
|
|||
service propagates dispose messages from DataWriters to DataReaders. |
|
0 or 1 |
|||
dispose> |
|
||||
Default: 1 |
|
|
|
||
|
|
|
|
||
|
|
|
|||
<propagate_ |
A DDS_Boolean (see Table 27.1). When this tag is 1, the data samples sent |
|
|||
by the PRSTDataWriters preserve the source timestamp that was associated |
|
||||
source_ |
0 or 1 |
||||
timestamp> |
with them when they were published by the original DataWriter. |
|
|
||
Default: 0 |
|
|
|
||
|
|
|
|
||
|
|
|
|||
<propagate_ |
A DDS_Boolean (see Table 27.1) that controls whether or not the persistence |
|
|||
service propagates unregister messages from DataWriters to DataReaders. |
|
0 or 1 |
|||
unregister> |
|
||||
Default: 0 |
|
|
|
||
|
|
|
|
||
|
|
|
|
|
|
<publisher_qos> |
Publisher QoS. See QoSs (Section 27.8.1). |
|
|
0 or 1 |
|
Default: DDS defaults |
|
|
|||
|
|
|
|
||
|
|
|
|||
|
This property controls how often (expressed as a number of samples) the |
|
|||
|
PRSTDataReader state is stored in the database. The PRSTDataReaders are |
|
|||
|
the DataReaders created by the persistence service. |
|
|
||
|
A high frequency will provide better performance. However, if the |
|
|||
<reader_ |
persistence service is restarted, it may receive some duplicate samples. The |
|
|||
checkpoint_ |
persistence service will send these duplicates samples on the wire but they |
0 or 1 |
|||
frequency> |
will be filtered by the DataReaders and they will not be propagated to the |
|
|||
|
application. |
|
|
|
|
|
This property is only applicable when the persistence service operates in |
|
|||
|
persistent mode (the <persistent_storage> tag is present). |
|
|
||
|
Default: 1 |
|
|
|
|
|
|
|
|||
|
A DDS_Boolean (see Table 27.1) that indicates if the persistence service will |
|
|||
|
create an independent database connection per PRSTDataWriter in the |
|
|||
|
group (0) or per Publisher (1) in the group. |
|
|
|
|
|
When <single_publisher> is 0 and <share_database_connection> is 1, there |
|
|||
|
is a single database connection per group. All the PRSTDataWriters will |
|
|||
<share_database_ |
share the same connection. |
|
|
|
|
When <single_publisher> is 1 or <share_database_connection> is 0, there is |
0 or 1 |
||||
connection> |
|||||
a database connection per PRSTDataWriter. |
|
|
|
||
|
|
|
|
||
|
This parameter is only applicable to configurations persisting the data into |
|
|||
|
a relational database using the tag |
<external_database> |
in |
|
|
|
<persistent_storage>. |
|
|
|
|
|
|
|
|||
|
Default: 0 |
|
|
|
|
|
|
|
|||
|
A DDS_Boolean (see Table 27.1) that indicates if the persistence service |
|
|||
<single_ |
should create one Publisher per persistence group or one Publisher per |
|
|||
PRSTDataWriter inside the persistence group. See Sharing a Publisher/ |
0 or 1 |
||||
publisher> |
|||||
|
|
|
|||
|
|
|
|
||
|
Default: 1 |
|
|
|
|
|
|
|
|||
|
A DDS_Boolean (see Table 27.1) that indicates if the persistence service |
|
|||
<single_ |
should create one Subscriber per persistence group or one Subscriber per |
|
|||
PRSTDataReader in the persistence group. |
|
|
0 or 1 |
||
subscriber> |
|
|
|||
|
|
||||
|
|
|
|||
|
Default: 1 |
|
|
|
|
|
|
|
|
|
|
Table 27.8 Persistence Group Tags
Tags within |
|
Number |
|
<persistence_ |
Description |
of Tags |
|
group> |
|
Allowed |
|
|
|
|
|
<subscriber_qos> |
Subscriber QoS. See QoSs (Section 27.8.1). |
0 or 1 |
|
Default: DDS defaults |
|||
|
|
||
|
|
|
|
<topic_qos> |
Topic QoS. See QoSs (Section 27.8.1). |
0 or 1 |
|
Default: DDS defaults |
|||
|
|
||
|
|
|
|
|
A DDS_Boolean (see Table 27.1) that indicates if the HISTORY and |
|
|
|
RESOURCE_LIMITS QoS policy of the PRSTDataWriters and |
|
|
<use_durability_ |
PRSTDataReaders should be configured based on the DURABILITY |
0 or 1 |
|
service> |
SERVICE value of the discovered DataWriters. |
||
|
|||
|
|
||
|
Default: 1 |
|
|
|
|
|
|
<writer_ack_ |
Controls how often (expressed in milliseconds) samples are marked as |
|
|
ACK'd in the database by the PRSTDataWriter. |
0 or 1 |
||
period> |
|||
Default: 0 |
|
||
|
|
||
|
|
|
|
|
Controls how often (expressed in milliseconds) transactions are committed |
|
|
|
for a PRSTDataWriter. |
|
|
|
A value of 0 indicates that transactions will be committed immediately. This |
|
|
<writer_ |
is the recommended setting to avoid losing data in the case of an |
|
|
checkpoint_ |
unexpected error in Persistence Service and/or the underlying hardware/ |
0 or 1 |
|
period> |
software infrastructure. |
|
|
|
For applications that can tolerate some data losses, setting this tag to a |
|
|
|
value greater than 0 will increase performance. |
|
|
|
Default: 0 |
|
|
|
|
|
|
|
Controls how often (expressed as a number of samples) transactions are |
|
|
|
committed for a PRSTDataWriter. |
|
|
|
A value of 1 indicates that samples will be persisted by the |
|
|
<writer_ |
PRSTDataWriters immediately. This is the recommended setting to avoid |
|
|
checkpoint_ |
losing data in the case of an unexpected error in persistence service and/or |
0 or 1 |
|
volume> |
the underlying hardware/software infrastructure. |
|
|
|
For application that can tolerate some data losses, setting this tag to a value |
|
|
|
greater than 1 will increase performance. |
|
|
|
Default: 1 |
|
|
|
|
|
|
|
Defines how many samples will be |
|
|
|
satisfy requests from |
|
|
|
When a DataReader requests samples from a PRSTDataWriter by sending a |
|
|
<late_joiner_read_ |
NACK message, the PRSTDataWriter may retrieve additional samples from |
0 or 1 |
|
batch> |
the database to minimize disk access. |
||
|
|||
|
This paramater determines that amount of samples that will be retrieved |
|
|
|
preemptively from the database by the PRSTDataWriter. |
|
|
|
Default: 20000 |
|
|
|
|
|
|
|
This tag can be used to enable and configure a sample log for the |
|
|
|
PRSTDataWriters in a persistence group. A sample log is a buffer of |
|
|
|
samples on disk that, when used in combination with delegate reliability, |
|
|
<sample_logging> |
allow decoupling the original DataWriters from slow DataReaders. |
0 or 1 |
|
|
For additional information on the sample log, see Scenario: Slow Consumer |
|
|
|
|
||
|
Default: Sample log is disabled |
|
|
|
|
|
Table 27.8 Persistence Group Tags
Tags within |
|
Number |
<persistence_ |
Description |
of Tags |
group> |
|
Allowed |
|
|
|
|
A DDS_Boolean (see Table 27.1) that determines how much state will be |
|
|
kept in memory by the PRSTDataWriters in order to avoid accessing the |
|
|
persistent storage. |
|
|
The property is only applicable when the persistence service operates in |
|
|
persistent mode (the <persistent_storage> tag is present). |
|
|
If this property is 1, the PRSTDataWriters will keep a copy of all the |
|
|
instances in memory. They will also keep a fixed state overhead of 24 bytes |
|
|
per sample. This mode provides the best performance. However, the restore |
|
<writer_in_ |
operation will be slower and the maximum number of samples that a |
0 or 1 |
memory_state> |
PRSTDataWriter can manage will be limited by the available physical |
|
|
memory. |
|
|
If this property is 0, all the state will be kept in the underlying persistent |
|
|
storage. In this mode, the maximum number of samples that a |
|
|
PRSTDataWriter can manage will not be limited by the available physical |
|
|
memory. |
|
|
Default: If the HistoryQosPolicy‘s kind is KEEP_LAST or the |
|
|
ResourceLimitsQosPolicy’s max_samples != DDS_UNLIMITED_LENGTH, |
|
|
the default is 1. Otherwise, the default is 0. |
|
|
|
|
|
A DDS_Boolean (see Table 27.1) that indicates if Persistence Service will use |
|
|
Waitsets or Listeners to read data from the PRSTDataReaders of the group. |
|
|
By default, the usage of Waitsets is disabled. With this configuration, |
|
|
Persistence Service uses the on_data_available() listener callback to take the |
|
|
data from the PRSTDataReaders within the persistence group. The write |
|
|
operation in a PRSTDataWriter is called within the listener callback. |
|
|
When Waitsets are enabled, Persistence Service will use them to read the |
|
|
data: |
|
<use_wait_set> |
❏ If <single_subscriber> is set to 1, there will be a single |
0 or 1 |
|
Waitset and a read thread shared across all the |
|
|
PRSTDataReaders in the group. |
|
|
❏ If <single_subscriber> is set to 0, there will be a Waitset |
|
|
and a read thread per PRSTDataReader in the group. |
|
|
The write operation in a PRSTDataWriter is called by the read thread |
|
|
associated with the PRSTDataReader. |
|
|
Default: 0 |
|
|
|
|
a. These fields cannot be set and are assigned automatically: protocol.virtual_guid, protocol.rtps_object_id, durabil- ity.kind.
27.8.1QoSs
When a persistence service discovers a topic 'A' that matches a specific persistence group, it creates a reader (known as ‘PRSTDataReader’) and writer (‘PRSTDataWriter’) to persist that topic. The QoSs associated with these readers and writers, as well as the corresponding publishers and subscribers, can be configured inside the persistence group using QoS tags.
For example:
<participant name="Part1"> <domain_id>71</domain_id>
<persistence_group name="PerGroup1" filter="*">
...
<publisher_qos base_qos_name="QosLib1::PubQos1"/> <subscriber_qos base_qos_name="QosLib1::SubQos1"/> <datawriter_qos base_qos_name="QosLib1::WriterQos1"/>
<datareader_qos base_qos_name="QosLib1::ReaderQos1"/>
...
</persistence_group> </participant>
For instance, the number of samples saved by Persistence Service is configurable through the HISTORY QosPolicy (Section 6.5.10) of the PRSTDataWriters.
If a QoS tag is not specified the persistence service will use the corresponding DDS default values (Section 27.8.2 describes an exception to this rule).
27.8.2DurabilityService QoS Policy
The DURABILITY SERVICE QosPolicy (Section 6.5.8) associated with a DataWriter is used to configure the HISTORY and the RESOURCE_LIMITS associated with the PRSTDataReaders and PRSTDataWriters.
By default, the HISTORY and RESOURCE_LIMITS of a PRSTDataReader and PRSTDataWriter with topic 'A' will be configured using the DURABILITY_SERVICE value of the first discovered DataWriter publishing 'A'. These values will overwrite the values specified in the XML file.
To not overwrite the XML values, you can use the tag <use_durability_service> in the persistence group definition:
<participant name="Part1"> <domain_id>71</domain_id>
<persistence_group name="PerGroup1" filter="*">
...
<use_durability_service/>0</ use_durability_service>
...
</persistence_group> </participant>
27.8.3Sharing a Publisher/Subscriber
By default, the PRSTDataWriters and PRSTDataReaders associated with a persistence group will share the same Publisher and Subscriber.
To associate a different Publisher and Subscriber with each PRSTDataWriter and PRSTDataReader, use the tags <single_publisher> and <single_subscriber>, as follows:
<participant name="Part1"> <domain_id>71</domain_id>
<persistence_group name="PerGroup1" filter="*">
...
<single_publisher/>0</single_publisher> <single_subscriber/>0</single_subscriber>
...
</persistence_group> </participant>
27.8.4Sharing a Database Connection
By default, the persistence service will share a single ODBC database connection to persist the topic data received by each PRSTDataReader.
To associate an independent database connection to the PRSTDataReaders created by the persistence service, use the tag <share_database_connection>, as follows:
<participant name="Part1"> <domain_id>71</domain_id>
<persistence_group name="PerGroup1" filter="*">
...
<share_database_connection>0</share_database_connection>
...
</persistence_group> </participant>
Sharing a database connection optimizes the resource usage. However, the concurrency of the system decreases because the access to the database connection must be protected.
27.8.5Memory Management
The samples received and stored by the PRSTDataReaders and PRSTDataWriters are in serialized form.
The serialized size of a sample is the number of bytes required to send the sample on the wire. The maximum serialized size of a sample is the number of bytes that the largest sample for a given type requires on the wire.
By default, the PRSTDataReaders and PRSTDataWriters created by the persistence service try to allocate multiple samples to their maximum serialized size. This may cause memory allocation issues when the maximum serialized size is significantly large.
For PRSTDataReaders, the number of samples in the DataReader’s queues can be controlled using the QoS values resource_qos.resource_limits.max_samples and resource_qos.resource_limits.initial_samples.
The PRSTDataWriters keep a cache of samples so that they do not have to access the database every time. The minimum size of this cache is 32 samples.
In addition, each PRSTDataWriter keeps an additional sample called DB sample that is used to move information from the DataWriter cache to the database and vice versa
The <memory_management> tag in a persistence group can be used to control the memory allocation policy for the samples created by PRSTDataReaders and PRSTDataWriters in the persistence group.
Table 27.9 describes the memory management tags.
Table 27.9 Memory Management Tags
Tags within |
|
Number |
|
<memory_ |
Description |
of Tags |
|
management> |
|
Allowed |
|
|
|
|
|
|
This tag is used to control the memory associated with the DB sample in |
|
|
|
a PRSTDataWriter. The persistence service will not be able to store a |
|
|
<persistent_sample_ |
sample into persistent storage if the serialized size is greater than this |
0 or 1 |
|
buffer_max_size> |
value. Therefore, this parameter must be used carefully. |
||
|
|||
|
Default: LENGTH_UNLIMITED (DB sample is allocated to the |
|
|
|
maximum size). |
|
|
|
|
|
|
|
This tag applies to both PRSTDataReaders and PRSTDataWriters. Its |
|
|
|
value determines the maximum size (in bytes) of the buffers that will be |
|
|
|
|
||
|
is greater than this size, the persistence service will allocate the memory |
|
|
<pool_sample_ |
dynamically to the exact size required by the sample. |
|
|
This parameter is used to control the memory allocated for the samples |
0 or 1 |
||
buffer_max_size> |
|||
in the PRSTDataReaders queues and the PRSTDataWriters caches. |
|
||
|
|
||
|
The size of the DB sample in the PRSTDataWriters is controlled by the |
|
|
|
value of the tag <persistent_sample_buffer_max_size>. |
|
|
|
Default: LENGTH_UNLIMITED (samples are allocated to the maximum |
|
|
|
size). |
|
|
|
|
|

27.9Configuring Durable Subscriptions in Persistence Service
This section assumes you are familiar with the concept of Required Subscriptions (Section 6.3.13).
A Durable Subscription is a Required Subscription where samples are stored and forwarded by
Persistence Service.
There are two ways to create a Durable Subscriptions:
1.Programmatically using a DomainParticipant API:
A subscribing application can register a Durable Subscription by providing the topic name and the endpoint group information, consisting of the Durable Subscription role_name and the quorum. To register or delete a Durable Subscription, use the
DomainParticipant’s register_durable_subscription() and delete_durable_subscription() operations, respectively (see Table 8.3 on page
2.Preconfigure Persistence Service with a set of Durable Subscriptions:
Persistence Service can be
<durable_subscriptions> XML tag under <participant>.
<participant name="Participant">
...
<durable_subscriptions>
<element> <role_name>Logger</role_name> <topic_name>Track</topic_name> <quorum>2</quorum>
</element>
<element> <role_name>Processor</role_name> <topic_name>Track</topic_name> <quorum>1</quorum>
</element> </durable_subscriptions>
</participant>
After registering or configuring the persistence service with specific Durable Subscriptions, the persistence service will keep samples until they are acknowledged by all the required Durable Subscriptions. In the above example, the samples must be acknowledged by two DataReaders that belong to the “Logger” Durable Subscription and one DataReader belonging to the “Processor” Durable Subscription.
27.9.1Sample Memory Management With Durable Subscriptions
The maximum number of samples that will be kept in a PRSTDataWriter queue is determined by the value of <resource_limits><max_samples> in the <writer_qos> used to configure the PRSTDataWriter.
By default, a PRSTDataWriter configured with KEEP_ALL <history><kind> will keep the samples in its cache until they are acknowledged by all the Durable Subscriptions associated with the PRSTDataWriter. After the samples are acknowledged by the Durable Subscriptions, they will be marked as reclaimable but they will not be purged from the PRSTDataWriter’s queue until the DataWriter needs these resources for new samples. This may lead to inefficient resource utilization, especially when <max_samples> is high or UNLIMITED.
The PRSTDataWriter behavior can be changed to purge samples |
after |
they have been |
||||||||
acknowledged by all the active/matching DataReaders and all the |
Durable |
Subscriptions |
||||||||
configured |
for |
the |
<persistence_service>. |
To |
do |
so, |
set |
the |
tag |
|

<purge_samples_after_acknowledgment> under <persistence_service> to TRUE. Notice that this setting is global to the service and applies to all the PRSTDataWriters created by each <persistence_group>.
27.10 Synchronizing of Persistence Service Instances
By default, different Persistence Service instances do not synchronize with each other. For example, in a scenario with two Persistence Service instances, the first persistence service could receive a sample ‘S1’ from the original DataWriter that is not received by the second persistence service. If the disk where the first persistence service stores its samples fails, ‘S1’ will be lost.
To enable synchronization between Persistence Servic instances, use the tag <synchronization> under <persistence_service>. When it comes to synchronization, there are two different kinds of information that can be synchronized independently:
❏Information about Durable Subscriptions and their states (see Section 27.9)
❏Data samples
Table 27.10 Synchronization Tags
Tags within |
|
Number |
|
Description |
of Tags |
||
<synchronization> |
|||
|
Allowed |
||
|
|
||
|
|
|
|
|
|
|
|
|
Enables synchronization of data samples in redundant Persistence Service |
|
|
|
instances. |
|
|
|
When set to 1, samples lost on the way to one service instance can be |
|
|
|
repaired by another without impacting the original publisher of that |
|
|
|
message. |
|
|
<synchronize_data> |
To synchronize the instances, the tag <synchronize_data> must be set to |
0 or 1 |
|
|
1 in every instance involved in the synchronization. |
|
|
|
Note: This sample synchronization mechanism is not equivalent to |
|
|
|
database replication. The extent to which database instances have |
|
|
|
identical contents depends on the destination ordering and other QoS |
|
|
|
settings for the Persistence Service instances. |
|
|
|
Default: 0 |
|
|
|
|
|
|
|
Enables synchronization of Durable Subscriptions in redundant |
|
|
|
Persistence Service instances. |
|
|
<synchronize_ |
When set to 1, the different Persistence Service instances will synchronize |
|
|
their Durable Subscription information. This information includes the |
|
||
durable_ |
0 or 1 |
||
set of Durable Subscriptions as well as information about the Durable |
|||
subscriptions> |
Subscription’s state, such as the samples that have already been received |
|
|
|
|
||
|
by the Durable Subscriptions. |
|
|
|
Default: 0 |
|
|
|
|
|
|
<durable_ |
The period (in milliseconds) at which the information about Durable |
|
|
subscription_ |
|
||
Subscriptions is synchronized. |
0 or 1 |
||
synchronization_ |
|||
Default: 5000 milliseconds |
|
||
period> |
|
||
|
|
||
|
|
|
27.11 Enabling RTI Distributed Logger in Persistence Service
Persistence Service provides integrated support for RTI Distributed Logger.
When you enable Distributed Logger, Persistence Service will publish its log messages to Connext. Then you can use RTI Monitor1 to visualize the log message data. Since the data is provided in a Connext topic, you can also use rtiddsspy or even write your own visualization tool.
To enable Distributed Logger, modify the Persistence Service XML configuration file. In the <administration> section, add the <distributed_logger> tag as shown in the example below.
<persistence_service name="default">
...
<administration>
...
<distributed_logger>
<enabled>true</enabled>
</distributed_logger>
...
</administration>
...
</persistence_service>
There are more configuration tags that you can use to control Distributed Logger’s behavior. For example, you can specify a filter so that only certain types of log messages are published. For details, see the RTI Distributed Logger Getting Started Guide.
27.12 Enabling RTI Monitoring Library in Persistence Service
To enable monitoring in Persistence Service, you must specify the property rti.monitor.library for the participants that you want to monitor. For example:
<persistence_service name="monitoring_test"> <participant name="monitoring_enabled_participant">
<domain_id>54</domain_id> <participant_qos>
<property>
<value>
<element>
<name>rti.monitor.library</name>
<value>rtimonitoring</value>
<propagate>false</propagate>
</element>
</value>
</property> </participant_qos>
<persistence_group name="persistAll">
...
</persistence_group> </participant> </persistence_service>
Notice that since Persistence Service is statically linked with RTI Monitoring Library, you do not need to have it in your Path (on Windows systems) or LD_LIBRARY_PATH (on
For details on how to configure the monitoring process, see the RTI Monitoring Library Getting Started Guide.
27.13 Support for Extensible Types
Persistence Service includes partial support for the "Extensible and Dynamic Topic Types for DDS" specification from the Object Management Group (OMG)1. This section assumes that you
1.RTI Monitor is a separate CUI application that can run on the same host as your application or on a different host.
are familiar with Extensible Types and you have read the Core Libraries and Utilities Getting Started Guide Addendum for Extensible Types.
Persistence groups can publish and subscribe to topics associated with final and extensible types.
The service will automatically create different pairs (PRSTDataReader, PRSTDataWriter) for each version of a type discovered for a topic in a persistence group. In Connext 5.0, it is not possible to associate more than one type with a topic within a single DomainParticipant, therefore each version of a type requires its own DomainParticipant.
The TYPE_CONSISTENCY_ENFORCEMENT QosPolicy (Section 7.6.6) kind for each PRSTDataReader is set to DISALLOW_TYPE_COERCION. This value cannot be overwritten by the user.
For example:
struct A { long x;
};
struct B { long x; long y;
};
Let’s assume that Persistence Service is configured as follows and we have two DataWriters on Topic “T” publishing type “A” and type “B” and sending TypeObject information.
<persistence_service name="XTypes"> <participant name="XTypesParticipant">
<persistence_group name="XTypesPersistenceGroup"> <filter>T</filter>
</persistence_group> </participant>
</persistence_service>
When Persistence Service discovers the first DataWriter with type “A”, it will create a DataReader (PRSTDataReader) to read samples from that DataWriter, and a DataWriter (PRSTDataWriter) to publish and store the received samples so they can be available to
When Persistence Service discovers the second DataWriter with type “B”, it will see that type “B” is not equal to type “A”; then it will create a new pair (PRSTDataReader, PRSTDataWriter) to receive and store samples from the second DataWriter.
Since the PRSTDataReaders are created with the TypeConsistencyEnforcementQosPolicy’s kind set to DISALLOW_TYPE_COERCION, the PRSTDataReader with type “A” will not match the DataWriter with type “B”. Likewise, the PRSTDataReader with type “B” will not match the DataWriter with type “A”.
27.13.1Type Version Discrimination
Persistence Service uses the rules described in the Core Libraries and Utilities Getting Started Guide Addendum for Extensible Types to decide whether or not to create a new pair (PRSTDataReader, PRSTDataWriter) when it discovers a DataWriter for a topic “T”.
For DataWriters created with previous Connext releases, Persistence Service will select the first pair (PRSTDataReader, PRSTDataWriter) with a registered type name equal to the discovered registered type name since DataWriters created with previous Connext releases (before 5.0) do not send TypeObject information.

Chapter 28 Running RTI Persistence Service
This chapter describes how to start and stop Persistence Service.
You can run Persistence Service on any node in the network. It does not have to be run on the same node as the publishing or subscribing applications for which it is saving/delivering data. If you run it on a separate node, make sure that the other applications can find it during the discovery
28.1Starting Persistence Service
The script to run Persistence Service’s executable is located in $NDDSHOME/scripts.
RTI Persistence Service v4.5f |
|
|
Usage: rtipersistenceservice [options] |
|
|
Options: |
|
|
<file> |
Configuration file. This parameter is |
|
|
|
optional since the configuration can be |
|
|
loaded from other locations |
Required |
<name> |
Configuration name. This parameter is |
|
|
required and it is used to find a |
|
|
<persistence_service> |
|
|
matching tag in the configuration files |
<name> |
Application name |
|
|
|
Used to identify this execution for remote |
|
|
administration and to name the domain |
|
|
participants |
|
|
Default: |
|
Appends the host name and process ID to the |
|
|
|
appName to help ensure unique names |
<int> |
domain ID for the domain participants |
|
|
|
created by the service |
|
|
Default: Use XML value |
<int> |
Enables remote administration and sets the |
|
|
|
domain ID for the communication |
|
|
Default: Use XML value |
<0|1> |
Indicates whether or not persistence |
|
|
|
service must restore its state from the |
|
|
persistent storage |
|
|
Default: Use XML value |
|
Use this option if you plan to start RTI |
|
|
|
Persistence Service remotely |
<dir> |
The info directory of the running |
|
|
|
persistence service. The service writes a |

|
|
ps.pid file into this directory when is |
|
|
started. When the service finalizes the |
|
|
file is deleted |
|
|
Default: None |
<int> |
Sets the maximum number of objects that can |
|
|
|
be stored per thread for a |
|
|
DomainParticipantFactory |
|
|
Default: Connext default |
<int> |
Service thread stack size |
|
|
|
Default: OS default |
RTI Persistence Service verbosity |
||
|
|
* 0 - silent |
|
|
* 1 - exceptions (Core Libraries and Ser- |
|
|
vice) |
|
|
* 2 - warnings (Service) |
|
|
* 3 - information (Service) |
|
|
* 4 - warnings (Core Libraries and Service) |
|
|
* 5 - tracing (Service) |
|
|
* 6 - tracing (Core Libraries and Service) |
|
|
Default: 1 (exceptions) |
|
Prints RTI Persistence Service version |
|
|
Displays this information |
The
28.2Stopping Persistence Service
To stop Persistence Service: clean shutdown. Persistence Chapter 29).
press
Table 28.1
Description |
||
|
|
|
|
|
|
|
Assigns a name to the execution of Persistence Service. |
|
|
Remote commands will refer to the persistence service using this name. |
|
|
In addition, the name of the DomainParticipants created by Persistence |
|
Service will be based on this name as follows: |
||
|
RTI Persistence Service: <appName>: <participantName>(<pub|sub>) |
|
|
Default: The name given with |
|
|
“RTI_Persistence_Service” |
|
|
|
|
|
Specifies an XML configuration file for the Persistence Service. |
|
The parameter is optional since the Persistence Service configuration can be |
||
|
loaded from other locations. See Section 27.1 for further details. |
|
|
|
|
|
Required. |
|
|
Selects a Persistence Service configuration. |
|
|
The same configuration files can be used to configure multiple persistence |
|
services. Each Persistence Service instance will load its configuration from a |
||
different <persistence_service> tag based on the name specified with this |
||
|
||
|
option. |
|
|
If not specified, Persistence Service will print the list of available |
|
|
configurations and then exit. |
|
|
|
|
|
Appends the host name and process ID to the service name provided with |
|
the |
||
|
administration. |
|
|
|
Table 28.1
Description |
||
|
|
|
|
|
|
|
Sets the domain ID for the DomainParticipants created by Persistence |
|
Service. |
||
If not specified, the value in the <participant> XML tag (see Table 27.7 on |
||
|
||
|
||
|
|
|
|
Enables remote administration and sets the domain ID for remote |
|
|
communication. |
|
|
When remote administration is enabled, Persistence Service will create a |
|
DomainParticipant, Publisher, Subscriber, DataWriter, and DataReader in the |
||
<ID> |
designated domain. |
|
|
This option overwrites the value of the tag <domain_id> within |
|
|
<administration>. |
|
|
Default: Use the value <domain_id> under <administration>. |
|
|
|
|
Prints the Persistence Service version and list of |
||
|
|
|
|
Specifies the license file (path and filename). Only applicable to licensed |
|
versions of Persistence Service. |
||
If not specified, Persistence Service looks for the license as described in the |
||
|
||
|
Persistence Service Installation Guide. |
|
|
|
|
|
Indicates whether or not Persistence Service must restore its state from the |
|
persistent storage. 0 = do not restore; 1 = do restore. |
||
If this option is not specified, the corresponding XML value in the |
||
|
||
|
<persistent_storage> tag (see Table 27.4 on page |
|
|
|
|
|
Indicates that Persistence Service will not be started when the process is |
|
executed. |
||
Use this option if you plan to start Persistence Service remotely, as |
||
|
||
|
described in Chapter 29.. |
|
|
|
|
|
The info directory of the running Persistence Service. |
|
|
Using this command line option, Persistence Service can be configured to |
|
|
create a file used to monitor the status of the last shutdown. |
|
|
At startup, the Persistence Service instance will create a file called ps.pid |
|
|
into the directory specified by |
|
|
If Persistence Service is shutdown gracefully, the file will be deleted before |
|
|
the process exists. |
|
If Persistence Service is not shutdown gracefully, the file will not be deleted. |
||
You can detect the shutdown state of Persistence Service by checking for the |
||
|
||
|
presence of the ps.pid file. |
|
|
If the file is present and Persistence Service is no longer running, the |
|
|
previous shutdown was not graceful. |
|
|
If Persistence Service is started and a ps.pid file exists, Persistence Service |
|
|
will immediately shutdown. In this case, you must remove the file before |
|
|
Persistence Service can be restarted again. |
|
|
Default: The file ps.pid will not be generated. |
|
|
|
|
|
Parameter used to configure the maximum objects per thread in the |
|
DomainParticipantFactory created by Persistence Service. |
||
|
Default: DDS default |
|
|
|
|
Service thread stack size. |
||
Default: DDS default |
||
|
||
|
|
Table 28.1
|
Description |
|
|
|
|
|
|
|
|
Persistence Service verbosity: |
|
|
0 |
- No verbosity |
|
1 |
- Exceptions (Core Libraries and Persistence Service) (default) |
|
2 |
- Warning (Persistence Service) |
3 - Information (Persistence Service) |
||
|
4 |
- Warning (Core Libraries and Persistence Service) |
|
5 |
- Tracing (Persistence Service) |
|
6 |
- Tracing (Core Libraries and Persistence Service) |
|
Each verbosity level, n, includes all the verbosity levels smaller than n. |
|
|
|
|
Prints the Persistence Service version. |
||
|
|
|

Chapter 29 Administering Persistence Service from a Remote Location
Persistence Service can be controlled remotely by sending commands through a special Topic. Any Connext application can be implemented to send these commands and receive the corresponding responses. A shell application that sends/receives these commands is provided with Persistence Service.
The script for the shell application is in $NDDSHOME/scripts/rtipssh.
Entering rtipssh
RTI Persistence Service |
Shell v5.0.x |
|
Usage: rtipssh [options]... |
||
Options: |
|
|
<integer> |
Domain ID for the remote configuration |
|
<seconds> |
Max time to wait a remote response |
|
<file> |
Run commands in this file |
|
|
Displays this information |
|
29.1Enabling Remote Administration
By default, remote administration is disabled in Persistence Service.
To enable remote administration you can use the <administration> tag (see Section 27.5) or the - remoteAdministrationDomainId
When remote administration is enabled, Persistence Service will create a DomainParticipant, Publisher, Subscriber, DataWriter, and DataReader in the designated domain. (The QoS values for these entities are described in Section 27.5.)
29.2Remote Commands
This section describes the remote commands using the shell interface; Section 29.3 explains how to use remote administration from a Connext application.

Remote commands:
start <target_persistence_service> stop <target_persistence_service> shutdown <target_persistence_service> status <target_persistence_service>
Parameters:
❏<target_persistence_service> can be:
•The application name of a persistence service, such as “MyPersistenceService1”, as specified at
•A wildcard expression1 for a persistence service name, such as
“MyPersistenceService*”
29.2.1start
start <target_persistence_service>
The start command starts the persistence service instance. Samples will not be persisted until the persistence service is started.
By default, the persistence service is started automatically when the process is executed. To start the service remotely use the command line option
29.2.2stop
stop <target_persistence_service>
The stop command stops the persistence service instance.
An instance that has been stopped can be started again using the command start.
29.2.3shutdown
shutdown <target_persistence_service>
The command shutdown stops the persistence service instance and finalizes the process
29.2.4status
status <target_persistence_service>
The status command gets the status of a running persistence service instance. Possible values are STARTED and STOPPED.
29.3Accessing Persistence Service from a Connext Application
You can send commands to control an Persistence Service instance from your own Connext application. You will need to create a DataWriter for a specific topic and type. Then, you can send a sample that contains a command and its parameters. Optionally, you can create a DataReader for a specific topic to receive the results of the execution of your commands.
The topics are:
❏rti/persistence_service/administration/command_request
1.As defined by the POSIX fnmatch API
❏rti/persistence_service/administration/command_response The types are:
❏RTI::PersistenceService::Administration::CommandRequest
❏RTI::PersistenceService::Administration::CommandResponse
You can find the IDL definitions for these types in $(NDDSHOME)/resource/ rtipersistenceservice/idl/PersistenceServiceAdministration.idl.
The QoS configuration of your DataWriter and DataReader must be compatible with the one used by the persistence service (see how this QoS is configured in Section 27.5).
The following example in C shows how to send a command to shutdown a persistence service instance:
/*******************************************************************/ /*** Create the Entities needed to send the command request ****/
/*******************************************************************/
participant = DDS_DomainParticipantFactory_create_participant(DDS_TheParticipantFactory, domainId, &DDS_PARTICIPANT_QOS_DEFAULT, NULL, DDS_STATUS_MASK_NONE);
if (participant == NULL) { /* Error */ }
publisher = DDS_DomainParticipant_create_publisher(participant, &DDS_PUBLISHER_QOS_DEFAULT, NULL, DDS_STATUS_MASK_NONE);
if (publisher == NULL) { /* Error */ }
subscriber = DDS_DomainParticipant_create_subscriber(participant, &DDS_SUBSCRIBER_QOS_DEFAULT, NULL, DDS_STATUS_MASK_NONE);
if (publisher == NULL) { /* Error */
}
typeName = RTI_PersistenceService_Administration_CommandRequestTypeSupport_get_type_name();
retcode = RTI_PersistenceService_Administration_CommandRequestTypeSupport_register_type (participant, typeName);
if (retcode != DDS_RETCODE_OK) { /* Error */
}
topicCmd = DDS_DomainParticipant_create_topic(participant, "rti/persistence_service/administration/command_request", typeName, &DDS_TOPIC_QOS_DEFAULT, NULL, DDS_STATUS_MASK_NONE);
if (topicCmd == NULL) { /* Error */ }
typeName =
RTI_PersistenceService_Administration_CommandResponseTypeSupport_get_type_name(); retcode =
RTI_PersistenceService_Administration_CommandResponseTypeSupport_register_type( participant, typeName);
if (retcode != DDS_RETCODE_OK) { /* Error */ }
topicResponse = DDS_DomainParticipant_create_topic(
participant, "rti/persistence_service/administration/command_response", typeName, &DDS_TOPIC_QOS_DEFAULT, NULL, DDS_STATUS_MASK_NONE);
if (topicResponse == NULL) { /* Error */ }
writerQos.reliability.kind = DDS_RELIABLE_RELIABILITY_QOS; writerQos.history.kind = DDS_KEEP_ALL_HISTORY_QOS;
writer = DDS_Publisher_create_datawriter(publisher, topicCmd, &writerQos,
NULL /* listener */, DDS_STATUS_MASK_NONE);
if (writer == NULL) { /* Error */ }
readerQos.reliability.kind |
= |
DDS_RELIABLE_RELIABILITY_QOS; |
readerQos.history.kind |
= |
DDS_KEEP_ALL_HISTORY_QOS; |
reader = DDS_Subscriber_create_datareader(subscriber, DDS_Topic_as_topicdescription(topicResponse), &readerQos, NULL, DDS_STATUS_MASK_NONE);
if (reader == NULL) { /* Error */ }
/*******************************************************************/ /*** Wait for discovery ********************************************/
/*******************************************************************/
/* Wait until we discover one reader and one writer matching
*with the command request DataWriter and the command response
*DataReader */
while (count < maxPollPeriods) {
retcode = DDS_DataWriter_get_publication_matched_status(writer, &pubMatchStatus); if (retcode != DDS_RETCODE_OK) { /* Error */ }
retcode = DDS_DataReader_get_subscription_matched_status(reader, &subMatchStatus); if (retcode != DDS_RETCODE_OK) { /* Error */ }
if (pubMatchStatus.total_count == 1 && subMatchStatus.total_count == 1) { break;
}
count++; NDDS_Utility_sleep(&pollPeriod);
}
if (count == maxPollPeriods) { /* Error */ }
/*******************************************************************/ /*** Send the command request **************************************/
/*******************************************************************/
request = RTI_PersistenceService_Administration_CommandRequestTypeSupport_create_data(); if (request == NULL) { /* Error */ }
/*
*it can be correlated with a response. Although one of the fields is
*called host it does not necessarily has to contain the IP address of
*the host. Same applies to app */
retcode = RTI_PersistenceService_Administration_CommandRequestDataWriter_write( (RTI_PersistenceService_Administration_CommandRequestDataWriter *) writer, request, &instance_handle);
if (retcode != DDS_RETCODE_OK) { /* Error */ }
/*******************************************************************/ /*** Wait for response ********************************************/
/*******************************************************************/
response = RTI_PersistenceService_Administration_CommandResponseTypeSupport_create_data();
if (response == NULL) { /* Error */ }
count = 0;
while (count < maxPollPeriods) {
retcode = RTI_PersistenceService_Administration_CommandResponseDataReader_take_next_sample( (RTI_PersistenceService_Administration_CommandResponseDataReader*)
reader, response, &sampleInfo); if (retcode == DDS_RETCODE_OK) {
break;
} else if (retcode != DDS_RETCODE_NO_DATA) { /* Error */
}
NDDS_Utility_sleep(&pollPeriod); count++;
}
if (count == maxPollPeriods) { printf("No response received\n");
} else {
printf("Response received:
}

Chapter 30 Advanced Persistence Service Scenarios
This section covers several advanced scenarios for using Persistence Service.
30.1Scenario:
Each running instance of the Persistence Service executes as a single process in a single computer. In
❏If the Persistence Service is configured to persist its samples to durable storage (a disk or a database) this will further limit the throughput of samples that can be persisted to what the database and/or disk can handle. Depending on computer hardware, the disk or database this limit may be in the order of tens of thousands of samples per second which is far less than what could be communicated
❏Depending on the CPU there will be limits on the throughput of samples that can be received by a single process.
❏The computer running the Persistence Service is typically connected to the network via a single network interface so the data that can be persisted will be limited to the throughput that flows though a single interface which is typically far less that the aggregated throughput that can flow on the complete network.
To overcome these limits multiple instances of the RTI Persistence Service can be run in parallel. These instances may run in multiple machines and be configured in a “load balancing” fashion such that each Persistence Service process is only responsible for persisting a subset of the data published on the DDS domain.
Multiple strategies for partitioning the data stored by each Persistence Service instance are possible:
❏Balance Persistence Services by Topic name. This strategy configures each persistence service to persist different Topic names. This is accomplished by associating a filter expression with the declaration of the persistent groups used to configure each Persistence Service (see Creating Persistence Groups (Section 27.8)). The filter expression is applied to the Topic names, so for example one Persistence Service could be configured with the filter
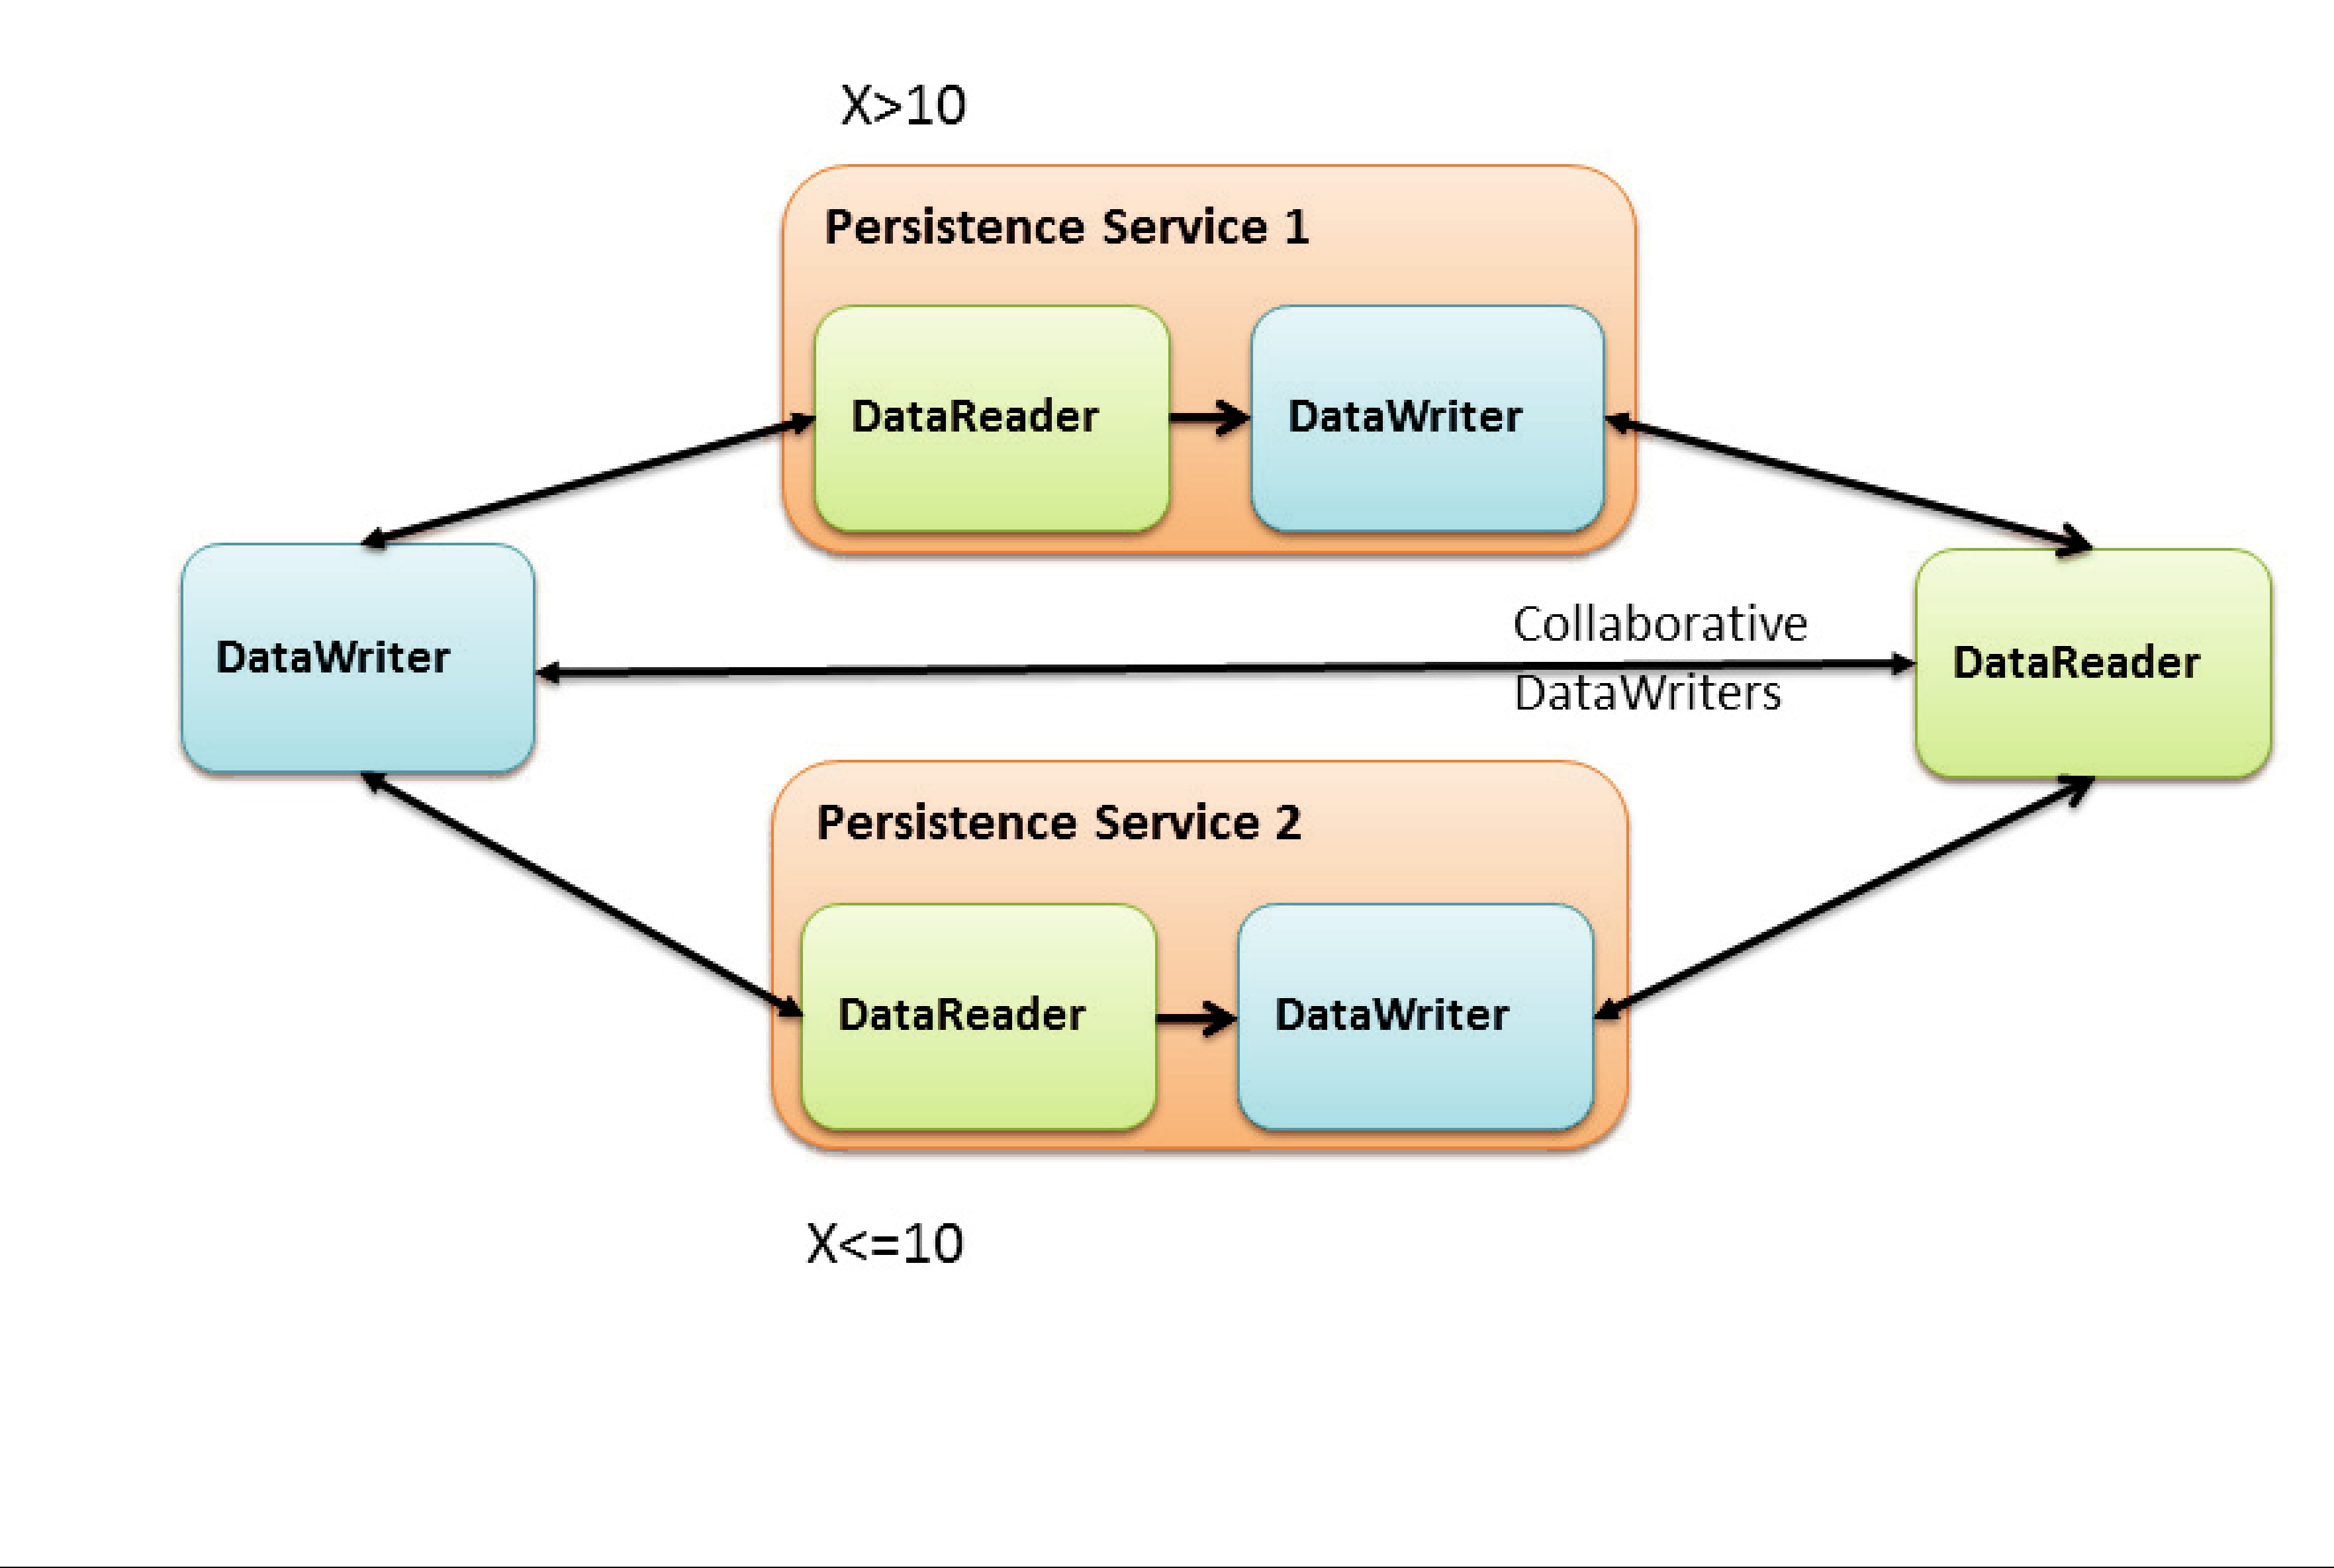
❏Balance Persistence Services by data content. In some scenarios the data published on a single Topic is too much for a single Persistence Service to handle. In this case the Persistence Services can also be configured with filter expressions based on the content of the data. This is accomplished by associating a content filter with the declaration of the persistent groups used to configure each Persistence Service (see Creating Persistence Groups (Section 27.8)).
When multiple instances of Persistence Service are used to store data on the same Topic, it becomes possible for samples from the same original DataWriter to be stored in separate instances of Persistence Service. In this situation, Connext DataReaders automatically merge the data from the multiple Persistence Services such that the relative order of the samples from the original DataWriter is preserved. This Connext capability is called Collaborative Datawriters because multiple DataWriters, in this case the ones for different Persistence Services, collaborate to reconstruct the original stream. (See Chapter 11: Collaborative DataWriters).
Figure 30.1
30.2Scenario: Delegated Reliability
The
DataReaders.
In situations where there many DataReaders are subscribing to the same Topic, the reliability and repair traffic may become too much for the DataWriter to handle and negatively impact its performance. To address this situation, Connext provides the ability to configure the DataWriter so that it delegates the reliability task to a separate service. This approach is known as delegated reliability.
To take advantage of delegated reliability, both the original DataWriter and DataReader must be configured to enable an external service to ensure the reliability on their behalf. This is done by

setting both the dds.data_writer.reliability.delegate_reliability property on the DataWriter and the dds.data_reader.reliability.delegate_reliability property on the DataReader to 1.
With this configuration, the DataWriter creates a reliable channel to Persistence Service, yet sends data using
Figure 30.2 Delegated Reliability Scenario
30.3Scenario: Slow Consumer
Unless special measures are taken, the presence of slow consumers can impact the overall behavior of the system. If a DataReader is not keeping up with the samples being sent by the DataWriter, it will apply
By default, Persistence Service uses the Connext receive thread to read samples from the PRStDataReaders, write the samples to the PRSTDataWriters history, and send ACKs to the original DataWriter. With this configuration, a PRSTDataReader does not ACK samples to the original DataWriter until they are written into the corresponding PRSTDataWriter’s history. Since multiple DataReaders may be accessing the PRSTDataWriter history at the same time that the persistence service is trying to write new samples, the PRSTDataWriter history becomes a contention point that can indirectly slow down the original DataWriter (see Figure 30.3).
To remove this contention point and decouple the slow consumer from the original DataWriter, Persistence Service supports a mode where samples can be buffered prior to being added to the PRSTDataWriter’s queue (see Figure 30.4).
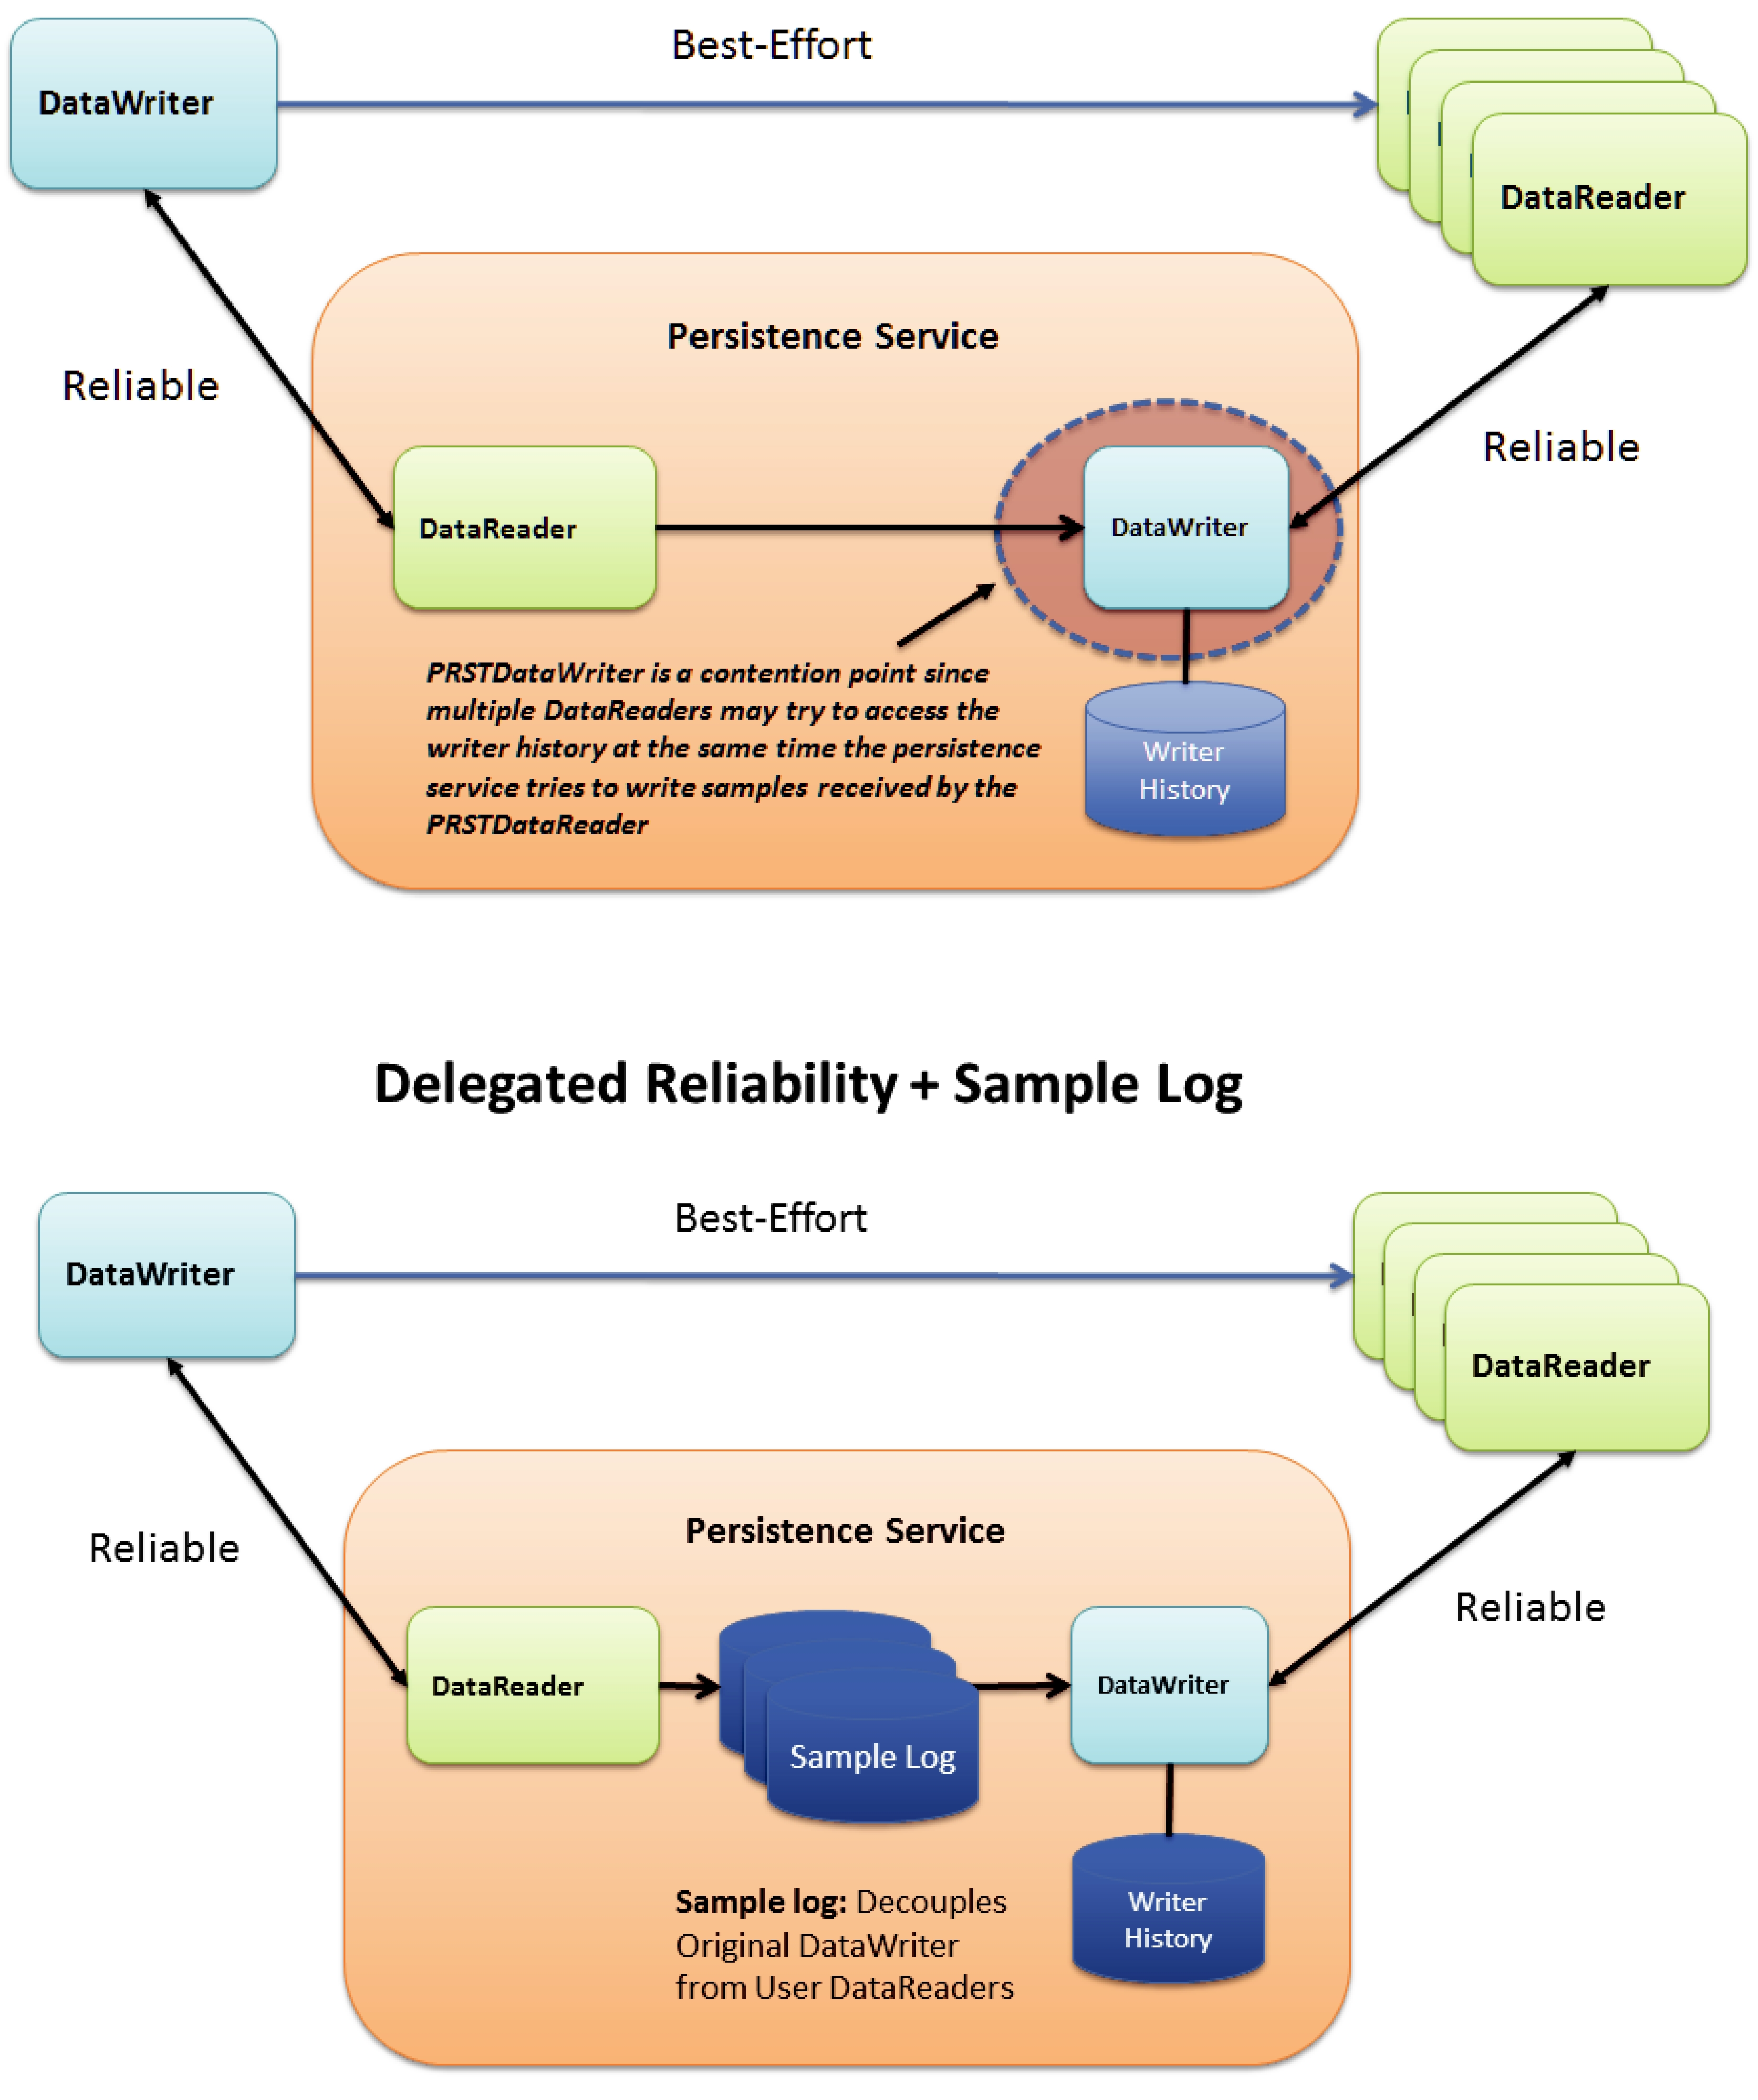
Figure 30.3
Figure 30.4 Slow Consumer Scenario With Delegated Reliability and Sample Log
If the PRSTDataWriter slows down due to the presence of slow consumers, the buffer will hold samples such that the original DataWriter and the rest of the system are not impacted. This buffer is called the Persistence Service sample log. The persistence service creates a separate sample log per PRSTDataWriter in the group. In addition to the sample log, the persistence service creates a thread (write thread) whose main function is to read samples from the log and write them to the associated PRSTDataWriter. There is one thread per PRSTDataWriter.
Important: Persistence Service currently does not allow multiple sample logs to share the same write thread.
Persistence Service can be configured to enable sample logging per persistence group using the <sample_logging> XML tag to specify the log’s configuration
Table 30.1 Sample Logging Tags
Tags within |
|
Number |
|
Description |
of Tags |
||
<sample_logging> |
|||
|
Allowed |
||
|
|
||
|
|
|
|
|
|
|
|
|
A DDS_Boolean (see Table 27.1) that indicates whether or not sample |
|
|
<enable> |
logging is enabled in the container persistence group. |
0 or 1 |
|
|
Default: 0 |
|
|
|
|
|
|
|
Specifies the maximum size of a sample log file in Mbytes. When a |
|
|
<log_file_size> |
log file becomes full, Persistence Service creates a new log file. |
0 or 1 |
|
|
Default: 60 MB |
|
|
|
|
|
|
|
The period (in milliseconds) at which Persistence Service removes |
|
|
<log_flush_period> |
sample log files whose full content have been written into the PRST- |
0 or 1 |
|
|
DataWriter by the sample log write thread. |
|
|
|
Default: 10000 milliseconds |
|
|
|
|
|
|
|
Determines how many samples should be read and processed at |
|
|
<log_read_batch> |
once by the sample log write thread. |
0 or 1 |
|
|
Default: 100 samples |
|
|
|
|
|
|
|
Samples in the sample log are identified by two attributes: |
|
|
|
❏ The file ID |
|
|
|
❏ The row ID (position within the file) |
|
|
<log_bookmark_period> |
The read bookmark indicates the most recently processed sample. |
0 or 1 |
|
|
This tag indicates how often (in milliseconds) the read bookmark is |
|
|
|
persisted into disk. |
|
|
|
Default: 1000 milliseconds |
|
|
|
|
|
Important: Enabling sample logging in a persistence group is expensive. For every PRSTDataWriter, Persistence Service will create a write thread and an event thread that will be in charge of flushing the log files and storing the read bookmark. Therefore, sample logging should be enabled only for the persistence groups where it is needed based on the potential presence of slow consumers and/or the expected data rate in the persistence group. Small data rates will likely not require a sample log.
Part 7: RTI CORBA Compatibility Kit
The material in this part of the manual is only relevant if you have purchased the CORBA Com- patibility Kit, an optional package that allows Connext’s code generator, rtiddsgen, to output type- specific code that is compatible with OCI’s distribution of TAO and the JacORB distribution.
❏Chapter 31: Introduction to RTI CORBA Compatibility Kit
❏Chapter 32: Generating
Chapter 31 Introduction to RTI CORBA Compatibility Kit
RTI CORBA Compatibility Kit is an optional package that allows the RTI Connext (formerly, RTI Data Distribution Service) code generator, rtiddsgen, to output
By having compatible data types, your applications can use CORBA and Connext APIs, with no type conversions required.
For more information about OCI's or DOC’s distribution of TAO and JacORB, please refer to the documentation included with those distributions. Additional information can be found on OCI’s TAO website (www.theaceorb.com), DOC’s TAO website (www.dre.vanderbilt.edu), and JacORB’s website (www.jacorb.org). TAO and JacOrb distributions that are compatible with this version of Connext are available from the RTI Support Portal, accessible from https:// support.rti.com.
In addition to this document, a simple example is available.
❏C++ using TAO:
•See the example in <RTI Connext installation directory>/example/CPP/corba. Please read Instructions.pdf.
❏Java using JacORB:
•See the example in <RTI Connext installation directory>/example/JAVA/corba. Please read Instructions.pdf.

The following figure shows the process of using IDL files and types that are shared with CORBA.
CORBA Compatibility Kit is designed to be installed on top of Connext; this kit replaces the default version of Connext’s code generation tool, rtiddsgen. The replacement rtiddsgen includes support for the
On the wire, the serialized version of the code for types generated using the
Chapter 32 Generating
The CORBA Compatibility Kit enables Connext’s IDL compiler, rtiddsgen, to produce
When using rtiddsgen, specify the
There are some
❏While the
❏For complex types such as sequences and strings, the memory management is different when the
❏Without the
The following sections describe how to use the CORBA Compatibility Kit. In addition to these instructions, a simple example is available.
❏C++ using TAO:
•Generating C++ Code (Section 32.1)
•See the example in <RTI Connext installation directory>/example/CPP/corba and read Instructions.pdf.
❏Java using JacORB:
•Generating Java Code (Section 32.2)
•See the example in <RTI Connext installation directory>/example/JAVA/corba and read Instructions.pdf.
32.1Generating C++ Code
To generate
<ACE_ROOT>/bin/tao_idl <IDL file name>.idl
This will generate CORBA support files for your data types. The generated file will have a name matching the pattern <IDL file name>C.h and will contain the type definitions. Pass this header file as a parameter to rtiddsgen to generate the Connext support code for the data types.
rtiddsgen
The optional
32.2Generating Java Code
To generate Java
<JacORB install dir>/bin/idl <IDL file name>.idl
After generating the CORBA code for the IDL types run rtiddsgen as follows:
rtiddsgen
The optional
To form a complete code set, use the type class generated by the CORBA IDL compiler and the files generated by rtiddsgen.
Chapter 33 Supported IDL Types
Table 33.1 lists the IDL types supported when using the
Table 33.1 Supported IDL Types when Using rtiddsgen
IDL Construct |
Support |
|
|
|
|
Modules |
Supported |
|
|
|
|
Interfaces |
Ignored |
|
|
|
|
Constants |
Supported |
|
|
|
|
Basic Data Types |
Supported |
|
|
|
|
Enums |
Supported |
|
|
|
|
String Types |
Supported |
|
|
|
|
Wide String Types |
Supported |
|
|
|
|
|
Supported |
|
Struct Types |
Note: |
|
|
||
|
|
|
Fixed Types |
Ignored |
|
|
|
|
Union Types |
Supported |
|
|
|
|
Sequence Types |
Supported |
|
Note: Sequences of anonymous sequences are not supported. See Note 2. |
||
|
||
|
|
|
Array Types |
Supported |
|
|
|
|
Typedefs |
Supported |
|
|
|
|
Any |
Not Supported. |
|
Note that rtiddsgen does not ignore them. This construct cannot be in the IDL file. |
||
|
||
|
|
|
Value Types |
Ignored |
|
|
|
|
Exception Types |
Ignored |
|
|
|
|
|
Supported |
|
Type Code |
rtiddsgen generates Connext TypeCodes |
|
|
CORBA TypeCodes are generated by the CORBA IDL compiler |
|
|
|
❏ Note 1
Inline nested structures, such as the following example, are not supported.
struct Outer {
short outer_short; struct Inner {
char inner_char; short inner_short;
} outer_nested_inner;
};
❏ Note 2
Sequences of anonymous Sequences are not supported. This kind of type will be banned in future revisions of CORBA. For example, the following is not supported:
sequence<sequence<short,4>,4> MySequence;
Instead, sequences of sequences can be supported using typedef definitions. For example, this is supported:
typedef sequence<short,4> MyShortSequence; sequence<MyShortSequence,4> MySequence;
Part 8: RTI RTSJ Extension Kit
The material in this part of the manual is only relevant if you have purchased RTI RTSJ Extension Kit, an optional package that allows you to configure Connext applications to use
Chapter 34 Introduction to RTI RTSJ Extension Kit
The RTI RTSJ Extension Kit is an optional package that allows you to configure Connext applications to use
For more information on RTSJ, please refer to the documentation available on the official web site: www.rtsj.org.
Additional documentation for the RTSJ Extension Kit is available in the API Reference HTML documentation: <RTI Connext installation directory>/ReadMe.html.
A simple example is also available: <RTI Connext installation directory>/example/JAVA/rtsj. Please read Instructions.pdf.
Chapter 35 Using RTI RTSJ Extension Kit
The kit includes a JAR file and associated electronic documentation, including API documentation in HTML and PDF formats and example code. The JAR file is provided in two versions, release and debug, named nddsrtsj.jar and nddsrtsjd.jar, respectively. These must be used in addition to the libraries provided with Connext itself. If you are using the Connext release JAR, we recommend that you also use the RTSJ release JAR, and likewise for the debug JAR, although this is not a requirement.
Detailed API documentation is available in HTML format, accessible here: <RTI_Connext_INSTALL_ROOT>/ReadMe.html.
A simple example is also available here: <RTI_Connext_INSTALL_ROOT>/example/JAVA/rtsj. Please read Instructions.pdf.
Part 9: RTI TCP Transport
RTI TCP Transport is only available on specific architectures. See the Platform Notes for details.
Out of the box, Connext uses the UDPv4 and Shared Memory transport to communicate with other DDS applications. This configuration is appropriate for systems running within a single LAN. However, using UDPv4 introduces some problems when Connext applications in different LANs need to communicate:
❏UDPv4 traffic is usually filtered out by the LAN firewalls for security reasons.
❏Forwarded ports are usually TCP ports.
❏Each LAN may run in its own private IP address space and use NAT (Network Address Translation) to communicate with other networks.
TCP Transport enables participant discovery and data exchange using the TCP protocol (either on a local LAN, or over the public WAN). TCP Transport allows Connext to address the chal- lenges of using TCP as a
This part of the User’s Manual contains the following chapter:

Chapter 36 Configuring the RTI TCP Transport
This chapter explains how to use and configure the TCP Transport:
❏TCP Communication Scenarios (Section 36.1)
❏Configuring the TCP Transport (Section 36.2)
36.1TCP Communication Scenarios
TCP Transport can be used to address multiple communication
❏Communication Within a Single LAN (Section 36.1.1)
❏Symmetric Communication Across NATs (Section 36.1.2)
❏Asymmetric Communication Across NATs (Section 36.1.3)
36.1.1Communication Within a Single LAN
TCP Transport can be used as an alternative to UDPv4 to communicate Connext applications running inside the same LAN. Figure 36.1 shows how to configure the TCP transport in this scenario.
parent.classid and server_bind_port are transport properties configured using the PropertyQosPolicy of the participant. (Note: When the TCP transport is instantiated, by default it is configured to work in a LAN environment using symmetric communication and binding to port 7400 for incoming connections.) For additional information about these properties, see Table 36.1 on page
Initial Peers represents the peers to which the participant will be announced to. Usually, these peers are configured using the DiscoveryQosPolicy of the participant or the environment variable NDDS_DISCOVERY_PEERS. For information on the format of initial peers, see Section 36.2.1.
Note: Unlike the UDPv4 transport, you must specify the initial peers, because multicast cannot be used with TCP.
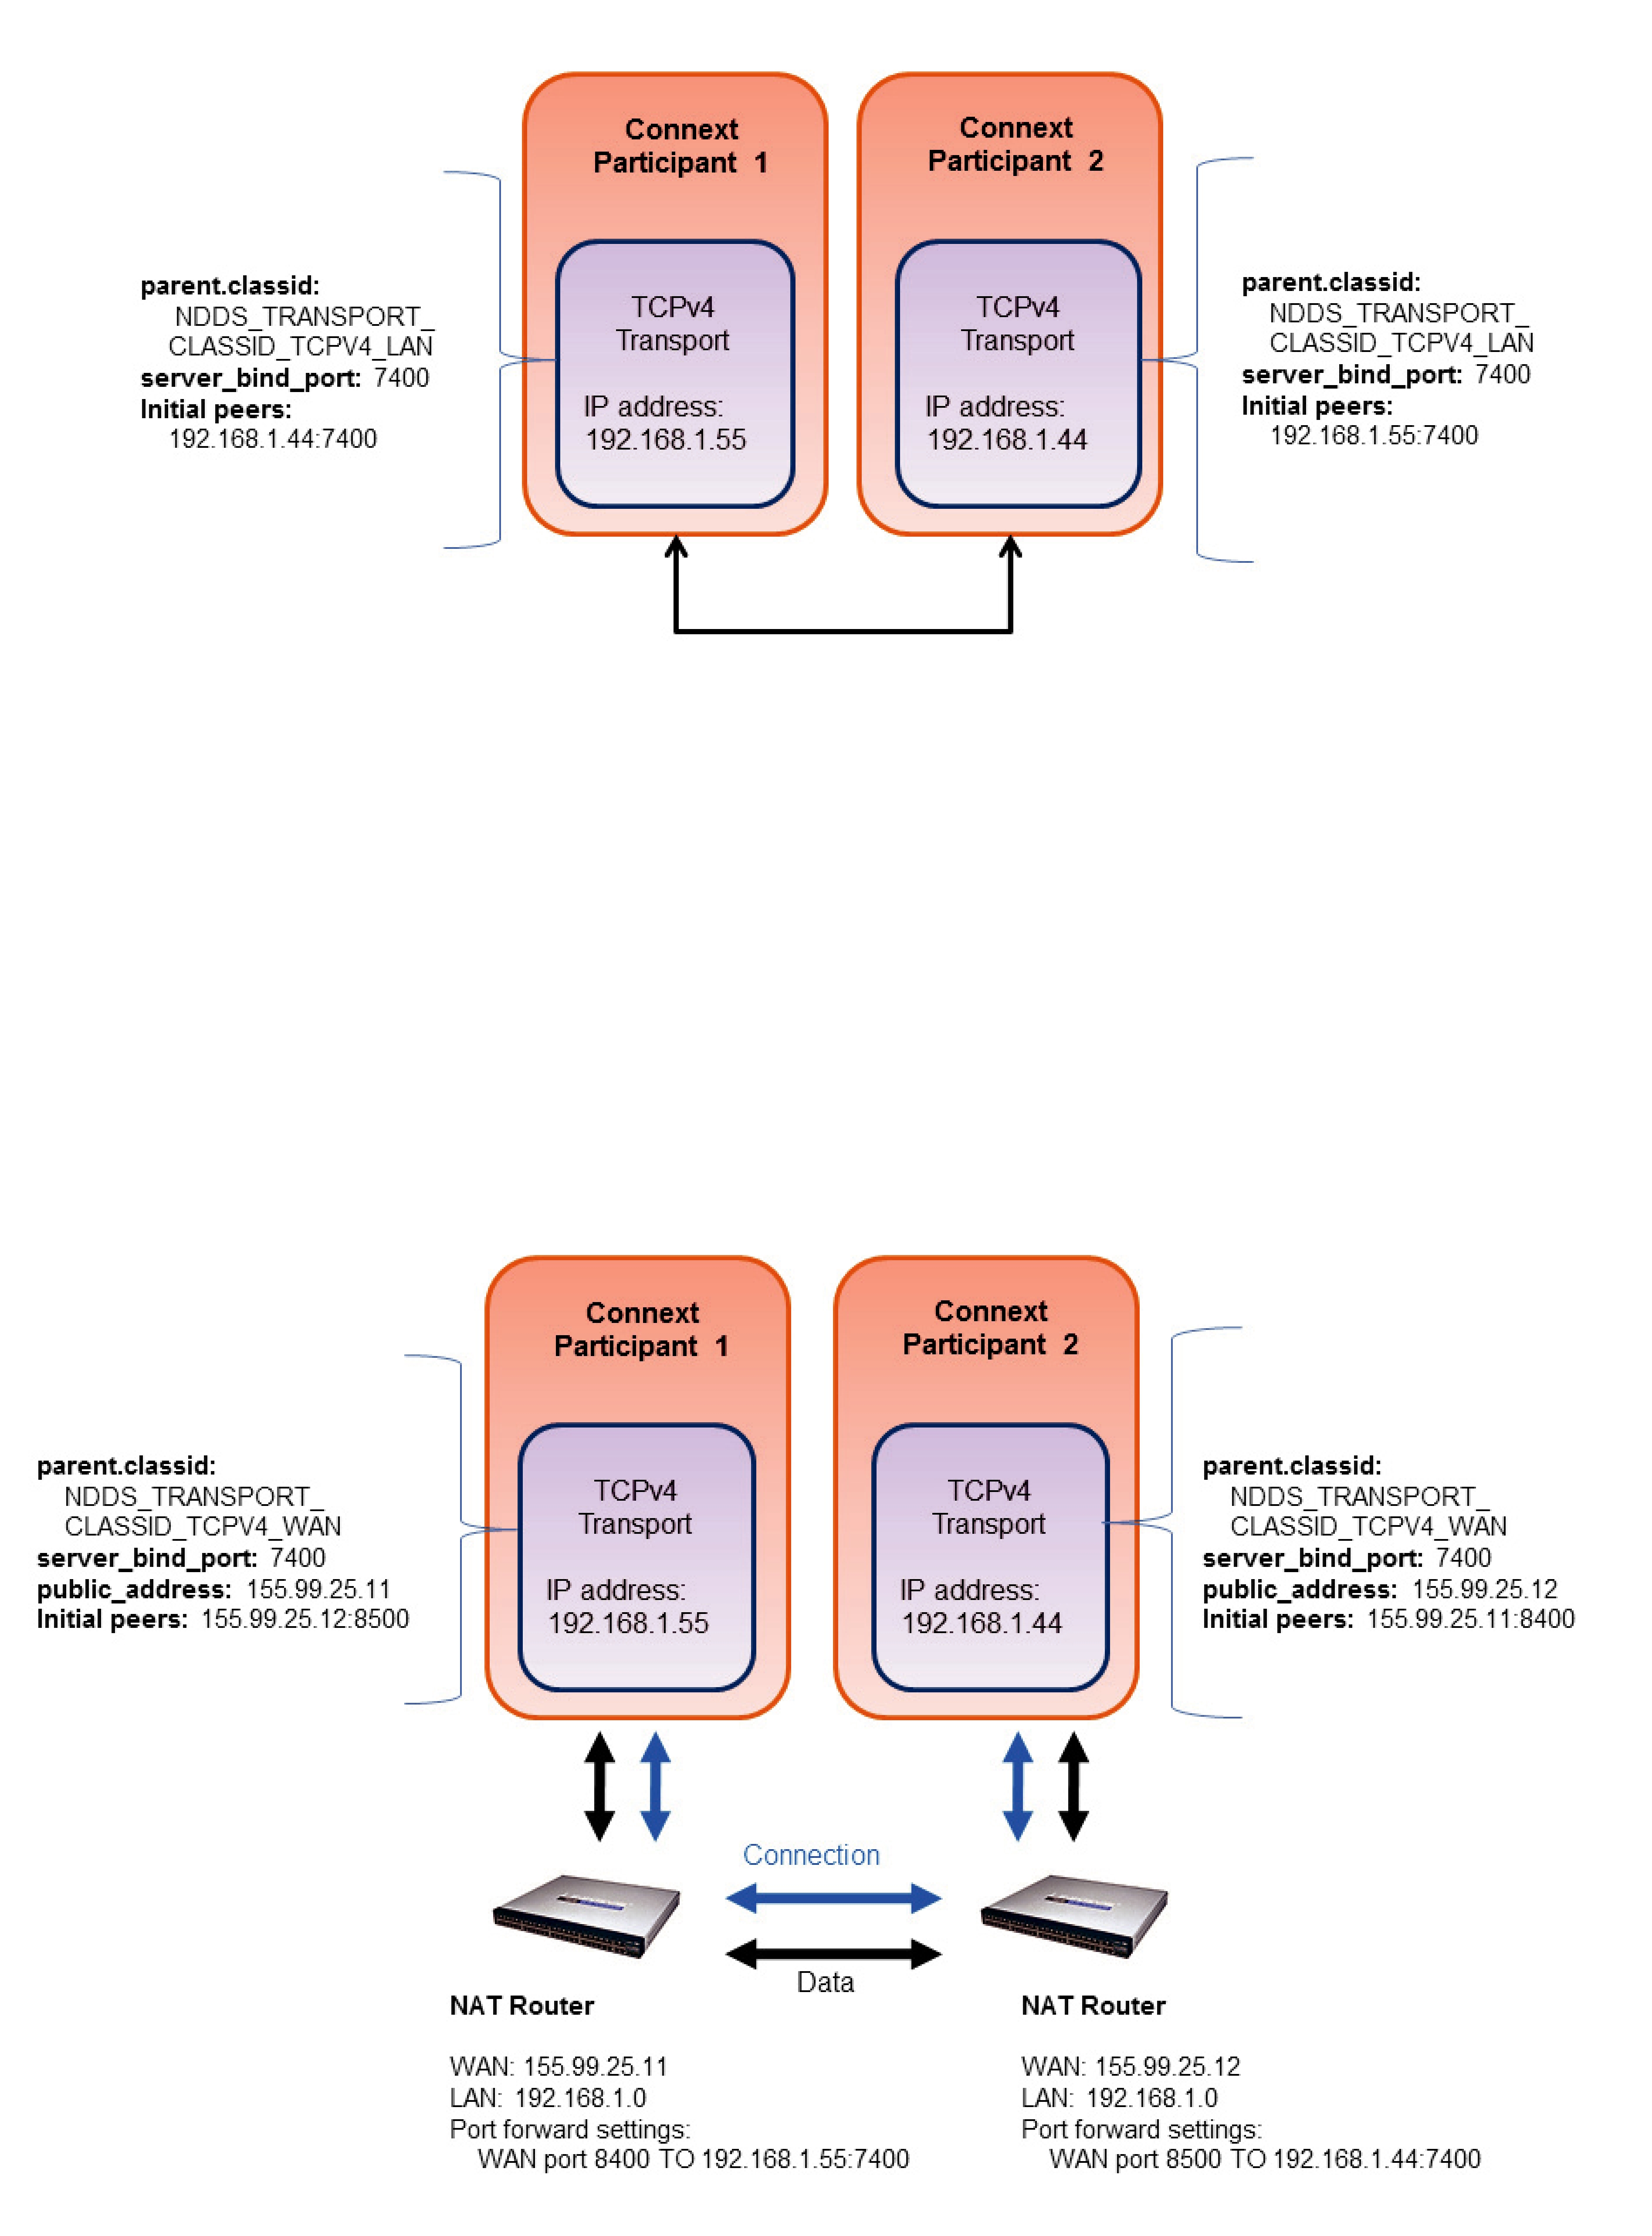
Figure 36.1 Communication within a Single LAN
36.1.2Symmetric Communication Across NATs
In NAT communication scenarios, each one of the LANs has a private IP address space. The communication with other LANs is done through NAT routers that translate private IP addresses and ports into public IP addresses and ports.
In symmetric communication scenarios, any Connext application can initiate TCP connections with other applications. Figure 36.2 shows how to configure the TCP transport in this scenario.
Figure 36.2 Symmetric Communication Across NATs

Notice that initial peers refer to the public address of the remote LAN where the Connext application is deployed and not the private address of the node where the application is running. In addition, the transport associated with a Connext instance will have to be configured with its public address (public_address) so that this information can be propagated as part of the discovery process.
Because the public address and port of the Connext instances must be known before the communication is established, the NAT Routers will have to be configured statically to translate (forward) the private server_bind_port into a public port. This process is known as static NAT or port forwarding; it allows traffic originating in outer networks to reach designated peers in the LAN behind the NAT router. You will need to refer to your router’s configuration manual to understand how to correctly set up port forwarding.
36.1.3Asymmetric Communication Across NATs
This scenario is similar to the previous one, except in this case the TCP connections can be initiated only by the Connext instance in LAN1. For security reasons, incoming connections to LAN1 are not allowed. In this case, the peer in LAN1 is considered ‘unreachable.’ Unreachable peers can publish and subscribe just like any other peer, but communication can occur only to a ‘reachable’ peer.
Figure 36.3 shows how to configure the TCP transport in this scenario. Notice that the transport property server_bind_port is set to 0 to configure the node as unreachable.
Figure 36.3 Asymmetric Communication Across NATs
In an asymmetric configuration, an unreachable peer (that is behind a firewall or NAT without port forwarding) can still publish and subscribe like a reachable peer, but with some important limitations:
❏An unreachable peer can only communicate with reachable peers: two unreachable peers cannot establish a direct communication since they are both behind a firewall and/or NAT.
Note that since Connext always relies on a direct connection between peers (even if there is a third node that can be reachable by both unreachable peers), communication can never occur between unreachable peers. For example, suppose Peers A and B are unreachable and Peer C is reachable. Communication can take place between A and C, and between B and C, but not between A and B. For this configuration, you should con- sider using RTI Federation Service (available for purchase as a separate product).
❏It can take longer to discover unreachable peers than reachable ones. This is because a reachable peer has to wait for the unreachable peer to establish the communication first.
For example, suppose Peer A (unreachable) starts before Peer B (reachable). The discov- ery mechanism of A attempts to connect to the
This effect can be minimized by modifying the QoS that controls the discovery mecha- nism used by A. In particular, you should set the DomainParticipant’s
DiscoveryConfig QoS policy’s min_initial_participant_announcement_period to a small value.
Note that the concept of symmetric/asymmetric configuration is a local concept that only describes the communication mechanism between two peers. A reachable peer can be involved in symmetric communication with another reachable peer, and at the same time have asymmetric communication with a unreachable peer. When a peer attempts to communicate with a remote peer, it knows if the remote peer is reachable or not by looking at the transport address provided.
36.2Configuring the TCP Transport
TCP Transport is distributed as a both shared and static library in “<Connext installation directory>/lib/<architecture>.” The library is called nddstransporttcp.
Mechanisms for Configuring the Transport:
❏By explicitly instantiating a new transport (see Section 36.2.2) and then registering it with the DomainParticipant (see Section 15.7). (Not available in the Java and .NET APIs.)
❏Through the Property QoS policy of the DomainParticipant (on UNIX, Solaris and Windows systems only). This process is described in Section 36.2.3.
This section describes:
❏Choosing a Transport Mode (Section 36.2.1)
❏Explicitly Instantiating the TCP Transport Plugin (Section 36.2.2)
❏Configuring the TCP Transport with the Property QosPolicy (Section 36.2.3)
❏Setting the Initial Peers (Section 36.2.4)
❏TCP/TLS Transport Properties (Section 36.2.5)
36.2.1Choosing a Transport Mode
When you configure the TCP transport, you must choose one of the following types of communication:
❏TCP over LAN — Communication between the two peers is not encrypted (data is written directly to a TCP socket). Each node can use all the possible interfaces available on that machine to receive connections. The node can only receive connections from machines that are on a local LAN.
❏TCP over WAN — Communication is not encrypted (data is written directly to a TCP socket). The node can only receive connections from a specific port, which must be configured in the public router of the local network (WAN mode).
❏TLS over LAN — This is similar to the TCP over LAN, where the node can use all the available network interfaces to TX/RX data (LAN nodes only), but in this mode, the data being written on the physical socket is encrypted first (through the openssl library). Performance (throughput and latency) may be less than TCP over LAN since the data needs to be encrypted before going on the wire. Discovery time may be longer with this mode because when the first connection is established, the two peers exchange handshake information to ensure line protection. For more general information on TLS, see Section 24.3.
❏TLS over WAN — The data is encrypted just like TLS over LAN, but it can be sent and received only from a specific port of the router.
Note: To use either TLS mode, you also need RTI TLS Support, which is available for purchase as a separate package.
An instance of the transport can only communicate with other nodes that use the same transport mode.
You can specify the transport mode in either the NDDS_Transport_TCPv4_Property_t structure (see Section 36.2.1) or in the parent.classid field of the Properties QoS (see Section 36.2.3). Your choice of transport mode will also be reflected in the prefix you use for setting the initial peers (see Section 36.2.4).
36.2.2Explicitly Instantiating the TCP Transport Plugin
As described on page
Notes:
❏This way of instantiating a transport is not supported in the Java and .NET APIs. If you are using Java or .NET, use the Property QoS mechanism described in Section 36.2.3.
❏To use this mechanism, there are extra libraries that you must link into your program and an additional header file that you must include. Please see Section 36.2.2.1 and Section 36.2.2.2 for details.
To instantiate a TCP transport:
1.Include the extra header file described in Section 36.2.2.1.
2.Instantiate a new transport by calling NDDS_Transport_TCPv4_new():
NDDS_Transport_Plugin* NDDS_Transport_TCPv4_new (
const struct NDDS_Transport_TCPv4_Property_t * property_in)
3. Register the transport by calling NDDSTransportSupport::register_transport().
See the API Reference HTML documentation for details on these functions and the contents of the NDDS_Transport_TCPv4_Property_t structure.
36.2.2.1Additional Header Files and Include Directories
To use the TCP Transport API, you must include an extra header file (in addition to those in Table 9.1, “Header Files to Include for Connext (All Architectures),” on page
#include "ndds/transport_tcp/transport_tcp_tcpv4.h"
Since TCP Transport is in the same directory as Connext (see Table 9.2, “Include Paths for Compilation (All Architectures),” on page
the TCP Transport API. If this is not the case, you will need to specify the appropriate include path.
36.2.2.2Additional Libraries and Compiler Flags
To use the TCP Transport, you must add the nddstransporttcp library to the link phase of your application. There are four different kind of libraries, depending on if you want a debug or release version, and static or dynamic linking with Connext.
For UNIX- based systems, the libraries are:
libnddstransporttcp.a — Release version, dynamic libraries
libnddstransporttcpd.a — Debug version, dynamic libraries
libnddstransporttcpz.a — Release version, static libraries
libnddstransporttcpzd.a — Debug version, static libraries
For
NDDSTRANSPORTTCP.LIB — Release version, dynamic libraries
NDDSTRANSPORTTCPD.LIB — Debug version, dynamic libraries
NDDSTRANSPORTTCPZ.LIB — Release version, static libraries
NDDSTRANSPORTTCPZD.LIB — Debug version, static libraries
Notes for using TLS:
To use either TLS mode (see Section 36.2.1), you also need RTI TLS Support, which is available for purchase as a separate package. The TLS library (libnddstls.so or NDDSTLS.LIB, depending on your platform) must be in your library search path (LD_LIBRARY_PATH environment variable on UNIX/Solaris systems, or Path environment variable on Windows systems).
If you already have $NDDSHOME/lib/<architecture> in your library search path, no extra steps are needed to use TLS once TLS Support is installed.
Even if you link everything statically, you must make sure that the location for $NDDSHOME/lib/<architecture> (or wherever the TLS library is located) is in your search path. The TLS library is loaded dynamically, even if you use static linking for everything else.
Your search path must also include the location for the Openssl library, which is used by the TLS library.
36.2.3Configuring the TCP Transport with the Property QosPolicy
The PROPERTY QosPolicy (DDS Extension) (Section 6.5.17) allows you to set up name/value pairs of data and attach them to an entity, such as a DomainParticipant.
Like all QoS policies, there are two ways to specify the Property QoS policy:
❏Programmatically, as described in this section and Section 4.1.7. This includes using the add_property() operation to attach name/value pairs to the Property QosPolicy and then configuring the DomainParticipant to use that QosPolicy (by calling set_qos() or specifying QoS values when the DomainParticipant is created).
❏With an XML QoS Profile, as described in Chapter 17: Configuring QoS with XML. This causes Connext to dynamically load the TCP transport library at run time and then implicitly create and register the transport plugin.
To add name/value pairs to the Property QoS policy, use the add_property() operation:
DDS_ReturnCode_t DDSPropertyQosPolicyHelper::add_property (DDS_PropertyQosPolicy policy, const char * name,
const char * value, DDS_Boolean propagate)

For more information on add_property() and the other operations in the DDSPropertyQosPolicyHelper class, see Table 6.56, “PropertyQoSPolicyHelper Operations,” on page
The ‘name’ part of the name/value pairs is a predefined string. The property names for the TCP Transport are described in Table 36.1, “Properties for NDDS_Transport_TCPv4_Property_t,” on page
Here are the basic steps, taken from the example Hello World application (for details, please see the example application.)
1. Get the default DomainParticipant QoS from the DomainParticipantFactory.
get_default_participant_qos(participant_qos);
2.Disable the builtin transports.
participant_qos.transport_builtin.mask = DDS_TRANSPORTBUILTIN_MASK_NONE;
3.Set up the DomainParticipant’s Property QoS. a. Load the plugin.
DDSPropertyQosPolicyHelper::add_property (participant_qos.property, "dds.transport.load_plugins", "dds.transport.TCPv4.tcp1", DDS_BOOLEAN_FALSE);
b. Specify the transport plugin library.
DDSPropertyQosPolicyHelper::add_property (participant_qos.property, "dds.transport.TCPv4.tcp1.library", "nddstransporttcp", DDS_BOOLEAN_FALSE);
c. Specify the transport’s ‘create’ function.
DDSPropertyQosPolicyHelper::add_property (participant_qos.property,
"dds.transport.TCPv4.tcp1.create_function",
"NDDS_Transport_TCPv4_create", DDS_BOOLEAN_FALSE);
d.Set the transport to work in a WAN configuration with a public address:
DDSPropertyQosPolicyHelper::add_property (participant_qos.property, "dds.transport.TCPv4.tcp1.parent.classid", ”NDDS_TRANSPORT_CLASSID_TCPV4_WAN”, DDS_BOOLEAN_FALSE);
DDSPropertyQosPolicyHelper::add_property (participant_qos.property, "dds.transport.TCPv4.public_address", "182.181.2.31", DDS_BOOLEAN_FALSE);
e.Specify any other properties, as needed.
4.Create the DomainParticipant using the modified QoS.
participant =
Important! Property changes should be made before the transport is
DomainParticipant is enabled, before the first DataWriter/DataReader is created, or before the builtin topic reader is looked up, whichever one happens first.
36.2.4Setting the Initial Peers
Note: You must specify the initial peers (you cannot use the defaults because multicast cannot be used with TCP).
For TCP Transport, the addresses of the initial peers (NDDS_DISCOVERY_PEERS) that will be contacted during the discovery process have the following format:
For WAN communication using TCP: tcpv4_wan://<IP address or hostname>:<port> For WAN communication using TLS: tlsv4_wan://<IP address or hostname>:<port>
For LAN communication using TCP: tcpv4_lan://<IP address or hostname>:<port> For LAN communication using TLS: tlsv4_lan://<IP address or hostname>:<port>
For example:
setenv NDDS_DISCOVERY_PEERS tcpv4_wan://10.10.1.165:7400, tcpv4_wan://10.10.1.111:7400,tcpv4_lan://192.168.1.1:7500
When the TCP transport is configured for LAN communication (with the parent.classid property), the IP address is the LAN address of the peer and the port is the server port used by the transport (the server_bind_port property).
When the TCP transport is configured for WAN communication (with the parent.classid property), the IP address is the WAN or public address of the peer and the port is the public port that is used to forward traffic to the server port in the TCP transport.
36.2.5TCP/TLS Transport Properties
Table 36.1 on page
Note: To use TLS, you also need RTI TLS Support, which is a separate component.
Table 36.1 Properties for NDDS_Transport_TCPv4_Property_t
Property Name |
|
|
|
|
|
|
|
|
|
(prefix with |
|
|
|
Description |
|
|
|
||
‘dds.transport.TCPv4.tcp1.’)1 |
|
|
|
|
|
|
|
|
|
|
|
|
|
|
|
|
|
|
|
|
Required |
|
|
|
|
|
|
|
|
dds.transport.load_plugins |
|||||||||
be loaded by Connext. For example: “dds.transport.TCPv4.tcp1". You will |
|||||||||
(Note: this does not take a prefix) |
|||||||||
use this string as the prefix to the property names. See Footnote 1. |
|
||||||||
|
Note: you can load up to 8 plugins. |
|
|
|
|
||||
|
|
|
|
|
|
||||
|
Required |
Must be "nddstransporttcp". |
|
|
|
||||
library |
This library needs to be in the path during run time for use by Connext (in |
||||||||
the LD_LIBRARY_PATH environment variable on UNIX systems, in PATH |
|||||||||
|
|||||||||
|
for Windows systems). |
|
|
|
|
|
|||
|
|
|
|
|
|||||
create_function |
Required |
Must be “NDDS_Transport_TCPv4_create”. |
|
|
|||||
|
|
|
|
|
|
|
|
|
|
|
Used |
to |
register |
the |
transport |
plugin |
returned |
by |
|
|
NDDS_Transport_TCPv4_create() |
(as |
specified |
by |
|||||
aliases |
<TCP_prefix>.create_function) to the DomainParticipant. Aliases should be |
||||||||
specified as a |
|||||||||
|
|||||||||
|
|
|
|
||||||
|
Must be set to one of the following values: |
|
|
|
|||||
|
NDDS_TRANSPORT_CLASSID_TCPV4_LAN |
|
|
|
|||||
|
for TCP communication within a LAN |
|
|
|
|||||
|
NDDS_TRANSPORT_CLASSID_TLSV4_LAN |
|
|
|
|||||
|
for TLS communication within a LAN |
|
|
|
|||||
parent.classid |
NDDS_TRANSPORT_CLASSID_TCPV4_WAN |
|
|
|
|||||
for TCP communication across LANs and firewalls |
|
|
|||||||
|
NDDS_TRANSPORT_CLASSID_TLSV4_WAN |
|
|
|
|||||
|
for TLS communication across LAN and firewalls |
|
|
||||||
|
Default: NDDS_TRANSPORT_CLASSID_TCPV4_LAN |
|
|
||||||
|
Note: To use either TLS mode, you also need RTI TLS Support which |
||||||||
|
is available for purchase as a separate package. |
|
|
||||||
|
|
|
|
|
|
|
|
|
|
Table 36.1 Properties for NDDS_Transport_TCPv4_Property_t
Property Name |
|
|
|
(prefix with |
Description |
|
|
‘dds.transport.TCPv4.tcp1.’)1 |
|
|
|
|
|
||
|
Specifies the maximum number of buffers that Connext can pass to the send() |
||
|
function of the transport plugin. |
|
|
|
The transport plugin send() API supports a |
||
|
send() call can take several discontiguous buffers, assemble and send them |
||
|
in a single message. This enables Connext to send a message from parts |
||
|
obtained from different sources without first having to copy the parts into a |
||
|
single contiguous buffer. |
|
|
parent.gather_send_ |
However, most transports that support a |
||
buffer_count_max |
limit on the number of buffers that can be gathered and sent. Setting this |
||
|
value will prevent Connext from trying to gather too many buffers into a send |
||
|
call for the transport plugin. |
|
|
|
Connext requires all |
||
|
send of least a minimum number of buffers. This minimum number is |
||
|
defined |
as |
|
|
NDDS_TRANSPORT_PROPERTY_GATHER_SEND_BUFFER_COUNT_MIN. |
||
|
Default: 128 |
|
|
|
|
||
|
The maximum size of a message in bytes that can be sent or received by the |
||
|
transport plugin. |
|
|
parent.message_size_max |
If you set this higher than the default, the DomainParticipant’s buffer_size (in |
||
the RECEIVER_POOL QosPolicy (DDS Extension) (Section 8.5.6)) should |
|||
|
|||
|
also be changed. |
|
|
|
Default: 9216 |
|
|
|
|
||
|
A list of strings, each identifying a range of interface addresses that can be |
||
|
used by the transport. |
|
|
|
Interfaces must be specified as |
||
parent.allow_interfaces_list |
delimiting an interface. |
|
|
For example: 10.10.*, 10.15.* |
|
||
|
|
||
|
If the list is |
applied before |
|
|
|
||
|
Default: All available interfaces are used. |
|
|
|
|
||
|
A list of strings, each identifying a range of interface addresses that will not |
||
|
be used by the transport. |
|
|
|
If the list is |
|
|
|
Interfaces must be specified as |
||
parent.deny_interfaces_list |
delimiting an interface. |
|
|
|
For example: 10.10.* |
|
|
|
This "black" list is applied after parent.allow_interfaces_list and filters out |
||
|
the interfaces that should not be used. |
|
|
|
Default: No interfaces are denied |
|
|
|
|
||
|
Size in bytes of the send buffer of a socket used for sending. On most |
||
|
operating systems, setsockopt() will be called to set the SENDBUF to the |
||
|
value of this parameter. |
|
|
send_socket_buffer_size |
This value must be greater than or equal to parent.message_size_max or |
||
|
The maximum value is operating |
|
|
|
Default: |
||
|
the send buffer of the socket) |
|
|
|
|
|
|
Table 36.1 Properties for NDDS_Transport_TCPv4_Property_t
Property Name |
|
(prefix with |
Description |
‘dds.transport.TCPv4.tcp1.’)1 |
|
|
|
|
Size, in bytes, of the receive buffer of a socket used for receiving. |
|
On most operating systems, setsockopt() will be called to set the RECVBUF |
|
to the value of this parameter. |
recv_socket_buffer_size |
This value must be greater than or equal to parent.message_size_max or |
|
The maximum value is |
|
Default: |
|
buffer of the socket) |
|
|
|
Prevents the transport plugin from using the IP loopback interface. |
|
This property is ignored when parent.classid is |
|
NDDS_TRANSPORT_CLASSID_TCPV4_WAN or |
|
NDDS_TRANSPORT_CLASSID_TLSV4_WAN. |
|
Two values are allowed: |
|
0: Enable local traffic via this plugin. The plugin will only use and report |
ignore_loopback_interface |
the IP loopback interface only if there are no other network interfaces |
|
(NICs) up on the system. |
|
1: Disable local traffic via this plugin. This means “do not use the IP |
|
loopback interface, even if no NICs are discovered.” This setting is useful |
|
when you want applications running on the same node to use a more |
|
efficient plugin like shared memory instead of the IP loopback. |
|
Default: 1 |
|
|
ignore_nonrunning_ |
Prevents the transport plugin from using a network interface that is not |
interfaces |
reported as RUNNING by the operating system. |
|
The transport checks the flags reported by the operating system for each |
|
network interface upon initialization. An interface which is not reported as |
|
UP will not be used. This property allows the same check to be extended to |
|
the IFF_RUNNING flag implemented by some operating systems. The |
|
RUNNING flag is defined to mean that "all resources are allocated" and may |
|
be off if no link is detected (e.g., the network cable is unplugged). |
|
Two values are allowed: |
|
0: Do not check the RUNNING flag when enumerating interfaces, just make |
|
sure the interface is UP. |
|
1: Check the flag when enumerating interfaces, and ignore those that are not |
|
reported as RUNNING. This can be used on some operating systems to |
|
cause the transport to ignore interfaces that are enabled but not |
|
connected to the network. |
|
Default: 1 |
|
|
|
Mask for the transport priority field. This is used in conjunction with |
|
transport_priority_ mapping_low/transport_priority_ mapping_high to |
|
define the mapping from DDS transport priority to the IPv4 TOS field. |
|
Defines a contiguous region of bits in the |
|
is used to generate values for the IPv4 TOS field on an outgoing socket. |
transport_priority_mask |
For example, the value 0x0000ff00 causes bits |
|
mapping. The value will be scaled from the mask range (0x0000 |
|
this case) to the range specified by low and high. |
|
If the mask is set to zero, then the transport will not set IPv4 TOS for send |
|
sockets. |
|
Default: 0 |
|
|
Table 36.1 Properties for NDDS_Transport_TCPv4_Property_t
Property Name |
|
|
(prefix with |
Description |
|
‘dds.transport.TCPv4.tcp1.’)1 |
|
|
|
|
|
transport_priority_ |
Sets the low and high values of the output range to IPv4 TOS. |
|
mapping_low |
These values are used in conjunction with transport_priority_mask to define |
|
transport_priority_ |
the mapping from DDS transport priority to the IPv4 TOS field. Defines the |
|
mapping_high |
low and high values of the output range for scaling. |
|
|
Note that IPv4 TOS is generally an |
|
|
Default transport_priority_mapping_low: 0 |
|
|
Default transport_priority_mapping_high: 0xFF |
|
|
|
|
|
The backlog parameter determines what is the maximum length of the queue |
|
server_socket_backlog |
of pending connections. |
|
|
Default: 5 |
|
|
|
|
|
Required for WAN communication (see note below) |
|
|
Public IP address and port (WAN address and port) (separated with ‘:’ ) |
|
|
associated with the transport instantiation. |
|
|
For example: 10.10.9.10:4567 |
|
|
This field is used only when parent.classid is |
|
|
NDDS_TRANSPORT_CLASSID_TCPV4_WAN or |
|
|
NDDS_TRANSPORT_CLASSID_TLSV4_WAN. |
|
|
The public address and port are necessary to support communication over |
|
public_address |
WAN that involves Network Address Translators (NATs). Typically, the |
|
address is the public address of the IP router that provides access to the |
||
|
WAN. The port is the IP router port that is used to reach the private |
|
|
server_bind_port inside the LAN from the outside. This value is expressed |
|
|
as a string in the form: ip[:port], where ip represents the IPv4 address and |
|
|
port is the external port number of the router. |
|
|
Host names are not allowed in the public_address because they may resolve |
|
|
to an internet address that is not what you want (i.e., ‘localhost’ may map to |
|
|
your local IP or to 127.0.0.1). |
|
|
Note: If you are using an asymmetric configuration, public_address does not |
|
|
have to be set for the |
|
|
|
|
|
Private IP port (inside the LAN) used by the transport to accept TCP |
|
|
connections. |
|
|
If this property is set to zero, the transport will disable the internal server |
|
|
socket, making it impossible for external peers to connect to this node. In this |
|
|
case, the node is considered unreachable and will communicate only using |
|
|
the asymmetric mode with other (reachable) peers. |
|
|
For WAN communication, this port must be forwarded to a public port in the |
|
server_bind_port |
||
|
The server_bind_port cannot be shared among multiple participants on a |
|
|
common host. On most operating systems, attempting to reuse the same |
|
|
server_bind_port for multiple participants on a common host will result in a |
|
|
"port already in use" error. However, Windows systems will not recognize if |
|
|
the server_bind_port is already in use; therefore care must be taken to |
|
|
properly configure Windows systems. |
|
|
Default: 7400 |
|
|
|
|
|
Allocation settings applied to read buffers. |
|
|
These settings configure the initial number of buffers, the maximum number |
|
|
of buffers and the buffers to be allocated when more buffers are needed. |
|
read_buffer_allocation |
Default: |
|
❏ read_buffer_allocation.initial_count = 2 |
||
|
||
|
❏ read_buffer_allocation.max_count = |
|
|
❏ read_buffer_allocation.incremental_count = |
|
|
will keep doubling on each allocation until it reaches max_count) |
|
|
|
Table 36.1 Properties for NDDS_Transport_TCPv4_Property_t
Property Name |
|
|
(prefix with |
Description |
|
‘dds.transport.TCPv4.tcp1.’)1 |
|
|
|
|
|
|
Allocation settings applied to buffers used for asynchronous |
|
|
write. |
|
|
These settings configure the initial number of buffers, the maximum number |
|
|
of buffers and the buffers to be allocated when more buffers are needed. |
|
|
Default: |
|
|
❏ write_buffer_allocation.initial_count = 4 |
|
write_buffer_allocation |
❏ write_buffer_allocation.max_count = 1000 |
|
❏ write_buffer_allocation.incremental_count = 10 |
||
|
||
|
Note that for the write buffer pool, the max_count is not set to unlimited. |
|
|
This is to avoid having a fast writer quickly exhaust all the available system |
|
|
memory, in case of a temporary network slowdown. When this write buffer |
|
|
pool reaches the maximum, the |
|
|
will fail; at that point Connext will take the appropriate action (retry to send |
|
|
or drop it), according to the application’s QoS (if the transport is used for |
|
|
reliable communication, the data will still be sent eventually). |
|
|
|
|
|
Allocation settings applied to buffers used to serialize and send control |
|
|
messages. |
|
|
These settings configure the initial number of buffers, the maximum number |
|
|
of buffers and the buffers to be allocated when more buffers are needed. |
|
control_buffer_allocation |
Default: |
|
|
❏ control_buffer_allocation.initial_count = 2 |
|
|
❏ control_buffer_allocation.max_count = |
|
|
❏ control_buffer_allocation.incremental_count = |
|
|
will keep doubling on each allocation until it reaches max_count) |
|
|
|
|
|
Allocation settings applied to control messages. |
|
|
These settings configure the initial number of messages, the maximum |
|
|
number of messages and the messages to be allocated when more messages |
|
|
are needed. |
|
control_message_allocation |
Default: |
|
❏ control_message_allocation.initial_count = 2 |
||
|
||
|
❏ control_message_allocation.max_count = |
|
|
❏ control_message_allocation.incremental_count = |
|
|
messages will keep doubling on each allocation until it reaches |
|
|
max_count) |
|
|
|
|
|
Allocation settings applied to control messages attributes. |
|
|
These settings configure the initial number of attributes, the maximum |
|
|
number of attributes and the attributes to be allocated when more attributes |
|
|
are needed. |
|
control_attribute_allocation |
Default: |
|
❏ control_attribute_allocation.initial_count = 2 |
||
|
||
|
❏ control_attribute_allocation.max_count = |
|
|
❏ |
|
|
|
Table 36.1 Properties for NDDS_Transport_TCPv4_Property_t
Property Name |
|
|
(prefix with |
Description |
|
‘dds.transport.TCPv4.tcp1.’)1 |
|
|
|
|
|
|
Forces asynchronous send. When this parameter is set to 0, the TCP transport |
|
|
will attempt to send data as soon as the internal send() function is called. |
|
|
When it is set to 1, the transport will make a copy of the data to send and |
|
|
enqueue it in an internal send buffer. Data will be sent as soon as the low- |
|
|
level socket buffer has space. |
|
|
Normally setting it to 1 delivers better throughput in a fast network, but will |
|
force_asynchronous_send |
result in a longer time to recover from various TCP error conditions. Setting |
|
it to 0 may cause the |
||
|
||
|
physically delivered to the lower socket buffer. For an application writing |
|
|
data at a very fast rate, it may cause the caller thread to block if the send |
|
|
socket buffer is full. This could produce lower throughput in those |
|
|
conditions (the caller thread could prepare the next packet while waiting for |
|
|
the send socket buffer to become available). |
|
|
Default: 0 |
|
|
|
|
|
The maximum size of a TCP segment. |
|
|
This parameter is only supported on Linux architectures. |
|
max_packet_size |
By default, the maximum size of a TCP segment is based on the network |
|
MTU for destinations on a local network, or on a default 576 for destinations |
||
|
on |
|
|
parameter to a value between 1 and 65535. |
|
|
Default: |
|
|
|
|
|
Configures the sending of KEEP_ALIVE messages in TCP. |
|
|
Setting this value to 1, causes a KEEP_ALIVE packet to be sent to the remote |
|
|
peer if a long time passes with no other data sent or received. |
|
|
This feature is implemented only on architectures that provide a |
|
|
implementation of the TCP |
|
enable_keep_alive |
On Windows systems, the TCP |
|
through the system’s registry: \HKEY_LOCAL_MACHINE\SYSTEM\ |
||
|
||
|
CurrentControlSet\Tcpip\Parameters. |
|
|
Refer to MSDN documentation for more details. |
|
|
On Solaris systems, most of the TCP |
|
|
though the kernel properties. |
|
|
Default: 0 |
|
|
|
|
|
Specifies the interval of inactivity in seconds that causes TCP to generate a |
|
keep_alive_time |
KEEP_ALIVE message. |
|
This parameter is only supported on Linux architectures. |
||
|
||
|
Default: |
|
|
|
|
|
Specifies the interval in seconds between KEEP_ALIVE retries. |
|
keep_alive_interval |
This parameter is only supported on Linux architectures. |
|
|
Default: |
|
|
|
|
|
The maximum number of KEEP_ALIVE retries before dropping the |
|
keep_alive_retry_count |
connection. |
|
This parameter is only supported on Linux architectures. |
||
|
||
|
Default: |
|
|
|
|
|
Disables the TCP nagle algorithm. |
|
disable_nagle |
When this property is set to 1, TCP segments are always sent as soon as |
|
possible, which may result in poor network utilization. |
||
|
||
|
Default: 0 |
|
|
|
Table 36.1 Properties for NDDS_Transport_TCPv4_Property_t
Property Name |
|
|
(prefix with |
Description |
|
‘dds.transport.TCPv4.tcp1.’)1 |
|
|
|
|
|
|
Bitmap that specifies the verbosity of log messages from the transport. |
|
|
Logging values: |
|
|
❏ |
|
|
❏ 0x00: silence |
|
|
❏ 0x01: errors |
|
|
❏ 0x02: warnings |
|
|
❏ 0x04: local |
|
|
❏ 0x08: remote |
|
|
❏ 0x10: period |
|
logging_verbosity_bitmap |
❏ 0x80: other (used for control protocol tracing) |
|
|
Default: |
|
|
Note: the logging verbosity is a global property shared across multiple |
|
|
instances of the TCP transport. If you create a new TCP Transport instance |
|
|
with logging_verbosity_bitmap different than |
|
|
the other instances as well. |
|
|
The default TCP transport verbosity is errors and warnings. |
|
|
Note: The option of 0x80 (other) is used only for tracing the internal control |
|
|
protocol. Since the output is very verbose, this feature is enabled only in the |
|
|
debug version of the TCP Transport library |
|
|
(libnddstransporttcpd.so / LIBNDDSTRANSPORTD.LIB). |
|
|
|
|
|
Maximum number of outstanding connection cookies allowed by the |
|
|
transport when acting as server. |
|
|
A connection cookie is a token provided by a server to a client; it is used to |
|
|
establish a data connection. Until the data connection is established, the |
|
outstanding_connection_ |
cookie cannot be reused by the server. |
|
To avoid wasting memory, it is good practice to set a cap to the maximum |
||
cookies |
||
number of connection cookies (pending connections). |
||
|
||
|
When the maximum value is reached, a client will not be able to connect to |
|
|
the server until new cookies become available. |
|
|
Range: 1 or higher, or |
|
|
Default: 100 |
|
|
|
|
|
Maximum lifespan (in seconds) of the cookies associated with pending |
|
|
connections. |
|
outstanding_connection_ |
If a client does not connect to the server before the lifespan of its cookie |
|
expires, it will have to request a new cookie. |
||
cookies_life_span |
||
Range: 1 second or higher, or |
||
|
||
|
Default: |
|
|
the feature). |
|
|
|
Table 36.1 Properties for NDDS_Transport_TCPv4_Property_t
Property Name |
|
(prefix with |
Description |
‘dds.transport.TCPv4.tcp1.’)1 |
|
|
|
|
Controls the maximum time (in seconds) the |
|
allowed to block the caller thread when the TCP send buffer becomes full. |
|
If the bandwidth used by the transport is limited, and the sender thread tries |
|
to push data faster than the OS can handle, the |
|
will block the caller until there is some room available in the queue. Limiting |
|
this delay eliminates the possibility of deadlock and increases the response |
|
time of the internal DDS thread. |
|
This property affects both CONTROL and DATA streams. It only affects |
|
SYNCHRONOUS send operations. Asynchronous sends never block a send |
send_max_wait_sec |
operation. |
|
|
|
For synchronous send() calls, this property limits the time the DDS sender |
|
thread can block for a full send buffer. If it is set too large, Connext not only |
|
won't be able to send more data, it also won't be able to receive any more |
|
data because of an internal resource mutex. |
|
Setting this property to 0 causes the |
|
immediate failure if the TCP send buffer is full. |
|
Setting this property to |
|
space becomes available in the TCP buffer. |
|
Default: 3 seconds. |
|
|
tls.verify.ca_file |
A string that specifies the name of file containing Certificate Authority |
|
certificates. File should be in PEM format. See the OpenSSL manual page for |
|
SSL_load_verify_locations for more information. |
|
To enable TLS, ca_file or ca_path is required; both may be specified (at least |
|
one is required). |
|
|
tls.verify.ca_path |
A string that specifies paths to directories containing Certificate Authority |
|
certificates. Files should be in PEM format and follow the |
|
naming conventions. See the OpenSSL manual page for |
|
SSL_CTX_load_verify_locations for more information. |
|
To enable TLS, ca_file or ca_path is required; both may be specified (at least |
|
one is required). |
|
|
tls.verify.verify_depth |
Maximum certificate chain length for verification. |
|
|
tls.verify.crl_file |
Name of the file containing the Certificate Revocation List. |
|
File should be in PEM format. |
|
|
tls.identity.certificate_chain |
String containing an identifying certificate (in PEM format) or certificate |
|
chain (appending intermediate CA certs in order). |
|
An identifying certificate is required for secure communication. The string |
|
must be sorted starting with the certificate to the highest level (root CA). If |
|
this is specified, certificate_chain_file must be empty. |
|
|
tls.identity.certificate_chain_file |
File containing identifying certificate (in PEM format) or certificate chain |
|
(appending intermediate CA certs in order). |
|
An identifying certificate is required for secure communication. The file |
|
must be sorted starting with the certificate to the highest level (root CA). If |
|
this is specified, certificate_chain must be empty. |
|
Optionally, a private key may be appended to this file. If no private key |
|
option is specified, this file will be used to load a private key. |
|
|
tls.identity.private_key_password |
A string that specifies the password for private key. |
|
|
tls.identity.private_key |
String containing private key (in PEM format). |
|
At most one of private_key and private_key_file may be specified. If no |
|
private key is specified (all values are NULL), the private key will be read |
|
from the certificate chain file. |
|
|
Table 36.1 Properties for NDDS_Transport_TCPv4_Property_t
Property Name |
|
(prefix with |
Description |
‘dds.transport.TCPv4.tcp1.’)1 |
|
|
|
tls.identity.private_key_file |
File containing private key (in PEM format). |
|
At most one of private_key and private_key_file may be specified. If no |
|
private key is specified (all values are NULL), the private key will be read |
|
from the certificate chain file. |
|
|
tls.identity.rsa_private_key |
String containing additional RSA private key (in PEM format). |
|
For use if both an RSA and |
|
At most one of rsa_private_key and rsa_private_key_file may be specified. |
|
At most one of rsa_private_key and rsa_private_key_file may be specified. |
|
|
tls.identity.rsa_private_key_file |
File containing additional RSA private key (in PEM format). |
|
For use if both an RSA and |
|
At most one of rsa_private_key and rsa_private_key_file may be specified. |
|
At most one of rsa_private_key and rsa_private_key_file may be specified. |
|
|
tls.cipher.cipher_list |
List of available (D)TLS ciphers. See the OpenSSL manual page for |
|
SSL_set_cipher_list for more information on the format of this string. |
|
|
tls.cipher.dh_param_files |
List of available |
|
|
tls.cipher.engine_id |
ID of OpenSSL cipher engine to request. |
|
|
1. Assuming you used ‘dds.transport.TCPv4.tcp1’ as the alias to load the plugin. If not, change the prefix to match the string used with dds.transport.load_plugins. This prefix must begin with 'dds.transport.'