2. Installing Connext Drive
A Connext Drive installation typically consists of a host bundle followed by one or more target bundles. To install Connext Drive, you must first install the host bundle, then choose which target (SDK libraries) to install.
For convenience, the Connext Drive host bundle includes an installation of Connext Micro, RTI’s libraries optimized for environments with size, weight, and power constraints, available as source code for easy porting. See Safety-certified libraries to learn how Connext Micro may be relevant for programs with safety requirements.
Note
If you have installed a “license-managed” bundle (usually used for evaluation purposes),
you do not need to install a target. License-managed bundles (usually used for evaluation
purposes) combine the host, target, and some add-ons in one package. They have lm in
their name, such as rti_connext_drive-2.0.0-lm-x64Win64VS2017.exe.
Connext Drive distributions are provided in two types of bundles:
A host bundle that contains files such as documentation, header files, tools, and infrastructure services executables. The host bundle is provided as a .run, .dmg, or .exe file that will run an installer.
Host bundles are named one of the following:
rti_connext_drive-<version>-host-<host-platform>.runrti_connext_drive-<version>-host-<host-platform>.dmgrti_connext_drive-<version>-host-<host-platform>.exe
The
<host_platform>depends on your development platform, such asx64Win64for a 64-bit Windows® platform.A target bundle that contains SDK libraries you will link against, or an add-on bundle that extends the capabilities of Connext Drive. If you are developing for a cross-compiled architecture, the target bundle will also include any applications that are supported for your architecture. A target or an add-on bundle is an “RTI Package” (*.rtipkg) file that must be installed on top of your host bundle. After you install the host bundle, you will have a script called bin/rtipkginstall [.bat]. You can use this script to install one or more target bundles, or you can use RTI Launcher to install the target bundles. (Launcher is installed as part of the host bundle.) See Installing a Target with a GUI.
Target bundles are named:
rti_connext_dds-<version>-<package_type>-target-<architecture>.rtipkg.Add-on bundles are named:
rti_<addon_package_name>-<version>-<architecture>.rtipkg.The
<architecture>depends on your target machine (where you will deploy your completed application). Your architecture is the combination of a processor, OS, and compiler version that you will use to build your application. For example, if you have a 64-bit Windows machine with Visual Studio® 2017, usex64Win64VS2017. For a 64-bit Linux machine with gcc version 5.4.0, usex64Linux3gcc5.4.0. To see the full list of available architectures, see the “RTI Architecture Abbreviation” columns in the RTI Connext DDS Core Libraries Platform Notes.
Note
A few notes about target and add-on bundles:
Download target and add-on bundles (an *.rtipkg file) with a
<version>of 6.1.1 for use with Connext Drive 2.0 host bundles.You will need to install more than one target bundle if you are developing for multiple target architectures, such as developing for both Linux® and QNX® systems.
You must have a target bundle even if you are developing for Java®. This is because Connext requires native libraries as well as the Java SDK. If you are on a Windows system, you can generally install any Windows architecture if you plan to develop with Java.
However, a target installation is not necessary for building or running C# applications. The NuGet package Rti.ConnextDds contains the necessary native libraries.
2.1. Installing a Host or an LM Bundle
Host bundles and “license managed” bundles (LM Bundles) are applications; thus, they can be started from a GUI or command line. To install them, do either of the following:
Double-click the installer.
Run the installation script from a command prompt. See Installing RTI Connext DDS, in the RTI Connext DDS Installation Guide.
Note
If your development platform already has Connext Professional 6.1.1 installed, you must change the default installation directory for Connext Drive 2.0 in the installation dialog OR uninstall Connext Professional 6.1.1.
In addition, please delete the following folder:
<path to your workspace>/rti_workspace/6.1.1/user_config/launcher
2.2. Installing a Target with a GUI
After you install the host bundle, you’ll have a tool called RTI Launcher. (See Starting Launcher, in the RTI Launcher User’s Manual.)
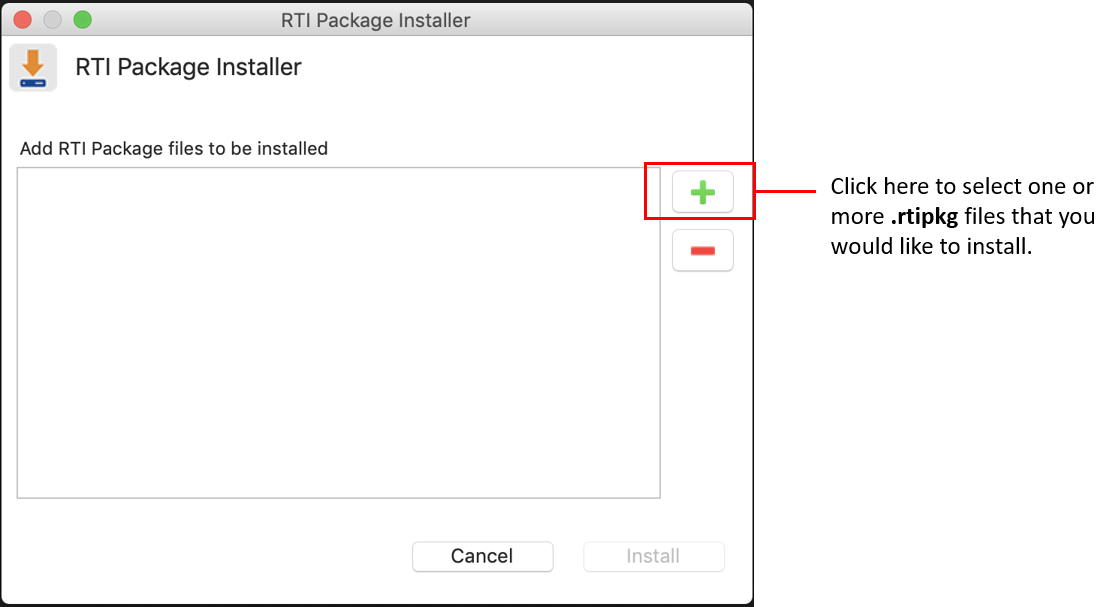
To install a target bundle from the Launcher tool, open the Configuration tab, and select “Install RTI Packages.” This will open a dialog that allows you to select one or more .rtipkg files that you would like to install.

Note
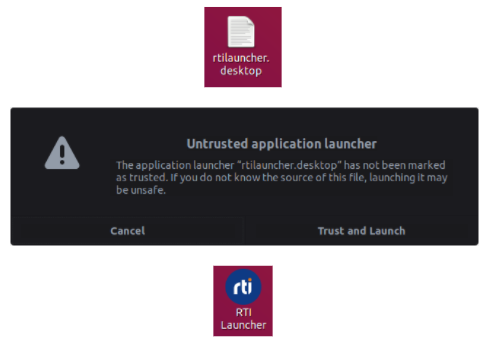
In some Linux operating systems, executing the desktop shortcut for Launcher might report that the application has not been marked as trusted. This is a harmful warning that will prevent you from executing Launcher using the desktop shortcut. To remove this warning, click Trust and Launch. This will mark the desktop shortcut as a trusted application, allowing you to run the application.
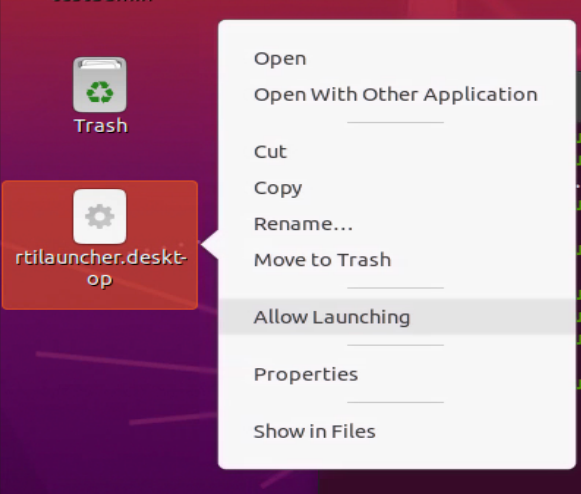
If the warning doesn’t appear when executing the desktop shortcut for Launcher, you might need to allow the shortcut to be launched. To do so, right-click on the shortcut and click on Allow Launching.
2.3. Installing a Target from a Command Line
To install targets from the command line, type:
$ <installdir>/bin/rtipkginstall <path to rtipkg>
$ <installdir>/bin/rtipkginstall <path to rtipkg>
> <installdir>\bin\rtipkginstall.bat <path to rtipkg>
Where <installdir> is your installation directory.
2.4. Paths Mentioned in the Documentation
The default top-level directory for Connext Drive 2.0.0 is rti_connext_dds-6.1.1, which corresponds to the version of Connext Professional included in the bundle.
This documentation refers to the following directories, depending on your operating system:
$NDDSHOME: This refers to the installation directory for Connext DDS.
The default installation paths are:
Non-root user:
/home/<your user name>/rti_connext_dds-<version>Root user:
/opt/rti_connext_dds-<version>
$NDDSHOME is an environment variable set to the installation path.
$NDDSHOME: This refers to the installation directory for Connext DDS.
The default installation path is: /Applications/rti_connext_dds-<version>
$NDDSHOME is an environment variable set to the installation path.
%NDDSHOME% This refers to the installation directory for Connext DDS.
The default installation paths are:
User without Administrator privileges:
<your home directory>\rti_connext_dds-<version>User with Administrator privileges:
"C:\Program Files\rti_connext_dds-<version>""
%NDDSHOME% is an environment variable set to the installation path.
Note
When using a command prompt to enter a command that includes the path
C:\Program Files (or any directory name that has a space), enclose the
path in quotation marks. For example:
“C:\Program Files\rti_connext_dds-version\bin\rtilauncher.bat”. Or, if
you have defined the NDDSHOME environment variable:
"%NDDSHOME%\bin\rtilauncher.bat".
You must set the NDDSHOME environment variable according to your selected
operating system.
Sometimes this documentation uses <NDDSHOME> to refer to the installation path.
Whenever you see <NDDSHOME> used in a path, replace it with $NDDSHOME for
Linux or macOS systems, with %NDDSHOME% for Windows systems, or with your
installation path.
Set the RTIMEHOME environment variable to the installation directory path
for Connext Micro. If you installed Connext Drive with default settings,
Connext Micro will be here:
<path_to_connext_dds_installation>/rti_connext_dds-6.1.1/rti_connext_micro-2.4.14.
If you copied Connext Micro to another place, set RTIMEHOME to point to that
location.
Set RTIME_TARGET_NAME to your target architecture:
If you have a Connext Drive LM bundle, set
RTIME_TARGET_NAMEto one of the two target architectures that are installed as part of the bundle:armv8Linux4gcc7.3.0_certprofilex64Linux4gcc7.3.0_certprofile
If you have a non-LM bundle, set
RTIME_TARGET_NAMEto the architecture of the target package you installed.
2.5. Setting Up a License
Most installations require a license file to run the tools or features included with Connext. If your distribution requires a license file, you will receive one from RTI via e-mail.
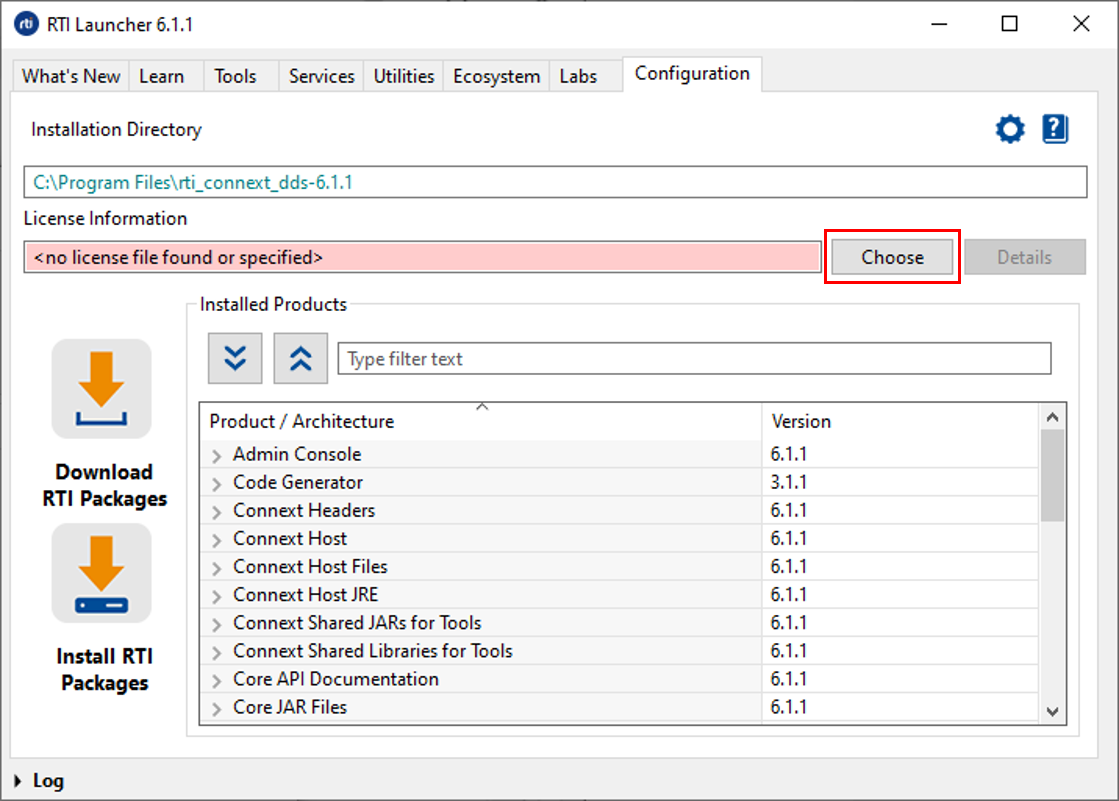
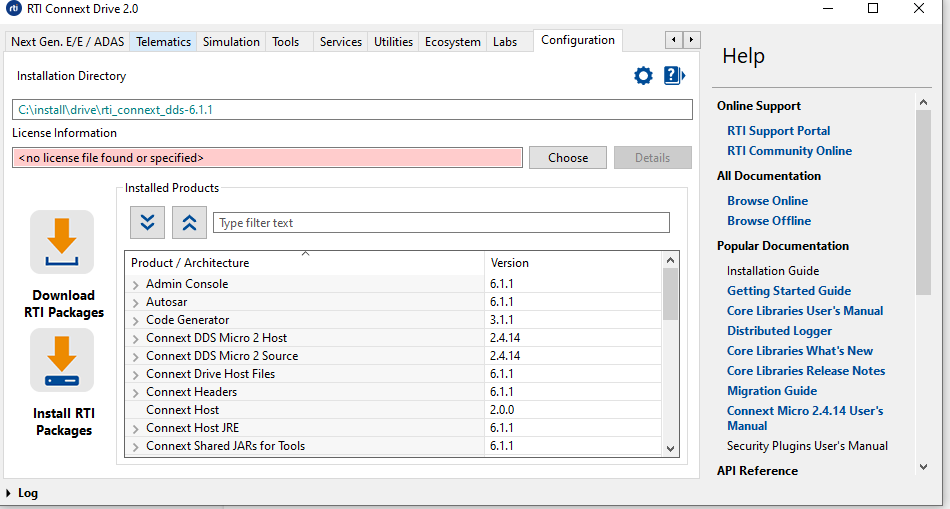
The easiest way to configure your license file is using Launcher, as shown below:
If you do not want to use Launcher, you can also install a license by placing it in one of these two locations:
<installation directory>/rti_license.dat<workspace directory>/rti_license.dat
The workspace directory is in the locations below by default, depending on your operating system:
/home/<your username>/rti_workspace/
/Users/<your username>/rti_workspace/
<your Windows documents folder>\rti_workspace\
A third way to install a license is to configure the environment variable RTI_LICENSE_FILE to point to your license file.
For more details, see the License Management section in the RTI Connext DDS Installation Guide.
2.6. Checking What’s Installed
To find out what target libraries or add-ons you have installed, you can use the Launcher tool. See Starting Launcher, in the RTI Launcher User’s Manual. Once in Launcher, open the Configuration tab:
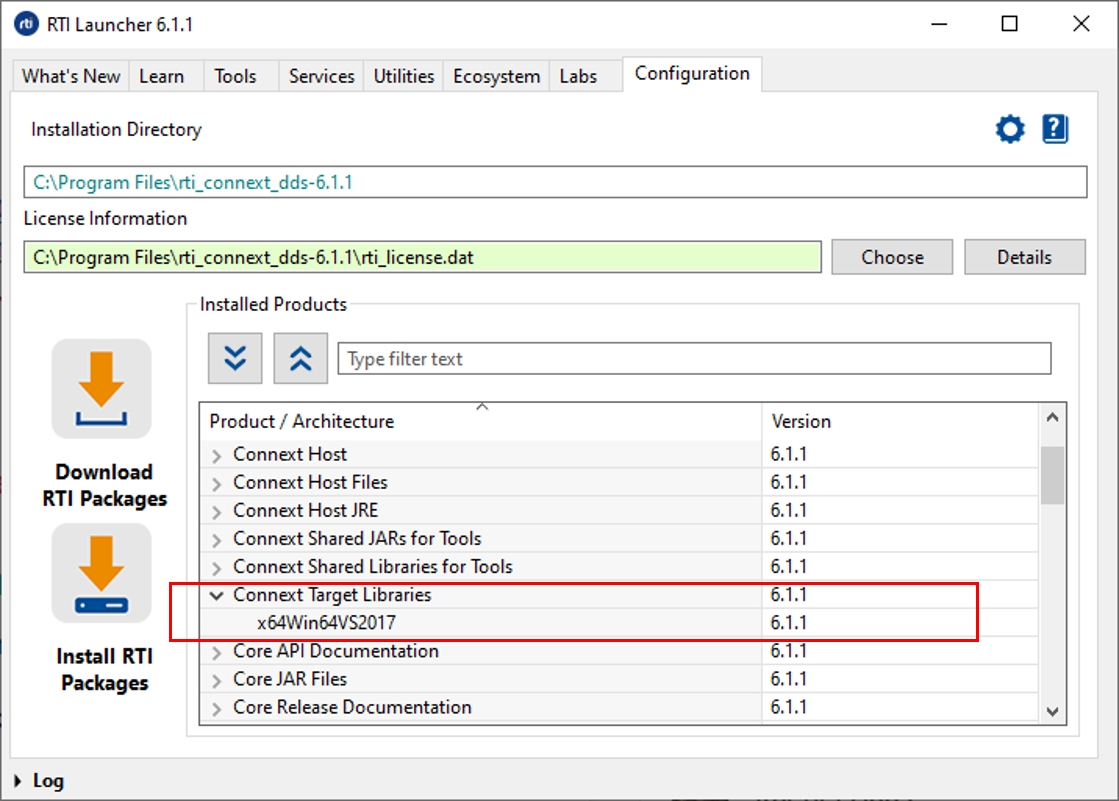
To check which target architectures you have installed, click on Connext Target Libraries, which will show you each installed target library and its version.
If you do not see any target libraries listed, you are missing a vital part of the Connext SDK, and you will not be able to compile your own applications. You can still run tools such as RTI Admin Console.
2.7. Where Do I Get More Help?
Advanced installation help can be found in the RTI Connext DDS Installation Guide, which explains:
Installer command-line options
Controlling the location of the RTI Workspace directory
Additional license management options
Special backup of RTI libraries
How to uninstall Connext DDS
Continue to Publish/Subscribe to start learning about the capabilities and features of Connext.
Additional documentation for RTI products and user forums can be found on community.rti.com. If you have additional questions or concerns, please contact your sales team.