macOS installer#
The following instructions guide you through the Connext installation steps, setting up a license file, and running a Hello World program to verify the installation.
1. Download Connext#
Get a free version of Connext at evaluation.rti.com . Log in with your RTI account or create a new account, then follow the instructions under “Try Connext on your desktop.” You will download:
An installer, such as
rti_connext_dds-<version>-lm-arm64Darwin23clang16.0.dmg.A license file,
rti_license.dat.
If you want to evaluate Connext without downloading, follow the instructions under “Try Connext in your browser” at evaluation.rti.com .
Existing customers
If you have already purchased a Connext bundle, follow the installation instructions here instead.
2. Run the installer#
Double-click the installer and follow the installation instructions.
Choose an installation directory or accept the default one,
/Applications/rti_connext_dds-<version>.
The installation includes:
The SDK to build your distributed applications.
Tools that help you design, visualize, and debug your system.
Infrastructure Services that perform dedicated functions in your system, such as recording, bridging, and persisting data.
To develop Python applications, you also need to install the Connext Python
API with pip as follows:
$ pip install rti.connext
(To install a specific version,
use pip install rti.connext==<version>, where <version> is from
Release history.)
3. Set up the license file#
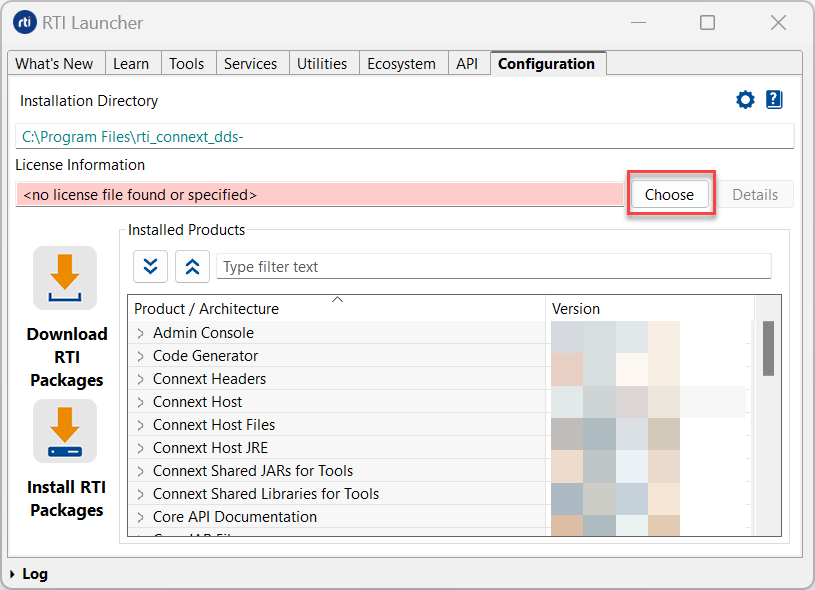
To set up the license file, you can use RTI Launcher, a graphical tool that also helps you explore and run Connext tools and utilities.
Open RTI Launcher by running:
$ <installation directory>/bin/rtilauncher
To set up the license file, go to the Configuration tab and select
the rti_license.dat file in the License Information field:
Alternatively, you can copy your license file to <installation directory>/rti_license.dat,
or set the environment variable RTI_LICENSE_FILE to point to your license file.
With the free version, the license file needs to be accessible when you run your Connext applications. We will show that in the next section.
4. Run a Hello World program#
Generate and run a simple Connext application to verify the installation.
First, run the following script to configure your environment:
$ source <installation directory>/resource/scripts/rtisetenv_arm64Darwin23clang16.0.zsh
(Scripts for other shells are available in the same directory.)
To define a data type for the Topic you will publish and subscribe to,
create a file named HelloWorld.idl in a new directory, with the following
content:
struct HelloWorld {
    int32 value;
};
Next, generate the code to use that type in an example application for a target language. Select the programming language you’d like to use:
Run RTI Code Generator:
$ rtiddsgen -language python -example universal HelloWorld.idl
In one terminal, run the subscriber:
$ python HelloWorld_subscriber.py
In another terminal, run the publisher:
$ python HelloWorld_publisher.py
(Make sure you have configured the environment as shown above (using
rtisetenv) for each shell; alternatively, copy the rti_license.dat
file to the current directory.)
You should see subscriber output similar to:
Hello World subscriber sleeping for 1 seconds...
Received: HelloWorld(value=0)
Hello World subscriber sleeping for 1 seconds...
Received: HelloWorld(value=1)
Hello World subscriber sleeping for 1 seconds...
Run RTI Code Generator:
$ rtiddsgen -language c++11 -example arm64Darwin23clang16.0 HelloWorld.idl
Build the applications (you need make and g++ installed):
$ make -f makefile_HelloWorld_arm64Darwin23clang16.0
In one terminal, run the subscriber:
$ ./objs/arm64Darwin23clang16.0/HelloWorld_subscriber
In another terminal, run the publisher:
$ ./objs/arm64Darwin23clang16.0/HelloWorld_publisher
(Make sure you have configured the environment as shown above (using
rtisetenv) for each shell; alternatively, copy the rti_license.dat
file to the current directory.)
You should see subscriber output similar to:
::HelloWorld subscriber sleeping up to 1 sec...
[value: 1]
::HelloWorld subscriber sleeping up to 1 sec...
[value: 2]
...
Run RTI Code Generator:
$ rtiddsgen -language c -example arm64Darwin23clang16.0 HelloWorld.idl
Build the applications (you need make and gcc installed):
$ make -f makefile_HelloWorld_arm64Darwin23clang16.0
In one terminal, run the subscriber:
$ ./objs/arm64Darwin23clang16.0/HelloWorld_subscriber
In another terminal, run the publisher:
$ ./objs/arm64Darwin23clang16.0/HelloWorld_publisher
(Make sure you have configured the environment as shown above (using
rtisetenv) for each shell; alternatively, copy the rti_license.dat
file to the current directory.)
You should see subscriber output similar to:
HelloWorld subscriber sleeping for 4 sec...
Received data

value: 0
Received data

value: 1
Run RTI Code Generator:
$ rtiddsgen -language c# -example net8 HelloWorld.idl
(If necessary, replace net8 with the version of .NET you are using.)
Delete the file NuGet.Config (this file points to the installation directory, but for the free version we will download the NuGet packages from nuget.org):
$ rm NuGet.Config
Build the applications (you’ll need the .NET SDK installed):
$ dotnet build
In one terminal, run the subscriber:
$ dotnet run -- --sub
In another terminal, run the publisher:
$ dotnet run -- --pub
(Make sure you have configured the environment as shown above (using
rtisetenv) for each shell; alternatively, copy the rti_license.dat
file to the current directory.)
You should see subscriber output similar to:
HelloWorld subscriber sleeping for 4 sec...
    value: 0

HelloWorld subscriber sleeping for 4 sec...
    value: 1
Run RTI Code Generator:
$ rtiddsgen -language java -example arm64Darwin23clang16.0 HelloWorld.idl
Build the applications (you need make and a Java JDK installed):
$ make -f makefile_HelloWorld_arm64Darwin23clang16.0
In one terminal, run the subscriber:
$ make -f makefile_HelloWorld_arm64Darwin23clang16.0 HelloWorldSubscriber
In another terminal, run the publisher:
$ make -f makefile_HelloWorld_arm64Darwin23clang16.0 HelloWorldPublisher
(Make sure you have configured the environment as shown above (using
rtisetenv) for each shell.)
You should see subscriber output similar to:
No data after 1 seconds.
Received:
    value: 0

Received:
    value: 1
...
Congratulations! You have successfully installed Connext.
(If you have trouble, see troubleshooting information. Or ask the Connext Chatbot.)
Next steps#
Now you’re ready to build your own Connext distributed applications.
