Testing Your Connext System with CANoe#
Introduction#
Testing is a critical part of the software development lifecycle, particularly in highly regulated industries like automotive and medical devices. As such, it is important to have a way to test that your Connext applications are functioning as intended and meeting system requirements.
Requirements#
Visual Studio 2022 or MS Build Tools
What this Example Does#
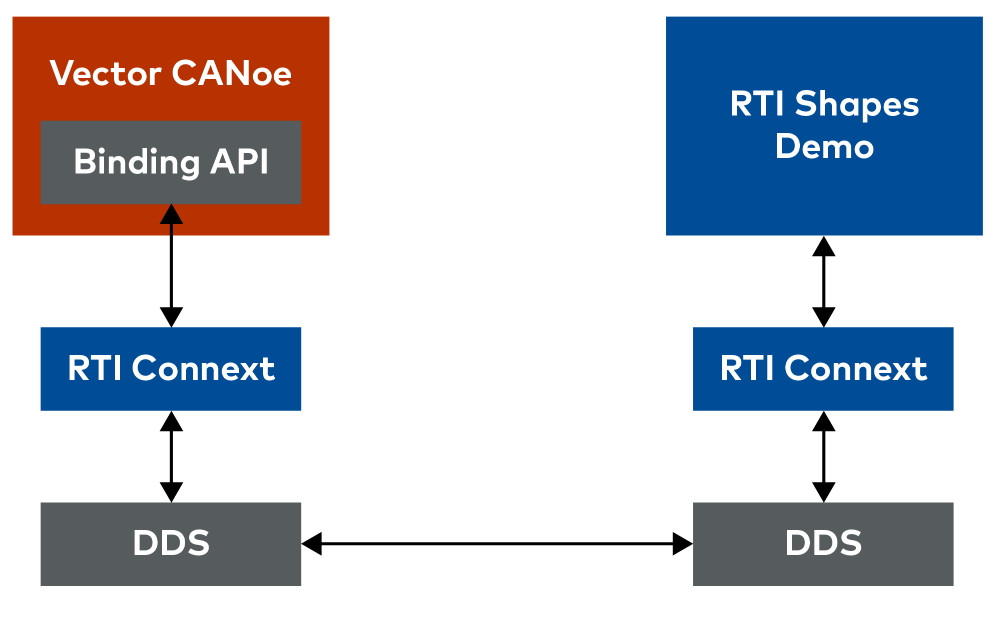
This example uses Connext XML-Based Application Creation and CANoe’s C# binding to communicate between CANoe and RTI Shapes Demo. It includes a sample vCDL file and the relevant C# binding example that implements Connext for this example.
Building the Example#
This example has been tested with CANoe 18 SP2 on Windows.
Download the example from the Vector download center.
Your PATH environment variable should include the
%NDDSHOME%\lib\<architecture> path so that CANoe can find the required
Connext libraries. Ensure that your CANoe Execution Environment is set to
64-bit.
Then, open Connext_CANoe.cfg in CANoe.
Building the Example#
Start the measurement. Then, call InitializeParticipant to start
the DomainParticipant. Then, try writing a sample with the
WriteSquareShape function.

You should see the CANoe DomainParticipant subscribe to its own sample and receive the data.
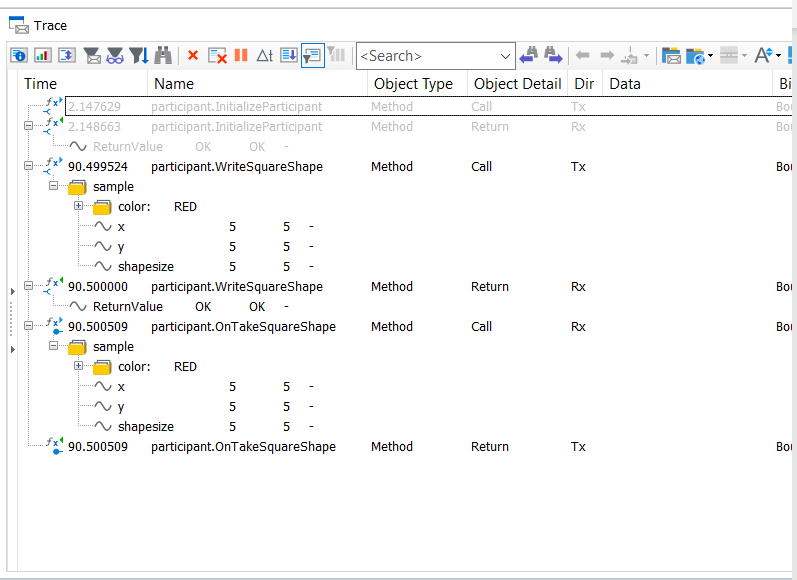
You can also use RTI Shapes Demo to subscribe to the Square Topic being published to by CANoe, or publish to the Square Topic with Shapes Demo to see CANoe receive and print out the samples.
Extending the Example to Your Own System#
Start with your Connext IDL/XML file containing your data types and
generate typefiles with rtiddsgen. You can then add the typefiles to the
Visual Studio Solution attached as a C# application model in CANoe. You
will also need to add the RTI Connext NuGet packages to the Visual Studio
Solution, and have your PATH set to %NDDSHOME%\lib\<architecture> so that
CANoe is able to find the required Connext libraries. Ensure that your
CANoe Execution Environment is set to 64-bit.
Use the Vector-provided IDL-to-vCDL script to convert your data types into vCDL. Then, implement the required methods like in the sample application model to initialize your participant, to write samples, and to take samples. This is easier with XML Application Creation since you don’t need to create your DomainParticipant, DataWriters, and DataReaders in code. You will need one method to initialize your participant, and one for each DataWriter and DataReader.
As a last step, you can implement the application-level behavior of your
simulated participant as shown in SimulationLogic.cs, build the Visual
Studio Solution and, if successful, start the measurement in CANoe.
You can refer to the Vector C# binding documentation (F1 Help Menu > Communication Concept > C# Binding) and the RTI Connext C# API documentation.
Summary#
This example shows how to use Connext XML-Based Application Creation and CANoe’s C# binding to communicate between CANoe and RTI Shapes Demo. It includes a sample vCDL file and the relevant C# binding example that implements Connext for this example.
Next Steps#
Post questions related to the Vector CANoe on the Vector Customer Portal.
Post questions related to RTI Connext on the RTI Community Forum.
Check out more of the Vector products and CANoe Family tools and learn how to simulate and test your system.
Check out more of the Connext product suite and learn how Connext can help you build your distributed system. If you haven’t already, get Connext for free.
