4. Keys and Instances
Prerequisites |
|
Time to complete |
1 hour |
Concepts covered in this module |
|
So far, we’ve talked about samples. A DataWriter, for example, publishes samples of a particular Topic. Sometimes, we want to use one Topic to publish samples of data for several different objects, such as flights or sensors. Connext uses “instances” to represent these real-world objects. (See Table 4.1.)
When you need to represent multiple objects within a DDS Topic, you use a key to establish instances. A key in DDS is similar to a primary key in a database—it is a unique identifier of something within your data. An instance is the object identified by the key. A key can be composed of multiple fields in your data as long as they uniquely identify the object you are representing. For example, in an air traffic control system, the key fields might be the airline name and flight number. Samples would be the updated locations of each flight “instance.” See other examples of keys, instances, and samples in the following table.
Instance |
Key |
Data Type |
Samples |
|---|---|---|---|
Commercial flight being tracked |
Airline name and flight number, such as:
|
@key string airline
@key int16 flight_num
float latitude
float longitude
|
UA, 901, 37.7749, -122.4194
|
Sensor sending data, such as an individual temperature sensor |
Unique identifier of that sensor, such as:
|
@key string sensor_id
int32 temperature
|
tempering-machine-1, temperature = 175
|
Car being monitored |
Vehicle identification number (VIN) of the car |
@key string VIN
float latitude
float longitude
|
JH4DA9370MS016526, 37.7749, -122.4194
|
Chocolate lot being processed in a factory |
Chocolate lot identifier; likely an incrementing number that rolls over |
@key uint32 lot_num
LotStatusKind state
|
1, waiting for cocoa
|
To specify one or more key fields, annotate them with “@key” in the IDL file. For example:
// Temperature data type
struct Temperature {

    // Unique ID of the sensor sending the temperature. Each time a sample is
    // written with a new ID, it represents a new sensor instance.
    @key
    string<256> sensor_id;

    // Degrees in Celsius
    int32 degrees;

};
You add an @key annotation before each field that is part of the unique
identifier of your instance.
(See The @key Annotation, in the RTI Connext Core
Libraries User’s Manual
if you want more details.)
4.1. Why and How Do We Use Instances?
Not every data model requires that you use instances. You’re already dividing up your data into multiple Topics. So why use instances at all?
Less memory and discovery time
Creating a new instance is lighter-weight than creating a new DataWriter/DataReader/Topic. For example, if you’re representing airline flights, you could create a new DataWriter, DataReader, and Topic each time a new flight takes off. At a major airport, that’s over a thousand flights per day! The problem with a one-Topic-per-flight system is that it uses more memory than necessary, and it takes more time for discovery. Using instances to represent unique flights requires less memory, and the instances do not need to be discovered the way DataWriters and DataReaders discover each other. (See Discovery.)
Lifecycle
Instances allow you to model the behavior of real-world objects that come and go. For example, you can use the instance lifecycle to detect an event such as a flight landing or a chocolate lot finishing. We will go into this in more detail when we talk about the Instance Lifecycle below.
QoS
Several Quality of Service (QoS) policies are applied per-instance. This is a huge benefit, and we’ll talk about this in greater detail later in Basic QoS.
4.1.1. Writing an Instance
To send a sample of an instance, all you need to do is make sure the key fields are set to the unique ID of your instance. Let’s refer back to the following example type, representing temperature sensor data:
// Temperature data type
struct Temperature {

    // Unique ID of the sensor sending the temperature. Each time a sample is
    // written with a new ID, it represents a new sensor instance.
    @key
    string<256> sensor_id;

    // Degrees in Celsius
    int32 degrees;

};
For the purposes of this example, assume that each physical sensor in our
distributed system has a unique ID assigned to it, and this ID maps to the
sensor_id field in our type. By marking sensor_id with the @key
annotation, we have marked it a key field, and therefore each unique sensor_id
string we write will represent a different DDS instance.
If we want to write values for multiple sensors, we can change
our code so the application takes an ID as a command-line parameter.
Then, it can use that ID from the command line as part of the string that
becomes the unique sensor ID—for example, TemperingMachine-<id>.
// Modify the data to be written here
// Specify the sensor instance sending the temperature. ID is passed at
// the command line. Each unique "TemperingMachine-<id>" is a
// unique instance.
temperature.sensor_id = "TemperingMachine-" + sensorId;
temperature.degrees = 32;

writer.Write(temperature)
Each time you pass a new ID parameter to the application, you have a new instance in your system. Any time a DataWriter writes a sample with a unique value in the sample’s key fields, it is writing to a unique instance. A DataWriter can write multiple instances just by setting the key fields to unique values.
In our current example, each DataWriter writes a single instance; however, as shown in Figure 4.2, the number of instances is not directly related to the number of DataWriters. One DataWriter can write many instances. Or multiple DataWriters can write one or more instances.
You have the flexibility to design your system however you want. Any DataWriter of a given Topic can be responsible for updating one or more instances within that Topic, depending on your requirements.
Tip
Remember: a “sample” is a single update of data. Every time your application calls the DataWriter’s write method, the DataWriter sends a sample. This is true whether you have instances in your system or not.

Figure 4.1 Samples without instances

Figure 4.2 Samples with instances
4.1.2. Reading an Instance
An instance lifecycle event will set the data_available status to true,
similar to what we have previously seen when a new sample is available for
a DataReader. In the code we have seen so far, the WaitSet wakes when the data_available
status becomes true and when we can process the sample. When the application gets the
data_available notification from an instance lifecycle event, retrieving an
instance is identical to retrieving a sample (except that you have some additional
options). You may remember the code from “Hello World”, where a
DataReader calls take() to retrieve data from the middleware, and then
iterates over a collection of all the samples:
// Take all samples
using var samples = reader.Take();
foreach (var data in samples)
{
      if (sample.Info.ValidData)
      {
          Console.WriteLine(sample.Data);
      }
}
In a system with instances, the Take() call will return a sequence of
samples for all of the instances in the system. (There is also a
Select() call that can be used to retrieve samples for a
particular instance.)
Take a closer look at that code, and you will notice there is a line where we check that the sample is valid:
if (sample.Info.ValidData)
You may be wondering: what does it mean for the sample to not contain
valid data? The answer is: a sample can contain data or it can
contain information about the instance’s lifecycle.
The data_available event notifies the DataReader about these updates
in the same way, so the “valid” data flag indicates whether the update
is a sample containing data or a sample containing an instance lifecycle
update.
4.1.3. Instance Lifecycle
An instance can have the following states, which are all part of the instance lifecycle:
Alive: A DataReader has received samples for the instance. (A DataWriter has written the instance, and the DataWriter is still in the system.)
Not alive, disposed: All DataReaders in the system have been notified via a DataWriter API call that this instance has been “disposed.” For example, you might set up a system in which once a flight has landed, it is disposed (we don’t need to track it anymore).
Not alive, no writers: The DataReader is no longer receiving samples for the instance. (Every DataWriter that wrote that instance has left the system or declared it is no longer writing that instance.)
We can use the state of instances in our application (i.e., the instance lifecycle) to trigger specific logic or to track specific events. What does it mean at a system level when an instance is not alive because of no writers, or if it is disposed? This depends on your system—DDS notifies the DataReaders that the instance has changed state, and you can decide what it means in your system. In the next section, Example: Chocolate Factory, we’ll look at one way that you can use instance states in a chocolate factory example.
All of the information about an instance’s lifecycle is part of the SampleInfo,
which you access using sample.Info, the same way we do in the
previous example code to check if the sample is valid. Take a look at
Instance States, in the RTI Connext Core
Libraries User’s Manual
to see the state diagram describing the instance lifecycle. To review the
state data that is specific to instances, you use the
sample.Info.State.Instance property—you can query this state to see if the
instance is Alive, NotAliveDisposed, or NotAliveNoWriters.
So, what is the typical lifecycle of an instance? An instance first becomes alive; this happens when a DataReader receives a sample for an instance for the first time. Then the instance may receive updates for some period of time from DataWriters publishing to that instance. If an instance becomes not alive, the instance will transition to either “Not alive, no writers” or “Not alive, disposed”. An instance may become not alive for a variety of reasons, which are detailed in the following table.
State |
How Change Occurs |
|---|---|
Alive |
|
Not alive, disposed |
|
Not alive, no writers |
|
4.2. Example: Chocolate Factory
This example illustrates the use of instance states in the context of a chocolate factory, where different stations add ingredients to a chocolate lot, and where the final stage is a tempering station that heats and then cools the chocolate to a specific temperature.
In the chocolate factory that we are creating, there will be two data types: Temperature and ChocolateLotState. We saw these types earlier, in Data Types.
Since a temperature reading doesn’t “go away” like a flight does, we will not use the instance lifecycle for the “Temperature” Topic. Instead, we will focus on the “ChocolateLotState” Topic, which can utilize instance lifecycle events.
4.2.1. Chocolate Factory: System Overview
We will start building this system with the following applications:
Monitoring/Control application:
Starts off processing a chocolate lot by writing a sample of the “ChocolateLotState” Topic, saying that a chocolate lot is ready to be processed.
Monitors the “ChocolateLotState” Topic as it’s updated by the different stations.
Finally, reads the “ChocolateTemperature” Topic to check that tempering is done correctly.
Tempering Station application:
Writes to the “ChocolateTemperature” Topic to let the Monitoring/Control application know the current tempering temperature.
Monitors the “ChocolateLotState” Topic to see if it needs to process a lot.
Processes the lot and updates the state of the lot by writing to the “ChocolateLotState” Topic.
Ingredient Station application (not implemented until a later module):
Monitors the “ChocolateLotState” Topic to see if it needs to process a lot.
Processes the lot (adds an ingredient) and updates the state of the lot by writing to the “ChocolateLotState” Topic.
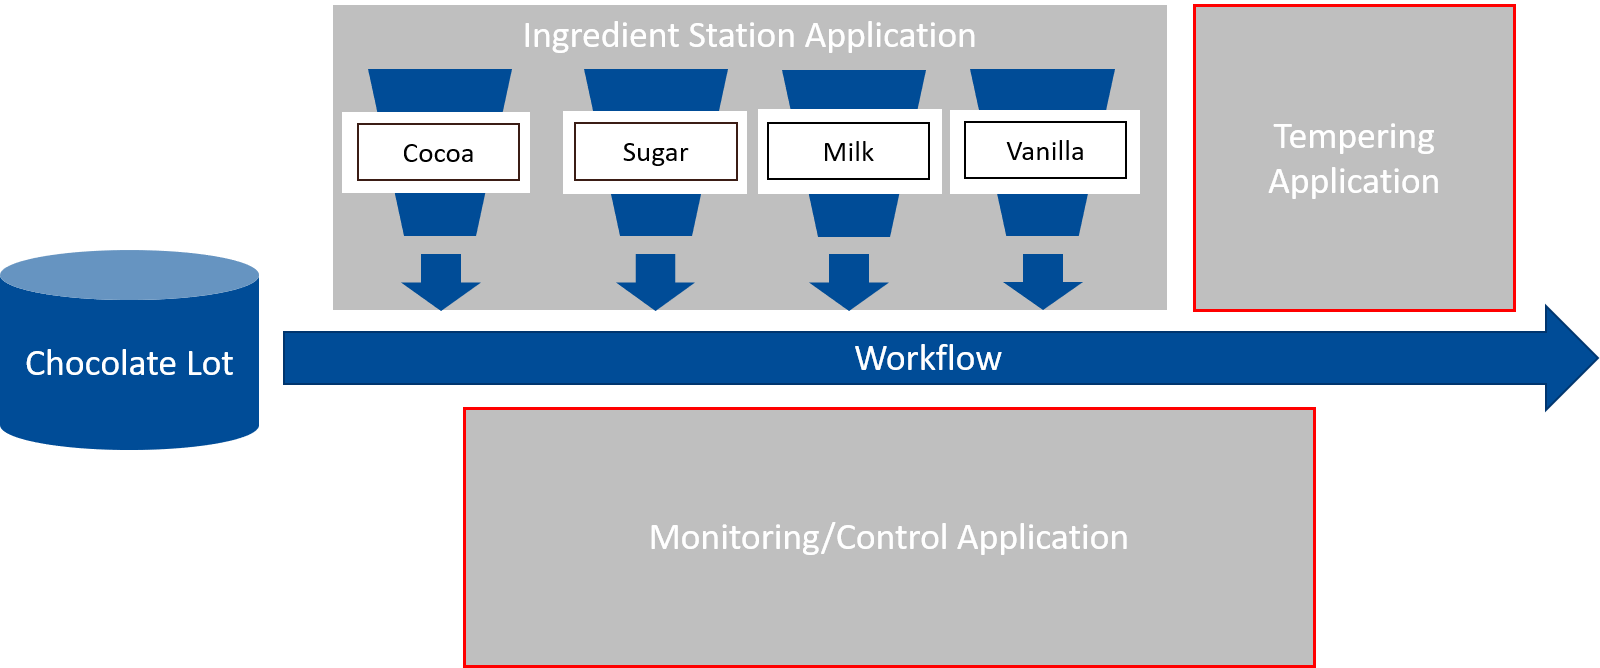
Figure 4.3 There are three applications in this chocolate factory. We will illustrate only the Tempering Application and the Monitoring/Control Application for now.
4.2.2. Chocolate Factory: Data Overview
A chocolate lot is processed by various stations described above. At each station, the chocolate lot transitions through three states:
Waiting at station
Processing at station
Completed by station
To represent the state of each chocolate lot that we are processing, we are going to be using a more complex version of the ChocolateLotState data type than we saw in the last module.
Recall that in the IDL file, the ChocolateLotState data type uses a lot
ID (lot_id) as the key field:
struct ChocolateLotState {
    // Unique ID of the chocolate lot being produced.
    // rolls over each day.
    @key
    int32 lot_id;

    // Which station is producing the status
    StationKind station;

    // This will be the same as the current station if the station producing
    // the status is currently processing the lot.
    StationKind next_station;

    // Current status of the chocolate lot: Waiting/Processing/Completed
    LotStatusKind lot_status;

};
As a chocolate lot receives ingredients from stations in the factory, the stations update the “ChocolateLotState” Topic.
The fields station and next_station in the IDL file represent
the current station
processing the lot, and the next station that should process the lot. If
there is no current station (because the lot is waiting for the first station),
station will be INVALID_CONTROLLER. If the lot is processing at a station
and is not ready to be sent to the next station, the next_station field will
be INVALID_CONTROLLER. The stations are represented by an enumeration in the IDL
(not shown here).
The lot_status field describes the status of the lot at a given controller: WAITING,
PROCESSING, or COMPLETED. This status is represented in an enumeration in the IDL
(not shown here).
When a chocolate lot finishes, the tempering application disposes the instance with
lotStatusWriter.DisposeInstance().
Note
Disposing an instance does not necessarily free up memory. There is some subtlety about memory management when using instances, so when you get past the basics, it’s a good idea to review Instance Memory Management, in the RTI Connext DDS Core Libraries User’s Manual.
4.3. Hands-On 1: Build the Applications and View in Admin Console
To keep this example from getting too complex, we are focusing on just the Monitoring/Control and Tempering applications right now. These applications have more than a single DataReader or DataWriter, as you can see below:
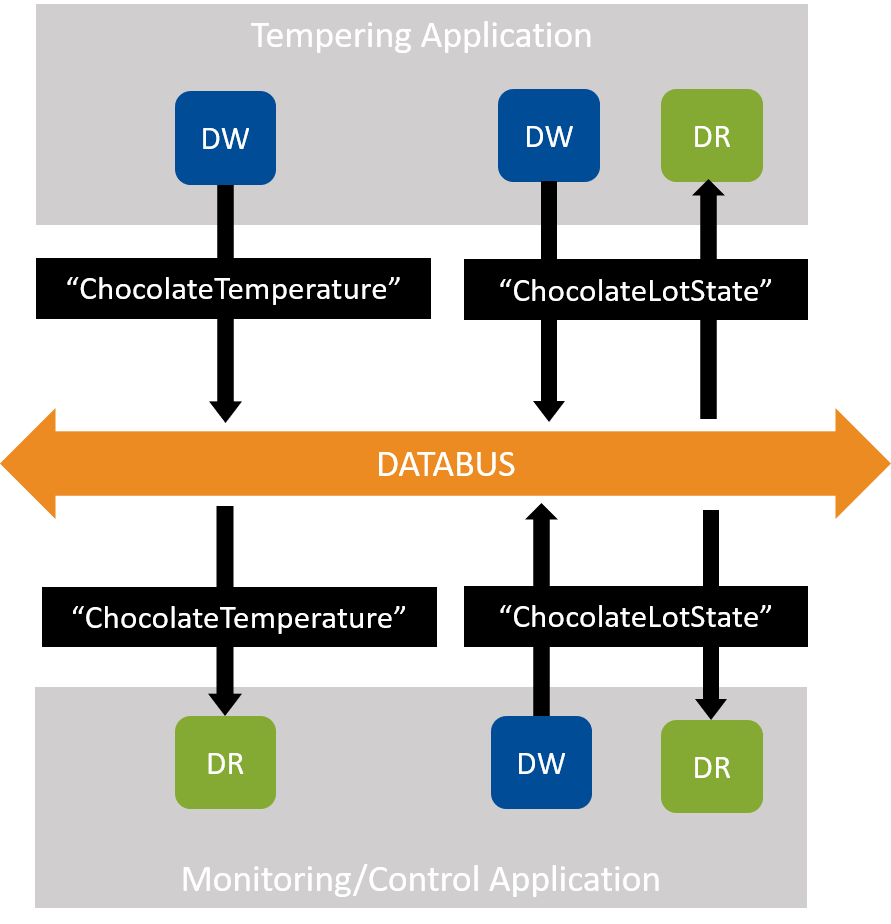
Figure 4.4 Our applications have more than one DataReader or DataWriter.
Let’s look at the “ChocolateLotState” DataWriters and DataReaders more closely:
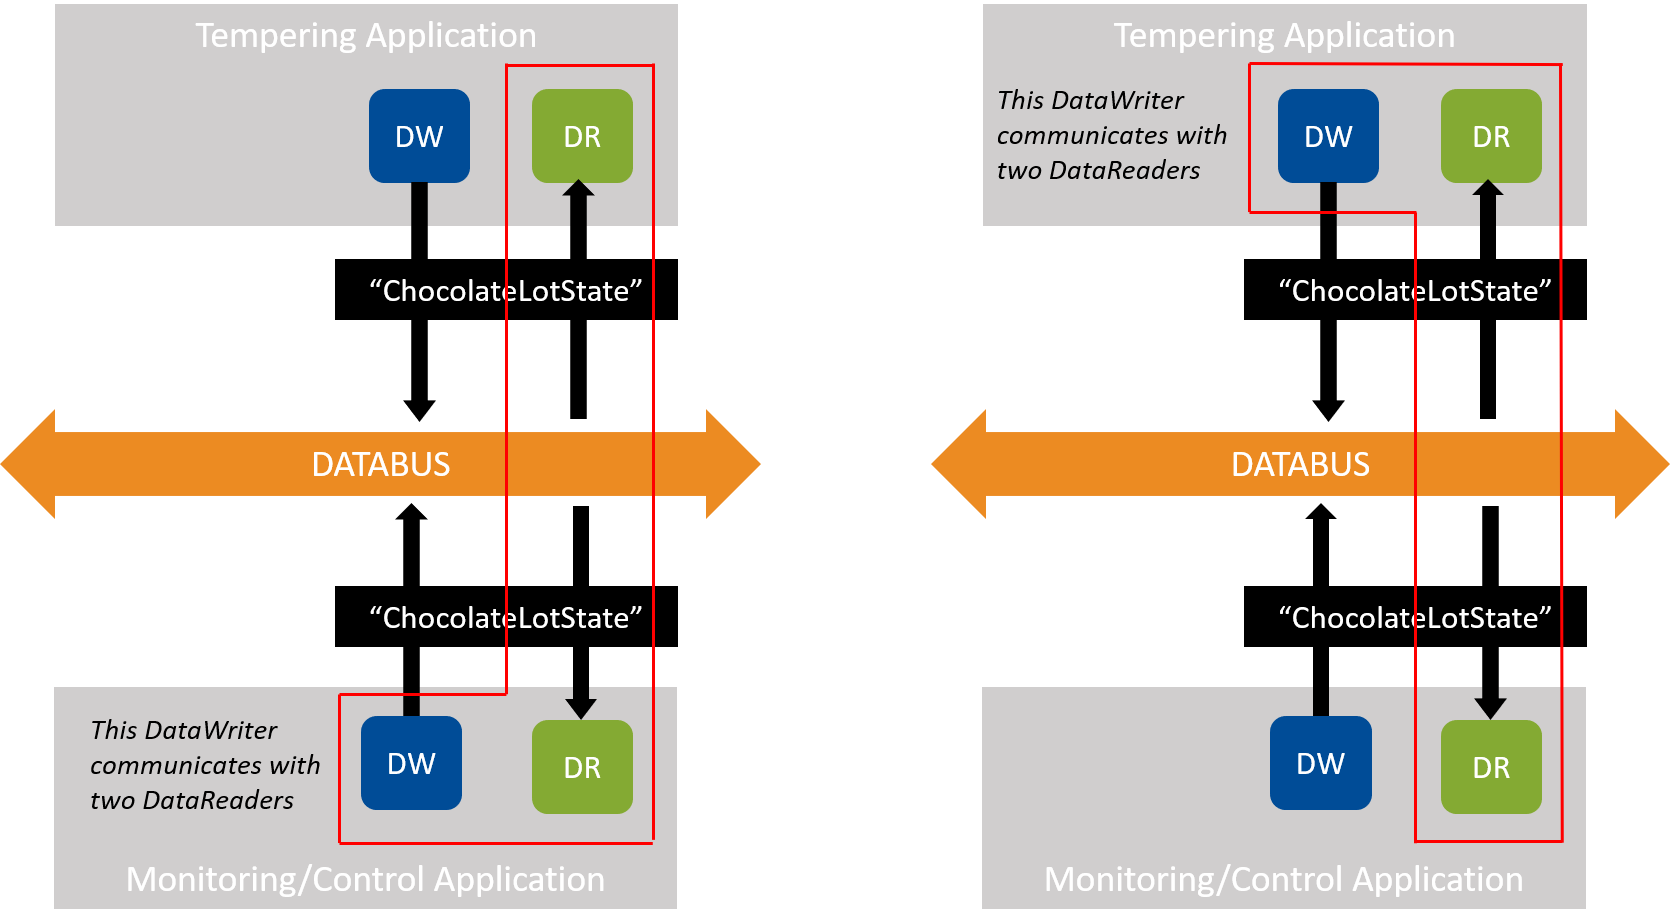
Figure 4.5 In our example, the DataWriter in each application communicates with two DataReaders—one in its own application and one in another application
Here’s a view of the “ChocolateLotState” DataWriters and DataReaders with samples:
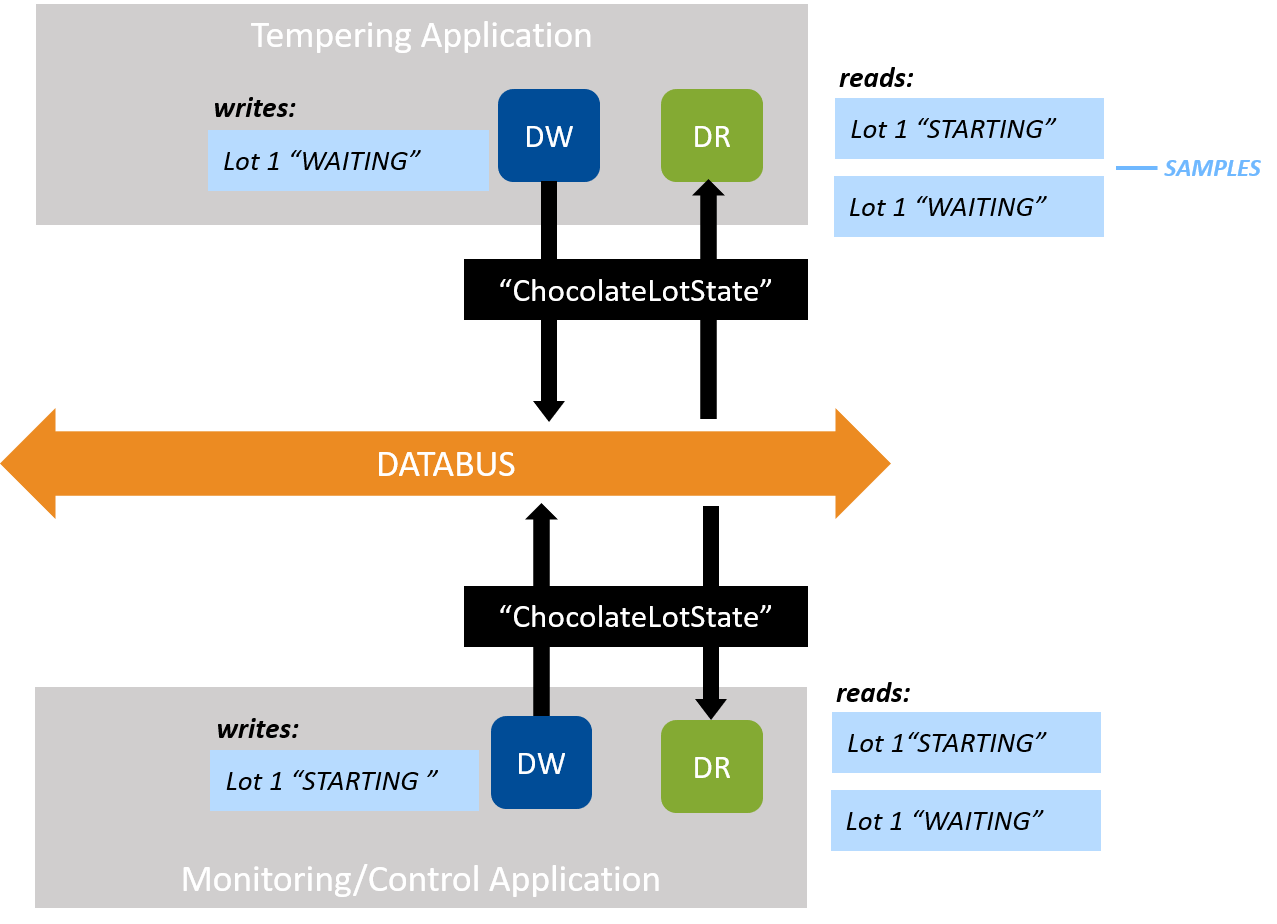
Figure 4.6 Notice that both DataWriters are communicating with both DataReaders
(Actually, the DataReader in the Tempering application only cares about the chocolate lot state if the next station is itself. Right now, the code tells that DataReader to ignore any next station state that isn’t the Tempering application, but later we will use content filtering to do this instead.)
Note
Figure 4.5 and Figure 4.6 demonstrate that it doesn’t matter where the matching DataWriters and DataReaders are. They could be in the same application or different applications. As long as they match in Topic and Quality of Service (more on Basic QoS later), they can communicate.
4.3.1. Build the Applications
In this exercise, you’ll be working in the directory
4_keys_instances/csharp. This directory was created when you cloned the
getting started repository from GitHub in the first module, in Clone Repository.
Unlike the previous examples where we built a single application, this
directory contains a solution (KeysInstances.sln) made of three C# projects:
MonitoringCtrlApplication/MonitoringCtrlApplication.csprojTemperingApplication/TemperingApplication.csprojChocolateFactoryTypes/ChocolateFactoryTypes.csproj
The first two build an application each, and reference the third one, which
builds a library with the types we will generate from chocolate_factory.idl.
Run the Code Generator (rtiddsgen) to generate the C# code for the IDL file:
$ cd 4_keys_instances
$ rtiddsgen -language c# -d csharp/ChocolateFactoryTypes chocolate_factory.idl
$ cd 4_keys_instances
$ rtiddsgen -language c# -d csharp/ChocolateFactoryTypes chocolate_factory.idl
> cd 4_keys_instances
> rtiddsgen -language c# -d csharp/ChocolateFactoryTypes -ppDisable chocolate_factory.idl
-ppDisabledisables the preprocessor. It is necessary for running rtiddsgen on a Windows system if the preprocessor is not in your path. You can only use-ppDisableif your IDL is simple, as it is here—otherwise you must add the preprocessor to your path. See Command-Line Arguments for rtiddsgen, in the RTI Connext DDS Code Generator User’s Manual if you want more information.We’re generating the code in the
csharp/ChocolateFactoryTypesdirectory, which already contains a project file (ChocolateFactoryTypes.csproj) that will compile the types as a .NET library.For more information, see Run Code Generator in the previous example.
Configure the NuGet package source.
In this exercise the
rtiddsgencommand we just ran only generates the type files, not the project files orNuGet.Config. In order to havedotnetfind the Connext package, you have two options:Copy the NuGet.Config file that you generated in the previous exercise from
2_hello_world/csharpor3_streaming_data/csharpto4_keys_instances/csharp, or
Configure NuGet globally by running the following command:
$ dotnet nuget add source <installdir>/lib/dotnet --name RTI
If you don’t configure the package source, the package will be fetched from nuget.org (which requires a license to run).
Using the dotnet CLI from
4_keys_instances/csharp, enter:$ dotnet build
These application projects are configured to build .NET 5 applications. If you want to build, for example, .NET Core 3.1 applications, edit
MonitoringCtrlApplication.csprojandTemperingApplication.csprojand change<TargetFramework>net5</TargetFramework>to<TargetFramework>netcoreapp3.1</TargetFramework>.
4.3.2. Run Multiple Copies of the Tempering Application
For now, we will focus on visualizing the Tempering application’s instances. Run multiple copies of the Tempering application. Be sure to specify different sensor IDs at the command line:
Open a terminal window and run the Tempering application with a sensor ID as a parameter:
$ dotnet run --project TemperingApplication -- --sensor-id 1
Open a second terminal window and run the Tempering application with a different sensor ID as a parameter:
$ dotnet run --project TemperingApplication -- --sensor-id 2
Note
You should run from the 4_keys_instances/csharp directory because
the examples use Quality of Service (QoS) information from the file
USER_QOS_PROFILES.xml in that directory. We’ll talk more about
QoS in a later module.
Note that --project TemperingApplication tells dotnet to run
the project in the TemperingApplication directory. Arguments
to the application (--sensor-id 2) are specified
after --.
You should see output similar to the following in both windows:
ChocolateTemperature Sensor with ID: 1 starting
Waiting for lot
Waiting for lot
Waiting for lot
Waiting for lot
Waiting for lot
Waiting for lot
Waiting for lot
Waiting for lot
4.3.3. View the Data in Admin Console
Make sure your two Tempering applications from the previous step are still running.
Like you did in Hands-On 2: Viewing Your Data, open up Admin Console and switch to the Data Visualization Perspective.
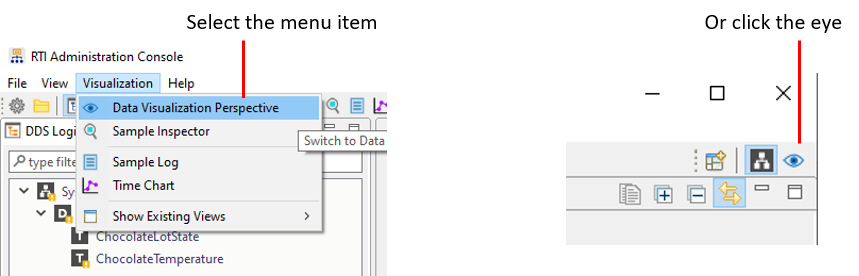
(If the Data Visualization Perspective is grayed out, you may already be in that view.)
Select the “ChocolateTemperature” Topic in the Logical View:
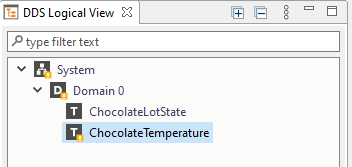
Note
Don’t worry about the warnings. We’ll look at those in Hands-On 4: Debugging the System and Completing the Application.
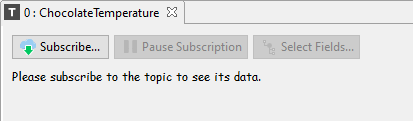
Select the Topic Data tab at the bottom of the window.

Subscribe to the “ChocolateTemperature” Topic.
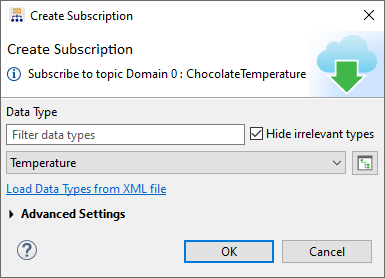
Click the Subscribe button:
Then click OK:
View the samples coming in.
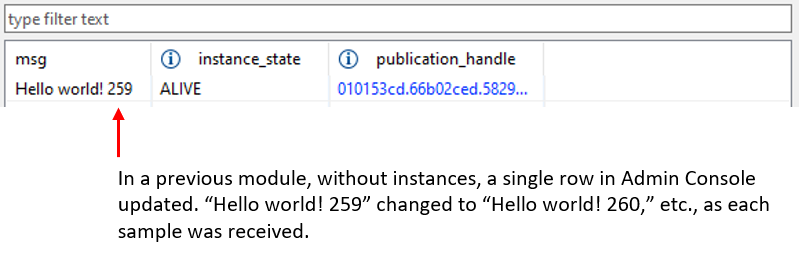
Recall that in the “Hello World” hands-on exercise, we did not yet have instances. Every sample updated in a single row in Admin Console:
With instances, however, you see multiple rows in Admin Console:
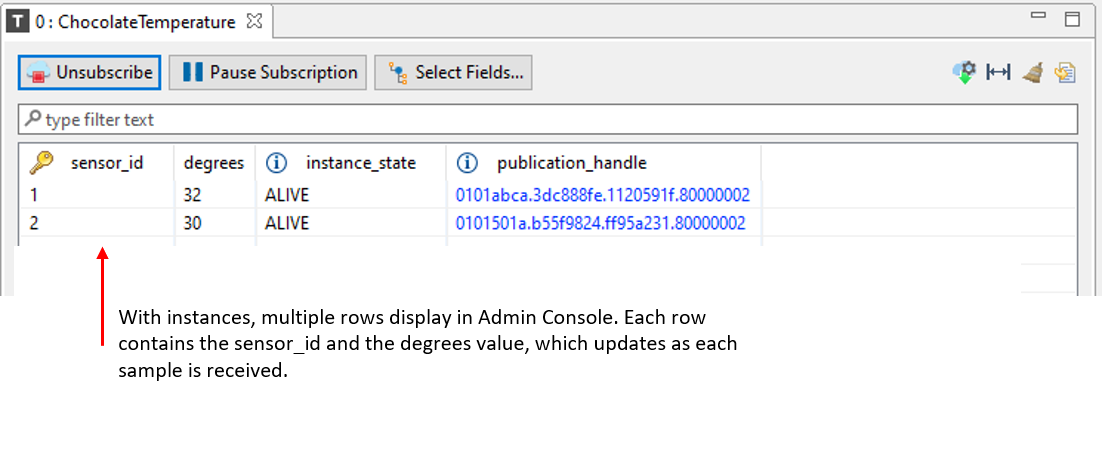
Figure 4.7 Since
sensor_idis a key field for the ChocolateTemperature data type, Admin Console understands that every sample is an update to a particularsensor_idinstance. Therefore, Admin Console can display each instance separately, and you can see the degrees value from each sensor displayed separately.Admin Console can show you one row per instance because it recognizes each instance as a different object.
Click Unsubscribe.
In Hands-On 4: Debugging the System and Completing the Application, we will debug your system using Admin Console. We do not want Admin Console subscribing to any data for that exercise.
4.4. Hands-On 2: Run Both Applications
4.4.1. Run Monitoring and Tempering Applications
In the previous hands-on, you ran multiple copies of the tempering application—quit them now if they’re still running.
From any command prompt window, run the Monitoring/Control application, which you already built in Build the Applications:
$ dotnet run --project MonitoringCtrlApplication
You should see output like the following:
Starting lot:
[lot_id: 0 next_station: TEMPERING_CONTROLLER]

Starting lot:
[lot_id: 1 next_station: TEMPERING_CONTROLLER]
Received lot update:
[lot_id: 1, station: INVALID_CONTROLLER, next_station: TEMPERING_CONTROLLER, lot_status: WAITING]

Starting lot:
[lot_id: 2 next_station: TEMPERING_CONTROLLER]
Received lot update:
[lot_id: 2, station: INVALID_CONTROLLER, next_station: TEMPERING_CONTROLLER, lot_status: WAITING]
This output shows the two things that the Monitoring/Control application is doing:
Starts the chocolate lots by writing a sample, which indicates that the next station is the TEMPERING_CONTROLLER. This line shows the application in its control capacity (“I’m starting the lot”):
Starting lot:
[lot_id: 1 next_station: StationKind::TEMPERING_CONTROLLER]
Reads the current state of the chocolate lot and prints that to the console. This line shows the application in its monitoring capacity (“right now, the lot is starting”).
[lot_id: 1, station: StationKind::INVALID_CONTROLLER , next_station:
StationKind::TEMPERING_CONTROLLER , lot_status:
LotStatusKind::WAITING ]
Since the Monitoring/Control application is the only application running right now, the lots will always be WAITING. In the next step, this will change when you start the Tempering application.
In your other command prompt window, run the Tempering application with a sensor ID as a parameter:
$ dotnet run --project TemperingApplication -- --sensor-id 1
You should see output like the following:
Waiting for lot
ChocolateTemperature Sensor with ID: 1 starting
Processing lot #16
Waiting for lot
Waiting for lot
Processing lot #17
Waiting for lot
Waiting for lot
Processing lot #18
Note
You may notice that the Monitoring/Control application starts with lot #0, but the Tempering application’s DataReader does not receive notifications about lot #0, or any lots from before it starts up. We will talk about this more when we talk about the Durability QoS in Basic QoS.
Review the output of the Monitoring/Control application now that you have started the Tempering application. You can see that the lot states changed to “PROCESSING” at the tempering station:
Starting lot:
[lot_id: 16 next_station: StationKind::TEMPERING_CONTROLLER ]
Received Lot Update:
[lot_id: 16, station: StationKind::INVALID_CONTROLLER , next_station:
StationKind::TEMPERING_CONTROLLER , lot_status:
LotStatusKind::WAITING ]
Received Lot Update:
[lot_id: 16, station: StationKind::TEMPERING_CONTROLLER ,
next_station: StationKind::INVALID_CONTROLLER , lot_status:
LotStatusKind::PROCESSING ]

Starting lot:
[lot_id: 17 next_station: StationKind::TEMPERING_CONTROLLER ]
Received Lot Update:
[lot_id: 17, station: StationKind::INVALID_CONTROLLER , next_station:
StationKind::TEMPERING_CONTROLLER , lot_status:
LotStatusKind::WAITING ]
Received Lot Update:
[lot_id: 17, station: StationKind::TEMPERING_CONTROLLER ,
next_station: StationKind::INVALID_CONTROLLER , lot_status:
LotStatusKind::PROCESSING ]
Quit both applications.
4.4.2. Review the Tempering Application Code
This code is significantly more complex than the previous examples,
because we are starting to build applications that are closer to
real-world applications, with multiple DataWriters and DataReaders.
Let’s start by examining the TemperingApplication.cs code.
Some of this file should look familiar to you. This application is
writing temperature data in the PublishTemperature method. Even
though a real tempering machine would raise the temperature of chocolate
and then lower it to around freezing, in this example we’re
just sending a “temperature” that’s close to freezing (in Fahrenheit).
private void PublishTemperature(
    DataWriter<Temperature> writer,
    string sensorId)
{
    // Create temperature sample for writing
    var temperature = new Temperature();
    while (!shutdownRequested)
    {
        // Modify the data to be written here
        temperature.sensor_id = sensorId;
        temperature.degrees = rand.Next(30, 33); // Random value between 30 and 32

        writer.Write(temperature);

        Thread.Sleep(100);
    }
}
Now take a look at the ProcessLot method. This looks similar to the
ProcessData methods you have seen in the previous hands-on exercises.
However, this function takes both a DataWriter and a DataReader instead
of just a DataReader. This function calls Take() to retrieve data from
the DataReader’s queue just like we did in the previous hands-on
exercises. However, after taking that data, it updates the state of the
lot to PROCESSING. In this example, instead of actually processing the lot,
we’re going to sleep for 5 seconds to represent the processing.
// Take all samples. Samples are loaned to application, loan is
// returned when LoanedSamples is Disposed. ValidData iterates only over
// samples such that sample.Info.ValidData is true.
using var samples = lotStateReader.Take();
foreach (var sample in samples.ValidData())
{
      if (sample.next_station == StationKind.TEMPERING_CONTROLLER)
      {
         Console.WriteLine("Processing lot #" + sample.lot_id);

         // Send an update that the tempering station is processing lot
         var updatedState = new ChocolateLotState(sample)
         {
            lot_status = LotStatusKind.PROCESSING,
            next_station = StationKind.INVALID_CONTROLLER,
            station = StationKind.TEMPERING_CONTROLLER
         };
         lotStateWriter.Write(updatedState);

         // "Processing" the lot.
         Thread.Sleep(5000);

         // Exercise #3.1: Since this is the last step in processing,
         // notify the monitoring application that the lot is complete
         // using a dispose
      }
}
4.5. Hands-On 3: Dispose the ChocolateLotState
The Tempering application will use the NOT_ALIVE_DISPOSED instance state to indicate that a chocolate lot has finished processing.
4.5.1. Add Code to Tempering Application to Dispose ChocolateLotState
Add a call to DisposeInstance() for the ChocolateLotState data in the
Tempering application, since it is the last step in the chocolate factory.
In
TemperingApplication.cs, find the comment:// Exercise #3.1: Since this is the last step in processing, // notify the monitoring application that the lot is complete // using a dispose
Add the following code after the comment to dispose the ChocolateLotState:
lotStateWriter.DisposeInstance(
   lotStateWriter.LookupInstance(updatedState));
Console.WriteLine("Lot completed");
4.5.2. Detect the Dispose in the Monitoring Application
Open MonitoringCtrlApplication.cs to look at the Monitoring/Control
application. Note that it does two things right now:
Kicks off processing chocolate lots, by sending the first update to the “ChocolateLotState” Topic. Since we are skipping all the ingredient station steps (for now) in this example, the Monitoring/Control application sends the lot directly to wait at the tempering machine, as you can see in the
publish_start_lotfunction:private void PublishStartLot( DataWriter<ChocolateLotState> writer, uint lotsToProcess) { ... sample.lot_id = count % 100; sample.lot_status = LotStatusKind.WAITING; sample.next_station = StationKind.TEMPERING_CONTROLLER; Console.WriteLine("Starting lot:"); Console.WriteLine($"[lot_id: {sample.lot_id} next_station: {sample.next_station}]"); writer.Write(sample); ... }
Monitors the lot state, and prints out the current state of the lots, as you can see in the
monitor_lot_statefunction:private int MonitorLotState(DataReader<ChocolateLotState> reader) { int samplesRead = 0; using var samples = reader.Take(); foreach (var sample in samples) { Console.WriteLine("Received Lot Update: "); if (sample.Info.ValidData) { Console.WriteLine(sample.Data); samplesRead++; } else { // Exercise #3.2: Detect that a lot is complete by checking for // the disposed state. } } return samplesRead; }
Add code to check the instance state and print the ID of the completed lot:
In
MonitoringCtrlApplication.cs, in theMonitorLotStatemethod, find the comment:// Exercise #3.2: Detect that a lot is complete by checking for // the disposed state.
Add the following code after the comment:
if (sample.Info.State.Instance == InstanceState.NotAliveDisposed)
{
   // Create a sample to fill in the key values associated
   // with the instance
   var keyHolder = new ChocolateLotState();
   reader.GetKeyValue(keyHolder, sample.Info.InstanceHandle);
   Console.WriteLine($"[lot_id: {keyHolder.lot_id} is completed]");
}
The code you just added:
Checks that the instance state was NOT_ALIVE_DISPOSED.
Creates a temporary ChocolateLotState object, and passes it to
reader.GetKeyValue()to get the value of the key fields associated with the instance handle.Prints out the ID of the lot that is completed.
4.5.3. Run the Applications
In one command terminal:
$ dotnet run --project MonitoringCtrlApplication
In another terminal:
$ dotnet run --project TemperingApplication -- --sensor-id 1
You should see the following output from the Tempering application:
Waiting for lot
Processing lot #1
Lot completed
Waiting for lot
Waiting for lot
Processing lot #2
Lot completed
You should see the following output from the Monitoring/Control application:
Starting lot:
[lot_id: 1 next_station: StationKind::TEMPERING_CONTROLLER ]
Received Lot Update:
[lot_id: 1, station: StationKind::INVALID_CONTROLLER , next_station:
StationKind::TEMPERING_CONTROLLER , lot_status:
LotStatusKind::WAITING ]
Received Lot Update:
[lot_id: 1, station: StationKind::TEMPERING_CONTROLLER ,
next_station: StationKind::INVALID_CONTROLLER , lot_status:
LotStatusKind::PROCESSING ]
Received Lot Update:
[lot_id: 1 is completed]

Starting lot:
[lot_id: 2 next_station: StationKind::TEMPERING_CONTROLLER ]
Received Lot Update:
[lot_id: 2, station: StationKind::INVALID_CONTROLLER , next_station:
StationKind::TEMPERING_CONTROLLER , lot_status:
LotStatusKind::WAITING ]
Received Lot Update:
[lot_id: 2, station: StationKind::TEMPERING_CONTROLLER ,
next_station: StationKind::INVALID_CONTROLLER , lot_status:
LotStatusKind::PROCESSING ]
Received Lot Update:
[lot_id: 2 is completed]
Notice that when we first ran the Monitoring/Control application, we saw WAITING and PROCESSING statuses. Now we also see a “completed” status. The “completed” status occurs because we added the code to dispose the instance in the Tempering application and because we checked for the disposed status in the Monitoring/Control application.
4.6. Hands-On 4: Debugging the System and Completing the Application
This hands-on is not specific to using instances, but it will make you more familiar with how to create multiple DataReaders and DataWriters in an application. This will help you as you continue with upcoming modules, and the exercises become more complex.
4.6.1. Debug in Admin Console
So far, we have only used Admin Console for data visualization. Now we will use it for system debugging.
Make sure your applications (monitoring_ctrl_application and tempering_application) are running.
Like you did in Hands-On 2: Viewing Your Data, in the first module, open up the Admin Console tool.
Click Unsubscribe if you haven’t already in Hands-On 1.
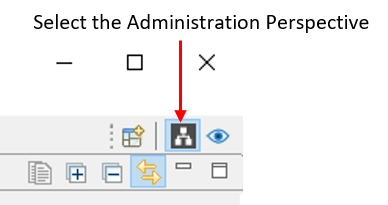
Choose the Administration Perspective toolbar icon in the top right corner of the window.
You should see a Logical View pane in the upper left.
Notice that one of your Topics has a warning:
Click on the Topic with a warning, and you should see a visualization of that Topic and DataWriter in the main window:
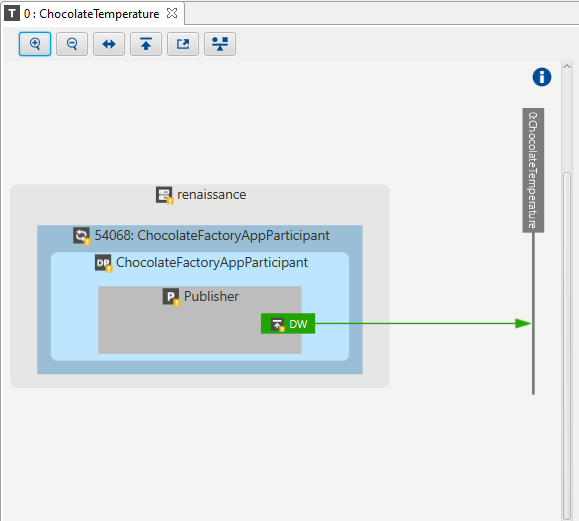
Hover your mouse over the writer (DW). You should see this warning message:
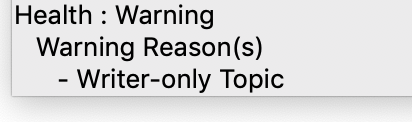
The reason for this warning is because there are no DataReaders reading the “ChocolateTemperature” Topic.
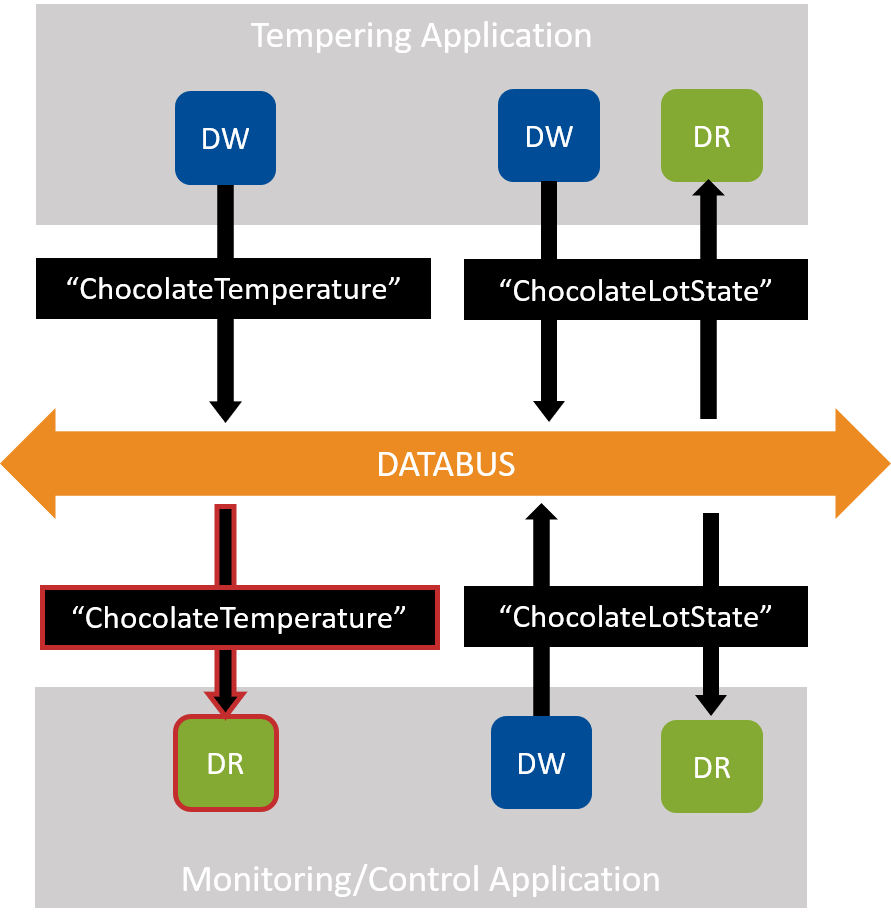
Figure 4.8 Using Admin Console, we identified that the DataReader for the “ChocolateTemperature” Topic is missing from the Monitoring/Control Application.
If you look more carefully at the code in
MonitoringCtrlApplication.cs, you’ll see that although the Monitoring/Control application reads and writes to the “ChocolateLotState” Topic, it never creates a DataReader to read the “ChocolateTemperature” Topic!If you want more information about System Visualization in Admin Console, see System Visualization in the Admin Console User’s Manual.
Quit the applications.
4.6.2. Add the ChocolateTemperature DataReader
In this exercise, you will add the missing DataReader.
First, review the RunExample function in
MonitoringCtrlApplication.cs. Notice that it uses a single
DomainParticipant to create a Publisher and a Subscriber. (See
Publishers, Subscribers, and DomainParticipants.)
DomainParticipant participant = DomainParticipantFactory.Instance
    .CreateParticipant(domainId);

...
// A Publisher allows an application to create one or more DataWriters
// Publisher QoS is configured in USER_QOS_PROFILES.xml
Publisher publisher = participant.CreatePublisher();

...
// A Subscriber allows an application to create one or more DataReaders
// Subscriber QoS is configured in USER_QOS_PROFILES.xml
Subscriber subscriber = participant.CreateSubscriber();
In the following steps, you’re going to add a second DataReader to the Monitoring/Control application that reads the ChocolateTemperature Topic. In Hands-On 2: Add a Second DataWriter (in Section 3), you used a single Publisher to create multiple DataWriters. In this example, you will use a single Subscriber to create multiple DataReaders.
To add a second DataReader to the Monitoring/Control application:
Create a “ChocolateTemperature” Topic that the DataReader will be reading. (Right now, this application only has the “ChocolateLotState” Topic defined, so you must add a “ChocolateTemperature” Topic to be used by the new DataReader.)
In
MonitoringCtrlApplication.cs, find this comment in the code:// Exercise #4.1: Add a Topic for Temperature to this applicationAdd the following code immediately after that comment to create a “ChocolateTemperature” Topic, which uses the Temperature data type:
Topic<Temperature> temperatureTopic = participant.CreateTopic<Temperature>(
      CHOCOLATE_TEMPERATURE_TOPIC.Value);
Tip
It is a best practice to use a variable defined inside the IDL file while creating the Topic instead of passing a string literal. Using a variable ensures that our Topic names are identical in our applications. (Recall that if they’re not identical, our DataWriter and DataReader won’t communicate.) It is convenient to use the IDL file to define the variable, since the IDL file is used by all of our applications. Here is what the Topic name looks like in the IDL file, which can be found in the
4_keys_instancesdirectory:const string CHOCOLATE_TEMPERATURE_TOPIC = "ChocolateTemperature";
Recall that one data type can be associated with several Topic names. Therefore, you may be defining more Topic names than data types in your IDL.
Add a new DataReader.
Now that we have a “ChocolateTemperature” Topic, we can add a new DataReader. Find this comment in the code:
// Exercise #4.2: Add a DataReader for Temperature to this applicationRemember from Details of Receiving Data (in Section 2) that the StatusCondition defines a condition we can attach to a WaitSet. The WaitSet will wake when the StatusCondition becomes true.
Add a new temperature DataReader and set up its StatusCondition by adding this code immediately after the comment:
DataReader<Temperature> temperatureReader =
      subscriber.CreateDataReader(temperatureTopic);

// Obtain the DataReader's Status Condition
StatusCondition temperatureStatusCondition = temperatureReader.StatusCondition;

// Enable the 'data available' status.
temperatureStatusCondition.EnabledStatuses = StatusMask.DataAvailable;

// Associate a handler with the status condition. This will run when the
// condition is triggered, in the context of the dispatch call (see below)
temperatureStatusCondition.Triggered += _ => MonitorTemperature(temperatureReader);
Associate the new DataReader’s status condition with the WaitSet. Find this comment in the code:
// Exercise #4.3: Add the new DataReader's StatusCondition to the WaitsetAdd this line below the comment:
waitset.AttachCondition(temperatureStatusCondition);
Add a function that processes the temperature data and prints a message if it ever exceeds 32 degrees. Find this comment in the code:
// Exercise #4.4: Add monitor_temperature functionAdd the following function to print out a message if the temperature exceeds 32 degrees immediately after that comment:
private void MonitorTemperature(DataReader<Temperature> reader)
{
    using var samples = reader.Take();
    foreach (var data in samples.ValidData())
    {
        // Receive updates from tempering station about chocolate temperature.
        // Only an error if over 32 degrees Fahrenheit.
        if (data.degrees > 32)
        {
            Console.WriteLine("Temperature high: " + data);
        }
    }
}
4.6.3. Run the Applications
Recompile and run the Tempering and Monitoring/Control applications again.
Notice that Admin Console no longer shows a warning, because the Monitoring/Control application now has a DataReader that is reading the “ChocolateTemperature” Topic that the Tempering application is writing.
Note
We’ve intentionally written the applications in a way that you won’t actually see temperature output printed to the console, to keep the code simpler, but we’ll change this in a later exercise.
Congratulations! In this module, you have learned to do the following:
Change an instance’s state to NOT_ALIVE_DISPOSED.
Get notified of the state change.
Debug your system using Admin Console.
Add a new DataReader to an application.
4.7. Next Steps
Next we will look at how to configure the behavior of your DataWriters and DataReaders using Quality of Service.