2. Publish/Subscribe
Prerequisites |
|
Time to complete |
30 minutes |
Concepts covered in this module |
|
The most basic communication pattern supported by RTI® Connext® is the publish/subscribe model. Publish/Subscribe is a communications model where data producers “publish” data and data consumers “subscribe” to data. These publishers and subscribers don’t need to know about each other ahead of time; they discover each other dynamically at runtime. The data they share is described by a “topic,” and publishers and subscribers send and receive data only for the topics they are interested in. In this pattern, many publishers may publish the same topic, and many subscribers may subscribe to the same topic. Subscribers receive data from all of the publishers that they share a topic with. Publishers send data directly to subscribers, with no need for a broker or centralized application to mediate communications.
2.1. Introduction to DataWriters, DataReaders, and Topics
In DDS, the objects that actually publish data are called DataWriters, and the objects that subscribe to data are DataReaders. DataWriters and DataReaders are associated with a single Topic object that describes that data. (DDS also has Publisher and Subscriber objects, but we will talk about them later.) An application typically has a combination of DataWriters and DataReaders.
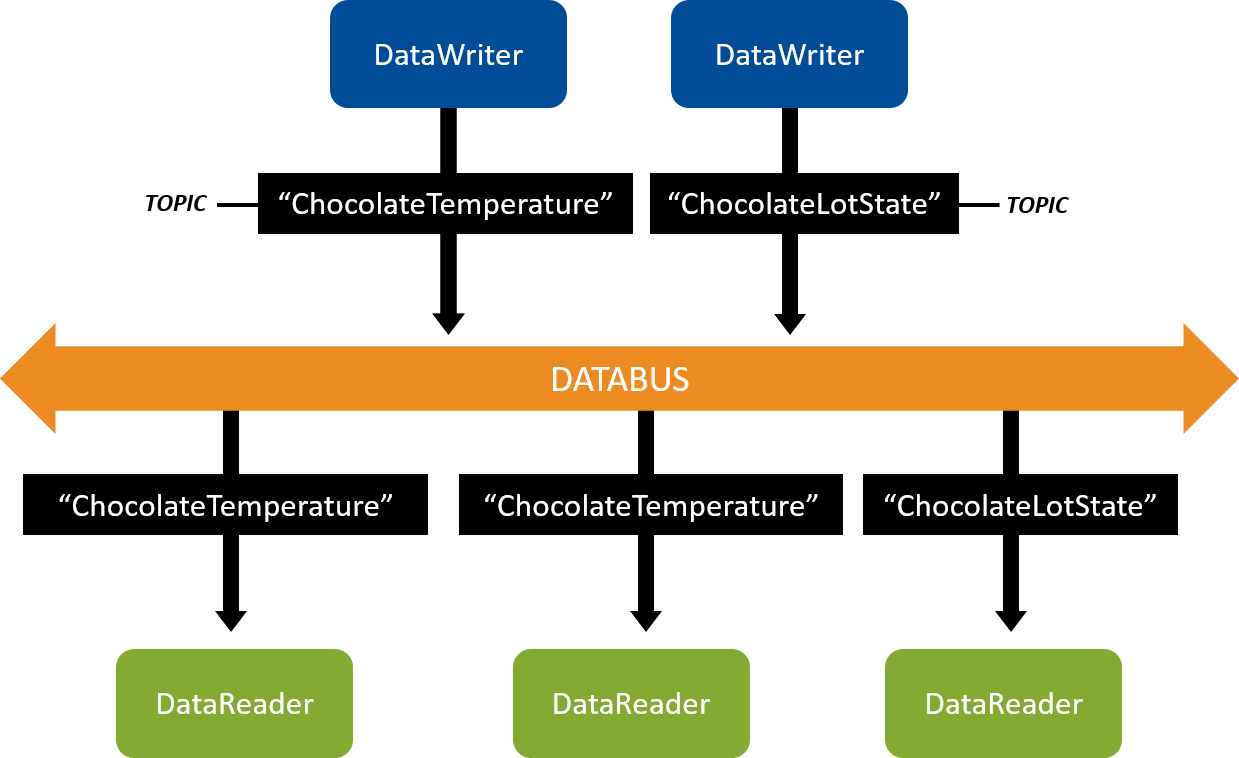
Figure 2.1 DataWriters write data and DataReaders read data of a Topic. DataWriters of the “ChocolateTemperature” Topic communicate with DataReaders of the “ChocolateTemperature” Topic. DataWriters of the “ChocolateLotState” Topic communicate with DataReaders of the “ChocolateLotState” Topic.
In a chocolate factory, for example, there might be a sensor that measures and publishes the current temperature of the tempering machine. Other applications monitor the temperature by subscribing to it. In this example, your Topic might be “ChocolateTemperature.” The sensor’s DataWriter will be associated with the “ChocolateTemperature” Topic. In a similar way, other DataWriters and DataReaders share different types of data using additional Topics.
Connext is responsible for discovering DataWriters and DataReaders in a system, checking if they have a matching Topic (and compatible quality of service, which we will discuss later) and then providing the communication between those DataWriters and DataReaders. Logically, this means you can visualize your applications as having DataWriters and DataReaders that connect to a “databus,” because your applications are not specifying exactly which other applications they communicate with – they only specify which Topics they read from and write to the databus, and Connext sets up the communication. Note that there is no “databus” object in your system – it is a logical way to visualize systems in which you don’t have to configure each communication path.
2.2. Hands-On 1: Your First DataWriter and DataReader
We are going to start with a simple “Hello World” application to show how to use the code generator, and how to create a DataWriter and a DataReader.
Tip
By the end of this exercise, a publishing application will send data,
and a subscribing application will receive and print it to the console
using Console.WriteLine().
2.2.1. Clone Repository
Get the files you need to perform the hands-on exercises.
Note
Always use the version of the examples that matches your Connext release.
By default, the GitHub repository branch is set to master, which is
always the latest release. If your version of Connext is not the latest
release, select the release version you want, such as release/<version>.
Do one of the following:
Download the repository as a Zip file from the repository webpage here, for your desired release (e.g.,
release/<version>).
Clone the repository from GitHub.
Use the following command:
$ git clone https://github.com/rticommunity/rticonnextdds-getting-started.git$ git clone https://github.com/rticommunity/rticonnextdds-getting-started.git> git clone https://github.com/rticommunity/rticonnextdds-getting-started.gitCheck out the desired release. For example:
$ git checkout release/<version>$ git checkout release/<version>> git checkout release/<version>
2.2.2. Set Up Environment Variables
The RTI Code Generator tool is located in <installdir>/bin/rtiddsgen
(<installdir> refers to the installation directory for Connext).
To follow the instructions in the coming sections, add <installdir>/bin
to your path.
Open a command prompt window, if you haven’t already.
Add
<installdir>/bin/to your path.
$ export PATH=${PATH}:<installdir>/bin
$ export PATH=${PATH}:<installdir>/bin
> set PATH=%PATH%;<installdir>\bin
When a directory name has a space, enclose the path in quotation marks.
For example: "C:\Program Files\rti_connext_dds-<version>\bin".
2.2.3. Run Code Generator
Inside the repository you have cloned, there is a directory named
2_hello_world, which contains the HelloWorld type definition in a file
named hello_world.idl.
Open
hello_world.idlto see the definition for our HelloWorld type:// Hello world! struct HelloWorld { // String with maximum length of 256 characters string<256> msg; };This language-independent interface is written in IDL, the Interface Definition Language. IDL allows you to declare data types used for communication (we’ll cover this more in Data Types). Connext includes a code generator that translates from this language-independent data type into code specific for your language. The generated code serializes and deserializes your data into and out of a network format.
From a terminal or command prompt, run rtiddsgen, which runs the code generator on
hello_world.idl:$ cd 2_hello_world $ rtiddsgen -language c# -example net5 -d csharp hello_world.idl$ cd 2_hello_world $ rtiddsgen -language c# -example net5 -d csharp hello_world.idl> cd 2_hello_world > rtiddsgen -language c# -example net5 -d csharp -ppDisable hello_world.idl
-ppDisabledisables the preprocessor. It is necessary for running rtiddsgen on a Windows system if the preprocessor is not in your path. You can only use-ppDisableif your IDL is simple, as it is here—otherwise you must add the preprocessor to your path. See Command-Line Arguments for rtiddsgen, in the RTI Code Generator User’s Manual if you want more information.
If you haven’t configured your path as described in Set Up Environment Variables, run<install dir>/bin/rtiddsgen.
-example net5generates an example .NET 5 publisher and subscriber application.
-d csharpspecifies the directory where the code will be generated.
Open the
csharpdirectory to review the code.
2.2.3.1. Overview of Generated and Example Code
The code you just generated includes the files in Table 2.1,
in the csharp directory. Some of the files are generated by rtiddsgen, some
came from the GitHub repository you cloned.
Files |
Description |
|---|---|
|
The C# definition of your data type, and the code used to serialize and deserialize it (convert it to a format for the network). This is the type-specific code that will be used in your real application. |
|
Example code you can read and modify. These files will compile as a
.NET application that can run as a publisher or as a subscriber.
These files were generated because you specified |
|
Used to build and run your application. |
|
Configuration file for Quality of Service (to be discussed more later). This file came from the repository you cloned. |
2.2.4. Open/Modify Publishing Application
To browse the code with IntelliSense (auto-completion) and inline API documentation you can use Visual Studio Code (with the C# extension by Microsoft), Visual Studio 2019, or Visual Studio for Mac.
To browse the code in Visual Studio Code, open the 2_hello_world/csharp folder:
$ code 2_hello_world/csharp
To use Visual Studio or Visual Studio for Mac, double-click on
hello_world.csproj or open it from the IDE.
Once you’ve opened the source code in your IDE of choice:
Open
hello_worldPublisher.csThis snippet shows how to create a Topic (with a name and data type) and create a DataWriter for that Topic:
// A Topic has a name and a datatype.
Topic<HelloWorld> topic = participant.CreateTopic<HelloWorld>(
    "Example HelloWorld");

// A Publisher allows an application to create one or more DataWriters
// Publisher QoS is configured in USER_QOS_PROFILES.xml
Publisher publisher = participant.CreatePublisher();

// This DataWriter will write data on Topic "Example HelloWorld"
// DataWriter QoS is configured in USER_QOS_PROFILES.xml
DataWriter<HelloWorld> writer = publisher.CreateDataWriter(topic);
Change the Topic name from “Example HelloWorld” to “HelloWorld Topic”:
Topic<HelloWorld> topic = participant.CreateTopic<HelloWorld>(
    "HelloWorld Topic");
Modify the code to send the message “Hello world!” with a count.
The following snippet shows how to write a HelloWorld update using the DataWriter’s write method.
In the for loop in the snippet, add the highlighted line, just after the comment
// Modify the data to be written here. This will set sample.msg to “Hello world!” with a count:var sample = new HelloWorld(); for (int count = 0; count < sampleCount; count++) { // Modify the data to be written here sample.msg = $"Hello World! {count}"; Console.WriteLine($"Writing HelloWorld, count {count}"); writer.Write(sample); Thread.Sleep(1000); }Recall that your “HelloWorld Topic” describes your data. This Topic is associated with the data type HelloWorld, which is defined in the IDL file (see Run Code Generator). The data type HelloWorld contains a string field named msg. In this step, you have just added code to set a value for the msg field. Now, when the DataWriter writes data, the msg field in the data will contain the string “Hello world! 1”, “Hello world! 2”, etc.
Definition
A sample is a single update to a Topic, such as “Hello world! 1”. Every time an application calls
Write(), it is “writing a sample.” Every time an application receives data, it is “receiving a sample.”Note that samples don’t necessarily overwrite each other. For example, if you set up a Reliable Quality of Service (QoS) with a History kind of KeepAll, all samples will be saved and accumulate. You can find more details in Basic QoS.
2.2.5. Open/Modify Subscribing Application
The subscriber application also creates a Topic.
Open
hello_worldSubscriber.cs:This snippet shows how to create a Topic (with a name and data type) and create a DataReader for that Topic:
// A Topic has a name and a datatype. Create a Topic named
// "HelloWorld Topic" with type HelloWorld
Topic<HelloWorld> topic = participant.CreateTopic<HelloWorld>(
    "Example HelloWorld");

// A Subscriber allows an application to create one or more DataReaders
// Subscriber QoS is configured in USER_QOS_PROFILES.xml
Subscriber subscriber = participant.CreateSubscriber();

// This DataReader reads data on Topic "Example HelloWorld".
// DataReader QoS is configured in USER_QOS_PROFILES.xml
DataReader<HelloWorld> reader = subscriber.CreateDataReader(topic);
Change the Topic name from “Example HelloWorld” to “HelloWorld Topic”, just as you did in the publishing application.
Note
The Topic names must match between the publishing and subscribing applications for the DataWriter and DataReader to communicate.
Topic<HelloWorld> topic = participant.CreateTopic<HelloWorld>(
    "HelloWorld Topic");
2.2.5.1. Details of Receiving Data
You don’t need to make any changes here, but look at the
HelloWorldSubscriber.cs code to see how it receives data. The
DataReader is being notified of new data using an object called a WaitSet:
// Create a WaitSet and attach the StatusCondition
var waitset = new WaitSet();
waitset.AttachCondition(statusCondition);
while (samplesRead < sampleCount)
{
    // Dispatch will call the handlers associated to the WaitSet
    // conditions when they activate
    Console.WriteLine("HelloWorld subscriber sleeping for 4 sec...");
    waitset.Dispatch(Duration.FromSeconds(4));
}
This WaitSet object is a way for the application to sleep until some
“condition” becomes true. When the application calls
waitset.Dispatch(Duration.FromSeconds(4)), it will sleep for up to the
duration time (4 seconds in this example), unless it is woken up due to
a condition becoming true.
There are multiple types of conditions that you can attach to a WaitSet, but this example shows a StatusCondition. Here is the code for the StatusCondition:
// Obtain the DataReader's Status Condition
StatusCondition statusCondition = reader.StatusCondition;

// Enable the 'data available' status.
statusCondition.EnabledStatuses = StatusMask.DataAvailable;

// Associate an event handler with the status condition.
// This will run when the condition is triggered, in the context of
// the dispatch call (see below)
int samplesRead = 0;
statusCondition.Triggered += _ => samplesRead += ProcessData(reader);
In this example, we are saying that we are interested in waking up when the “data available” status becomes true. This means that when data arrives:
The reader’s
DataAvailablestatus becomes trueThe application is woken up from the
DispatchcallThe
Triggeredevent handler is called
A closer look at ProcessData, called by the event handler:
private static int ProcessData(DataReader<HelloWorld> reader)
{
    // Take all samples. Samples are loaned to application, loan is
    // returned when the samples variable is Disposed.
    int samplesRead = 0;
    using (var samples = reader.Take())
    {
        foreach (var sample in samples)
        {
            if (sample.Info.ValidData)
            {
                Console.WriteLine(sample.Data);
                samplesRead++;
            }
        }
    }

    return samplesRead;
}
This code calls reader.Take(), which removes any available samples out
of the DataReader queue, and returns them in a collection. If data is
arriving quickly, it is likely this collection will contain multiple
samples. In this example, the sample’s data is being printed to the
screen with Console.WriteLine.
2.2.6. Compile Your Changes
Now that you have made changes to both the publisher and subscriber code, compile
the code with your modifications. From 2_hello_world/csharp run:
$ dotnet build
You can also build the code from Visual Studio Code, Visual Studio, and
Visual Studio for Mac. This guide will use the dotnet command-line interface
to build and run the applications.
2.2.7. Run the Applications
From within the
2_hello_world/csharpdirectory, enter the following:$ dotnet run -- --pubNote
You must be in the
2_hello_world/csharpdirectory when you run the previous command. Or if you opened the project in Visual Studio, make sure the current working directory is set to the full path to2_hello_world/csharp. The examples use Quality of Service (QoS) information from the fileUSER_QOS_PROFILES.xmlin the2_hello_world/csharpdirectory. We’ll talk more about QoS in a later module.You should see this in the window for the publisher:
Writing HelloWorld, count 1
Writing HelloWorld, count 2
Writing HelloWorld, count 3
Writing HelloWorld, count 4
...
Open another command prompt window, and from within the
2_hello_world/csharpdirectory, enter the following:$ dotnet run -- --subYou should see this in the window for the subscriber:
msg: "Hello world! 1"
Wait timed out after 4 seconds.

msg: "Hello world! 2"
Wait timed out after 4 seconds.

msg: "Hello world! 3"
Wait timed out after 4 seconds.

msg: "Hello world! 4"
...
Note
Since the
waitTimeoutfor both the publisher and subscriber is up to 4 seconds, you may or may not get theWait timed out after 4 secondsline between the samples, depending on the timing between the two applications.The
msg: "Hello world! <count>"line is the data being sent by the DataWriter. If the DataWriter weren’t communicating with the DataReader, you would just see theWait timed out after 4 secondslines and not the “msg” lines. (The subscribing application prints the “timed out” lines after the WaitSet times out while waiting for data, then it prints the “msg:” lines when it receives data from the DataWriter.)Note
If you don’t get the results described here, see Troubleshooting.
2.2.8. Taking It Further
Under the hood, the publishing and subscribing applications are doing a lot of work:
Before communication starts, the DataWriter and DataReader discover each other and check that they have the same Topic name, compatible data types, and compatible QoS. (We will talk more about discovery in a later module). After discovery, the DataWriter sends data directly to the DataReader, with no message broker required.
When you run the applications on the same machine, by default they communicate over shared memory. If you run one on another machine, they communicate over the network using UDP.
2.2.8.1. Start up Multiple Publishing or Subscribing Applications
Try starting up multiple publishing or subscribing applications, and you
will see that they will also send or receive data. (Remember to run from the
2_hello_world/csharp directory.)
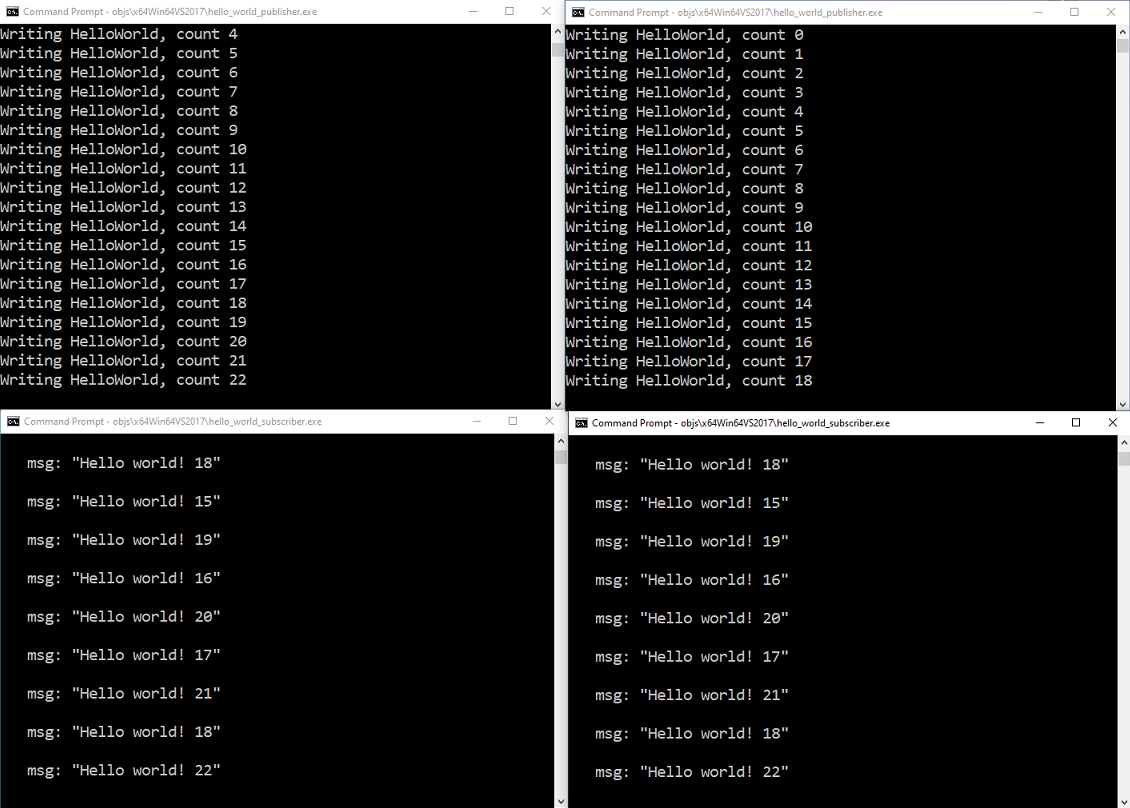
Figure 2.2 Two applications publishing, and two subscribing, to the same Topic. Notice that each subscriber is receiving data from both publishers.
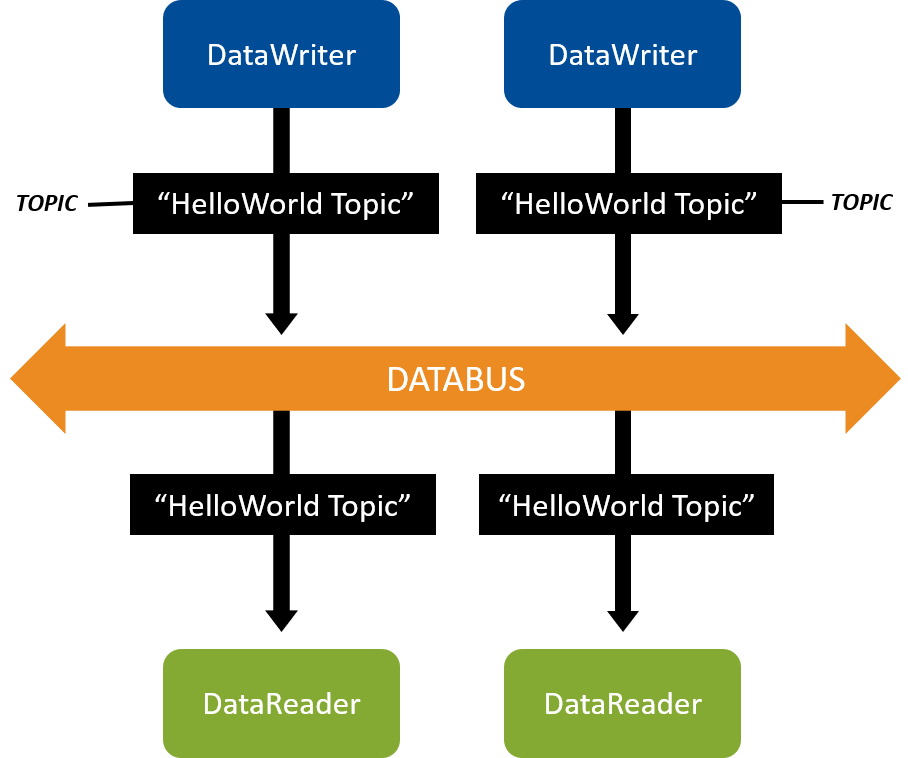
Figure 2.3 Two applications publishing, and two subscribing, to the same Topic.
2.2.8.2. Publish/Subscribe across Multiple Machines
To publish/subscribe between two machines:
Clone the repository on both machines. See Clone Repository.
In the
2_hello_worlddirectory on one machine, modify and run the publishing application as described in Open/Modify Publishing Application. See also Compile Your Changes and Run the Applications.
In the
2_hello_worlddirectory on the other machine, modify and run the subscribing application as described in Open/Modify Subscribing Application. See also Compile Your Changes and Run the Applications.Note
If you are running both applications and they aren’t communicating (you don’t see the “msg:” lines shown at the end of Run the Applications), see Troubleshooting.
2.2.8.3. Create Multiple DataWriters, DataReaders, and Topics in a Single Application
So far, you have created two applications: one that uses a DataReader to subscribe to “HelloWorld Topic” and one that uses a DataWriter to publish “HelloWorld Topic.” You have seen that these applications automatically discover each other and communicate, and that you can run multiple copies of them.
In Data Types, you’ll add a second DataWriter to an application, and in Keys and Instances, you’ll create an application that contains multiple DataWriters, DataReaders, and Topics.
Tip
Even though these initial example applications each do only one thing, typical real-world applications contain a combination of DataWriters and DataReaders for multiple Topics in a single application. We will illustrate this in later modules.
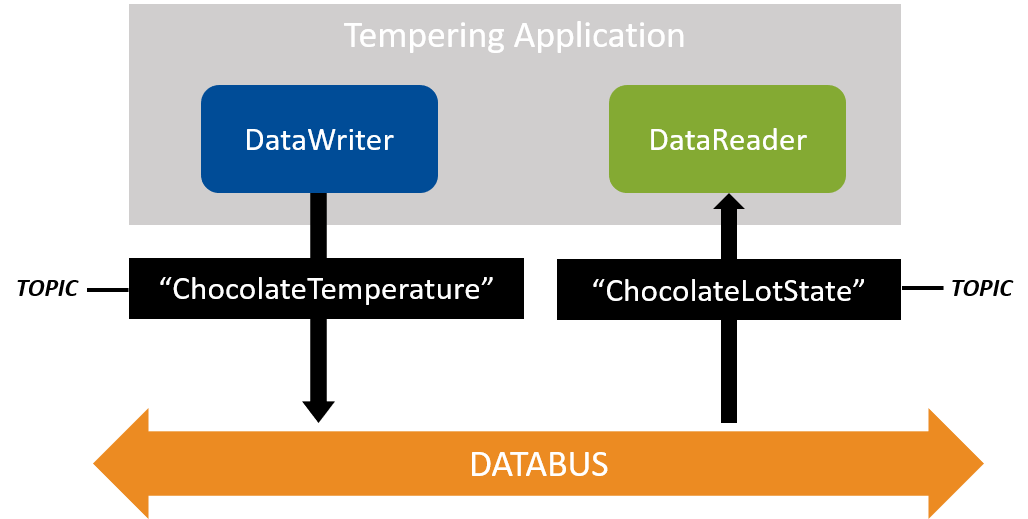
Figure 2.4 Sneak Preview: In a later module, we will create a tempering application that will write a “ChocolateTemperature” Topic and read a “ChocolateLotState” Topic. An application can write and read multiple Topics by creating more DataWriters and DataReaders.
2.3. Troubleshooting
2.3.1. Why aren’t my applications communicating?
If you are running both applications and they aren’t communicating (you don’t see the
msg: Hello world lines shown at the end of Run the Applications), here
are some things to check:
Did you change the Topic name in both applications before compiling? They should match.
Are you running both applications from the
2_hello_world/csharpdirectory, so they load the sameUSER_QOS_PROFILES.xmlfile?You must be in the
2_hello_world/csharpdirectory when you typedotnet run.
If you are running on multiple machines, does your network support multicast? If it does not, see How do I set my discovery peers? below, for how to specify the addresses of the remote machines your application plans to communicate with.
Check to see if one or both machines use a firewall. You may need to disable your firewall or configure it to allow multicast traffic for communication to be established.
See also Discovery.
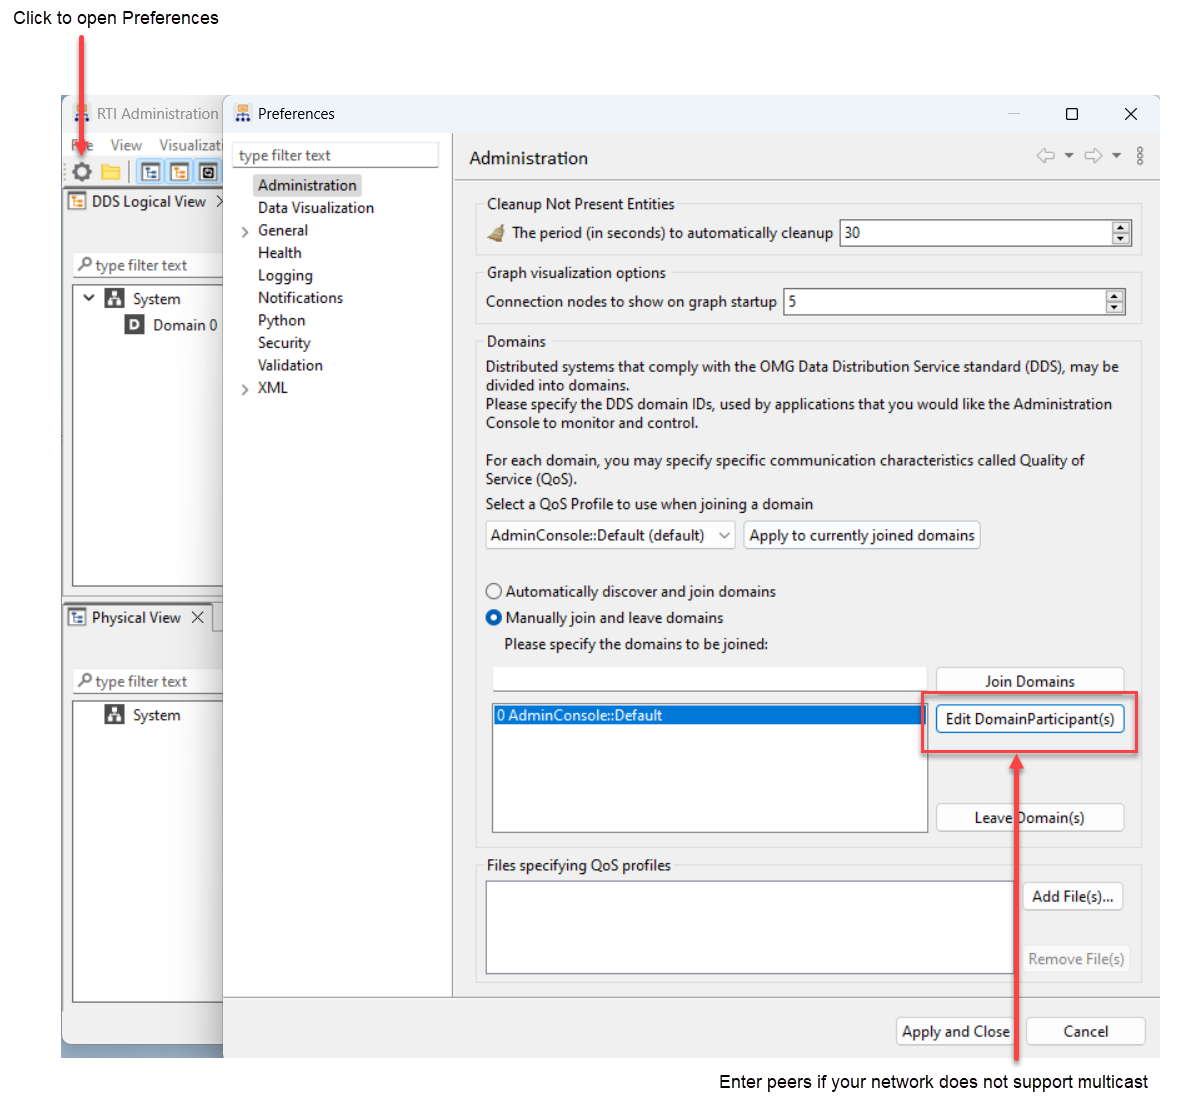
2.3.2. How do I set my discovery peers?
If you are running Connext on multiple machines and your network does not support multicast, specify the address(es) of the remote machine(s) you want to communicate with:
In the
2_hello_world\csharpdirectory, find USER_QOS_PROFILES.xml.
Identify the following lines in USER_QOS_PROFILES.xml:
<domain_participant_qos>
    <!--
    The participant name, if it is set, will be displayed in the
    RTI tools, making it easier for you to tell one
    application from another when you're debugging.
    -->
    <participant_name>
        <name>HelloWorldParticipant</name>
    </participant_name>

</domain_participant_qos>
Add the
<discovery>section as follows, and replace the IP address with the IP address or hostname of the other machine you want to communicate with:<domain_participant_qos> <!-- The participant name, if it is set, will be displayed in the RTI tools, making it easier for you to tell one application from another when you're debugging. --> <participant_name> <name>HelloWorldParticipant</name> </participant_name> <discovery> <initial_peers> <!-- Add an element for each machine you want to communicate with --> <element>192.168.1.14</element> </initial_peers> </discovery> </domain_participant_qos>
If you want more information about discovery peers, see Configuring the Peers List Used in Discovery, in the RTI Connext Core Libraries User’s Manual.
2.3.3. Why does the DataReader miss the first samples?
Discovery is not an instantaneous event. It takes some time for the discovery process between applications to complete. The DataWriter and DataReader must discover each other before they can start communicating. Therefore, if you send data immediately after creating the Connext entities, DataReaders will not receive the first few samples because they are still in-process of discovering the DataWriters and vice versa. This is true even when the DataWriters and DataReaders are reliable, because the Reliability QoS on its own does not guarantee delivery to DataReaders that have not been discovered yet.
You can overcome this behavior with the Durability QoS Policy, which can be set to deliver historical samples (that DataWriters already sent) to late-joining DataReaders. The DataReaders will then receive the first samples they originally missed. We’ll talk about this more in Basic QoS.
2.3.4. Why do I get a “No source for License information” error?
If you get the following error, it may be because you’re importing the
Rti.ConnextDds NuGet package from nuget.org, which requires a license.
RTI Connext DDS No source for License information
Please contact support@rti.com with any questions or comments
If you intend to use the nuget.org packages, make sure a license file is available when you run your application (see License Management in the Connext Installation Guide).
If you have installed the C# support package (Installing Connext in the Connext Installation Guide), which
doesn’t require a license file to run applications, make sure there is a
NuGet.Config file in the same directory where you run dotnet build or
dotnet run.
It should look like this:
<configuration>
    <packageSources>
        <add key="local" value="<installdir>/lib/dotnet" />
    </packageSources>
</configuration>
This file is generated by rtiddsgen when you specify the option -example
or -create makefiles. <installdir> refers to the installation directory
for Connext.
Alternatively, you can add this package source globally with the following command:
$ dotnet nuget add source <installdir>/lib/dotnet --name RTI
After this, the Rti.ConnextDds package will be located locally without the
need of NuGet.Config files.
Note
You can remove it at any time: dotnet nuget remove source RTI.
2.4. Hands-On 2: Viewing Your Data
Now that you’ve created applications that are publishing data, you can visualize that data using the Admin Console tool.
Note
The applications from Hands-On 1 above should be running while you perform the Admin Console steps below. See Run the Applications.
2.4.1. Open Admin Console
Start by opening Admin Console from RTI Launcher:
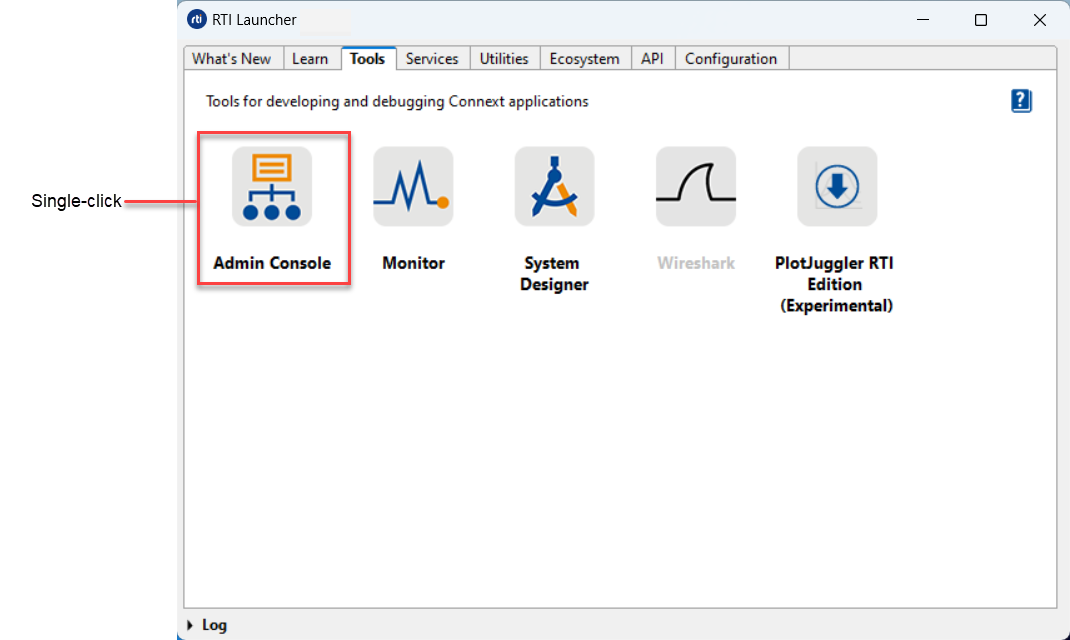
The following sections guide you through Admin Console for the purposes of this exercise, but you can find more information in the Admin Console User’s Manual.
2.4.2. Choose Automatically Join
You may be prompted to automatically or manually join domains when you first open Admin Console. For the purposes of this exercise, choose to automatically join (the default). We’ll discuss domains in a later module.
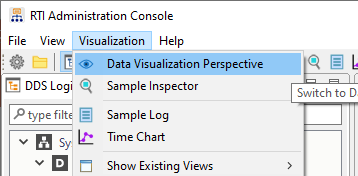
2.4.3. Switch to Data Visualization Perspective
Select the Data Visualization Perspective entry under the Visualization menu. (You may need to close a Welcome tab first.) If you can’t select the Data Visualization Perspective menu item, you may already be in that mode.
2.4.4. Open Topic Data Tab
From the DDS Logical View, click on the “HelloWorld Topic” to open the Topic View.
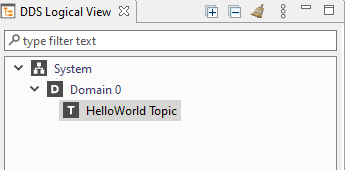
Select the Topic Data tab at the bottom of the window.

Click Subscribe:

2.4.5. Subscribe to “HelloWorld Topic”
The Admin Console tool itself is a DDS application, so it must also create DataReaders to subscribe to the “HelloWorld Topic.” (See the Admin Console online Help for more information about this.) When you subscribe to the “HelloWorld Topic” in Admin Console, Admin Console will create a DataReader for this Topic.
Click on the Subscribe… button or right-click on the Topic in the DDS Logical View and select Subscribe. This will open the Create Subscription dialog seen below. Click OK to subscribe to the Topic.

2.4.6. Use Topic Data Tab
After the Topic is subscribed to, you will see your “Hello world” message.

In the Admin Console tool, you’re also able to inspect DataWriters and DataReaders, and even chart your live data.
2.4.7. Use Admin Console across Machines
Admin Console is like any other Connext application. It discovers what DataWriters and DataReaders are on the network, whether they’re on the same machine as Admin Console or on different machines.
If you have trouble viewing data in Admin Console across machines, the same troubleshooting tips apply to Admin Console as apply to DataWriters and DataReaders in How do I set my discovery peers?. If your network supports multicast, you’ll see data on the other machines in Admin Console; otherwise, specify the IP addresses of the remote machines you want Admin Console to communicate with.
2.5. Next Steps
Congratulations! You’ve written your first DDS application, which publishes HelloWorld data. In this exercise, you’ve experienced a quick overview of the development process from defining a data type and using the code generator, to building an example application and using Connext Professional tools to see that data is being published. We’ll continue to build on these skills and to use these tools in more depth in subsequent exercises.
The next module takes a deeper dive into data types, including a little more information about how to define common types. We will be starting to work with an example that’s more complex than a “hello world”—we’re going to be using a chocolate factory example to showcase DDS concepts. See Data Types.