Distributed Data Cache#
Introduction#
What you’ll learn
This module shows how Connext provides a distributed data cache in which the global data space is accessible by all applications in the system.
You will do the following:
Define a data type and a Topic
Build a simple application to publish data to your Topic
Query the cache to get the data you are interested in
Configure the cache history and update rate
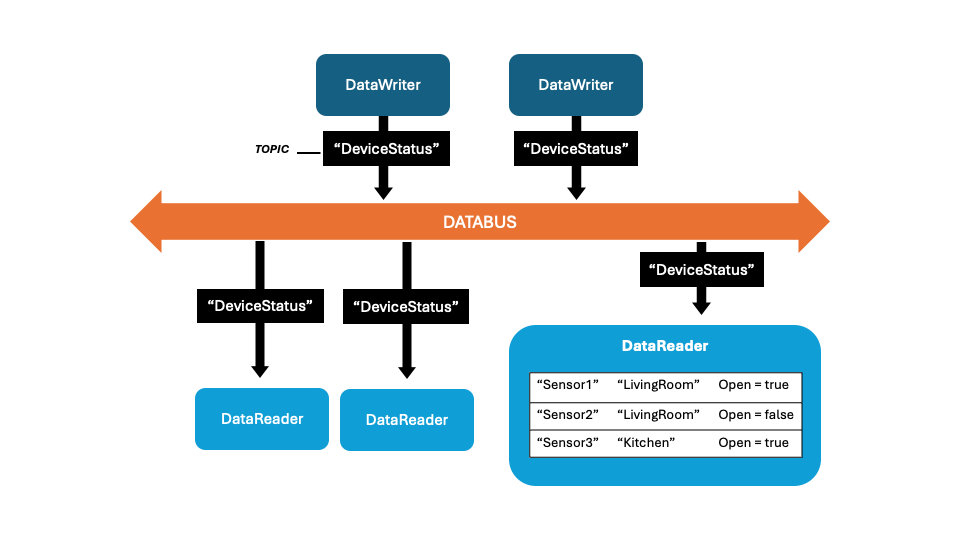
The distributed data cache is a Connext programming pattern that allows your applications to access data from your distributed system.
Connext handles the application discovery and data distribution, and your applications simply write and read data. Subscribers cache the data and allow querying it locally.
This pattern is similar to Publish-Subscribe, but focuses on maintaining and accessing the data cache instead of reacting to events (but both approaches can be combined).
This example uses the same publisher applications from the Publish-Subscribe module, simulating a window that gets open and closed over time, only this time the subscriber application not only receives data for the “WindowStatus” topic but caches it. We will then query the cache to get the data we are interested in.
How to complete this module#
To complete this module, you’ll need the following:
20-30 minutes
A Connext installation (full installation or pip-based installation). See Get Started.
A text editor or IDE to write your code.
You can complete the module from scratch by copying and pasting the code provided in the sections below, or you can get the full code from GitHub.
Cloning the GitHub repository
Clone the GitHub repository with the following command:
$ git clone --recurse-submodule https://github.com/rticommunity/rticonnextdds-examples.git
The code for this module is located in the tutorials/distributed_data_cache
directory. See the README.md files for additional instructions.
This guide is designed for Connext 7.7.0 or newer. For Connext 7.3.1, checkout the branch release/7.3.1.
1. Define your data type#
We will start by defining our data types. We will model the same home automation system from the Publish-Subscribe module, in which sensors that indicate whether a door or window is open.
If you’re developing in Python, you can define your data types using Python classes with some special annotations.
In a new directory, create a file called home_automation.py:
from rti.types import struct, key

@struct(
    member_annotations={"sensor_name": [key]}
)
class DeviceStatus:
    sensor_name: str = ""
    room_name: str = ""
    is_open: bool = False
IDL is a language for defining your data types. From the IDL definition of your data types, Connext generates the code for your applications in different programming languages: Python, C++, C#, Java, C.
In a new directory create a file called home_automation.idl:
struct DeviceStatus {
    @key string sensor_name;
    string room_name;
    boolean is_open;
};
To generate code from this IDL definition, run the following command:
rtiddsgen -language [python|c++11|c++98|c#|java|c] -platform <platform_name> home_automation.idl
This command generates the type definition for your data type in the target language, the support code to serialize it so it can be sent over the network, and the build files for a specific platform.
For example, use the following command to generate the code for a C++11 application on x64 Linux:
rtiddsgen -language c++11 -platform x64Linux4gcc8.5.0 home_automation.idl
Choosing your language and platform
The platform name depends on the language and the package you installed. The following table shows some platform names you can use:
|
|
|---|---|
|
and more… |
|
|
|
|
You can also add -create examplefiles to generate a simple
publisher and subscriber example applications, but in this exercise
we will write our own.
The sensor_name field is a key, which identifies unique instances (such as
Window1 sensor and Window2 sensor) of this type.
2. Run the publishers#
We will also use the same publisher applications from the Publish-Subscribe module, simulating a window that gets open and closed over time:
import sys
from time import sleep
import rti.connextdds as dds
from home_automation import DeviceStatus

def publish_sensor(sensor_name: str, room_name: str):
    participant = dds.DomainParticipant(domain_id=0)
    topic = dds.Topic(participant, "WindowStatus", DeviceStatus)
    writer = dds.DataWriter(topic)

    device_status = DeviceStatus(sensor_name, room_name, is_open=False)
    for _ in range(1000):
        # Simulate the window opening and closing
        device_status.is_open = not device_status.is_open
        writer.write(device_status)
        sleep(2)

if __name__ == '__main__':
    sensor_name = sys.argv[1] if len(sys.argv) > 1 else "Window1"
    room_name = sys.argv[2] if len(sys.argv) > 2 else "LivingRoom"

    try:
        publish_sensor(sensor_name, room_name)
    except KeyboardInterrupt:
        pass
#include <thread>
#include "rti/rti.hpp"
#include "home_automation.hpp"

void publish_sensor(
        const std::string& sensor_name,
        const std::string& room_name)
{
    dds::domain::DomainParticipant participant(0);
    dds::topic::Topic<DeviceStatus> topic(participant, "WindowStatus");
    dds::pub::DataWriter<DeviceStatus> writer(topic);

    DeviceStatus device_status(sensor_name, room_name, false);
    for (int i = 0; i < 20; i++) {
        // Simulate the door/window opening and closing
        device_status.is_open = !device_status.is_open;
        writer.write(device_status);
        std::this_thread::sleep_for(std::chrono::seconds(2));
    }
}

int main(int argc, char **argv)
{
    std::string sensor_name = (argc > 1) ? argv[1] : "Sensor1";
    std::string room_name = (argc > 2) ? argv[2] : "LivingRoom";
    publish_sensor(sensor_name, room_name);
}
using System.Threading;
using Rti.Dds.Domain;
using Rti.Dds.Publication;
using Rti.Dds.Topics;

namespace HomeAutomation
{
    public class Publisher
    {
        public static void PublishSensor(string sensorName, string roomName)
        {
            DomainParticipant participant =
                DomainParticipantFactory.Instance.CreateParticipant(domainId: 0);
            Topic<DeviceStatus> topic = participant.CreateTopic<DeviceStatus>("WindowStatus");
            DataWriter<DeviceStatus> writer =
                participant.ImplicitPublisher.CreateDataWriter(topic);

            // Create a DeviceStatus sample
            var deviceStatus = new DeviceStatus
            {
                sensor_name = sensorName,
                room_name = roomName,
                is_open = false
            };

            for (int i = 0; i < 1000; i++)
            {
                // Simulate the window opening and closing
                deviceStatus.is_open = !deviceStatus.is_open;
                writer.Write(deviceStatus);
                Thread.Sleep(2000); // Sleep for 2 seconds
            }
        }
    }
}
Run a few publisher applications as follows on different terminals:
On terminal 1:
python home_automation_publisher.py Window1 LivingRoom
On terminal 2:
python home_automation_publisher.py Window2 LivingRoom
On terminal 3:
python home_automation_publisher.py Window3 Kitchen
On terminal 1:
./objs/<platform>/home_automation_publisher Window1 LivingRoom
On terminal 2:
./objs/<platform>/home_automation_publisher Window2 LivingRoom
On terminal 3:
./objs/<platform>/home_automation_publisher Window3 Kitchen
On terminal 1:
dotnet run -- pub Window1 LivingRoom
On terminal 2:
dotnet run -- pub Window2 LivingRoom
On terminal 3:
dotnet run -- pub Window3 Kitchen
Keep the publishers running while we go to the next step.
Troubleshooting
In case of errors building or running your application, make sure you have set up your environment and license file.
For instructions, go to Get Started, select your platform and installation method, then find the section Run a Hello World.
3. Query the cache#
Next, we’ll create a subscriber application that receives data for the “WindowStatus” topic and caches it. We will then query the cache to get the data we are interested in.
First, subscribe to the “WindowStatus” topic.
Create the following file:
import rti.connextdds as dds
from home_automation import DeviceStatus

participant = dds.DomainParticipant(domain_id=0)
topic = dds.Topic(participant, "WindowStatus", DeviceStatus)
reader = dds.DataReader(topic)
Run the script in interactive mode:
python -i home_automation_subscriber.py
This creates the DataReader, which we can now use to query the cache on a Python interactive shell.
First, let’s see the full cache:
>>> reader.read_data()
[DeviceStatus(sensor_name='Window3', room_name='Kitchen', is_open=1), DeviceStatus(sensor_name='Window1', room_name='LivingRoom', is_open=0), DeviceStatus(sensor_name='Window2', room_name='LivingRoom', is_open=1)]
Note that we call read_data(), which doesn’t remove the data from the cache
and allows us to read it again. To remove the data, use take_data() instead.
Now, let’s look at the windows that are open:
>>> reader.select().content(dds.Query(reader, "is_open = true")).read_data()
[DeviceStatus(sensor_name='Window3', room_name='Kitchen', is_open=1), DeviceStatus(sensor_name='Window2', room_name='LivingRoom', is_open=1)]
We can also filter by sensor name or room name:
>>> reader.select().content(dds.Query(reader, "sensor_name = 'Window1'")).read_data()
[DeviceStatus(sensor_name='Window1', room_name='LivingRoom', is_open=0)]

>>> reader.select().content(dds.Query(reader, "room_name = 'LivingRoom'")).read_data()
[DeviceStatus(sensor_name='Window2', room_name='LivingRoom', is_open=1), DeviceStatus(sensor_name='Window1', room_name='LivingRoom', is_open=1)]
If we expect to read the status of Window1 often, since sensor_name
is a key, it is more efficient to read by instance. To do that, we first
obtain the instance handle that identifies Window1:
>>> window1_handle = reader.lookup_instance(DeviceStatus(sensor_name="Window1"))
And then use it every time we want to get the status of Window1:
>>> reader.select().instance(window1_handle).read_data()
[DeviceStatus(sensor_name='Window1', room_name='LivingRoom', is_open=1)]
Sometimes your application is only interested in new updates.
With the sample state, you can get only data that you haven’t read before:
>>> reader.select().state(dds.SampleState.NOT_READ).read_data()
[DeviceStatus(sensor_name='Window3', room_name='Kitchen', is_open=1), DeviceStatus(sensor_name='Window2', room_name='LivingRoom', is_open=1)]

>>> reader.select().state(dds.SampleState.NOT_READ).read_data()
[]
The second time you may get an empty list if no new updates have been published since the first call.
Using the view state, you can read only new instances. For example, if you run a new publisher for Window4 and then go back to our subscriber:
>>> reader.select().state(dds.ViewState.NEW_VIEW).read_data()
[DeviceStatus(sensor_name='Window4', room_name='LivingRoom', is_open=0)]
You only get the new instance, Window4.
First, subscribe to the “WindowStatus” topic.
Create the following file:
#include <iostream>
#include <thread>

#include "rti/rti.hpp"
#include "home_automation.hpp"

int main(int argc, char **argv)
{
    dds::domain::DomainParticipant participant(0);
    dds::topic::Topic<DeviceStatus> topic(participant, "WindowStatus");
    dds::sub::DataReader<DeviceStatus> reader(topic);
    dds::sub::LoanedSamples<DeviceStatus> samples {};

    // Sleep for a few seconds to receive some samples
    std::this_thread::sleep_for(std::chrono::seconds(4));

    // Add the queries here
}
Add the queries to the subscriber, main function.
First, let’s obtain the full cache:
samples = reader.read();
for (const auto& sample : samples) {
    std::cout << sample.data() << std::endl;
}
Note that we call read() which doesn’t remove the data from the cache
and allows us to read it again. To remove the data, use take() instead.
Now, let’s look at the windows that are open:
samples = reader.select().content(dds::sub::Query(reader, "is_open = true")).read();
We can also filter by sensor name or room name:
samples = reader.select().content(dds::sub::Query(reader, "sensor_name = 'Window1'")).read();

samples = reader.select().content(dds::sub::Query(reader, "room_name = 'LivingRoom'")).read();
If we expect to read the status of Window1 often, since sensor_name
is a key, it is more efficient to read by instance. To do that, we first
obtain the instance handle that identifies Window1:
dds::core::InstanceHandle window1_handle =
        reader.lookup_instance(DeviceStatus("Window1", "LivingRoom", true));
And then use it every time we want to get the status of Window1:
samples = reader.select().instance(window1_handle).read();
Sometimes your application is only interested in new updates.
With the sample state, you can get only data that you haven’t read before:
samples = reader.select().state(dds::sub::status::SampleState::not_read()).read();

samples = reader.select().state(dds::sub::status::SampleState::not_read()).read();
The second time you may get an empty list if no new updates have been published since the first call.
Using the view state, you can read only new instances. For example, if you run a new publisher for Window4 and then go back to our subscriber:
samples = reader.select().state(dds::sub::status::ViewState::new_view()).read();
You only get the new instance, Window4.
The full application is home_automation_subscriber.cxx.
First, subscribe to the “WindowStatus” topic.
Create the following file:
using System;
using System.Threading;
using System.Threading.Tasks;
using Omg.Dds.Subscription;
using Rti.Dds.Core;
using Rti.Dds.Domain;
using Rti.Dds.Subscription;
using Rti.Dds.Topics;

namespace HomeAutomation
{
    public class Subscriber
    {
        public static void MonitorSensors()
        {
            using DomainParticipant participant =
                DomainParticipantFactory.Instance.CreateParticipant(domainId: 0);

            Topic<DeviceStatus> topic =
                participant.CreateTopic<DeviceStatus>("WindowStatus");

            DataReader<DeviceStatus> reader =
                participant.ImplicitSubscriber.CreateDataReader(topic);

            // Sleep for a few seconds to receive some samples
            Thread.Sleep(4000);

            // Add the queries here
        }
    }
}
Add the queries to the subscriber, MonitorSensors method.
First, let’s obtain the full cache:
using (var samples = reader.Read())
{
    foreach (var sample in samples.ValidData())
    {
        Console.WriteLine($"Sample:\n{sample}");
    }
}
Note that we call Read(), which doesn’t remove the data from the cache
and allows us to read it again. To remove the data, use Take() instead.
Now, let’s obtain the windows that are open:
using (var filterCond = reader.CreateQueryCondition("is_open = true"))
using (var samples = reader.Select().WithCondition(filterCond).Read())
{
    // ...
}
We can also filter by sensor name or room name:
using (var filterCond = reader.CreateQueryCondition("sensor_name = 'Window1'"))
using (var samples = reader.Select().WithCondition(filterCond).Read())
{
    // ...
}

using (var filterCond = reader.CreateQueryCondition("room_name = 'LivingRoom'"))
using (var samples = reader.Select().WithCondition(filterCond).Read())
{
    // ...
}
If we expect to read the status of Window1 often, since sensor_name
is a key, it is more efficient to read by instance. To do that, we first
obtain the instance handle that identifies Window1:
var instanceHandle = reader.LookupInstance(
        new DeviceStatus { sensor_name = "Window1"});
And then use it every time we want to get the status of Window1:
using (var samples = reader.Select().WithInstance(instanceHandle).Read())
{
    // ...
}
Sometimes your application is only interested in new updates.
With the sample state, you can get only data that you haven’t read before:
using (var samples = reader.Select().WithState(SampleState.NotRead).Read())
{
    // ...
}

using (var samples = reader.Select().WithState(SampleState.NotRead).Read())
{
    // ...
}
The second time you may get an empty list if no new updates have been published since the first call.
Using the view state, you can read only new instances. For example, if you run a new publisher for Window4 and then go back to our subscriber:
using (var samples = reader.Select().WithState(ViewState.New).Read())
{
    // ...
}
You only get the new instance, Window4.
The full application is HomeAutomationSubscriber.cs.
4. Track instance lifecycle#
When you publish data on a Topic, you may want to identify the objects or
instances for which each update is intended. In our example, different devices
are identified by the sensor_name, which we have defined as a @key in
the DeviceStatus type.
When at least one DataWriter is publishing updates for an instance, we say the instance is alive. The instance becomes not alive when:
No DataWriters for that instance are available anymore; or
We explicitly call the DataWriter’s
dispose_instance()function, which is a way to say that the object no longer exists.
DataReaders have access to this information through the SampleInfo
associated with each update.
Let’s try try this out. With the previous applications running, stop the publisher for “Window4”.
On the subscriber, do the following:
Query the cache again, but this time call read() instead of
read_data() to also access the SampleInfo:
>>> reader.read()
[..., Sample(data=None, info=SampleInfo(state=[..., instance_state = not_alive_no_writers]))]
Notice that we’re getting a notification that an instance is no longer
alive: instance_state = not_alive_no_writers.
Use the following code to get all instances that are no longer alive from the cache:
>>> {reader.key_value(info.instance_handle).sensor_name
... for _, info in
... reader.select().state(dds.InstanceState.NOT_ALIVE_MASK).read()}
{'Window4'}
Let’s break this down:
reader.select().state(dds.InstanceState.NOT_ALIVE_MASK).read()queries the cache for instances that are no longer alive.info.instance_handleidentifies the instance.reader.key_value()returns aDeviceStatusobject with the key fields for that instance (sensor_name).
Use the following code to get all instances that are no longer alive from the cache:
DeviceStatus key_holder;
samples = reader.select().state(dds::sub::status::InstanceState::not_alive_mask()).read();
for (const auto& sample : samples) {
    reader.key_value(key_holder, sample.info().instance_handle());
    std::cout << key_holder.sensor_name << std::endl;
}
Let’s break this down:
reader.select().state(dds::sub::status::InstanceState::not_alive_mask()).read()queries the cache for instances that are no longer alive.sample.info().instance_handle()identifies the instance.reader.key_value()populateskey_holderwith the key fields for that instance (sensor_name).
Use the following code to get all instances that are no longer alive from the cache:
using (var samples = reader.Select().WithState(InstanceState.NotAlive).Read())
{
    foreach (var sample in samples)
    {
        var keyHolder = reader.GetKeyValue(new DeviceStatus(), sample.Info.InstanceHandle);
        Console.WriteLine(keyHolder.sensor_name);
    }
}
Let’s break this down:
reader.Select().WithState(InstanceState.NotAlive).Read()queries the cache for instances that are no longer alive.sample.Info.InstanceHandleidentifies the instance.reader.GetKeyValue()returns aDeviceStatusobject with the key fields for that instance (sensor_name).
The following optional exercise shows the publisher simulating turning the sensor off and disposing the instance.
Create a publisher that disposes an instance (optional)
Let’s create a new interactive publisher application that simulates actions on the sensor. It will allow the following inputs:
“open” to open the Window and publish the new status
“close” to close the Window and publish the new status
“off” to turn the sensor off (dispose the instance)
“on” to turn the sensor on (publish the current status)
Find the full code for this publisher on the GitHub repository. We’ll go through the most relevant parts of the code next.
We’re defining a class, WindowSensor, to manage the sensor
status and the actions we can perform on it.
The __init__ method receives the sensor_name and the
room_name, creates the DataWriter, and registers the
instance we will be updating. Registering an instance is optional,
but it allows for faster write() operations, so it’s
recommended when you will be updating the instance repeatedly. We
will also publish the initial status.
class WindowSensor:

    def __init__(self, sensor_name: str, room_name: str) -> None:
        self.status = DeviceStatus(sensor_name, room_name, is_open=False)

        participant = dds.DomainParticipant(domain_id=0)
        topic = dds.Topic(participant, "WindowStatus", DeviceStatus)
        self.writer = dds.DataWriter(topic)

        self.instance = self.writer.register_instance(self.status)
        self.writer.write(self.status, self.instance)
Next, we define the four operations we can perform on the sensor:
def open_window(self) -> None:
    self.status.is_open = True
    self.writer.write(self.status, self.instance)

def close_window(self) -> None:
    self.status.is_open = False
    self.writer.write(self.status, self.instance)

def turn_off(self) -> None:
    self.writer.dispose_instance(self.instance)

def turn_on(self) -> None:
    self.writer.write(self.status, self.instance)
Notice that we use the dispose_instance() method to notify that
the sensor is no longer available when we turn it off.
After that, we define a function control_sensor to read from
the standard input which commands to run.
The full application is interactive_sensor_publisher.py.
Run one publisher:
python interactive_sensor_publisher.py Window1 LivingRoom
On another terminal, run another publisher:
python interactive_sensor_publisher.py Window2 LivingRoom
Run the subscriber in interactive mode as before:
python -i home_automation_subscriber.py
Go back to the publishers and enter “open” on both of them. Then enter “off” on the first one (“Window1”).
Type the following to get which instances are in the disposed state:
>>> {reader.key_value(info.instance_handle).sensor_name
... for _, info in
... reader.select().state(dds.InstanceState.NOT_ALIVE_DISPOSED).read()}
{'Window1'}
Now type “on” on the first publisher, and “off” on the second one. On the subscriber, re-run the command above; you should see “Window2” only.
We’re defining a class, WindowSensor, to manage the sensor
status and the actions we can perform on it.
The WindowSensor constructor receives the sensor_name
and the room_name, creates the DataWriter, and registers
the instance we will be updating. Registering an instance is
optional, but it allows for faster write() operations, so
it’s recommended when you will be updating the instance repeatedly.
We will also publish the initial status.
class WindowSensor {
  public:
    WindowSensor(const std::string& sensor_name, const std::string& room_name)
            : status_(sensor_name, room_name, false),
            instance_(dds::core::InstanceHandle::nil()),
            writer_(nullptr)
    {
        dds::domain::DomainParticipant participant(0);
        dds::topic::Topic<DeviceStatus> topic(participant, "WindowStatus");
        writer_ = std::make_shared<dds::pub::DataWriter<DeviceStatus>>(
                dds::pub::DataWriter<DeviceStatus>(topic));

        instance_ = writer_->register_instance(status_);
        writer_->write(status_, instance_);
    }

  private:
    DeviceStatus status_;
    dds::core::InstanceHandle instance_;
    std::shared_ptr<dds::pub::DataWriter<DeviceStatus>> writer_;
}
Next, we define the four operations we can perform on the sensor:
void open_window()
{
    status_.is_open = true;
    writer_->write(status_, instance_);
}

void close_window()
{
    status_.is_open = false;
    writer_->write(status_, instance_);
}

void turn_off()
{
    writer_->dispose_instance(instance_);
}

void turn_on()
{
    writer_->write(status_, instance_);
}
Notice that we use the dispose_instance() method to notify that
the sensor is no longer available when we turn it off.
After that, we define a function control_sensor to read from
the standard input which commands to run.
The full application is interactive_sensor_publisher.cxx.
Run one publisher:
./build/interactive_sensor_publisher Window1 LivingRoom
On another terminal, run another publisher:
./build/interactive_sensor_publisher Window2 LivingRoom
Create the subscriber application as before, but with the following additional code to track the instances that are disposed:
samples = reader.select().state(dds::sub::status::InstanceState::not_alive_disposed()).read();
for (auto sample : samples) {
    DeviceStatus key_holder;
    reader.key_value(key_holder, sample.info().instance_handle());
    disposed_instances.insert(key_holder.sensor_name);
}
The full application is interactive_sensor_subscriber.cxx.
Run the subscriber:
./build/interactive_sensor_subscriber
Go back to the publishers and enter “open” on both of them. Then enter “off” on the first one (“Window1”).
The subscriber will display the disposed instance “Window1”.
Now type “on” on the first publisher, and “off” on the second one. On the subscriber, re-run the command above; you should see “Window2” only.
We’re defining a class, WindowSensor, to manage the sensor
status and the actions we can perform on it.
The WindowSensor constructor receives the sensor_name,
and the room_name, creates the DataWriter, and registers the
instance we will be updating. Registering an instance is optional,
but it allows for faster Write() operations, so it’s recommended
when you will be updating the instance repeatedly. We will also
publish the initial status.
public class WindowSensor
{
    private DeviceStatus status;
    private DataWriter<DeviceStatus> writer;
    private InstanceHandle instance;

    public WindowSensor(string sensorName, string roomName)
    {
        status = new DeviceStatus
        {
            sensor_name = sensorName,
            room_name = roomName,
            is_open = false
        };

        DomainParticipant participant =
            DomainParticipantFactory.Instance.CreateParticipant(domainId: 0);
        Topic<DeviceStatus> topic = participant.CreateTopic<DeviceStatus>("WindowStatus");
        writer = participant.ImplicitPublisher.CreateDataWriter(topic);

        instance = writer.RegisterInstance(status);
        writer.Write(status, instance);
    }
}
Next, we define the four operations we can perform on the sensor:
public void OpenWindow()
{
    status.is_open = true;
    writer.Write(status, instance);
}

public void CloseWindow()
{
    status.is_open = false;
    writer.Write(status, instance);
}

public void TurnOff()
{
    writer.DisposeInstance(instance);
}

public void TurnOn()
{
    writer.Write(status, instance);
}
Notice that we use the DisposeInstance() method to notify us that
the sensor is no longer available when we turn it off.
After that, we define a method ControlSensor to read from
the standard input which commands to run.
The full application is HomeAutomationInteractivePublisher.cs.
Run one publisher:
dotnet run -- interactive_pub Window1 LivingRoom
On another terminal, run another publisher:
dotnet run -- interactive_pub Window2 LivingRoom
Create the subscriber application as before, but with the following additional code to track the instances that are disposed:
using var samples = reader.Select().WithState(InstanceState.NotAliveDisposed).Read();

foreach (var sample in samples)
{
    var keyHolder = reader.GetKeyValue(new DeviceStatus(), sample.Info.InstanceHandle);
    disposedInstances.Add(keyHolder.sensor_name);
}
The full application is HomeAutomationInteractiveSubscriber.cs.
Run the subscriber:
dotnet run -- interactive_sub
Go back to the publishers and enter “open” on both of them. Then enter “off” on the first one (“Window1”).
The subscriber will display the disposed instance “Window1”.
Now type “on” on the first publisher, and “off” on the second one. On the subscriber, re-run the command above; you should see “Window2” only.
Configuring the cache#
Connext provides several quality of service (QoS) policies to configure how the data is cached. These include the durability, history, lifespan, and time-based filter policies.
The Last-Value Cache module shows how to configure durability
and history to ensure that new subscribers have access to the last value
published for each instance (sensor_name in our example).
You can also use a content filter to subscribe only to a subset of the data. This is explored in the Content Filtering module.
Learn more#
We’ve explored how each DataReader maintains a cache of the distributed data for a Topic, and how your application can query the cache and track the lifecycle of instances of a Topic.
Next Steps
Related modules:
Content Filtering. You can subscribe only to a subset of the data by specifying a content filter.
Last-Value Cache. By default, new subscribers don’t receive previously published data. See how to configure data durability to ensure that new subscribers have access to the last value published for each instance.
Data Persistence. Make the distributed data cache persistent by running a Persistence Service. Data will be available even after applications stop running or need to restart.
Reference documentation:
API Reference, select() - Python, Modern C++, C#
User’s Manual, Accessing Data Samples With Read or Take
User’s Manual, Working with Instances
