Publish-Subscribe#
Introduction#
What you’ll learn
This module provides an introduction to the publish-subscribe communication model. After completing it, you will be able to build a basic RTI® Connext® distributed application.
You will do the following:
Create a Topic and define its data type
Create an application to publish data to your Topic
Create an application to subscribe to your Topic and react to updates
The most fundamental communication pattern supported by Connext is the Data-Centric Publish-Subscribe (DCPS) model. Connext allows your applications to share any data in the system by publishing and subscribing to Topics.
Data producers publish, or write, data. Data consumers subscribe to, or read, data.
The data shared by a publisher and subscriber is described by a Topic, a data object comprised of a name and a data type. Subscribers receive data only for the Topics they are interested in.
Connext automatically handles application discovery and peer-to-peer data distribution, notifying subscribers when updates for a Topic are available.
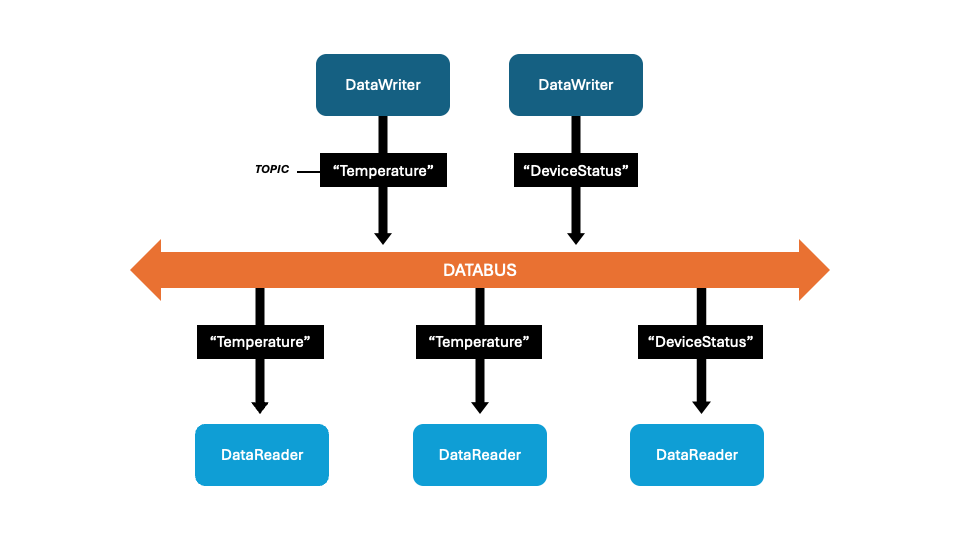
In this pattern, many publishers may publish the same Topic, and many subscribers may subscribe to the same Topic. Subscribers receive data from all of the publishers that they share a Topic with. Connext delivers data from publishers directly to subscribers, with no need for a broker or centralized application to mediate communications.
In this module, we will build a simple home automation system in which several sensors publish the status of a door or a window (whether it’s open or closed), and an alert system subscribes to the status of all the sensors and prints a warning when a door or window is open.
How to complete this module#
To complete this module you’ll need the following:
20-30 minutes
A Connext installation (full installation or pip-based installation). See Get Started.
A text editor or IDE to write your code.
You can complete the module from scratch by copying and pasting the code provided in the sections below, or you can get the full code in RTI’s GitHub examples repository.
Cloning the GitHub repository
Clone the GitHub repository with the following command:
$ git clone --recurse-submodule https://github.com/rticommunity/rticonnextdds-examples.git
The code for this module is located in the tutorials/publish_subscribe
directory. See the README.md files for additional instructions.
This guide is designed for Connext 7.7.0 or newer. For Connext 7.3.1, checkout the branch release/7.3.1.
You can also complete this module in your browser, with no installation, at evaluation.rti.com .
1. Define your data type#
Connext is a data-centric framework. Your applications communicate by publishing and subscribing to Topics, which are defined by a structured data type. A Topic can provide information about anything: a temperature reading, a stock price, a video frame, a flight status, and so on.
In this step, you will define a data type to model a device status with three fields: a string for the sensor name, another string for the room name, and a boolean to indicate whether the door or window is open or closed. The sensor name field will be a key. Keys identify unique instances of a data type, and each sensor will be a different instance (this configuration will be useful in other modules).
If you’re developing in Python, you can define your data types using Python dataclasses with some special annotations.
In a new directory, create a file called home_automation.py with
the following content:
from rti.types import struct, key

@struct(
    member_annotations={"sensor_name": [key]}
)
class DeviceStatus:
    sensor_name: str = ""
    room_name: str = ""
    is_open: bool = False
IDL (interface description language) is used to define your data types. Using the IDL definitions of your data types, Connext generates the code for your applications in different programming languages: Python, C++, C#, Java, or C.
In a new directory, create a file called home_automation.idl with
the following content:
struct DeviceStatus {
    @key string sensor_name;
    string room_name;
    boolean is_open;
};
To generate code from this IDL definition, run the following command using your language and platform:
$ <install dir>/bin/rtiddsgen -language [python|c++11|c++98|c#|java|c] -platform <platform_name> home_automation.idl
Choosing your language and platform
The platform name depends on the language and the package you installed. The following table shows some platform names you can use:
|
|
|---|---|
|
and more… |
|
|
|
|
You can also add -create examplefiles to generate simple
publisher and subscriber example applications, but in this exercise
we will write our own.
This command generates the type definition for your data type in the target language, the support code to serialize it so it can be sent over the network, and the build files for the specified platform.
For example, the following command generates the code for a C++11 application on x64 Linux:
$ rtiddsgen -language c++11 -platform x64Linux4gcc8.5.0 home_automation.idl
2. Create a publisher application#
You will write an application to publish a “WindowStatus” Topic. This publisher simulates a window that is opened and closed over time.
Using the application code detailed below, you’ll first create a DomainParticipant and Topic within a domain ID, then create a DataWriter to publish updates for that Topic.
A domain ID is a logical partition for your applications, which can only communicate when they are in the same domain ID. The DomainParticipant acts as the container for other Topics, DataWriters, DataReaders, and other entities.
First, import the Connext package as well as the type you defined in the previous step:
import rti.connextdds as dds
from home_automation import DeviceStatus
Next, create the DomainParticipant to join a domain and a Topic in that domain.
participant = dds.DomainParticipant(domain_id=0)

topic = dds.Topic(participant, "WindowStatus", DeviceStatus)
This code creates a Topic named “WindowStatus” with the DeviceStatus
type we defined earlier.
Finally, create a DataWriter for that Topic and write an update every two seconds, simulating the window opening and closing repeatedly.
writer = dds.DataWriter(topic)


device_status = DeviceStatus("Window1", "LivingRoom", is_open=False)
for i in range(1000):
    device_status.is_open = not device_status.is_open
    writer.write(device_status)
    sleep(2)
Let’s put everything together in a file called
home_automation_publisher.py. We will also make the sensor name
and room name inputs to the application.
import sys
from time import sleep
import rti.connextdds as dds
from home_automation import DeviceStatus

def publish_sensor(sensor_name: str, room_name: str):
    participant = dds.DomainParticipant(domain_id=0)
    topic = dds.Topic(participant, "WindowStatus", DeviceStatus)
    writer = dds.DataWriter(topic)

    device_status = DeviceStatus(sensor_name, room_name, is_open=False)
    for i in range(1000):
        # Simulate the window opening and closing
        device_status.is_open = not device_status.is_open
        writer.write(device_status)
        sleep(2)

if __name__ == '__main__':
    sensor_name = sys.argv[1] if len(sys.argv) > 1 else "Window1"
    room_name = sys.argv[2] if len(sys.argv) > 2 else "LivingRoom"
    try:
        publish_sensor(sensor_name, room_name)
    except KeyboardInterrupt:
        pass
First, include the Connext headers and the generated type definition:
#include "rti/rti.hpp"
#include "home_automation.hpp"
Next, create the DomainParticipant to join a domain and a Topic in that domain.
dds::domain::DomainParticipant participant(0);
dds::topic::Topic<DeviceStatus> topic(participant, "WindowStatus");
This code creates a Topic named “WindowStatus” with the DeviceStatus
type we defined earlier.
Finally, create a DataWriter for that Topic and write an update every two seconds, simulating the window opening and closing.
dds::pub::DataWriter<DeviceStatus> writer(topic);

DeviceStatus device_status { "Window1", "LivingRoom", false };
for (int i = 0; i < 1000; i++) {
    device_status.is_open = !device_status.is_open;
    writer.write(device_status);
    std::this_thread::sleep_for(std::chrono::seconds(2));
}
Let’s put everything together in a file called home_automation_publisher.cxx.
We will also make the sensor name and room name inputs to the application.
#include <iostream>
#include <thread>
#include <rti/rti.hpp>
#include "home_automation.hpp"

void publish_sensor(
    const std::string& sensor_name,
    const std::string& room_name)
{
    dds::domain::DomainParticipant participant(0);
    dds::topic::Topic<DeviceStatus> topic(participant, "WindowStatus");
    dds::pub::DataWriter<DeviceStatus> writer(topic);

    DeviceStatus device_status { sensor_name, room_name, false };
    for (int i = 0; i < 1000; i++) {
        device_status.is_open = !device_status.is_open;
        writer.write(device_status);
        std::this_thread::sleep_for(std::chrono::seconds(2));
    }
}

int main(int argc, char **argv)
{
    std::string sensor_name = (argc > 1) ? argv[1] : "Sensor1";
    std::string room_name = (argc > 2) ? argv[2] : "LivingRoom";
    publish_sensor(sensor_name, room_name);
}
First, include the Connext namespaces:
using System;
using System.Threading;
using Rti.Dds.Core;
using Rti.Dds.Domain;
using Rti.Dds.Publication;
using Rti.Dds.Topics;
Next, we’ll create the DomainParticipant to join a domain and a Topic in that domain.
DomainParticipant participant =
    DomainParticipantFactory.Instance.CreateParticipant(domainId: 0);
Topic<DeviceStatus> topic = participant.CreateTopic<DeviceStatus>("WindowStatus");
This creates a Topic named “WindowStatus” with the DeviceStatus
type we defined earlier.
Finally, we’ll create a DataWriter for that Topic and write an update every two seconds, simulating the window opening and closing.
DataWriter<DeviceStatus> writer =
    participant.ImplicitPublisher.CreateDataWriter(topic);

// Create a DeviceStatus sample
var deviceStatus = new DeviceStatus
{
    sensor_name = "Window1",
    room_name = "LivingRoom",
    is_open = false
};

for (int i = 0; i < 1000; i++)
{
    deviceStatus.is_open = !deviceStatus.is_open;
    writer.Write(deviceStatus);
    Thread.Sleep(2000); // Sleep for 2 seconds
}
You can find the full code for the publisher HomeAutomationPublisher.cs on GitHub
First, we’ll create the DomainParticipant to join a domain and a Topic in that domain.
DomainParticipant participant = DomainParticipantFactory.get_instance().create_participant(
        0,
        DomainParticipantFactory.PARTICIPANT_QOS_DEFAULT,
        null, // listener
        StatusKind.STATUS_MASK_NONE);

String typeName = DeviceStatusTypeSupport.get_type_name();
DeviceStatusTypeSupport.register_type(participant, typeName);

Topic topic = participant.create_topic(
        "WindowStatus",
        typeName,
        DomainParticipant.TOPIC_QOS_DEFAULT,
        null, // listener
        StatusKind.STATUS_MASK_NONE);
This creates a Topic named “WindowStatus” with the DeviceStatus
type we defined earlier.
Finally, we’ll create a DataWriter for that Topic and write an update every two seconds, simulating the window opening and closing.
DeviceStatusDataWriter writer = (DeviceStatusDataWriter) participant.create_datawriter(
        topic,
        Publisher.DATAWRITER_QOS_DEFAULT,
        null, // listener
        StatusKind.STATUS_MASK_NONE);

DeviceStatus deviceStatus = new DeviceStatus();
deviceStatus.sensor_name = "Window1";
deviceStatus.room_name = "LivingRoom";

for (int i = 0; i < 1000; i++) {
    deviceStatus.is_open = !deviceStatus.is_open;
    writer.write(deviceStatus, InstanceHandle_t.HANDLE_NIL);
    try {
        Thread.sleep(2000);
    } catch (InterruptedException ix) {
        break;
    }
}
For brevity, these snippets don’t show error handling.
You can find the full code for the publisher DeviceStatusPublisher.java on GitHub
First, include the Connext headers and the generated type definition:
#include "ndds/ndds_c.h"
#include "home_automation.h"
#include "home_automationSupport.h"
Next, we’ll create the DomainParticipant to join a domain and a Topic in that domain.
DDS_DomainParticipant *participant = NULL;
DDS_Topic *topic = NULL;
const char *type_name = NULL;

participant = DDS_DomainParticipantFactory_create_participant(
        DDS_TheParticipantFactory,
        0,
        &DDS_PARTICIPANT_QOS_DEFAULT,
        NULL /* listener */,
        DDS_STATUS_MASK_NONE);

type_name = DeviceStatusTypeSupport_get_type_name();
DeviceStatusTypeSupport_register_type(participant, type_name);

topic = DDS_DomainParticipant_create_topic(
        participant,
        "WindowStatus",
        type_name,
        &DDS_TOPIC_QOS_DEFAULT,
        NULL /* listener */,
        DDS_STATUS_MASK_NONE);
This creates a Topic named “WindowStatus” with the DeviceStatus
type we defined earlier.
Finally, we’ll create a DataWriter for that Topic and write an update every two seconds, simulating the window opening and closing.
DDS_DataWriter *writer = NULL;
DeviceStatusDataWriter *DeviceStatus_writer = NULL;
DeviceStatus *device_status = NULL;
struct DDS_Duration_t send_period = { 2, 0 };

writer = DDS_DomainParticipant_create_datawriter(
        participant,
        topic,
        &DDS_DATAWRITER_QOS_DEFAULT,
        NULL /* listener */,
        DDS_STATUS_MASK_NONE);

DeviceStatus_writer = DeviceStatusDataWriter_narrow(writer);

device_status = DeviceStatusTypeSupport_create_data();
strncpy(device_status->sensor_name, "Window1", 255);
strncpy(device_status->room_name, "LivingRoom", 255);
device_status->is_open = DDS_BOOLEAN_FALSE;

for (i = 0; i < 1000; i++) {
    device_status->is_open =
            device_status->is_open ? DDS_BOOLEAN_FALSE : DDS_BOOLEAN_TRUE;
    DeviceStatusDataWriter_write(
            DeviceStatus_writer,
            device_status,
            &DDS_HANDLE_NIL);

    NDDS_Utility_sleep(&send_period);
}
For brevity, these snippets don’t show error handling.
You can find the full code for the publisher home_automation_publisher.c on GitHub
3. Create a subscriber application#
You will write an application to subscribe to the “WindowStatus” topic. This subscriber simulates an alert system that prints a warning when a Window is open.
Using the application code detailed below, you’ll again create a DomainParticipant and Topic. To communicate with the publisher application created in step 2, you’ll use the same domain ID and Topic name.
Create a DomainParticipant and a Topic. In order to communicate with the publisher application, we have to use the same domain ID and Topic name.
participant = dds.DomainParticipant(domain_id=0)
topic = dds.Topic(participant, "WindowStatus", DeviceStatus)
Now create a DataReader, which is the object that will receive the data.
reader = dds.DataReader(topic)
There are multiple ways to wait for updates on a Topic. In this example
you will use an async for loop to take the data updates as they
are received:
async for data in reader.take_data_async():
    if data.is_open:
        print(f"WARNING: {data.sensor_name} in {data.room_name} is open!")
Let’s see how the whole subscriber application,
home_automation_subscriber.py, looks:
import rti.connextdds as dds
import rti.asyncio # required by take_data_async()
from home_automation import DeviceStatus

async def sensor_monitoring():
    participant = dds.DomainParticipant(domain_id=0)
    topic = dds.Topic(participant, "WindowStatus", DeviceStatus)
    reader = dds.DataReader(topic)

    async for data in reader.take_data_async():
        if data.is_open:
            print(f"WARNING: {data.sensor_name} in {data.room_name} is open!")

if __name__ == '__main__':
    try:
        rti.asyncio.run(sensor_monitoring())
    except KeyboardInterrupt:
        pass
You will again create a DomainParticipant and a Topic. In order to communicate with the publisher application we have to use the same domain ID and Topic name.
dds::domain::DomainParticipant participant(0);
dds::topic::Topic<DeviceStatus> topic(participant, "WindowStatus");
Now create a DataReader, which is the object that will receive the data.
dds::sub::DataReader<DeviceStatus> reader(topic);
There are multiple ways to wait for updates on a Topic. In this example
you will use a SampleProcessor with a callback to get notified
with each new data update:
rti::sub::SampleProcessor sample_processor;
sample_processor.attach_reader(
        reader,
        [](const rti::sub::LoanedSample<DeviceStatus> &sample)
        {
            if (sample.info().valid()) { // ignore samples with only meta-data
                if (sample.data().is_open) {
                    std::cout << "WARNING: " << sample.data().sensor_name
                              << " in " << sample.data().room_name
                              << " is open!" << std::endl;
                }
            }
        });
Let’s see how the whole subscriber application, home_automation_subscriber.cxx,
looks:
#include <iostream>
#include <thread>

#include "rti/rti.hpp"
#include "rti/sub/SampleProcessor.hpp"
#include "home_automation.hpp"

int main(int argc, char **argv)
{
    dds::domain::DomainParticipant participant(0);
    dds::topic::Topic<DeviceStatus> topic(participant, "WindowStatus");
    dds::sub::DataReader<DeviceStatus> reader(topic);

    rti::sub::SampleProcessor sample_processor;
    sample_processor.attach_reader(
            reader,
            [](const rti::sub::LoanedSample<DeviceStatus>& sample)
            {
                if (sample.info().valid()) { // ignore samples with only meta-data
                    if (sample.data().is_open) {
                        std::cout << "WARNING: " << sample.data().sensor_name
                                << " in " << sample.data().room_name
                                << " is open!" << std::endl;
                    }
                }
            });

    while (true) { // wait in a loop
        std::this_thread::sleep_for(std::chrono::seconds(4));
    }
}
We will again create a DomainParticipant and a Topic. In order to communicate with the publisher application we have to use the same domain ID and Topic name.
using DomainParticipant participant =
    DomainParticipantFactory.Instance.CreateParticipant(domainId: 0);
Topic<DeviceStatus> topic =
    participant.CreateTopic<DeviceStatus>("WindowStatus");
Now we create a DataReader, which is the object that will receive the data.
DataReader<DeviceStatus> reader =
    participant.ImplicitSubscriber.CreateDataReader(topic);
There are multiple ways to wait for updates on a Topic. In this example
we will use an await foreach loop to take the data updates as they
are received:
await foreach (var data in reader.TakeAsync().ValidData())
{
    if (data.is_open)
    {
        Console.WriteLine($"WARNING: {data.sensor_name} in {data.room_name} is open");
    }
}
You can find the full code for the subscriber HomeAutomationSubscriber.cs on GitHub
We will again create a DomainParticipant and a Topic. In order to communicate with the publisher application we have to use the same domain ID and Topic name.
DomainParticipant participant = DomainParticipantFactory.get_instance().create_participant(
        0,
        DomainParticipantFactory.PARTICIPANT_QOS_DEFAULT,
        null, // listener
        StatusKind.STATUS_MASK_NONE);

String typeName = DeviceStatusTypeSupport.get_type_name();
DeviceStatusTypeSupport.register_type(participant, typeName);

Topic topic = participant.create_topic(
        "WindowStatus",
        typeName,
        DomainParticipant.TOPIC_QOS_DEFAULT,
        null, // listener
        StatusKind.STATUS_MASK_NONE);
Now we create a DataReader, which is the object that will receive the data.
DeviceStatusDataReader reader = (DeviceStatusDataReader) participant.create_datareader(
    topic,
    Subscriber.DATAREADER_QOS_DEFAULT,
    null, // listener
    StatusKind.STATUS_MASK_NONE);
There are multiple ways to wait for updates on a Topic. In this example
we will use a WaitSet to get blocked until new data is available:
DeviceStatusSeq dataSeq = new DeviceStatusSeq();
SampleInfoSeq infoSeq = new SampleInfoSeq();
WaitSet waitset = new WaitSet();
Duration_t waitTimeout = new Duration_t(2, 0);
ReadCondition condition = reader.create_readcondition(
        SampleStateKind.ANY_SAMPLE_STATE,
        ViewStateKind.ANY_VIEW_STATE,
        InstanceStateKind.ANY_INSTANCE_STATE);

waitset.attach_condition(condition);

while (samplesRead < 1000) { // read 1000 samples
    try {
        // Wait for data to be available
        waitset.wait(activeConditions, waitTimeout);

        try {
            reader.take(dataSeq,
                    infoSeq,
                    ResourceLimitsQosPolicy.LENGTH_UNLIMITED,
                    SampleStateKind.ANY_SAMPLE_STATE,
                    ViewStateKind.ANY_VIEW_STATE,
                    InstanceStateKind.ANY_INSTANCE_STATE);

            for (int i = 0; i < dataSeq.size(); ++i) {
                if (infoSeq.get(i).valid_data) {
                    DeviceStatus data = (DeviceStatus) dataSeq.get(i);
                    if (data.is_open) {
                        System.out.println("WARNING: " + data.sensor_name +
                                " in " + data.room_name + " is open!");
                    }
                    samplesRead++;
                }
            }
        } catch (RETCODE_NO_DATA noData) {
            // No data to process, not a problem
        } finally {
            reader.return_loan(dataSeq, infoSeq);
        }
    } catch (RETCODE_TIMEOUT timeout) {
        // No data, received in the waitTimeout
    }
}
You can find the full code for the subscriber DeviceStatusSubscriber.java on GitHub
We will again create a DomainParticipant and a Topic. In order to communicate with the publisher application we have to use the same domain ID and Topic name.
DDS_DomainParticipant *participant = NULL;
DDS_Topic *topic = NULL;
const char *type_name = NULL;

participant = DDS_DomainParticipantFactory_create_participant(
        DDS_TheParticipantFactory,
        0,
        &DDS_PARTICIPANT_QOS_DEFAULT,
        NULL /* listener */,
        DDS_STATUS_MASK_NONE);

type_name = DeviceStatusTypeSupport_get_type_name();
DeviceStatusTypeSupport_register_type(participant, type_name);

topic = DDS_DomainParticipant_create_topic(
        participant,
        "WindowStatus",
        type_name,
        &DDS_TOPIC_QOS_DEFAULT,
        NULL /* listener */,
        DDS_STATUS_MASK_NONE);
Now we create a DataReader, which is the object that will receive the data.
DDS_DataReader *reader = NULL;
reader = DDS_DomainParticipant_create_datareader(
        participant,
        DDS_Topic_as_topicdescription(topic),
        &DDS_DATAREADER_QOS_DEFAULT,
        NULL, /* listener */
        DDS_STATUS_MASK_NONE);
There are multiple ways to wait for updates on a Topic. In this example
we will use a SampleProcessor with a callback to get notified
with each new data update:
First, we need to define a callback function that will be called when new data is available:
void DeviceStatusListener_on_new_sample(
        void *handler_data,
        const void *sample_data,
        const struct DDS_SampleInfo *sample_info)
{
    DeviceStatus *device_status = (DeviceStatus *) sample_data;

    if (sample_info->valid_data) {
        if (device_status->is_open) {
            printf("WARNING: %s in %s is open!\n",
                device_status->sensor_name,
                device_status->room_name);
        }
    }
}
Now we create a SampleProcessor and attach the reader to it:
DDS_SampleProcessor *sample_processor = NULL;
struct DDS_SampleHandler sample_handler = DDS_SampleHandler_INITIALIZER;
struct DDS_Duration_t poll_period = { 2, 0 };

sample_processor =
        DDS_SampleProcessor_new(&DDS_ASYNC_WAITSET_PROPERTY_DEFAULT);

sample_handler.on_new_sample = DeviceStatusListener_on_new_sample;

DDS_SampleProcessor_attach_reader(
        sample_processor,
        reader,
        &sample_handler);

/* Wait for samples */
for (i = 0; i < 1000; i++) {
    NDDS_Utility_sleep(&poll_period);
}
You can find the full code for the subscriber home_automation_subscriber.c on GitHub
4. Run the applications#
Run one subscriber and two publisher instances, each in a different terminal.
On one terminal window, run the alert subscriber application:
$ python home_automation_subscriber.py
On another terminal window, run a sensor publisher application:
python home_automation_publisher.py
Your subscriber application should alert you when the window is open.
WARNING: Window1 in LivingRoom is open!
WARNING: Window1 in LivingRoom is open!
...
Now open another terminal window and run a second instance of the sensor publisher:
$ python home_automation_publisher.py Window2 Kitchen
The subscriber application now receives updates from both sensors, since both publish the same Topic.
WARNING: Window1 in LivingRoom is open!
WARNING: Window1 in LivingRoom is open!
...
WARNING: Window2 in Kitchen is open!
WARNING: Window1 in LivingRoom is open!
First, build the publisher and subscriber applications using the build
files generated by rtiddsgen for your platform.
Build the applications using the makefile_home_automation_<platform> file. For example:
make -f makefile_home_automation_x64Linux4gcc8.5.0
Open home_automation-<platform>.sln in Visual Studio and
compile the project.
Build the applications using the makefile_home_automation_<platform> file. For example:
make -f makefile_home_automation_arm64Darwin23clang16.0
On one terminal window, run the alert subscriber application:
$ ./objs/<platform>/home_automation_subscriber
On another terminal window, run a sensor publisher application:
$ ./objs/<platform>/home_automation_publisher
Your subscriber application should alert you when the window is open.
WARNING: Window1 in LivingRoom is open!
WARNING: Window1 in LivingRoom is open!
...
Now open another terminal window and run a second instance of the sensor publisher:
$ ./objs/<platform>/home_automation_publisher Window2 Kitchen
The subscriber application now receives updates from both sensors, since both publish the same Topic.
WARNING: Window1 in LivingRoom is open!
WARNING: Window1 in LivingRoom is open!
...
WARNING: Window2 in Kitchen is open!
WARNING: Window1 in LivingRoom is open!
To run the C# applications, you first need to create the file
HomeAutomationProgram.cs as an entrypoint that runs the publisher
or subscriber based on a command-line argument. This code is
available in the RTI GitHub examples repository at tutorials/publish_subscribe/cs/HomeAutomationProgram.cs.
Build the publisher and subscriber applications using the build
files generated by rtiddsgen for your platform, as completed in step 1.
Build the application:
$ dotnet build
On one terminal window, run the alert subscriber application:
$ dotnet run -- sub
On another terminal window, run a sensor publisher application:
$ dotnet run -- pub
Your subscriber application should alert you when the window is open.
WARNING: Window1 in LivingRoom is open!
WARNING: Window1 in LivingRoom is open!
...
Now open another terminal window and run a second instance of the sensor publisher:
$ dotnet run -- pub Window2 Kitchen
The subscriber application now receives updates from both sensors, since both publish the same Topic.
WARNING: Window1 in LivingRoom is open!
WARNING: Window1 in LivingRoom is open!
...
WARNING: Window2 in Kitchen is open!
WARNING: Window1 in LivingRoom is open!
First, build the publisher and subscriber applications using the build
files generated by rtiddsgen for your platform.
Build the applications using the makefile_home_automation_<platform> file. For example:
$ make -f makefile_home_automation_x64Linux4gcc8.5.0
On one terminal window, run the alert subscriber application:
$ make -f makefile_home_automation_<platform> DeviceStatusSubscriber
On another terminal window, run a sensor publisher application:
$ make -f makefile_home_automation_<platform> DeviceStatusPublisher
Your subscriber application should alert you when the window is open.
WARNING: Window1 in LivingRoom is open!
WARNING: Window1 in LivingRoom is open!
...
Now open another terminal window and run a second instance of the sensor publisher:
$ make -f makefile_home_automation_<platform> DeviceStatusPublisher ARGS="Window2 Kitchen"
The subscriber application now receives updates from both sensors, since both publish the same Topic.
WARNING: Window1 in LivingRoom is open!
WARNING: Window1 in LivingRoom is open!
...
WARNING: Window2 in Kitchen is open!
WARNING: Window1 in LivingRoom is open!
First, build the publisher and subscriber applications using the build
files generated by rtiddsgen for your platform.
Build the applications using the makefile_home_automation_<platform> file. For example:
make -f makefile_home_automation_x64Linux4gcc8.5.0
Open home_automation-<platform>.sln in Visual Studio and
compile the project.
Build the applications using the makefile_home_automation_<platform> file. For example:
make -f makefile_home_automation_arm64Darwin23clang16.0
On one terminal window, run the alert subscriber application:
$ ./objs/<platform>/home_automation_subscriber
On another terminal window, run a sensor publisher application:
$ ./objs/<platform>/home_automation_publisher
Your subscriber application should alert you when the window is open.
WARNING: Window1 in LivingRoom is open!
WARNING: Window1 in LivingRoom is open!
...
Now open another terminal window and run a second instance of the sensor publisher:
$ ./objs/<platform>/home_automation_publisher Window2 Kitchen
The subscriber application now receives updates from both sensors, since both publish the same Topic.
WARNING: Window1 in LivingRoom is open!
WARNING: Window1 in LivingRoom is open!
...
WARNING: Window2 in Kitchen is open!
WARNING: Window1 in LivingRoom is open!
Troubleshooting
In case of errors building or running your application, make sure you have set up your environment and license file.
For instructions, go to Get Started, select your platform and installation method, then find the section Run a Hello World.
5. Configure Reliable QoS#
By default, Connext applications communicate using best-effort reliability, which means that some Topic updates may be lost. While this is fine for some use cases, such as periodic updates or streaming scenarios, our alert system needs to reliably know when a window is open.
Connext provides many quality of service (QoS) settings to configure the
communication between applications. To set reliable communications,
add a file called USER_QOS_PROFILES.xml to your application directory
with the following content:
<?xml version="1.0" encoding="UTF-8"?>
<dds xmlns:xsi="http://www.w3.org/2001/XMLSchema-instance"
    xsi:noNamespaceSchemaLocation="https://community.rti.com/schema/current/rti_dds_profiles.xsd">
    <qos_library name="MyLibrary">
        <qos_profile name="MyProfile" is_default_qos="true">
            <base_name>
                <element>BuiltinQosLib::Generic.StrictReliable</element>
            </base_name>
        </qos_profile>
    </qos_library>
</dds>
Your applications will automatically pick up this file from the current
working directory and apply the QoS specified by the profile set as the
default (is_default_qos="true"). In the above QoS configuration,
MyProfile is the default.
Running your applications as you did in the previous section, you’ll see similar output. However, under the hood, the actual behavior is different and subject to the QoS you’ve defined.
Optional exercises#
Use metadata to print the source timestamp (optional)
In the subscriber application, you can access the metadata associated with every Topic update, which includes the source timestamp.
In this excersie, you’ll modify your subscriber application to include the time when the window was opened.
To read the metadata, change the for loop as follows:
async for data, info in reader.take_async():
    if not info.valid:
        continue # skip updates with only meta-data

    if data.is_open:
        timestamp = datetime.fromtimestamp(info.source_timestamp.to_seconds())
        print(f"WARNING: {data.sensor_name} in {data.room_name} is open ({timestamp})")
Also, add from datetime import datetime at the beginning of the file.
When you re-run the subscriber application, you will see output like this:
WARNING: Window1 in LivingRoom is open (2024-04-04 16:25:23.645277)
...
You can access the source timestamp with the sample.info() getter:
if (sample.data().is_open) {
    uint64_t timestamp =
            sample.info().source_timestamp().to_millisecs();
    std::cout << "WARNING: " << sample.data().sensor_name
              << " in " << sample.data().room_name
              << " is open "
              << "(" << std::fixed << std::setprecision(2)
              << timestamp / 1000.0 << "s)" << std::endl;
}
Rebuild the applications and re-run the subscriber. You will see output like this:
WARNING: Window1 in LivingRoom is open (2024-04-04 16:25:23.645277)
...
You can access the source timestamp with the sample.Info.SourceTimestamp
property:
await foreach (var sample in reader.TakeAsync())
{
    if (sample.Info.ValidData)
    {
        DeviceStatus data = sample.Data;
        if (data.is_open)
        {
            Console.WriteLine(
                $"WARNING: {data.sensor_name} in {data.room_name} is open " +
                $"({sample.Info.SourceTimestamp.TotalMilliseconds / 1000.0}s)"
            );
        }
    }
}
Rebuild the applications and re-run the subscriber. You will see output like this:
WARNING: Window1 in LivingRoom is open (2024-04-04 16:25:23.645277)
...
Youcan access the source timestamp with the info.source_timestamp attribute:
SampleInfo info = infoSeq.get(i);
if (info.valid_data) {
    DeviceStatus deviceStatus = dataSeq.get(i);
    if (deviceStatus.is_open) {
        double timestamp = info.source_timestamp.sec + (info.source_timestamp.nanosec / 1e9);
        System.out.println("WARNING: " + deviceStatus.sensor_name
                + " in " + deviceStatus.room_name + " is open ("
                + String.format( "%.2f", timestamp ) + " s)");
    }

}
Rebuild the applications and re-run the subscriber. You will see output like this:
WARNING: Window1 in LivingRoom is open (2024-04-04 16:25:23.645277)
...
You can access the source timestamp with the sample_info->source_timestamp attribute:
if (sample_info->valid_data) {
    if (device_status->is_open) {
        timestamp = sample_info->source_timestamp;
        printf("WARNING: %s in %s is open (%.3f s)\n",
            device_status->sensor_name,
            device_status->room_name,
            timestamp.sec + timestamp.nanosec / 1e9);
    }
}
Rebuild the applications and re-run the subscriber. You will see output like this:
WARNING: Window1 in LivingRoom is open (2024-04-04 16:25:23.645277)
...
Publish a second topic to send alert notifications (optional)
In this exercise, you’ll modify the subscriber application to, instead of
printing a warning, publish the alert into a new “HomeAlerts” Topic.
For this Topic, you’ll use a key-value type. The key will be the sensor
name, and the value a human-readable message describing the alert.
Connext provides a built-in type (KeyedString) for this purpose,
so you don’t need to define a new data type.
To subscribe to the new Topic, run DDS Spy (rtiddsspy), a command-line tool
that can subscribe to any Topic.
Create home_alerts.py by copying
home_automation_subscriber.py and editing it as detailed
below.
Add the following code to import the KeyedString type:
from rti.types.builtin import KeyedString
Create the new “HomeAlerts” Topic (on the same domain), and a DataWriter for that Topic:
alerts_topic = dds.Topic(participant, "HomeAlerts", KeyedString)
alerts_writer = dds.DataWriter(alerts_topic)
Update the loop to publish an alert when a window is opened:
async for data in reader.take_data_async():
    if data.is_open:
        alert = KeyedString(
            key=data.sensor_name,
            value=f"Window in {data.room_name} was just opened",
        )
        alerts_writer.write(alert)
While the application will now work, you can further improve it by making the alert source timestamp match the original event timestamp (the window opening).
In the updated code below, the loop also reads the
info (metadata) associated with each update and passes the
source timestamp of the “WindowStatus” update to the write()
method.
async for data, info in status_reader.take_async():
    if info.valid and data.is_open:
        alert = KeyedString(
            key=data.sensor_name,
            value=f"Window in {data.room_name} was just opened",
        )
        alert_writer.write(alert, timestamp=info.source_timestamp)
See the full home_alerts.py code below. (Note the names
for the original topic and reader objects have changed to
status_topic and status_reader):
import rti.asyncio  # required by take_data_async()
import rti.connextdds as dds
from home_automation import DeviceStatus
from rti.types.builtin import KeyedString

async def sensor_monitoring():
    participant = dds.DomainParticipant(domain_id=0)

    status_topic = dds.Topic(participant, "WindowStatus", DeviceStatus)
    status_reader = dds.DataReader(status_topic)

    alert_topic = dds.Topic(participant, "HomeAlerts", KeyedString)
    alert_writer = dds.DataWriter(alert_topic)

    async for data, info in status_reader.take_async():
        if info.valid and data.is_open:
            alert = KeyedString(
                key=data.sensor_name,
                value=f"Window in {data.room_name} was just opened",
            )
            alert_writer.write(alert, timestamp=info.source_timestamp)

if __name__ == "__main__":
    rti.asyncio.run(sensor_monitoring())
The new application, home_alerts.cxx, is available on GitHub.
First, create the type alias KeyedString:
using KeyedString = dds::core::KeyedStringTopicType;
Create the new “HomeAlerts” Topic (on the same domain), and a DataWriter for that Topic.
dds::topic::Topic<KeyedString> alert_topic(participant, "HomeAlerts");
dds::pub::DataWriter<KeyedString> alert_writer(alert_topic);
Next, update the sample processor to publish an alert when a window is opened:
sample_processor.attach_reader(
        status_reader,
        [alert_writer](const rti::sub::LoanedSample<DeviceStatus> &sample) mutable {
            if (!sample.info().valid() || !sample.data().is_open) {
                return;
            }

            alert_writer.write(
                    KeyedString(
                            sample.data().sensor_name,
                            "Window in " + sample.data().room_name + " was just opened"));
        });
While the application will now work, you can improve it by making the alert source timestamp match the original event timestamp (the window opening).
In the updated code below, the sample processor also uses the
sample.info() metadata associated with each update, and
passes the source timestamp of the WindowStatus event to the
write() method.
alert_writer.write(
        KeyedString(
                sample.data().sensor_name,
                "Window in " + sample.data().room_name + " was just opened"),
        sample.info().source_timestamp());
See the full home_alerts.cxx code below. (Note the names
for the original topic and reader objects have changed to
status_topic and status_reader):
#include <iostream>
#include <thread>

#include "rti/rti.hpp"
#include "rti/sub/SampleProcessor.hpp"
#include "home_automation.hpp"

using KeyedString = dds::core::KeyedStringTopicType;

int main(int argc, char **argv)
{
    dds::domain::DomainParticipant participant(0);
    dds::topic::Topic<DeviceStatus> status_topic(participant, "WindowStatus");
    dds::sub::DataReader<DeviceStatus> status_reader(status_topic);

    dds::topic::Topic<KeyedString> alert_topic(participant, "HomeAlerts");
    dds::pub::DataWriter<KeyedString> alert_writer(alert_topic);

    rti::sub::SampleProcessor sample_processor;
    sample_processor.attach_reader(
            status_reader,
            [alert_writer](const rti::sub::LoanedSample<DeviceStatus> &sample) mutable {
                if (!sample.info().valid() || !sample.data().is_open) {
                    return;
                }

                alert_writer.write(
                        KeyedString(
                                sample.data().sensor_name,
                                "Window in " + sample.data().room_name + " was just opened"),
                        sample.info().source_timestamp());
            });

    while (true) {  // wait in a loop
        std::this_thread::sleep_for(std::chrono::seconds(4));
    }
}
Now run a couple publishers and the home alerts application on different terminal windows.
Follow the instructions to build the example using CMake in the GitHub repository
Terminal 1 - run a sensor publisher application:
$ python home_automation_publisher.py
Terminal 2 - run a second publisher:
$ python home_automation_publisher.py Window2 Kitchen
Terminal 3 - run the home alerts application:
$ python home_alerts.py
Terminal 1 - run a sensor publisher application:
$ ./build/home_automation_publisher
Terminal 2 - run a second publisher:
$ ./build/home_automation_publisher Window2 Kitchen
Terminal 3 - run the home alerts application:
$ ./build/home_alerts
You shouldn’t see any output yet. After running the applications, run
rtiddsspy to subscribe to the alert Topic:
$ <install dir>/bin/rtiddsspy -printSample COMPACT -topic HomeAlerts
You should now see the alerts:
21:21:06 New writer        from 10.0.0.225      : topic="WindowStatus" type="DeviceStatus"
21:21:06 New writer        from 10.0.0.225      : topic="HomeAlerts" type="KeyedString"
21:21:06 New reader        from 10.0.0.225      : topic="WindowStatus" type="DeviceStatus"
21:21:07 New writer        from 10.0.0.225      : topic="WindowStatus" type="DeviceStatus"
21:21:10 New data          from 10.0.0.225      : topic="HomeAlerts" type="KeyedString" sample={"key":"Window2","value":"Window in Kitchen was just opened"}
21:21:11 New data          from 10.0.0.225      : topic="HomeAlerts" type="KeyedString" sample={"key":"Window1","value":"Window in LivingRoom was just opened"}
21:21:14 Modified instance from 10.0.0.225      : topic="HomeAlerts" type="KeyedString" sample={"key":"Window2","value":"Window in Kitchen was just opened"}
21:21:15 Modified instance from 10.0.0.225      : topic="HomeAlerts" type="KeyedString" sample={"key":"Window1","value":"Window in LivingRoom was just opened"}
...
Here’s what’s happening:
The home automation publisher publishes the “WindowStatus” Topic with the status of the sensor.
The alert service application receives updates to the “WindowStatus” Topic and, when a window is opened, publishes an update to the “HomeAlert” Topic.
rtiddsspy subscribes to the “HomeAlert” Topic and prints each update. “New data” indicates that a new instance (“Window1”, “Window2”) was received. “Modified instance” indicates an update (a new alert) for an existing instance.
Learn more#
This module introduced the basic concepts of the publish-subscribe communication model with a simple example focused on an event-driven design. You learned how to publish a Topic, which allows any application in the system to have access to the data. We created one subscriber application to perform a specific task based on updates to that Topic.
Next Steps
This guide is designed to be modular, and most modules can be completed independently. The following are a few suggestions for next steps.
Learn about additional communications patterns:
Distributed Data Cache. The application we just built reacts to events (updates to a Topic). You can also model your system with subscribers that work as if they had a local copy of the distributed data at their disposal. You’ll also learn how key fields define instances in a Topic and how to track their life cycle.
Content Filtering. A more efficient alert application can use a content filter to receive updates only when the window is open or for a subset of rooms. As a data-centric framework, Connext can efficiently filter the data at the source.
Discovery. We’ve run our application on the same machine for simplicity. This module explains how to run on different machines and networks.
Learn more about developing with Connext:
Data Modeling. This module shows how to define more complex data types and data flows, and introduces System Designer to help you create your applications.
Debugging. Use command-line and graphical tools to debug why your applications don’t communicate.
Data Visualization. Use Admin Console to visualize the data being published in your system.
Reference documentation:
