Docker & Kubernetes#
Coming soon!
The RTI Docker images required to complete this module are not available yet.
This module is provided as a preview. The Docker images will be available soon.
Introduction#
What you’ll learn
In this module, you’ll learn how to use Docker® to build and run your Connext applications in containers and how to deploy them in cloud environments.
You will do the following:
Create a Docker image for your C++ Connext applications.
Run Connext applications in Docker containers.
You can also follow these optional tutorials:
Use Docker Compose to define a system with several containers
Run the applications in the cloud using Cloud Discovery Service
Try a set of recipes for different deployment scenarios with Kubernetes
RTI provides Connext Docker images that enable you to easily containerize your applications. Images are available for Connext Professional as well as Connext Tools and Infrastructure Services. You can use these images to:
Create containers to run Connext standalone or as part of a container management platform like Kubernetes
Build custom images using your preferred configuration
In this module, we’ll use a Dockerfile based on the Connext SDK image
(rticom/connext-sdk) to build the applications detailed in the
Publish-Subscribe module. Then we’ll run those applications using
the Connext Runtime image (rticom/connext-runtime).
How to complete this module#
To complete this module, you’ll need the following:
20-30 minutes (plus extra time for the optional exercise)
An RTI Connext license file (
rti_license.dat). Get a free license: Try Connext for Free.Docker installed on your machine.
The optional tutorials have additional requirements, listed in each section.
A clone of the
rticonnextdds-examplesGitHub repository.
Cloning the GitHub repository
Clone the GitHub repository with the following command:
$ git clone --recurse-submodule https://github.com/rticommunity/rticonnextdds-examples.git
The code for this module is located in the tutorials/docker
directory. See the README.md files for additional instructions.
This guide is designed for Connext 7.7.0 or newer. For Connext 7.3.1, checkout the branch release/7.3.1.
We will use code from the Publish-Subscribe module, but completing that module is not required.
1. Create a Docker image for your applications#
In this step, you’ll build the home automation publisher and subscriber applications from the Publish-Subscribe module.
We will work in the tutorials/docker directory, which contains a
Dockerfile, a CMakeLists.txt file, and the source files for the
applications.
First, copy your rti_license.dat file to this directory.
The first section of the Dockerfile builds the applications:
FROM rticom/connext-sdk:7.3.0-EAR as build-stage

WORKDIR /app

# Copy the necessary files to the container
COPY rti_license.dat ${NDDSHOME}
COPY CMakeLists.txt .
COPY home_automation.idl .
COPY *.cxx .
COPY *.xml .

# Build the applications
RUN mkdir build
WORKDIR /app/build
RUN cmake ..
RUN make -j4
This section of the Dockerfile completes the following tasks:
Derives your image from the
rticom/connext-sdkimage, which provides the necessary tools to build Connext applications.Copies the license file to the Connext installation directory in the container.
Copies the source files to an /app directory in the container.
Compiles the applications using the
CMakeLists.txtfile.
The CMakeLists.txt file uses Connext CMake utilities included in the image
to generate the C++ code for the types in the home_automation.idl file, then
compiles the home_automation_publisher and home_automation_subscriber
applications:
cmake_minimum_required(VERSION 3.11)
project(connext-tutorial-docker-pub-sub)

# Include Connext CMake utilities
list(APPEND CMAKE_MODULE_PATH
    "/opt/rti.com/rticonnextdds-examples/resources/cmake/Modules/"
)
include(ConnextDdsConfigureCmakeUtils)
connextdds_configure_cmake_utils()
include(ConnextDdsAddExample)

connextdds_call_codegen(
    IDL "home_automation"
    LANG "C++11"
    PREFIX "home_automation"
)

connextdds_add_application(
    TARGET "publisher"
    LANG "C++11"
    OUTPUT_NAME "home_automation_publisher"
    SOURCES
        $<TARGET_OBJECTS:home_automation_CXX11_obj>
        "${CMAKE_CURRENT_SOURCE_DIR}/home_automation_publisher.cxx"
    DEPENDENCIES
    ${_CONNEXT_DEPENDENCIES}
)

connextdds_add_application(
    TARGET "subscriber"
    LANG "C++11"
    OUTPUT_NAME "home_automation_subscriber"
    SOURCES
        $<TARGET_OBJECTS:home_automation_CXX11_obj>
        "${CMAKE_CURRENT_SOURCE_DIR}/home_automation_subscriber.cxx"
    DEPENDENCIES
    ${_CONNEXT_DEPENDENCIES}
)
The second section of the Dockerfile uses the results of the build to run the
publisher application in a new image based on the rticom/connext-runtime
image:
FROM rticom/connext-runtime:7.3.0-EAR as final-stage

WORKDIR /app
COPY --chown=rtiuser:rtigroup --from=build-stage ${NDDSHOME}/rti_license.dat ${NDDSHOME}
COPY --chown=rtiuser:rtigroup --from=build-stage /app/build/ /app
This section of the Dockerfile completes the following tasks:
Copies the build results from the previous stage to a new, smaller image based on
rticom/connext-runtime, which contains just what’s necessary to run the applications.Copies the license file.
Now build the image with the following command:
$ docker build -t home-automation .
2. Run the applications with Docker#
After creating the Docker image, you can run the publisher and subscriber applications.
In one terminal, run a container for the subscriber application:
$ docker run --rm --network host --name subscriber home-automation ./home_automation_subscriber
In another terminal, run another container for the publisher application:
$ docker run --rm --network host --name publisher home-automation ./home_automation_publisher
You should see the following subscriber output:
WARNING: Sensor1 in LivingRoom is open!
WARNING: Sensor1 in LivingRoom is open!
WARNING: Sensor1 in LivingRoom is open!
...
You can run additional subscribers and publishers in different terminals:
$ docker run --rm --network host --name publisher2 home-automation ./home_automation_publisher Sensor2 Kitchen
Note that the applications use the QoS profile defined in USER_QOS_PROFILES.xml,
which was copied to the container’s working directory.
Extra: Automate a complex system with Docker Compose#
In this optional exercise, you’ll create a docker-compose.yml file to
automate the creation of a system that includes several applications. This
system adds a second Topic, an alert service, and an alert subscriber, as first
introduced in the Publish a second topic
optional exercise in the Publish-Subscribe module.
This tutorial requires Docker Compose in addition to Docker.
Automate a complex system with Docker Compose
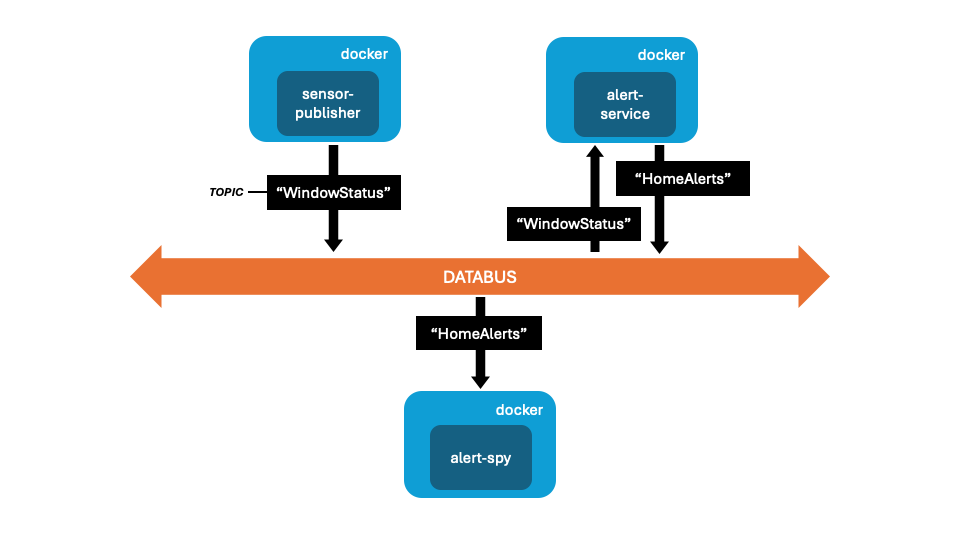
In this optional exercise, you’ll run four containers:
sensor1-publisherruns a publisher application, which publishes the “WindowStatus” Topic.sensor2-publisherruns another publisher for “WindowStatus.”alert-serviceruns the home_alerts application, which subscribes to the “WindowStatus” Topic and publishes the “HomeAlert” Topic when a window is opened.alert-spyrunsrtiddsspyto subscribe to and print the “HomeAlert” Topic.
You’ll also associate a different QoS profile to the publishers and the alert service.
Let’s look at the docker-compose.yml file:
version: '3.8'

services:
    home-automation-base:
        image: home-automation
        build:
            context: .
            dockerfile: Dockerfile

    sensor1-publisher:
        image: home-automation
        depends_on:
            - home-automation-base
        network_mode: host
        environment:
            - NDDS_QOS_PROFILES=sensor_publisher_qos.xml
        command: ["./home_automation_publisher", "Sensor1", "LivingRoom"]

    sensor2-publisher:
        image: home-automation
        depends_on:
            - home-automation-base
        network_mode: host
        environment:
            - NDDS_QOS_PROFILES=sensor_publisher_qos.xml
        command: ["./home_automation_publisher", "Sensor2", "Kitchen"]

    alert-service:
        image: home-automation
        depends_on:
            - home-automation-base
        network_mode: host
        environment:
            - NDDS_QOS_PROFILES=alert_service_qos.xml
        command: ["./home_alerts"]

    alert-spy:
        image: rticom/dds-spy:7.3.0-EAR
        network_mode: host
        command: ["-printSample COMPACT -topic HomeAlerts"]
This file defines the following services:
home-automation-base: Creates thehome-automationimage used by the other containers.sensor1-publisher: Runs the first publisher application (“Sensor1” in “LivingRoom”) with the QoS profilesensor_publisher_qos.xml.sensor2-publisher: Runs the second publisher application (“Sensor2” in “Kitchen”) with the same QoS profile.alert-service: Runs the alert service application with the QoS profilealert_service_qos.xml.alert-spy: Runsrtiddsspyto subscribe to and print the “HomeAlert” Topic using therticom/dds-spyimage.
The environment variable NDDS_QOS_PROFILES specifies a file for applications
to load the default QoS profiles. The profiles defined in sensor_publisher_qos.xml
and alert_service_qos.xml simply configure reliable communications
and set a participant name, which helps identify the applications in tools
like Admin Console.
To run the system, enter the following command:
$ docker-compose up --build
After the build completes, you should see the output of all the services:
sensor1-publisher-1     | Publishing sensor Sensor1 in room LivingRoom...
sensor2-publisher-1     | Publishing sensor Sensor2 in room Kitchen...
alert-service-1         | Starting home alert service...
alert-spy-1             |
alert-spy-1             | RTI Connext DDS Spy built with DDS version: 7.3.0
alert-spy-1             | ~~~~~~~~~~~~~~~~~~~~~~~~~~~~~~~~~~~~~~~~~~
alert-spy-1             | rtiddsspy is listening for data, press CTRL+C to stop it.
alert-spy-1             |
alert-spy-1             | 20:13:29 New reader        from 192.168.65.3    : topic="WindowStatus" type="DeviceStatus"
alert-spy-1             | 20:13:29 New writer        from 192.168.65.3    : topic="HomeAlerts" type="DDS::KeyedString"
alert-spy-1             | 20:13:29 New writer        from 192.168.65.3    : topic="WindowStatus" type="DeviceStatus"
alert-spy-1             | 20:13:31 New data          from 192.168.65.3    : topic="HomeAlerts" type="DDS::KeyedString" sample={"key":"Sensor2","value":"Window was just opened"}
alert-spy-1             | 20:13:31 New data          from 192.168.65.3    : topic="HomeAlerts" type="DDS::KeyedString" sample={"key":"Sensor1","value":"Window was just opened"}
alert-spy-1             | 20:13:29 New writer        from 192.168.65.3    : topic="WindowStatus" type="DeviceStatus"
alert-spy-1             | 20:13:35 Modified instance from 192.168.65.3    : topic="HomeAlerts" type="DDS::KeyedString" sample={"key":"Sensor2","value":"Window was just opened"}
alert-spy-1             | 20:13:35 Modified instance from 192.168.65.3    : topic="HomeAlerts" type="DDS::KeyedString" sample={"key":"Sensor1","value":"Window was just opened"}
alert-spy-1             | 20:13:39 Modified instance from 192.168.65.3    : topic="HomeAlerts" type="DDS::KeyedString" sample={"key":"Sensor2","value":"Window was just opened"}
alert-spy-1             | 20:13:39 Modified instance from 192.168.65.3    : topic="HomeAlerts" type="DDS::KeyedString" sample={"key":"Sensor1","value":"Window was just opened"}
...
Here’s what’s happening:
sensor1-publisherandsensor2-publisherpublish the “WindowStatus” Topic with the status of their corresponding sensors.alert-servicereceives updates to the “WindowStatus” Topic and, when a window is opened, prints theWARNINGmessage and publishes an update to the “HomeAlert” Topic.alert-spysubscribes to the “HomeAlert” Topic and prints each update.
Extra: Run the applications in the cloud#
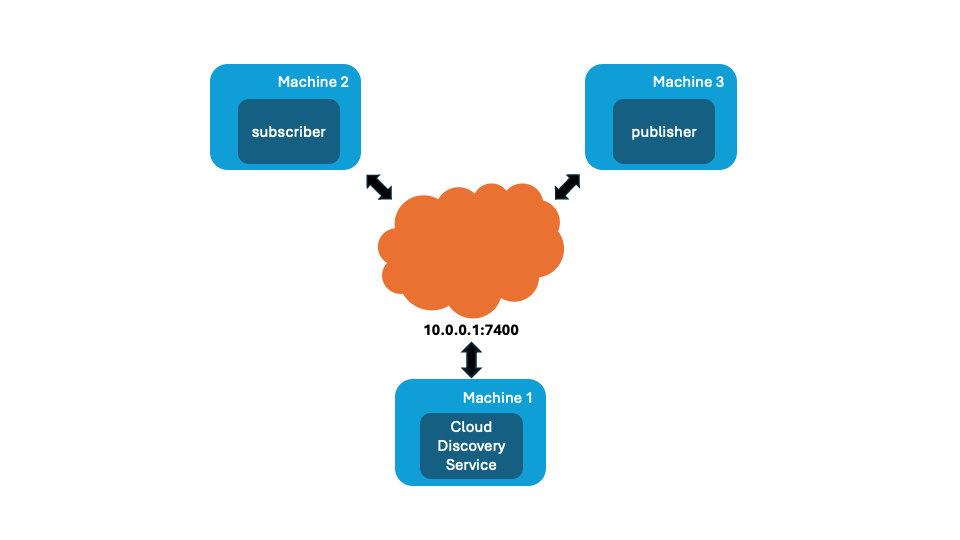
In this section, you’ll configure the applications to run on different networks (for example, in the cloud) and discover each other using Cloud Discovery Service.
This tutorial requires access to three machines on separate networks, and one of them must have a public IP address.
Run the applications in the cloud
Cloud Discovery Service was introduced in the Discovery module. It’s a service that facilitates discovery between applications, simplifying their configuration.
This exercise assumes that the machine where Cloud Discovery Service is running is accessible through the IP address 10.0.0.1 and UDP port 7400.
On machine 1, run Cloud Discovery Service as follows:
$ docker run --rm -v rti_license.dat:/opt/rti.com/rti_connext_dds-7.7.0/rti_license.dat --network host rticom/cloud-discovery-service:7.7.0 -cfgName defaultWAN
This command runs the Cloud Discovery Service container with a default configuration that uses RTI’s Real-Time WAN Transport and listens on port 7400.
Next, modify the USER_QOS_PROFILES.xml file to configure the
applications. Add the following code in the <qos_profile> tag, and
then set the appropriate IP address and port:
<domain_participant_qos>
    <transport_builtin>
        <mask>UDPv4_WAN</mask>
    </transport_builtin>
    <discovery>
        <initial_peers>
            <element>udpv4_wan://10.0.0.1:7400</element>
        </initial_peers>
    </discovery>
</domain_participant_qos>
The applications will now use Real-Time WAN Transport to communicate. They will initially contact Cloud Discovery Service at the specified address to discover other applications.
Rebuild the image to update the USER_QOS_PROFILES.xml file, and
run the applications, each in a different machine:
$ docker build -t home-automation
On machine 2, run the subscriber:
$ docker run --rm --name subscriber home-automation ./home_automation_subscriber
On machine 3, run the publisher:
$ docker run --rm --name publisher home-automation ./home_automation_publisher
You should see the subscriber output:
WARNING: Sensor1 in LivingRoom is open!
WARNING: Sensor1 in LivingRoom is open!
WARNING: Sensor1 in LivingRoom is open!
...
Extra: Kubernetes deployment recipes#
The repository rticommunity/kubernetes-examples contains practical examples of how to deploy Connext applications with Kubernetes.
Each example states a problem and provides practical solutions using Kubernetes:
Communications Between Pods Inside a Kubernetes Cluster via Multicast Discovery
Communications Between Pods Inside a Kubernetes Cluster via Unicast Discovery
Intra Pod Communications Using Shared Memory
Communications Between External Applications and Pods Within a Kubernetes Cluster Using a Gateway
Communications Between External Applications And Pods Within a Kubernetes Cluster Using a Network Load-Balanced Gateway
The examples assume you have some familiarity with Kubernetes.
For simplicity, these examples use the RTI DDS Ping (rticom/dds-ping)
Docker image to simulate publishers and subscribers, but you can adapt them
to run your own containers.
See rticommunity/kubernetes-examples for more information.
Learn more#
This module demonstrated how to build and run your Connext applications in Docker containers and introduced you to recipes to deploy them using Kubernetes.
Next Steps
Related modules:
Discovery. Introduces the application discovery mechanism and shows how to run applications on multiple machines.
More resources on Docker and Kubernetes:
RTI Docker Hub. Find all Connext docker images, including images for infrastructure services (recording, routing, persistence…), and instructions for each.
rticommunity/kubernetes-examples. Find Kubernetes recipes for deploying Connext systems.
More about Real-Time WAN Transport and Cloud Discovery Service:
User’s Manual, Real-Time WAN Transport
User’s Manual, Cloud Discovery Service
