4. Security
Observability Framework can secure the telemetry data generated by Connext applications and stored in the telemetry backends. Data in transit is secured using the RTI Security Plugins and BASIC-Auth over HTTPS. Data at rest is secured by the third-party telemetry backends.
Figure 4.1 shows the Observability Framework security architecture when Collector Service is configured to store the telemetry data in Prometheus and Grafana Loki.
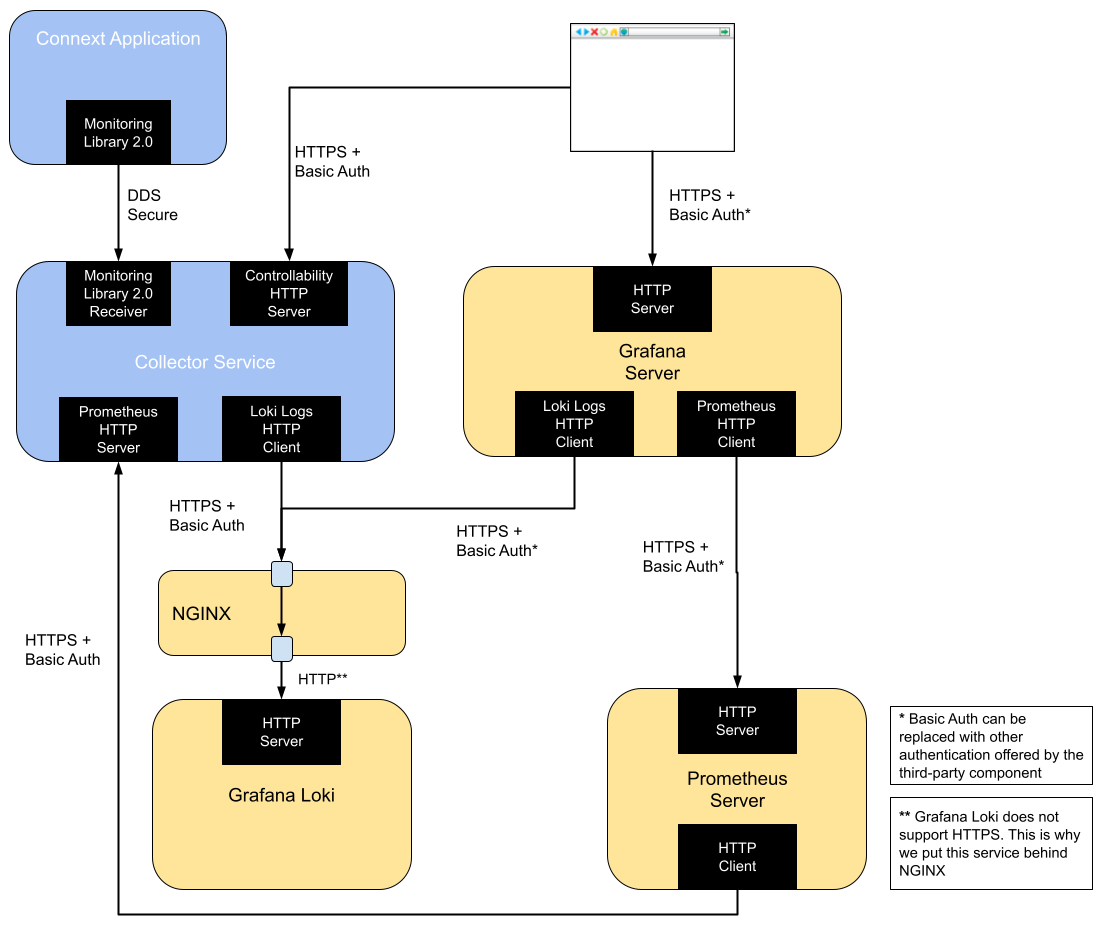
Figure 4.1 Security Architecture of RTI Observability Framework when using Prometheus and Grafana Loki
To facilitate testing and evaluation, you can install Observability Framework using Docker Compose (Prepackaged) to automatically run and deploy all the components shown in Figure 4.1 within a single host.
Figure 4.2 shows the Observability Framework security architecture when Collector Service is configured to forward the telemetry data to an OpenTelemetry Collector. This diagram does not show the Grafana server because Observability Dashboards are only provided for the Prometheus and Grafana Loki telemetry backends.
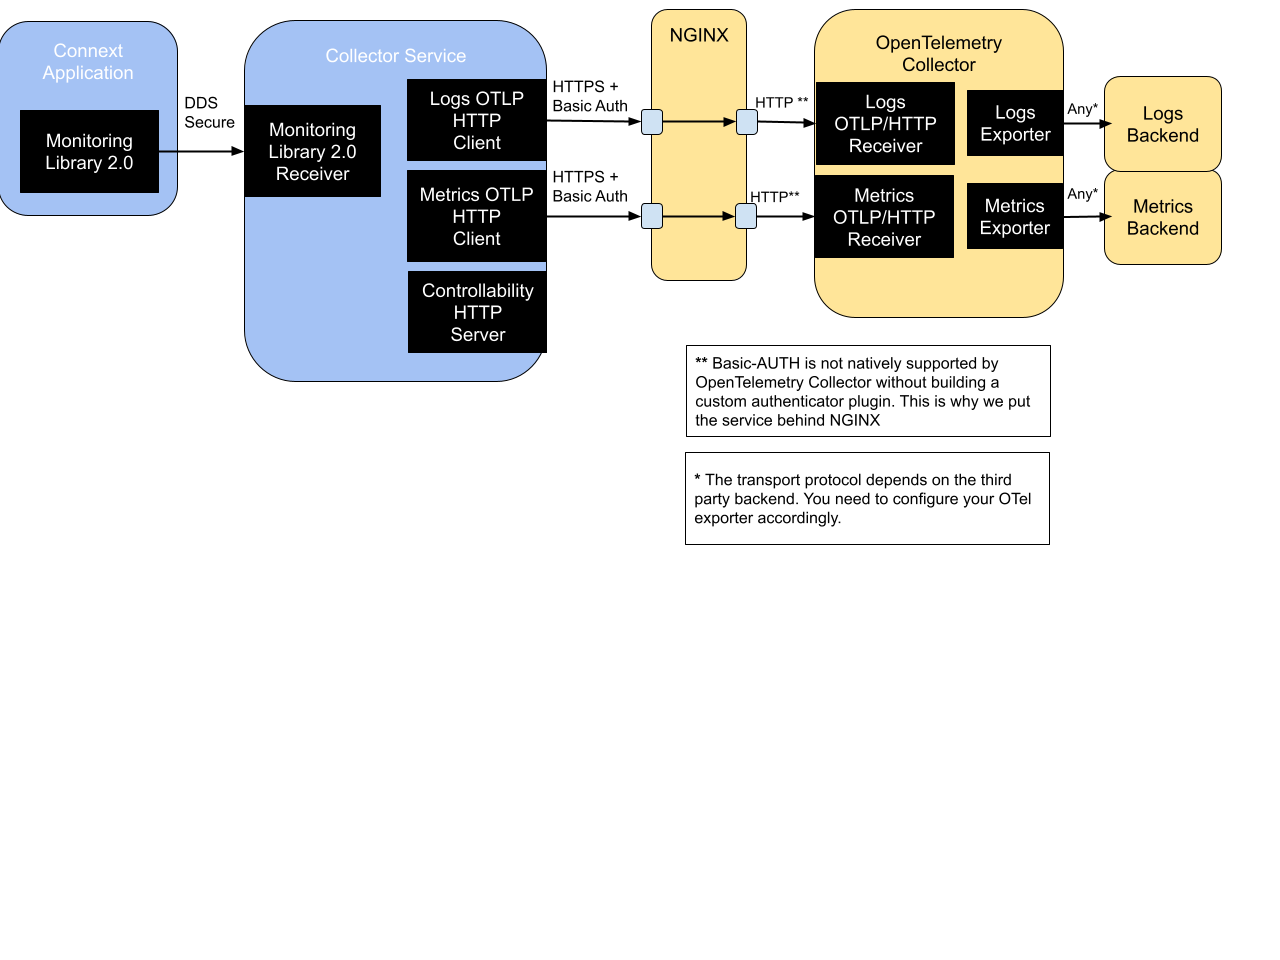
Figure 4.2 Security Architecture of RTI Observability Framework when using OpenTelemetry Collector
To facilitate testing and evaluation, you can install Observability Framework using Docker Compose (Prepackaged) to automatically run and deploy an OpenTelemetry Collector instance that stores the telemetry data in a local Prometheus and Grafana Loki as shown in Figure 4.3.
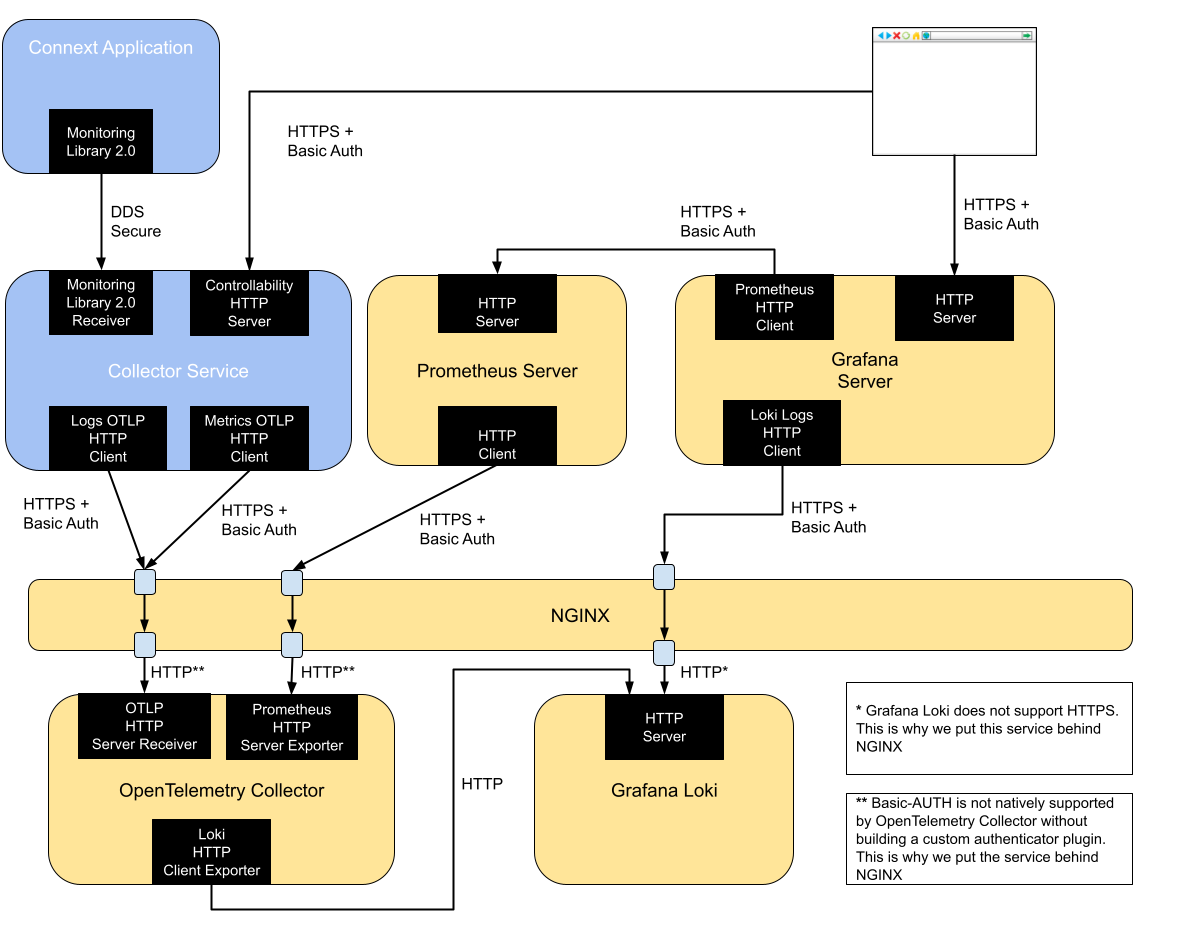
Figure 4.3 Security Architecture of the RTI Observability Framework when using OpenTelemetry Collector, Prometheus and Grafana Loki
4.1. Secure Communication between Connext Applications and Collector Service
The exchange of telemetry data between a Connext application and Collector Service is secured by using the RTI Security Plugins. For additional information on how to configure the Security Plugins, see the Support for RTI Observability Framework section in the RTI Security Plugins User’s Manual.
If you install Observability Framework using the Docker Compose (Prepackaged) option, the security artifacts required to configure the Security Plugins in Collector Service can be provided during the installation process. Use the highlighted parameters in your JSON configuration file:
  {
      "securityConfig": {
          "basicAuthUsername": "yourusername",
          "basicAuthPassword": "yourpassword",
          "httpsSecurity": {
              "caCertificate":     "path/to/ca_cert.pem",
              "serverCertificate": "path/to/server_cert.pem",
              "serverKey":         "path/to/server_key.pem"
          },
          "ddsSecurity": {
              "identityCaCertificate":    "path/to/identityCaCert.pem",
              "permissionsCaCertificate": "path/to/permissionsCaCert.pem",
              "identityCertificate":      "path/to/identityCert.pem",
              "identityKey":              "path/to/identityKey.pem",
              "signedPermissionsFile":    "path/to/signedPermissions.p7s",
              "signedGovernanceFile":     "path/to/signedGovernance.p7s"
          }
      }
  }
If you run Collector Service using the
Docker (Separate Deployment) option,
the security artifacts required to
configure the RTI Security Plugins in Collector Service can be bind-mounted by providing
the following options to the docker run command:
-v path/to/identityCaCert.pem:/rti/security/dds/identity_ca.pem
-v path/to/permissionsCaCert.pem:/rti/security/dds/permissions_ca.pem
-v path/to/identityCert.pem:/rti/security/dds/identity_certificate.pem
-v path/to/identityKey.pem:/rti/security/dds/private_key.pem
-v path/to/signedPermissions.p7s:/rti/security/dds/permissions.p7s
-v path/to/signedGovernance.p7s:/rti/security/dds/governance.p7s
In addition, you need to set the CFG_NAME environment variable to one
of the provided Docker image’s built-in configurations that enable the
Security Plugins in Collector Service (see Docker (Separate Deployment)).
For additional details, see the Collector Service docker image documentation.
For details on how to generate the security artifacts see Generating the Observability Framework Security Artifacts.
4.2. Secure Communication with Collector Service’s HTTP Servers
Collector Service can start two HTTP servers: one to receive remote commands and another one to expose the Prometheus metrics. The communication with these HTTP servers is secured using BASIC-Auth over HTTPS.
Collector Service provides a REST API for receiving remote commands to control the collection and distribution of telemetry data from Connext Applications. In this release, the REST API can only be used from Observability Dashboards.
Collector Service can be configured to store the telemetry data in a Prometheus backend. Prometheus collects metrics from targets by scraping metrics HTTP endpoints on these targets.
To configure the security of the HTTP servers started by Collector Service, you can follow these steps.
If you install Observability Framework using Docker Compose (Prepackaged), use the highlighted parameters in the installation JSON configuration file:
  {
      "securityConfig": {
          "basicAuthUsername": "yourusername",
          "basicAuthPassword": "yourpassword",
          "httpsSecurity": {
              "caCertificate":     "path/to/ca_cert.pem",
              "serverCertificate": "path/to/server_cert.pem",
              "serverKey":         "path/to/server_key.pem"
          },
          "ddsSecurity": {
              "identityCaCertificate":    "path/to/identityCaCert.pem",
              "permissionsCaCertificate": "path/to/permissionsCaCert.pem",
              "identityCertificate":      "path/to/identityCert.pem",
              "identityKey":              "path/to/identityKey.pem",
              "signedPermissionsFile":    "path/to/signedPermissions.p7s",
              "signedGovernanceFile":     "path/to/signedGovernance.p7s"
          }
      }
  }
If you run Collector Service using
Docker (Separate Deployment), the security artifacts to
configure the HTTP servers running in Collector Service
can be bind-mounted by providing the following options to the docker run
command:
-v path/to/server.pem:/rti/security/https/server.pem
-v path/to/htdigest:/rti/security/https/htdigest
In addition, you need to set the CFG_NAME environment variable to one
of the provided Docker image’s built-in secure configurations
(see Docker (Separate Deployment)).
The server.pem file must contain both a valid server certificate
(server_cert.pem) and the corresponding private key (server_key.pem).
The htdigest is a password file that contains the username and password for
BASIC-Auth. The htdigest file is a password file that contains the Apache
htdigest.
For details on how to generate the server.pem file and the htdigest file, see Generating the Observability Framework Security Artifacts.
Important
The configuration of the HTTP clients initiated by third-party components is out of the scope of this documentation. Please refer to the documentation of the third-party components for additional details.
However, if you install Observability Framework using
Docker Compose (Prepackaged), the third-party components will
be configured to use the security artifacts provided in the installation
JSON configuration file. You can take a look into the configuration files
of the third-party components located in the directory
<rti_workspace_dir>/user_config/observability to see how the security
artifacts are used.
4.3. Secure Communication with Third-party Components’ HTTP Servers
Observability Framework can start three HTTP clients: one to send logs to Grafana Loki, one to send logs to OpenTelemetry Collector, and one to send metrics to OpenTelemetry Collector. The communication with these HTTP clients is secured using BASIC-Auth over HTTPS.
To configure the security of the HTTP clients started by Collector Service:
If you install Observability Framework using Docker Compose (Prepackaged), use the highlighted parameters in the installation JSON configuration file:
  {
      "securityConfig": {
          "basicAuthUsername": "yourusername",
          "basicAuthPassword": "yourpassword",
          "httpsSecurity": {
              "caCertificate":     "path/to/ca_cert.pem",
              "serverCertificate": "path/to/server_cert.pem",
              "serverKey":         "path/to/server_key.pem"
          },
          "ddsSecurity": {
              "identityCaCertificate":    "path/to/identityCaCert.pem",
              "permissionsCaCertificate": "path/to/permissionsCaCert.pem",
              "identityCertificate":      "path/to/identityCert.pem",
              "identityKey":              "path/to/identityKey.pem",
              "signedPermissionsFile":    "path/to/signedPermissions.p7s",
              "signedGovernanceFile":     "path/to/signedGovernance.p7s"
          }
      }
  }
If you run Collector Service using
Docker (Separate Deployment), the security artifacts to
configure the HTTP clients running in Collector Service can be provided
by using the following options to the docker run command:
-e OBSERVABILITY_BASIC_AUTH_USERNAME=yourusername
-e OBSERVABILITY_BASIC_AUTH_PASSWORD=yourpassword
-v path/to/ca_cert.pem:/rti/security/https/rootCA.crt
In addition, you need to set the CFG_NAME environment variable to one
of the provided Docker image’s built-in secure configurations
(see Docker (Separate Deployment)).
Important
The configuration of the third-party components’ HTTP servers is out of the scope of this documentation. Please refer to the documentation of the third-party components for additional details.
However, if you install Observability Framework using
Docker Compose (Prepackaged), the third-party components will
be configured to use the security artifacts provided in the installation
JSON configuration file. You can take a look into the configuration files
of the third-party components located in the directory
<rti_workspace_dir>/user_config/observability to see how the security
artifacts are used.
4.4. Generating the Observability Framework Security Artifacts
This section describes how to generate the security artifacts required to secure Observability Framework. For an overview of the security architecture of the Observability Framework, see Security.
There are two sets of security artifacts:
DDS security artifacts secure the exchange of telemetry data with an application using Monitoring Library 2.0.
HTTPS security artifacts secure the exchange of telemetry data between Collector Service and the third-party observability backends as well as to send remote commands to Collector Service.
4.4.1. Generating DDS Security Artifacts
The DDS security artifacts are used to secure the exchange of telemetry data between a Connext application and Collector Service.
See Support for RTI Observability Framework section in the RTI Security Plugins User’s Manual for details about how to secure the communication between a Connext application and Collector Service.
For details on how to create/update DDS security artifacts, see Generating and Revoking Your Own Certificates Using OpenSSL in Security Plugins Getting Started.
4.4.2. Generating HTTPS Security Artifacts
The security artifacts needed to secure the communication between Collector Service and the third-party observability backends are:
A root CA certificate file
A server certificate file
A server key
We will start by generating a self-signed Root CA, which will issue the Server Certificate used to secure the various HTTP servers in Observability Framework. This will require us to set up a minimal security infrastructure first.
We will show an example for ECDSA as the public-key algorithm to generate the certificates. Note that you can use any public-key algorithm listed in Supported Cryptographic Algorithms in the Security Plugins User’s Manual.
Note
We will use the OpenSSL CLI to perform the security operations in the generation of the security artifacts. Make sure to include in the path your OpenSSL binary directory 1. The installation process is described in the RTI Security Plugins Installation Guide.
- 1
Read the official documentation for more information on the OpenSSL configuration files.
4.4.2.1. Preliminary Steps
Setting up a security infrastructure requires some preliminary configuration. We will cover a minimal setup here.
The
rti_workspacedirectory containing examples and user configuration files is automatically copied into the users’ home or My Documents folder when the first RTI application is launched (e.g., RTI Launcher, rtiddsgen, rtipkginstall, or rtiobservability). In yourrti_workspacedirectory you should have OpenSSL configuration files named<rti_workspace_dir>/examples/dds_security/cert/ecdsa01/ca/ecdsa01RootCa.cnfand<rti_workspace_dir>/examples/dds_security/cert/ecdsa01/https/ecdsa01Https01.cnf. Make copies of these files and call themobservabilityRootCa.cnfandobservabilityServer.cnfrespectively. To better organize your project, save these copies in a new directory calledcert/observability:$ cd <rti_workspace_dir>/examples/dds_security $ cp cert/ecdsa01/ca/ecdsa01RootCa.cnf cert/observability/ca/observabilityRootCa.cnf $ cp cert/ecdsa01/https/ecdsa01Https01.cnf cert/observability/https/observabilityServer.cnf
Modify
observabiltyRootCa.cnfto redefine thenamevariable. Note that this configuration file uses this variable to derive some filenames, such as those used in the next section:... # Variables defining this CA name = observabilityRootCa # Name desc = # Description ...
4.4.2.1.1. Initialize the OpenSSL CA Database
When using a CA to perform an operation, OpenSSL relies on special database files to keep track of the issued certificates, serial numbers, revoked certificates, etc. We need to create these database files to be able to use the openssl x509 -req command:
$ mkdir cert/observability/ca/database
$ touch cert/observability/ca/database/observabilityRootCaIndex
$ echo 01 > cert/observability/ca/database/observabilityRootCaSerial
4.4.2.1.2. Limit the Access of the CA’s Private Key
It is also a good practice to store the CA’s private key in a separate directory with more restrictive access rights, so only you can sign certificates.
$ mkdir cert/observability/ca/private
$ chmod 700 cert/observability/ca/private
4.4.2.2. Generating a New Root CA
Modify
cert/observability/ca/observabilityRootCa.cnfand specify the fields in thereq_distinguished_namesection. This information will be incorporated into your certificate:... [ req_distinguished_name ] countryName = US stateOrProvinceName = CA localityName = Santa Clara 0.organizationName = Observing Organization commonName = Observability Root CA emailAddress = rootCa@observability.com ...
Use the OpenSSL CLI to generate a self-signed certificate using the Root CA’s configuration. Run the following command from the
cert/observabilitydirectory:$ openssl req -nodes -x509 -days 1825 -text -sha256 -newkey ec -pkeyopt ec_paramgen_curve:prime256v1 -keyout ca/private/observabilityRootCaKey.pem -out ca/observabilityRootCaCert.pem -config ca/observabilityRootCa.cnf
This will produce a new private key,
observabilityRootCaKey.pemin thecert/observability/ca/privatedirectory, and a new certificate,observabilityRootCaCert.pem, in thecert/observability/cadirectory. This certificate will be valid for 1825 days (5 years) starting today.
4.4.2.3. Generating Server Certificates
Server Certificates are verified against the Root CA when authenticating servers over HTTPS. Therefore, in the simplest scenario, it is the Root CA that is responsible for issuing Server Certificates.
We will create a certificate signing request (CSR) for the server localhost. Then we will use the new Root CA to issue the certificate requested by the CSR.
Add the information you want to include in localhost’s certificate in the file
cert/observability/https/observabilityServer.cnfthat was previously created. You may want to use the following contents as a reference:prompt=no distinguished_name = req_distinguished_name [ req_distinguished_name ] countryName=US stateOrProvinceName=CA organizationName=Observing Organization emailAddress=server@observability.com commonName=localhost [ https_cert ] subjectAltName = @alt_names [ alt_names ] DNS.1 = localhost IP.1 = 127.0.0.1
You are free to modify any field except
countryName,stateOrProvinceName, andorganizationName. These fields must match the ones of the Root CA; otherwise it will refuse to issue the requested certificate (note that acommonNameis also required). These requirements are specified inobservabilityRootCa.cnf, in thepolicy_matchsection.
Generate the new server’s key and CSR. Run the following command from the
cert/observabilitydirectory:$ openssl req -nodes -new -newkey ec -pkeyopt ec_paramgen_curve:prime256v1 -config https/observabilityServer.cnf -keyout https/observabilityServerKey.pem -out https/observabilityServer.csrThis will produce an RSA private key,
observabilityServerKey.pem, and a CSR based on that key,observabilityServer.csr. Since CSRs have all the information and cryptographic material that a CA needs to issue a certificate, the server’s private key must never be known to anyone but the creator.
Use the new Root CA’s certificate and private key to issue a new Server Certificate. Run the following command from the
cert/observabilitydirectory:$ openssl x509 -req -days 730 -text -CAserial ca/database/observabilityRootCaSerial -extfile https/observabilityServer.cnf -extensions https_cert -CA ca/observabilityRootCaCert.pem -CAkey ca/private/observabilityRootCaKey.pem -in https/observabilityServer.csr -out https/observabilityServerCert.pem
The Root CA will issue the server’s public certificate,
observabilityServerCert.pem, which will be valid for 730 days (2 years) starting today.Collector Service requires a server certificate file for HTTPS operation that contains both the server certificate and key. The following is an example of how to create this file using the server certificate and key generated in the previous step. Run the following command from the
<rti_workspace_dir>/examples/dds_security/cert/observabilitydirectory:$ cp https/observabilityServerCert.pem observabilityServer.pem $ cat https/observabilityServerKey.pem >> observabilityServer.pem
4.4.2.4. BASIC-Auth Password File
The communication between Collector Service and the third-party observability backends is secured using BASIC-Auth over HTTPS.
The HTTP servers started by Collector Service require a password file that contains the username and password for BASIC-Auth. This section describes how to create this file.
Note
The creation of the equivalent password file for the third-party observability backends is out of the scope of this documentation. Please refer to the documentation of the third-party observability backends for additional details on how to create this file.
Collector Service requires an htdigest formatted password
file for basic authentication. The following example uses the Apache htdigest
command to create this file. For more information on this command see
Apache - htdigest - manage user files for digest authentication
Here is an example of how to use the htdigest command:
$ htdigest -c htdigest localhost user
Adding password for user in realm localhost.
New password: <type "userpassword">
Re-type new password: <type "userpassword">
The example uses the following arguments for the htdigest command.
Parameter |
Description |
Value |
|---|---|---|
-c |
Create the passwdfile. If passwdfile already exists, it is deleted first. |
-c |
passwordfile |
Name of the file to contain the username, realm, and password. If -c is given, this file is created if it does not already exist, or deleted and recreated if it does exist. |
htdigest |
realm |
The realm name to which the user name belongs. See http://tools.ietf.org/html/rfc2617#section-3.2.1 for more details. |
hostname (“localhost”) |
username |
The user name to create or update in passwdfile. If username does not exist is this file, an entry is added. If it does exist, the password is changed. |
user |
password |
The password to create or update in passwdfile. If username does not exist is this file, an entry is added. If it does exist, the password is changed. |
userpassword |
This will create an htdigest file with the following content:
user:localhost:bbbb113a9f365f1b3787b6a944ccbc59