
Cloud Data Streaming#
Introduction#
What you’ll learn
In this module, you’ll use a Connext Cloud Databus to connect several local Connext systems.
You will do the following:
Run the home automation publisher on your machine
Create a Connext Cloud Databus
Connect your machine to the Databus with an edge gateway
Verify that the “WindowStatus” Topic is received in the Databus dashboard
Subscribe to the “WindowStatus” Topic from a second machine to verify cross-site data flow (or from your own machine if a second machine isn’t available)
In the Publish-Subscribe module, the home automation publisher writes “WindowStatus” samples and the subscriber prints a warning when a window opens.
In this module, you’ll keep those applications unchanged and use Connext Cloud to connect multiple edge sites. Each edge site can be a different machine, including your desktop, a VM or a remote server. A local gateway joins the local DDS domain and the Connext Cloud Databus, then caches and routes selected Topics between them.
You’ll start on your own machine: run the publisher, connect it to the Databus, and watch the data arrive in the Databus dashboard. Then you’ll connect the subscriber from a second machine to see the cross-site data flow. The final step shows that a new subscriber can connect directly to the Databus and retrieve the latest cached value for each sensor, even if the publisher is no longer running.
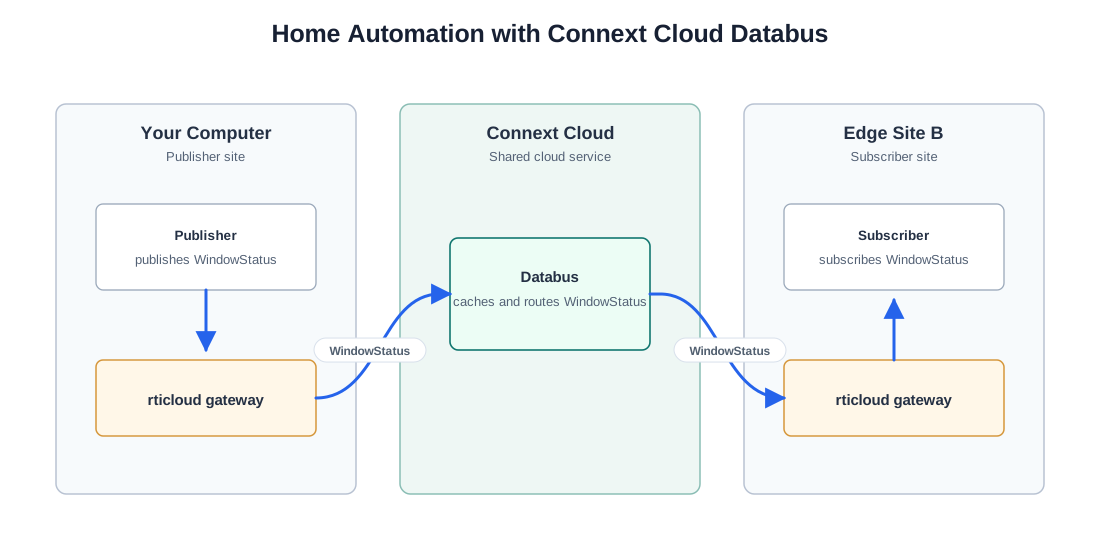
Home automation publisher and subscriber connected through Connext Cloud.#
How to complete this module#
To complete this module, you’ll need the following on your machine:
A free Connext Cloud account.
The rticloud CLI installed.
A Connext 7.7.0 or newer installation to build and run your own edge applications. Follow the Installation guide.
A clone of the
rticonnextdds-examplesGitHub repository.(Optional) A second machine for the cross-site data-flow check. This can be another computer, a local VM, or your own cloud VM. If you only have one machine, you can still continue with the module and skip the cross-site check. To use a second machine, install the rticloud CLI and Connext on it, and clone
rticonnextdds-examples.
Cloning the GitHub repository
Clone the GitHub repository with the following command:
$ git clone --recurse-submodule https://github.com/rticommunity/rticonnextdds-examples.git
The code for this module is located in the tutorials/publish_subscribe
directory. See the README.md files for additional instructions.
This guide is designed for Connext 7.7.0 or newer. For Connext 7.3.1, checkout the branch release/7.3.1.
This module uses the publisher and subscriber from the Publish-Subscribe module.
1. Run the publisher on your machine#
Start from the cloned rticonnextdds-examples repository on your machine
and run a home automation publisher. Your machine is the first edge site. The
examples use domain ID 0 by default.
Keep the publisher running while you create the cloud resources and start the gateway.
Install the Connext Python package with pip install rti.connext
if you haven’t already. See Python installation.
$ cd rticonnextdds-examples/tutorials/publish_subscribe/py
$ python home_automation_publisher.py Window1 LivingRoom
Build the applications:
$ cd rticonnextdds-examples/tutorials/publish_subscribe/c++11
$ mkdir -p build
$ cd build
$ cmake -DBUILD_SHARED_LIBS=ON ..
$ cmake --build .
Run a publisher:
$ ./home_automation_publisher Window1 LivingRoom
The full instructions, including other programming languages, are in the Publish-Subscribe module.
Note
If you prefer a minimal connectivity test, you can use rtiddsping
instead of the home automation applications: run rtiddsping -pub instead
of the publisher.
2. Create a Cloud Databus#
Create the Databus in the Connext Cloud dashboard.
Go to Databuses and select Create a Databus.
Name the Databus
home-automation-databus. Click Next.In the Configure Core Services step, keep the default settings. Click Next.
In the Select Components step, you can create or select an Observability Service to monitor the health of the Databus. This is optional; you can also link one after creating the Databus.
In the final step, review the settings and create the Databus.
Wait until the Databus shows an active status before continuing.
3. Create an edge gateway template#
Create an Edge Gateway application template for the Databus:
In the Connext Cloud dashboard, go to Databuses.
Open
home-automation-databus.Open the Applications tab and select Create Application.
Select Edge Gateway and click Continue.
Name the template
home_automation_gateway, leave the default port. Click Next.Choose the Basic configuration option to route all Topics in both directions from domain 0. Click Next.
Review the configuration and click Create Application.
Note
Routing all topics keeps this tutorial simple. For a real deployment, restrict the gateway template to only the Topics and directions that each site needs.
4. Connect your machine to the Databus#
Open a new terminal on your machine. If you haven’t configured the CLI before,
run rticloud configure and choose us-east-2. Then run the gateway:
$ rticloud gateway
Follow the interactive prompts:
Select Data Only.
Select
home-automation-databus.Select the
home_automation_gatewaygateway template.
Leave the command running. It starts the local gateway.
Note
rticloud gateway stores its project configuration and logs under
.connext/ in the current directory. If you stop a gateway, run
rticloud gateway again from the same directory to restart it. Use
rticloud gateway reset if you want to start over.
Now confirm that Connext Cloud sees your publisher’s data:
In the Connext Cloud dashboard, go to Databuses.
Open
home-automation-databus.Use the Overview tab to inspect the data flow chart.
Open the Topics tab and confirm that “WindowStatus” is present.
It might take a few seconds for the dashboard to update; you can click the Refresh button on the top right until the data flow and topic list appear.
Your machine’s “WindowStatus” samples are now flowing into the Databus.
5. Connect the subscriber from a second machine#
Note
If you only have one machine, skip this step and continue with step 6.
On the second machine, start from its clone of the rticonnextdds-examples
repository and run the home automation subscriber:
$ cd rticonnextdds-examples/tutorials/publish_subscribe/py
$ python home_automation_subscriber.py
Build the applications as in step 1, then run the subscriber:
$ ./home_automation_subscriber
The subscriber doesn’t print anything yet. That is expected: the publisher runs on a different machine and network, so the applications cannot discover each other directly.
Open a new terminal on the second machine and run rticloud configure and
rticloud gateway. Follow the same prompts as in the previous step,
selecting the same Databus and gateway template.
The moment the gateway connects, the subscriber starts printing warnings from the publisher on your machine:
WARNING: Window1 in LivingRoom is open!
This confirms that the “WindowStatus” samples are flowing from your machine, through both gateways and the Cloud Databus, to the remote subscriber.
Note
If you prefer a minimal connectivity test, you can use rtiddsping
instead of the home automation applications: run rtiddsping -sub instead
of the subscriber.
6. Check the Databus directly with rticloud spy#
This checks that rticloud spy can subscribe directly to the Databus. It
also shows that the Databus keeps the latest WindowStatus value for each
key. The spy can retrieve the current state for each sensor even after the
local publisher has stopped.
Run this command on your machine or on a third machine:
$ rticloud spy
When prompted, select home-automation-databus. If the CLI offers to create
the rticloud_spy cloud application, select that option. Unlike the home
automation applications, rticloud spy connects directly to Connext Cloud;
it does not connect through the local gateway.
Note
rticloud spy stores its project configuration and logs under
.connext/ in the current directory. If you stop it, run it again from
the same directory to reuse its configuration. Use rticloud spy reset
if you want to start over.
With the publisher and gateway running,
rticloud spyreceives liveWindowStatusupdates.Stop the publisher;
rticloud spystops receiving data. Then stoprticloud spy.Run
rticloud spyagain. It should show the most recently publishedWindowStatusvalue forWindow1fromhome-automation-databus. This confirms that the Databus kept the latest value for that key and made it available whenrticloud spysubscribed.Start the publisher again.
rticloud spyreceives newWindowStatusupdates.Stop the gateway.
rticloud spystops receiving data, confirming that the gateway is the path that sends the publisher’s local DDS data to the Databus.
You have now confirmed that the gateway sends local data to the Databus and that the Databus retains the latest value for subscribers that join later.
Learn more#
This module showed how to connect the home automation publisher and subscriber across multiple edge sites through a Connext Cloud Databus without changing the application code. It also showed that late joiners receive the latest value for each key from Connext Cloud.
Next Steps
Once your Topics are available in the Connext Cloud Databus, you can use Connext Studio and AI to analyze and visualize your global data flows. See the AI Agents module for a walkthrough.
