1.2. Hello World with Publish/Subscribe
In this section we are going to learn about the Publish/Subscribe model using a simple “Hello World” application. You will learn about the RTI Code Generator and how to create a DataWriter and a DataReader to publish and subscribe to data.
Publish/Subscribe is a communications model where data producers “publish” data and data consumers “subscribe” to data. These publishers and subscribers don’t need to know about each other ahead of time; they discover each other dynamically at runtime. The data they share is described by a “topic,” and publishers and subscribers send and receive data only for the topics they are interested in. In this pattern, many publishers may publish the same topic, and many subscribers may subscribe to the same topic. Subscribers receive data from all of the publishers that they share a topic with. Publishers send data directly to subscribers, with no need for a broker or centralized application to mediate communications.
1.2.1. Introduction to DataWriters, DataReaders, and Topics
Connext Micro conforms to the OMG Data Distribution Service (DDS) connectivity standard. In DDS, the objects that actually publish data are called DataWriters, and the objects that subscribe to data are DataReaders. DataWriters and DataReaders are associated with a single Topic object that describes that data. (DDS also has Publisher and Subscriber objects, but we will talk about them later.) An application typically has a combination of DataWriters and DataReaders.
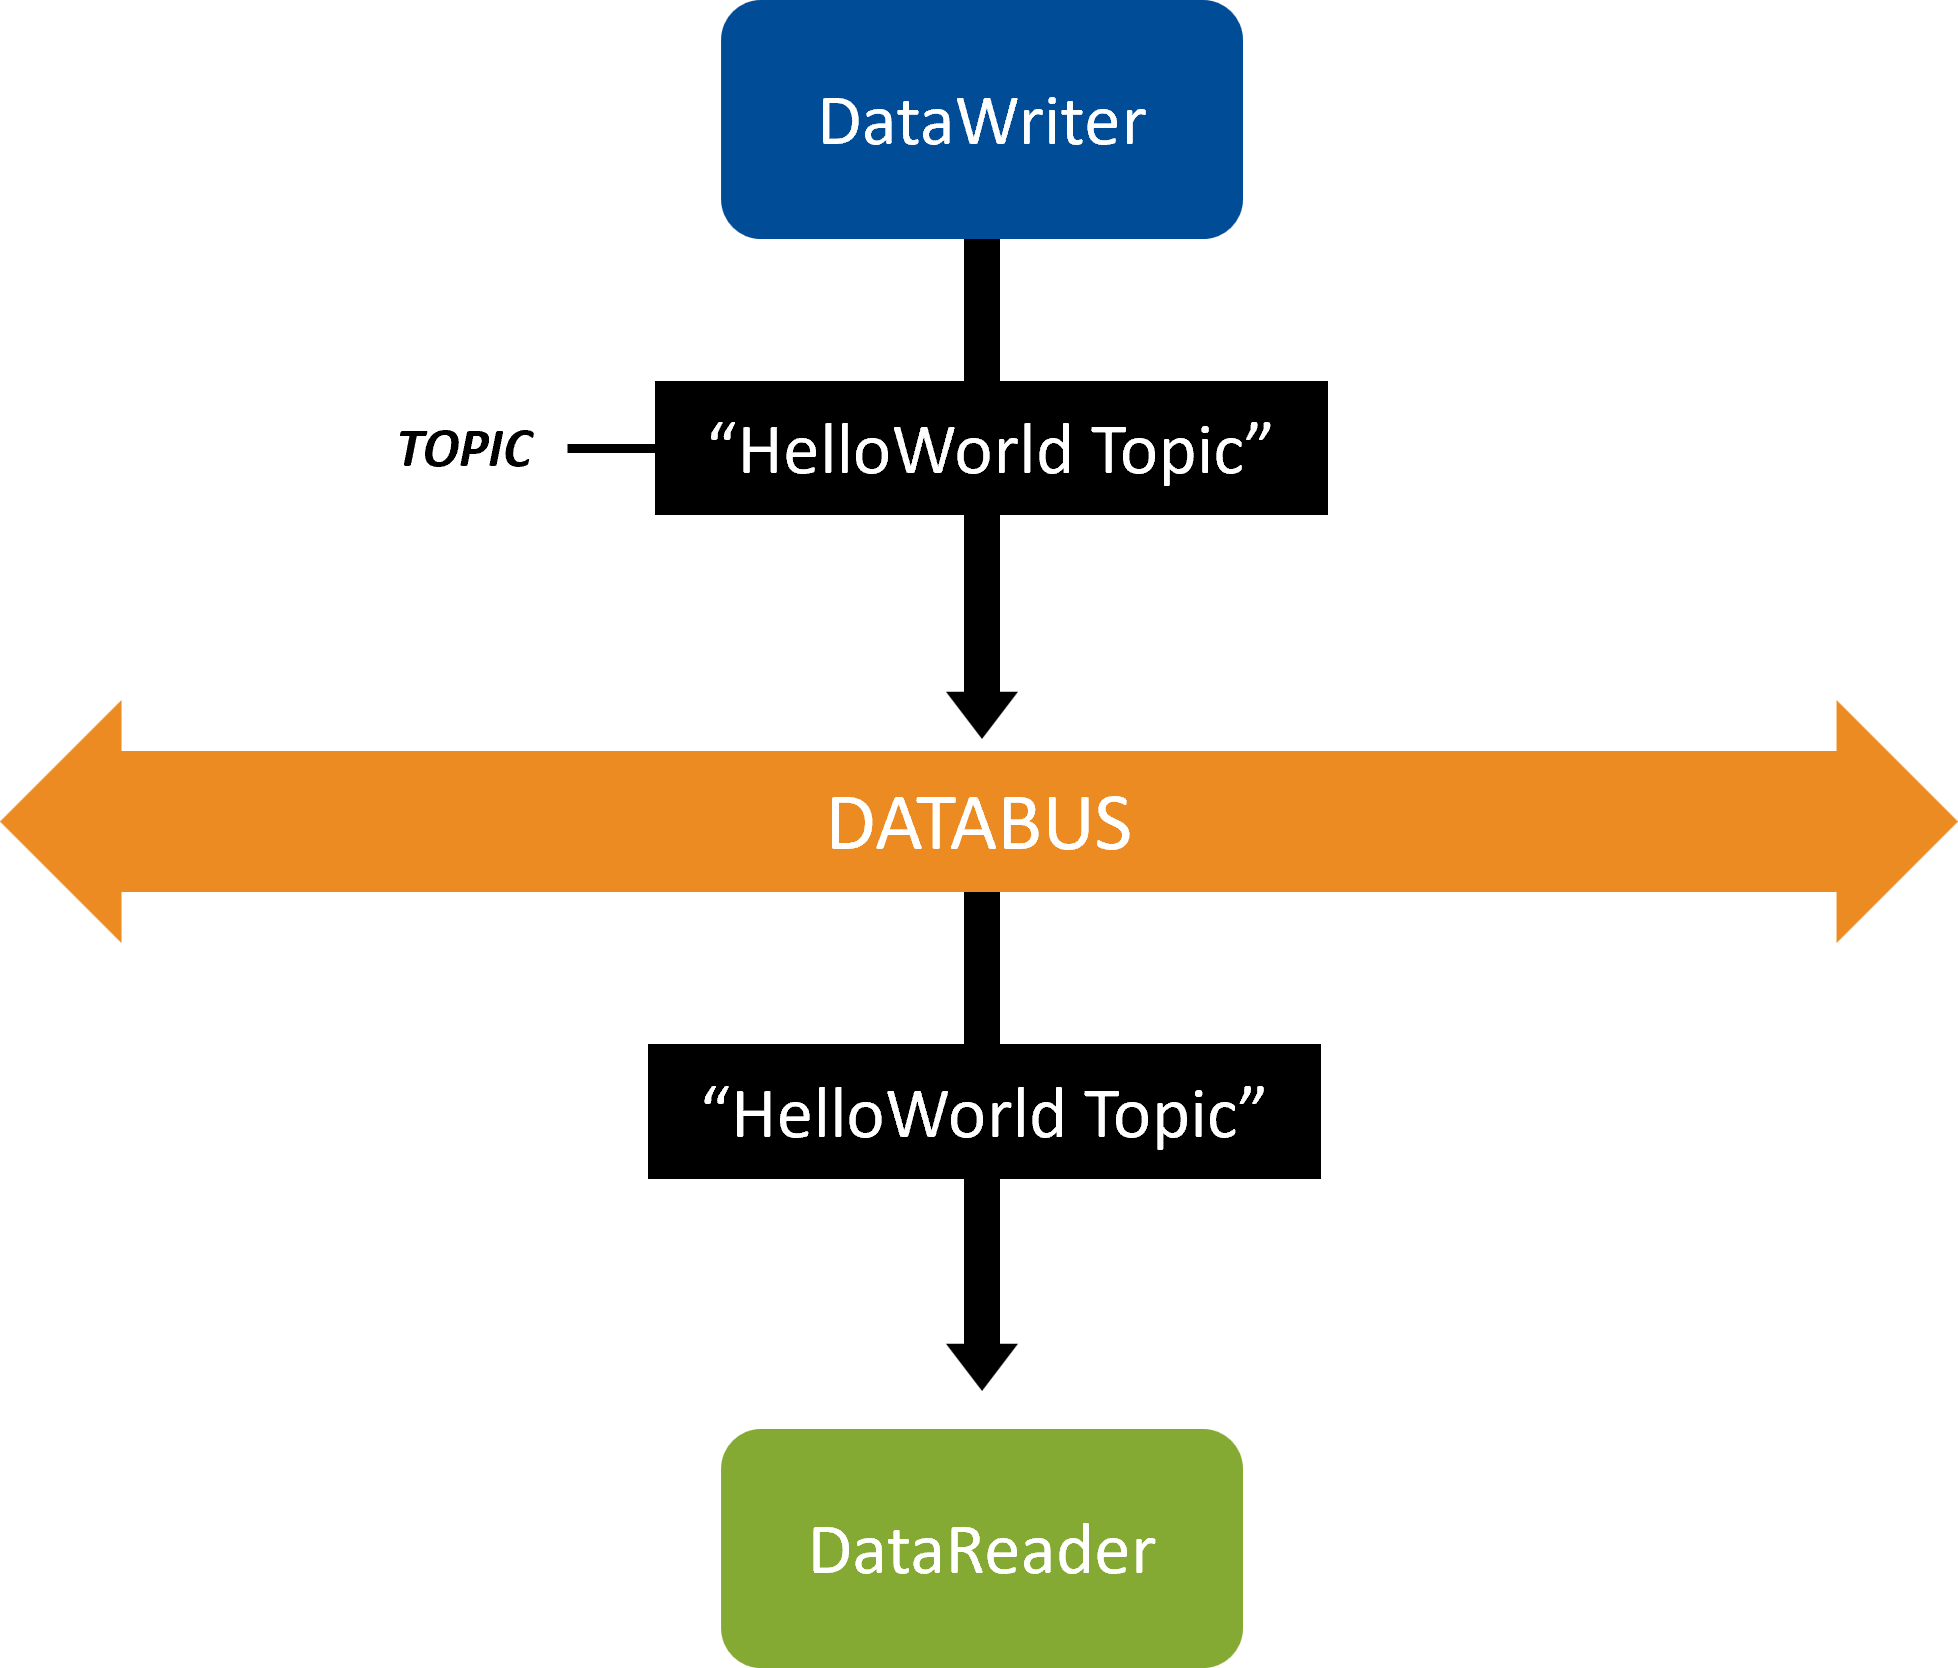
Figure 1.1 DataWriters write data and DataReaders read data of a Topic.
Connext Micro is responsible for discovering DataWriters and DataReaders in a system, checking if they have a matching Topic (and compatible quality of service, which we will discuss later) and then providing the communication between those DataWriters and DataReaders. Logically, this means you can visualize your applications as having DataWriters and DataReaders that connect to a “databus,” because your applications are not specifying exactly which other applications they communicate with—they only specify which Topics they read from and write to the databus, and Connext Micro sets up the communication. Note that there is no “databus” object or Connext Micro service deployed in your system—this is simply a logical way to visualize systems in which you don’t have to configure each communication path.
1.2.2. Create a DataWriter and DataReader
We are going to start with a simple “Hello World” application in C to show how to use the Code Generator, and how to create a DataWriter and a DataReader.
Tip
By the end of this exercise, a publishing application will send data, and a subscribing application will receive and print it to the console.
1.2.2.1. Set environment variables
Before we begin, we need to set some environment variables:
Set the
RTIMEHOMEenvironment variable to the installation directory path for RTI Connext Micro.If you installed Connext Professional with default settings, RTI Connext Micro will be here:
<path_to_connext_dds_installation>/rti_connext_dds-<version>/rti_connext_micro-<version>. If you copied RTI Connext Micro to another place, setRTIMEHOMEto point to that location.Add
<RTIMEHOME>/rtiddsgen/scriptsto your path environment variable folder.Add
<RTIMEHOME>/resource/scriptsto your path environment variable folder.
1.2.2.2. Generate an example application
We’ll use the RTI Code Generator (also referred to as rtiddsgen) included with Connext Micro to generate a DDS example application. To do that, we’ll start with a type definition file as input.
1.2.2.2.1. Create a type definition file
Create a HelloWorld.idl file with the following type definition:
// Hello world!
struct HelloWorld {

    // String with maximum length of 256 characters
    string<256> msg;

};
In this file, the data HelloWorld is described in the language-independent
Interface Definition Language (IDL). IDL allows you to declare data types used
for communication. The RTI Code Generator (rtiddsgen) translates from this
language-independent data type into code specific for your programming language.
The generated code serializes and deserializes your data into and out of a
network format.
1.2.2.2.2. Run Code Generator
Tip
Before running rtiddsgen, make sure you added
rti_connext_dds_micro-<version>/rtiddsgen/scripts to your path environment
variable folder as described in Set environment variables. Run the
following command to check:
rtiddsgen -version
You should see the following output:
INFO com.rti.ndds.nddsgen.Main rtiddsgen version <version>
INFO com.rti.ndds.nddsgen.Main Connext DDS templates: XXXX-XXXX-XXXX-XXXX-XXXX-XXXX-XXXX-XXXX
INFO com.rti.ndds.nddsgen.Main Connext Micro templates: XXXX-XXXX-XXXX-XXXX-XXXX-XXXX-XXXX-XXXX
INFO com.rti.ndds.nddsgen.Main Done
If you don’t see Connext Micro templates: in the output, you might be
using a version of rtiddsgen from Connext Professional. Make sure you added
rtiddsgen to the environment path from
rti_connext_dds_micro-<version>/rtiddsgen/scripts.
From a terminal or command prompt, change directories to where you created HelloWorld.idl and run the following command:
$ rtiddsgen -example -language C HelloWorld.idl
$ rtiddsgen -example -language C HelloWorld.idl
> rtiddsgen -example -language C -ppDisable HelloWorld.idl
-ppDisable disables the preprocessor. It is necessary for running
rtiddsgen on a Windows system if the preprocessor is not in your path.
You can only use -ppDisable if your IDL does not contain any C
preprocessor directives, as here—otherwise you must add the preprocessor
to your path.
1.2.2.2.3. Overview of generated and example code
The code you just generated includes the files in Table 1.1.
Files |
Description |
|---|---|
|
The C definition of your data type, and the code used to serialize and deserialize it (convert it to a format for the network). This is the type-specific code that will be used in your real application. These files were generated when you ran rtiddsgen. |
|
Example application code. It includes code for two applications you can read and modify. These will compile into separate applications, HelloWorld_publisher and HelloWorld_subscriber. These files were generated when you ran rtiddsgen. |
|
Used to compile your application with CMake. This file was generated when you ran rtiddsgen. |
|
Instructions for how to open and modify the files, compile, and run the example. This file was generated when you ran rtiddsgen. |
1.2.2.3. Modify application
In your example application directory, open
HelloWorldApplication.cin your IDE of choice.This snippet shows how to create a Topic (with a name and data type):
sprintf(application->topic_name, "Example HelloWorld");
application->topic = DDS_DomainParticipant_create_topic(
    application->participant,
    application->topic_name,
    application->type_name,
    &DDS_TOPIC_QOS_DEFAULT,
    NULL,
    DDS_STATUS_MASK_NONE);
if (application->topic == NULL)
{
    printf("topic == NULL\n");
    goto done;
}
Change the Topic name from “Example HelloWorld” to “HelloWorld Topic”:
sprintf(application->topic_name, "HelloWorld Topic");
application->topic = DDS_DomainParticipant_create_topic(
    application->participant,
    application->topic_name,
    application->type_name,
    &DDS_TOPIC_QOS_DEFAULT,
    NULL,
    DDS_STATUS_MASK_NONE);
if (application->topic == NULL)
{
    printf("topic == NULL\n");
    goto done;
}
1.2.2.4. Modify publisher
Open
HelloWorld_publisher.cin your IDE of choice.The following snippet shows how to write a HelloWorld update using the DataWriter’s write method:
for (i = 0; (application->count <= 0) || (i < application->count); ++i)
{

    /* TODO set sample attributes here */

    retcode = HelloWorldDataWriter_write(
        hw_datawriter,
        sample,
        &DDS_HANDLE_NIL);
    if (retcode != DDS_RETCODE_OK)
    {
        printf("Failed to write sample\n");
    }
    else
    {
        printf("Written sample %d\n",(i+1));
    }

    OSAPI_Thread_sleep((RTI_UINT32)application->sleep_time);
}
Add the following code to send the message “Hello world!” with a count:
for (i = 0; (application->count <= 0) || (i < application->count); ++i)
{

    /* TODO set sample attributes here */

    snprintf(sample->msg,128,"Hello World (%d) ! \n",i);

    retcode = HelloWorldDataWriter_write(
        hw_datawriter,
        sample,
        &DDS_HANDLE_NIL);
    if (retcode != DDS_RETCODE_OK)
    {
        printf("Failed to write sample\n");
    }
    else
    {
        printf("Written sample %d\n",(i+1));
    }

    OSAPI_Thread_sleep((RTI_UINT32)application->sleep_time);
}
Recall that your “HelloWorld Topic” describes your data. This Topic is associated with the data type HelloWorld, which is defined in the IDL file (see Run Code Generator). The data type HelloWorld contains a string field named msg. In this step, you have just added code to set a value for the msg field. Now, when the DataWriter writes data, the msg field in the data will contain the string “Hello world! 1”, “Hello world! 2”, etc.
Definition
A sample is a single update to a Topic, such as “Hello world (1) !”. Every time an application calls
write(), it is “writing a sample.” Every time an application receives data, it is “receiving a sample.”Note that samples don’t necessarily overwrite each other. For example, if you set up a RELIABLE Quality of Service (QoS) 1 with a History kind of KEEP_ALL, all samples will be saved and accumulate.
- 1
For more information on QoS policies, refer to QoS Policies in the API Reference.
1.2.2.5. Modify subscriber
Open
HelloWorld_subscriber.cin your IDE of choice.The following snippet shows how to process a sample:
for (i = 0; i < HelloWorldSeq_get_length(&sample_seq); ++i)
   {
      sample_info = DDS_SampleInfoSeq_get_reference(&info_seq, i);

      if (sample_info->valid_data)
      {
            sample = HelloWorldSeq_get_reference(&sample_seq, i);
            printf("\nValid sample received\n");
            *total_samples += 1;

            /* TODO read and process sample attributes here */
            (void)sample;

      }
      else
      {
            printf("\nSample received\n\tINVALID DATA\n");
      }
   }
Add the following code to display the received messages:
for (i = 0; i < HelloWorldSeq_get_length(&sample_seq); ++i)
   {
      sample_info = DDS_SampleInfoSeq_get_reference(&info_seq, i);

      if (sample_info->valid_data)
      {
            sample = HelloWorldSeq_get_reference(&sample_seq, i);
            printf("\nValid sample received\n");
            *total_samples += 1;

            /* TODO read and process sample attributes here */
            printf("%s\n", sample->msg);

      }
      else
      {
            printf("\nSample received\n\tINVALID DATA\n");
      }
   }
1.2.2.6. Compile your changes
Now that you have made changes to the example code, compile the code with your modifications. Run the following command from the example directory:
$ rtime-make --config Debug --build --target x86_64leElfgcc12.3.0-Linux5 --source-dir . -G "Unix Makefiles" --delete
$ rtime-make --config Debug --build --target x86_64leMachOclang15.0-Darwin23 --source-dir . -G "Unix Makefiles" --delete
> rtime-make.bat --config Debug -A x64 --target self --name x86_64lePEvs2017-Win10 --build --source-dir .
After running the command, you should see two applications in the
objs/<architecture> or objs/<architecture>/Debug directory:
HelloWorld_publisher
HelloWorld_subscriber
1.2.2.7. Run the applications
Note
By default, this example uses two interfaces to receive samples. Since your
installation might use different names for these interfaces (which would prevent
communication), we’ll use the option -udp_intf <interface name> to specify
them in the following commands. You can use command ifconfig (on Linux or
macOS systems) or ipconfig (on Windows systems) to know the name of all
available interfaces.
From within the
objs/<architecture>orobjs/<architecture>/Debugdirectory, enter the following full path:$ objs/x86_64leElfgcc12.3.0-Linux5/Debug/HelloWorld_publisher -udp_intf <interface name>
$ objs/x86_64leMachOclang15.0-Darwin23/Debug/HelloWorld_publisher -udp_intf <interface name>
> objs\x86_64lePEvs2017-Win10\Debug\HelloWorld_publisher.exe -udp_intf <interface name>
You should see this in the window for the publisher:
Written sample 1
Written sample 2
Written sample 3
Written sample 4

...
Open another command prompt window, and from within the example directory, enter the following full path:
$ objs/<architecture>/Debug/HelloWorld_subscriber -udp_intf <interface name>
$ objs/<architecture>/Debug/HelloWorld_subscriber -udp_intf <interface name>
> objs\<architecture>\Debug\HelloWorld_subscriber.exe -udp_intf <interface name>
You should see this in the window for the subscriber:
Valid sample received
Hello World (1) !

Subscriber sleeping for 1000 msec...

Valid sample received
Hello World (2) !

Subscriber sleeping for 1000 msec...

Valid sample received
Hello World (3) !

Subscriber sleeping for 1000 msec...

Valid sample received
Hello World (4) !

...
The
Hello world <count> !line is the data being sent by the DataWriter. If the DataWriter weren’t communicating with the DataReader, you would just see theSubscriber sleeping for 1000 msec...lines and not the “msg” lines. (The subscribing application prints the “timed out” lines after the WaitSet times out while waiting for data, then it prints the “msg:” lines when it receives data from the DataWriter.)
1.2.2.8. Taking it further
Under the hood, the publishing and subscribing applications are doing a lot of work:
Before communication starts, the DataWriter and DataReader discover each other and check that they have the same Topic name, compatible data types, and compatible QoS. After discovery, the DataWriter sends data directly to the DataReader, with no message broker required.
When you run the applications on the same machine, by default they communicate over shared memory. If you run one on another machine, they communicate over the network using UDP.
1.2.2.8.1. Start up multiple publishing or subscribing applications
Try starting up multiple publishing or subscribing applications, and you will see that they will also send or receive data. (Remember to run from the example directory.)
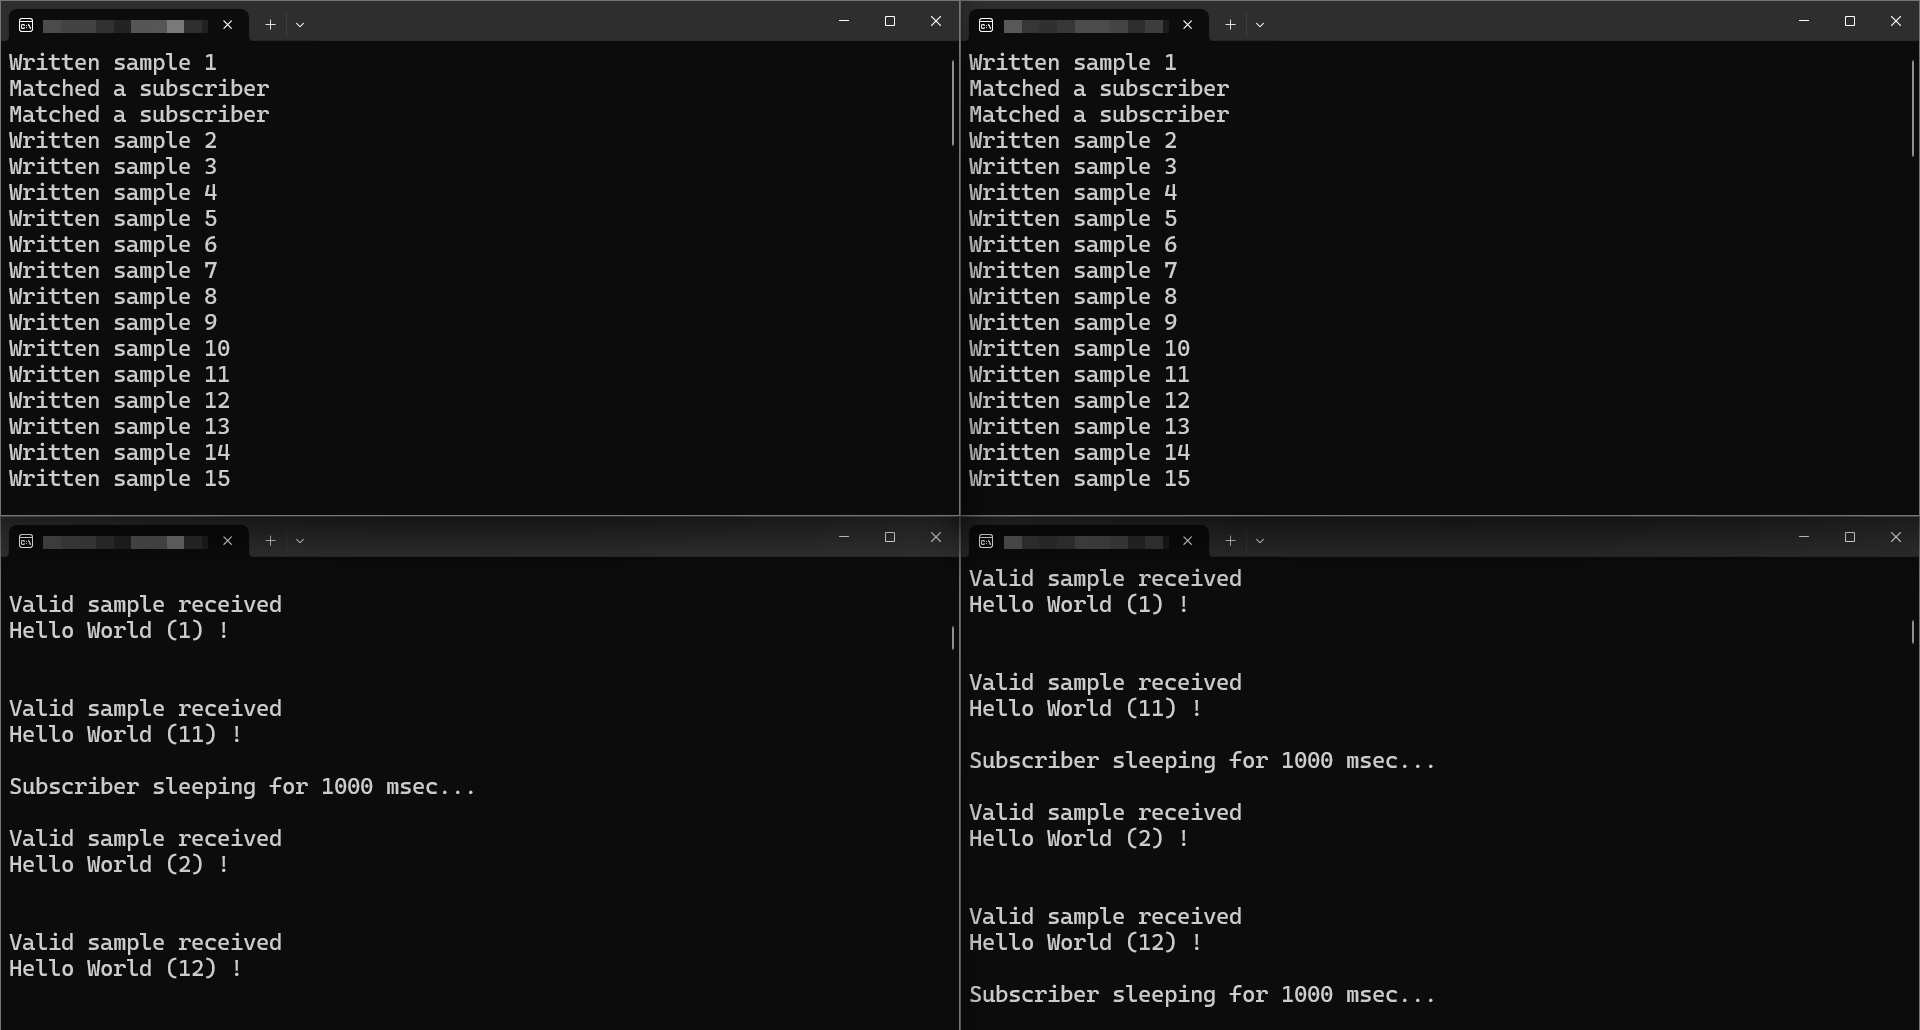
Figure 1.2 Two applications publishing, and two subscribing, to the same Topic. Notice that each subscriber is receiving data from both publishers.
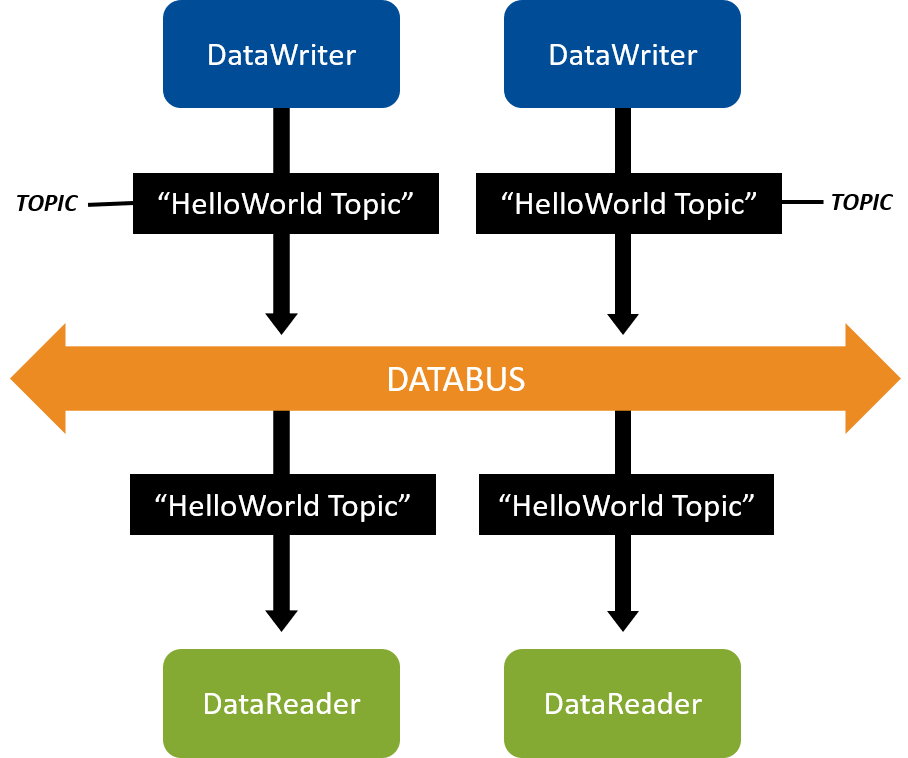
Figure 1.3 Two applications publishing, and two subscribing, to the same Topic.
1.2.3. Troubleshooting
1.2.3.1. Why aren’t my applications communicating?
If you are running both applications and they aren’t communicating (you don’t
see the Hello world <count> ! lines shown at the end of
Run the applications), here are some things to check:
Make sure you specified the correct interfaces for both your applications with the
-udp_intfoption, as described in Run the applications.
Check if your interface supports local loopback. If it doesn’t, try using an interface that does, or run the application between two host machines and change the peer on each one to be the host address of the other machine.
See if your machine uses a firewall. You may need to disable your firewall or configure it to allow multicast traffic for communication to be established.
1.2.3.2. Why does the DataReader miss the first samples?
Discovery is not an instantaneous event. It takes some time for the discovery process between applications to complete. The DataWriter and DataReader must discover each other before they can start communicating. Therefore, if you send data immediately after creating the Connext Micro entities, DataReaders will not receive the first few samples because they are still in-process of discovering the DataWriters and vice versa. This is true even when the DataWriters and DataReaders are reliable, because the Reliability QoS Policy on its own does not guarantee delivery to DataReaders that have not been discovered yet.
You can overcome this behavior with the Durability QoS Policy, which can be set to deliver historical samples (that DataWriters already sent) to late-joining DataReaders. The DataReaders will then receive the first samples they originally missed.
1.2.4. Next steps
Congratulations! You’ve written your first Connext Micro application. You’ve experienced a quick overview of the development process from defining a data type and using the RTI Code Generator, to building an example application.
Continue to Developing Applications for a deeper look at the process of developing your own Connext Micro applications.