Routing Service Constrained WAN Example
The purpose of this demonstration is to show how RTI Routing Service can be used to constrain the amount of information sent over a network (usually a WAN). Different QoS and configuration and filters are applied to Routing Service without any changes to the original publisher.
There are two primary demos: one for localhost-only demonstrations that publishes to, and subscribes from, two Shapes Demo applications; and one that uses an AWS hosted instance of Shapes Demo.
Requirements:
- Install RTI Routing Service and Shapes Demo if you don't already have them (both are included with RTI DDS Connext DDS Professional).
- Set the NDDSHOME environmental variable based on your environment. For help with the step, see the Core Libraries User's Manual, here for the current release or here for release 6.0.1.
- For a demo based on the localhost, download these four XML files from github and place them in their own directory
- 0ms.xml
- 300ms.xml
- 1000ms.xml
- localhost.xml
- For the AWS hosted demo, download the XML configuration file from the same github location.
- local.tcp.transport.xml
- server.tcp.transport.xml (Not required and for reference, this is the server side Routing Service configuration)
- simple_shapes_demo.xml (Not required and for reference, this is the server side web integration service configuration)
- For the localhost content filter propagation demo, you will need to configure Shapes Demo to use the localhost interface so Wireshark can capture the packets:
- This article explains how to disable shared memory
- This article explains how to configure colorizing rules in Wireshark. This can be used for the I/O graph portion of Wireshark, which we will use later.
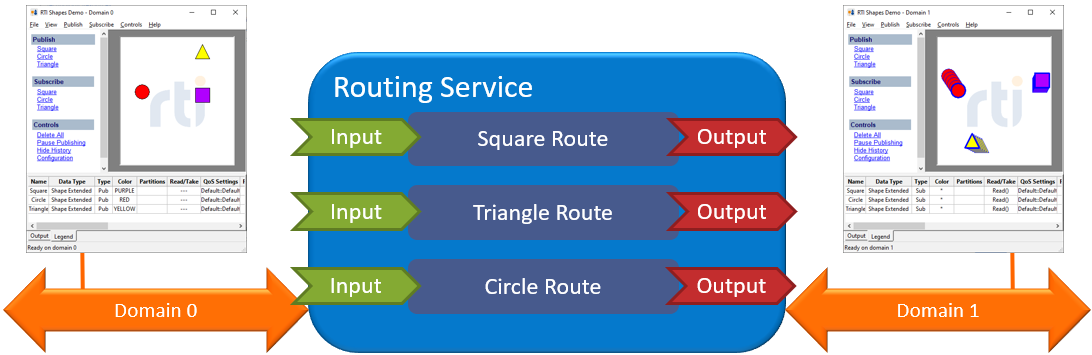
Localhost Demo:
- Start one copy of Shapes Demo on domain 0.
- Publish one square, circle, and triangle shape using different colors (all using the default QoS settings)
- Start a second copy of Shapes Demo on domain 1.
- To change domains, select "Controls→Configuration" then click the "stop" button. Change the domain number, and click "start".
- Subscribe to squares, circles, and triangles (all using the default QoS settings).
- At this point you should not see any samples on the subscribing side because Routing Service is not running.
- Start Routing Service via RTI Launcher:
- Select the Services tab, then click the Routing Service icon.
- Set your Working Directory to be where the localhost .xml configuration files are located.
- Specify the Custom configuration file to be localhost.xml.
- On the Configuration line, specify "example - from CUSTOM".
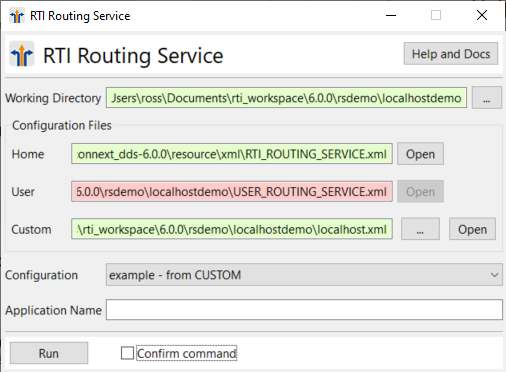
- You should see shapes show up on the Shapes Demo application that is subscribing on Domain 1.
- Note that Routing Service is not configured to route from domain 1 to domain 0, so if you have problems, check your domain IDs.
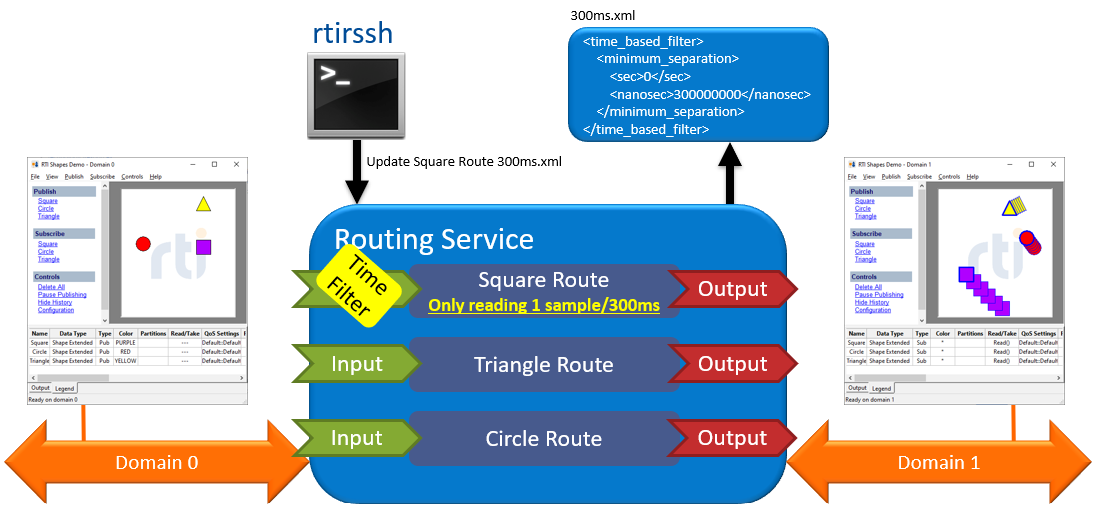
- Start the Routing Service remote shell to dynamically reconfigure Routing Service:
- From the command line run rtirssh -domainId 0 -timeout 3
- If the executable cannot be found, you may have to set your PATH variable to the bin/ folder of your Connext DDS installation directory.
- Update the square route to include a time-based filter.
- Run this command within the rtirssh shell:
update example Route::Session::Square <path to xml>/300ms.xml - Notice that now the square is only received on Domain 1 every 300ms. This is a filter acting on Routing Service's input.
- This could be useful for telematic applications that may not need every single sample at the upstream analysis or logging system. And under degraded WAN network conditions, this time filter can be dynamically applied to individual routes.
- You can remove the time-based filter by using the "0ms.xml" file with the above command.
- If you want to increase the time between samples you can use the "1000ms.xml" file.
- Let's leave the "300ms.xml" time-filter on for now, so we can compare it to batching QoS in the next step.
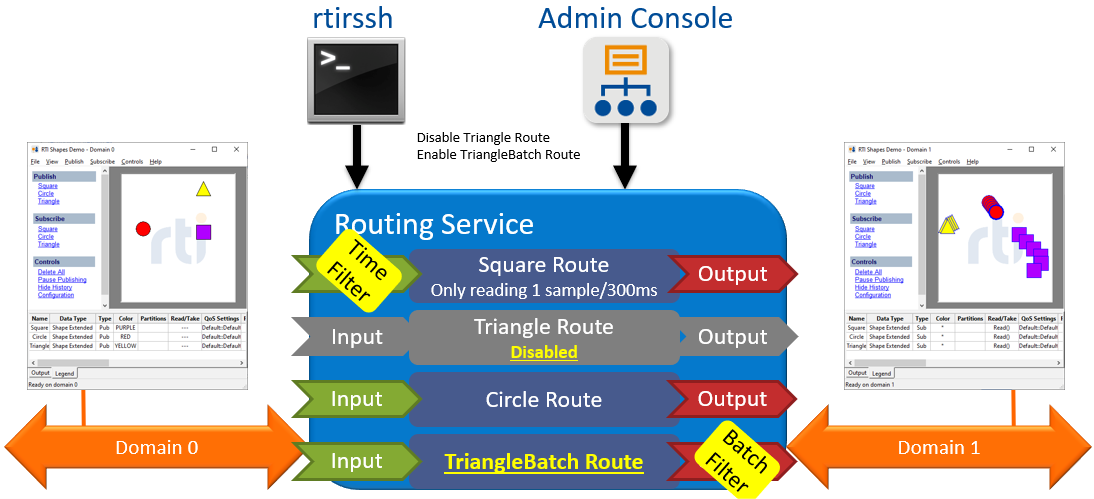
- Enabling batching by disabling the triangle's route, then enabling the TriangleBatch route:
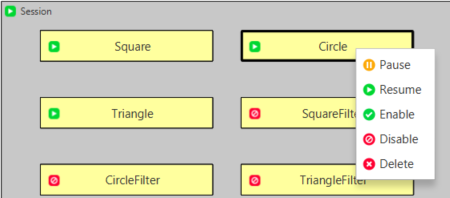
- Use Launcher's Tools tab to launch Admin Console.
- Select the routing service instance in the Physical View in the bottom left pane.
- Right-click the Triangle route and disable it. Then right-click on the TriangleBatch route and enable it.
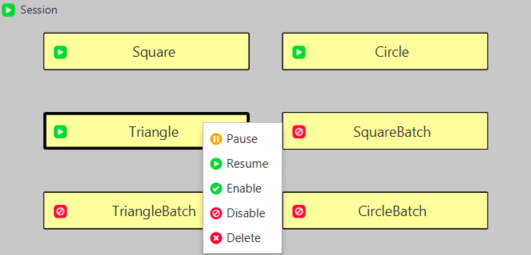
- Notice that the triangle is now updating in batches of 6 samples (compared to the other shapes that are updating one sample at a time).
- Combine batching and time filters:
- Run this command within the rtirssh shell:
update example Route::Session::TriangleBatch <path to xml>/300ms.xml - Notice that the triangle is still batching 6 samples up at a time, but it is also time-filtering one sample every 300ms.
- If you instead apply the 1000ms.xml filter, you'll notice batches of 2 samples at a time. This is because the time filter is applied on the input before batching is applied. Then batching is applied with a <max_flush_delay> of 2 seconds.
This configuration of batching can be useful to send periodic data at a defined rate, regardless of the number of samples that have been collected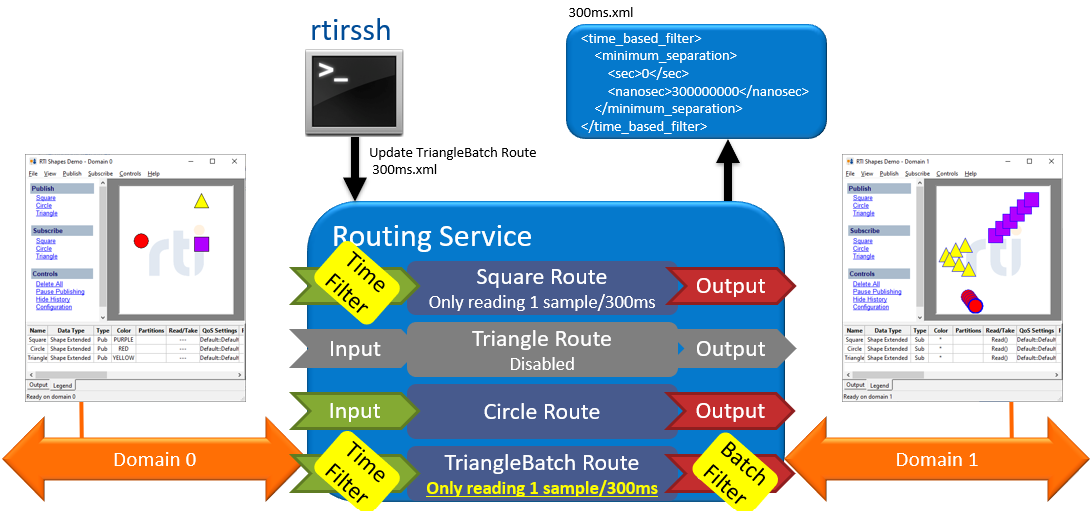
- Combine multiple topics into a single topic.
- In Admin Console, disable the TriangleBatch route and enable the TriangleToCircle route (similar to step #7 above).
- Notice that the triangle is now remapped to circles. This would allow applications with similar data types to combine multiple topics into a single topic. This can limit discovery traffic and improve discovery time.

Triangles shown on the subscriber are disposed instances. - You can also rewrite the squares to circles, enabling the SquareToCircle route (disable the Square route first).
- You will not be able to directly apply the time-based filters to these routes without modifying the xml files, since the SquareToCircle and TriangleToCircle are <topic_route>'s, not <auto_topic_route>'s.
- Content filter propagation
- Restart Routing Service so the default Square/Circle/Triangle routes are enabled.
- In the Shapes Demo on Domain 0, delete the triangle and circle publications, so only the square publication is left.
- In the Shapes Demo on Domain 1, delete all subscriptions, and subscribe to a square using a content filter (place it across the bottom half of the area).
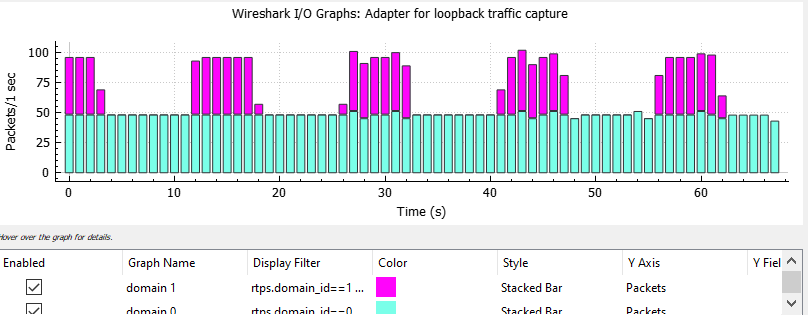
- Using Wireshark, capture on localhost, go to statistics->IO graph and add these filters for data samples on Domain 0 and Domain 1:
- Domain 0 wireshark IO graph filter: rtps.domain_id==0 && ((rtps.sm.wrEntityId.entityKind == 0x02) || (rtps.sm.wrEntityId.entityKind == 0x03))
- Domain 1 wireshark IO graph filter: rtps.domain_id==1 && ((rtps.sm.wrEntityId.entityKind == 0x02) || (rtps.sm.wrEntityId.entityKind == 0x03))
- Notice how square samples are sent on domain 1 only when the shape is within the filter (purple bars), but that filter is not propagated over to the original publisher on domain 0 for writer side filtering (teal bars)
- Delete the square publisher and subscriber, and setup the same demo using circles or triangles (publisher on domain 0, subscriber with a filter on domain 1).
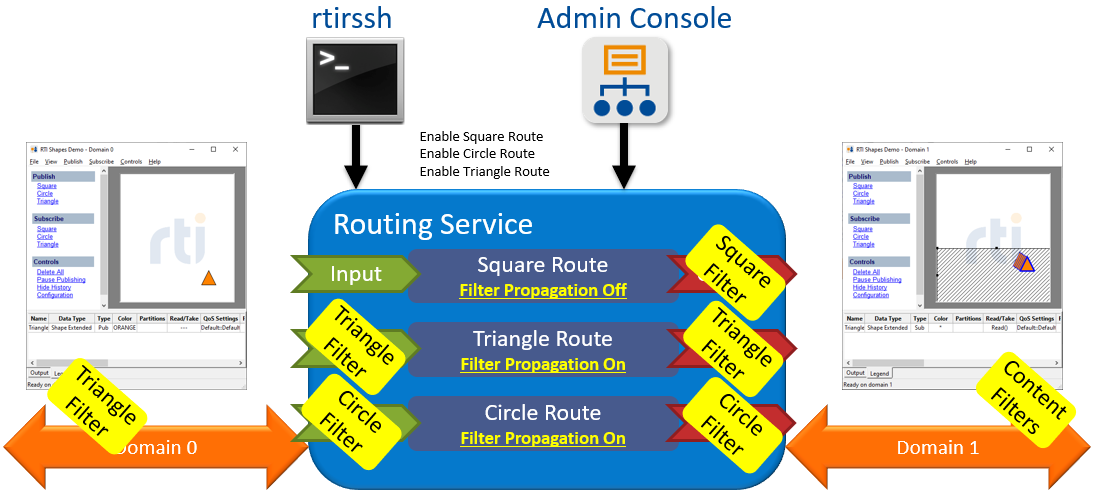
- Notice that the circle or triangle content filter is propagated through the routing service over to the original publisher, because the <filter_propagation> is enabled within that route.
When the shape is outside of the subscriber's filter, no samples are published on either domain. You can dynamically move the filter around to show the power of this filter propagation.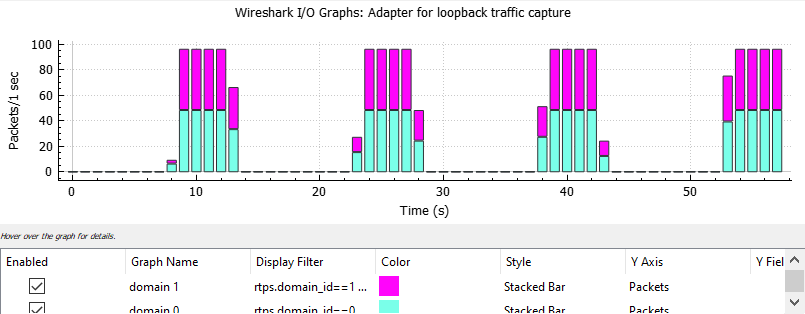
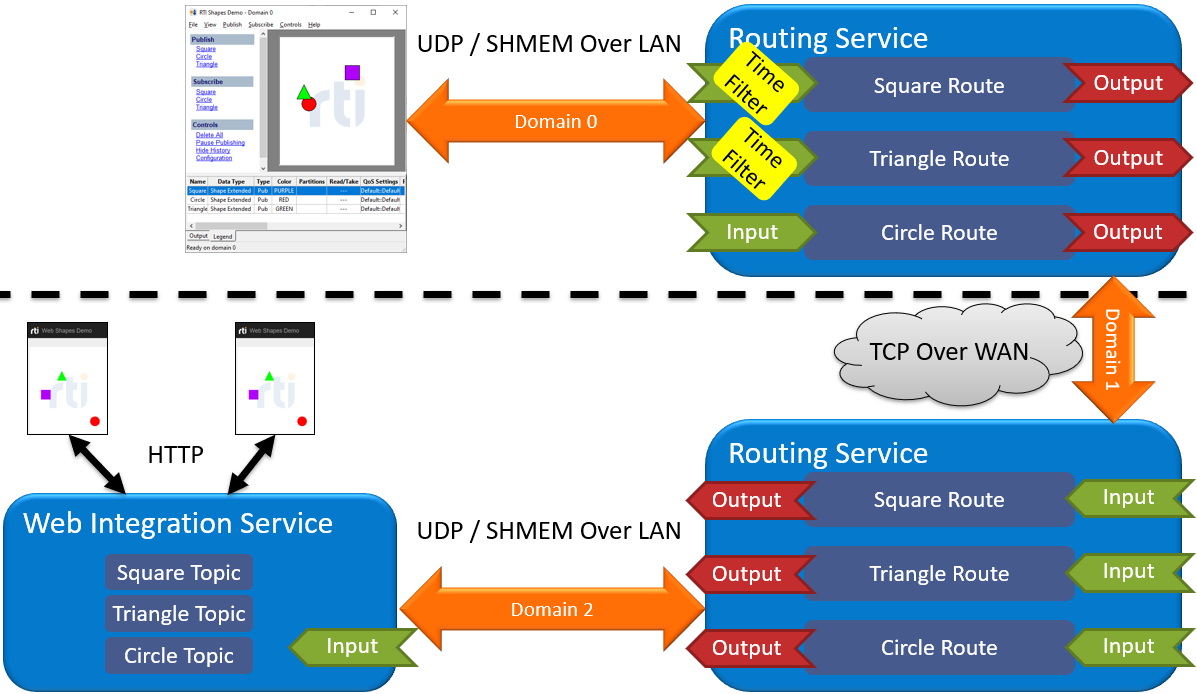
WAN Demo over TCP
To build on the localhost routing service demo above, a second copy of routing service is setup on an AWS instance to send DDS samples over the WAN network using TCP.
To visualize the DDS samples on the AWS instance, the web integration service is configured to display the shapes via a web browser.
Network Diagram of the Demonstration

WAN Over TCP Process
- Start one copy of Shapes Demo on Domain 0.
- Publish one square, circle, and triangle using different colors (the default QoS settings should be fine)
- We don't recommend setting the shapes to move very quickly, because once we add a time-based filter, it can become harder to visually see each shape's path. You can easily slow down all shapes with "Controls→Slow Down".
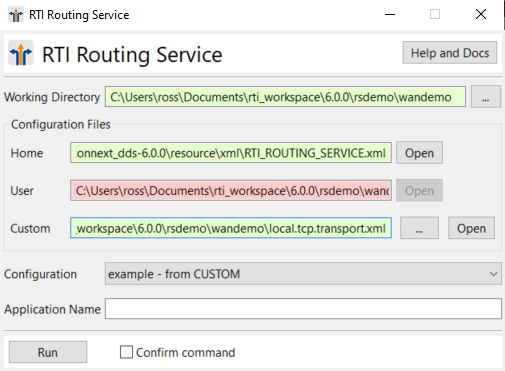
- Start Routing Service:
- From Launcher, start Routing Service and set your Working Directory, set the Custom configuration file to local.tcp.transport.xml from above.
- On the Configuration line, select "example - from CUSTOM"
- To verify that your local instance of Routing Service is operating correctly, launch Admin Console.
Select the "example" Routing Service in the Physical View.
The Routing Entities and Statistics tabs should now be selected, and on the right side you should see the number of samples/second passing through each route.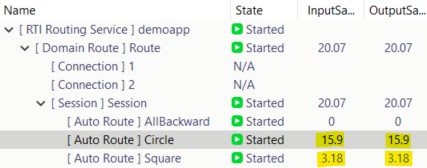
Each topic is publishing a different number of samples a second by default due to time filtering being applied automatically - Launch http://50.18.214.8:8080/websockets/simple_shapes_demo/js/ in a browser

- Notice that each Routing Service instance is adapting samples between different Domain IDs.
- Each Routing Service is also adapting between TCP and UDP/Shared memory.
- You should see the shapes on your browser that is connected to the web integration service URL. By default, time-based filters are applied to the Squares (300ms.xml), and Triangles (1000ms.xml), no filter is applied to the Circles.
- These time-based filters are applied on the input side of the local Routing Service, so fewer samples are sent over the WAN link.
- To dynamically apply different time filters to the local Routing Service instance on topics, use the rtirssh shell:
- Disable Triangle time filters: update example Route::Session::Triangle <path to xml>/0ms.xml
- Apply a 300ms Triangle time filter: update example Route::Session::Triangle <path to xml>/300ms.xml
- Apply a 1000ms Triangle time filter: update example Route::Session::Triangle <path to xml>/1000ms.xml
- Use Admin Console 6.0.1+ subscribe to the command_request and command_reply topics to monitor the commands sent to the Routing Service instance. (Use the builtin AdminConsole::DataVisualization QoS.)
- In the sample log, you can see commands and responses sourced from the remote shell (rtirssh) or Admin Console's Routing Service view.

- Enable content-filtering of the data at the local Routing Service instance:
- Use Admin Console disable the Circle route and enable the CircleFilter route (like you did during the localhost portion of the demo above).
- A content filter is now applied on the input side of the local Routing Service instance, which is based on the X value of the shape.
Samples are filtered prior to the TCP/WAN link, saving WAN bandwidth.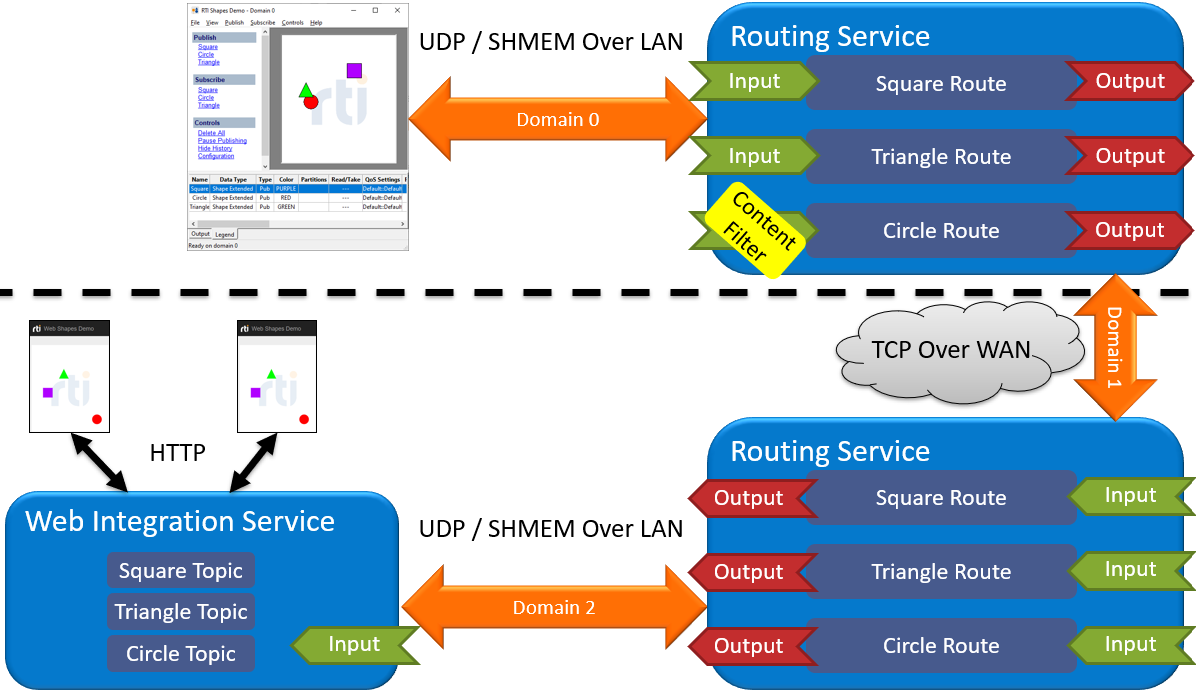
- You can see this content filter by capturing RTPS traffic in Wireshark on your interface connected to your WAN, and viewing the I/O graph.
Data samples are only sent over the WAN link when the content filter is matched. (You may want to only enable one route at a time for a cleaner graph.)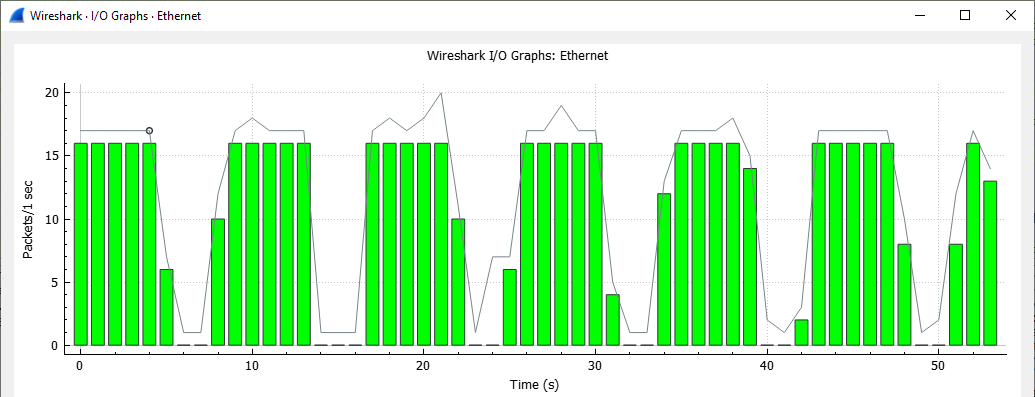
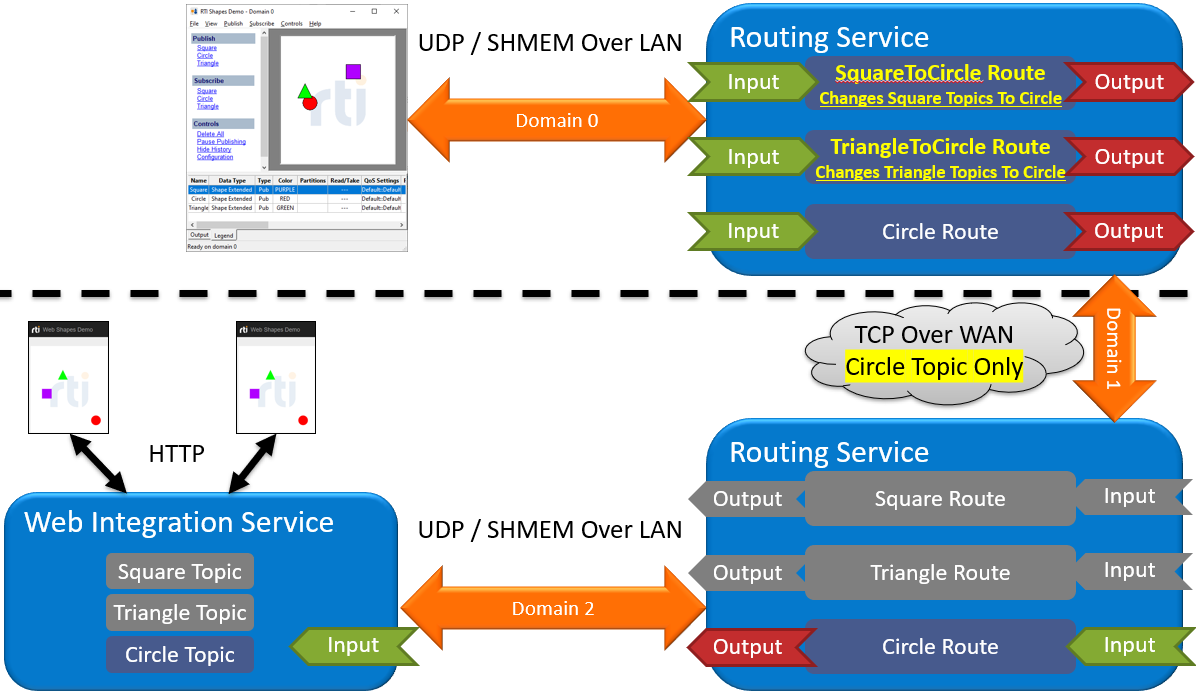
- Combine multiple topics into a single topic
- Use Admin Console to select the Routing Service instance, as you did above. Disable the Square and Triangle routes.
- Enable the SquareToCircle and TriangleToCircle routes.
- These routes transform the topic name and are applied on the local instance of Routing Service. This helps reduce the amount of bandwidth and time used for discovery.
Demo Notes
- The rtirssh tool is a demonstration of the Routing Service Administration interface. Customers can develop their own implementation to control their routing service instances.
- Disposed shapes sometime remain in the web integration service after you exit Routing Service. To clear these instances, re-enable these routes and delete them from the original publisher.