2.4.2. Configuring Quality of Service (QoS)
The System Designer QoS View lets you create and manage Quality of Service policies for the Entities in your project. To configure QoS in System Designer, add a QoS Library, add a QoS Profile within the Library, then add Entity QoS policies to the profile as needed.
The System Designer QoS View lets you explore and manage QoS policies in two ways:
Structured View: An intuitive graphical interface to manage QoS.
XML View: Review, edit, and validate QoS in XML format.

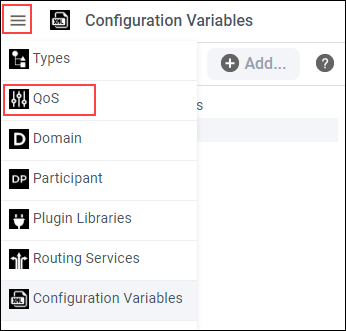
To open the QoS View, select the hamburger icon ![]() at
the top left and select QoS.
at
the top left and select QoS.
2.4.2.1. Structured View
In the Structured View, you can browse all of the QoS Libraries, Profiles, and policies in your project.

Select the ![]() button on each QoS policy name to expand it and
learn more about the policy or configure it. A short description is displayed
and a link to [More…] information for that policy is provided.
button on each QoS policy name to expand it and
learn more about the policy or configure it. A short description is displayed
and a link to [More…] information for that policy is provided.
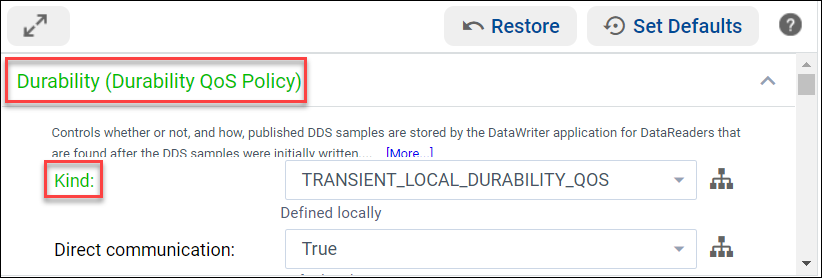
After changing a QoS policy, the text becomes green to indicate that it was set locally.
The toolbar in Structured View includes the following commands:
 - expand/collapse all changed policies
 - choose to view Basic or Advanced QoS policies
 - filter QoS policies by function or attribute
 - restore all changed policies to their previous value
 - reset all changed policies to their default value
2.4.2.2. XML View
The XML View allows you to review, edit, and validate the auto-generated XML file.
The toolbar in XML View includes the name and location of the active XML file and the following commands:
 - manually edit the XML file
 - use RTI Code Generator to check the XML file for
issues
- use RTI Code Generator to check the XML file for
issues
2.4.2.3. Adding QoS
This section uses an example to detail how to add QoS to an Entity in System Designer. In this example, we will change the History QoS policy on a DataReader.
Note
For more information on QoS, see Basic QoS in the Connext Getting Started Guide.
Create a new or open an existing project in System Designer, then use the hamburger icon
 to open the QoS View. If you completed the example
in Working with Types, use the same project.
to open the QoS View. If you completed the example
in Working with Types, use the same project.To add a QoS Library to the project, click
 or right-click QoS Libraries in the tree:
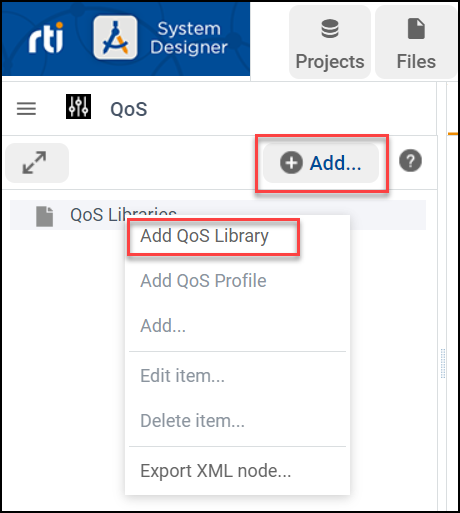
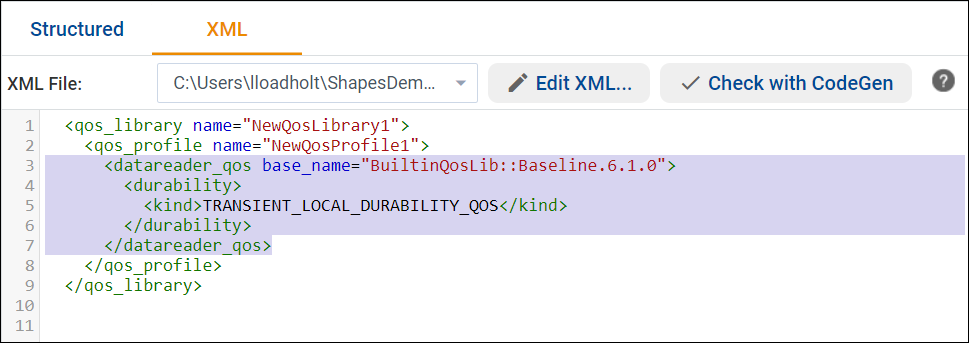
When prompted, enter the name NewQosLibrary1, then click OK.
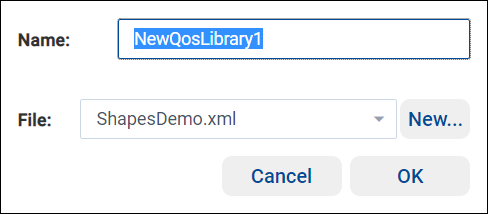
By default, the new QoS is added to the last XML file used. The default is the XML file created with your new project. To change the default, use the File drop-down list to select a different XML file in your project, or use the New… button to add a new XML file to your project.
To add a QoS Profile, right-click the QoS Library in the tree panel and select Add QoS Profile, or click
.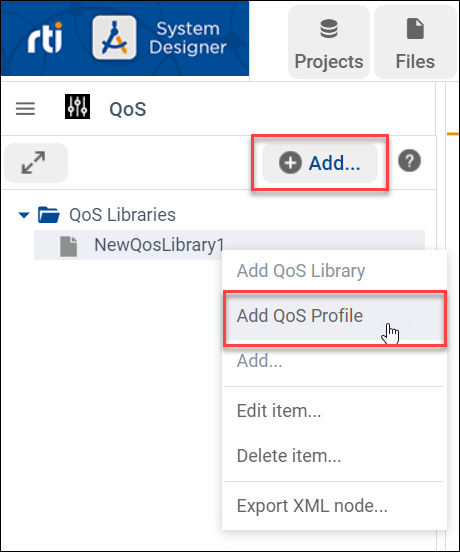
In the pop-up window, enter the name NewQosProfile1, then click OK.
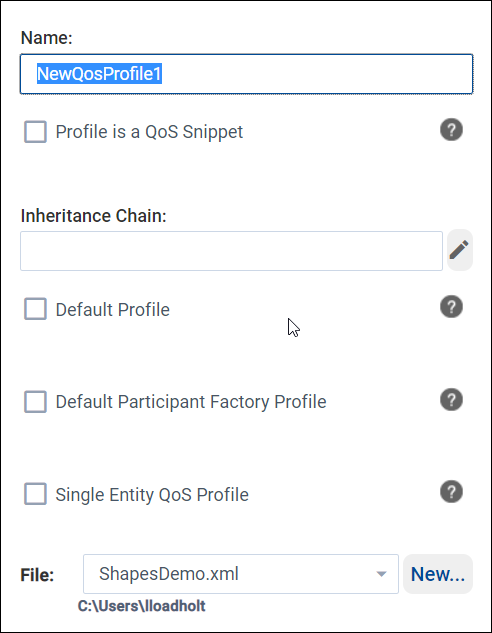
Use the
 icon for information about each of the fields in
this pop-up. See Inheritance chain for details about inheriting
values from a different profile.
icon for information about each of the fields in
this pop-up. See Inheritance chain for details about inheriting
values from a different profile.After creating the QoS Library and Profile, add QoS for your Entities. Right-click the QoS Profile in the tree panel and select Add… (or click
), then select the Entity
QoS you want to create. In this example, select DataReader QoS.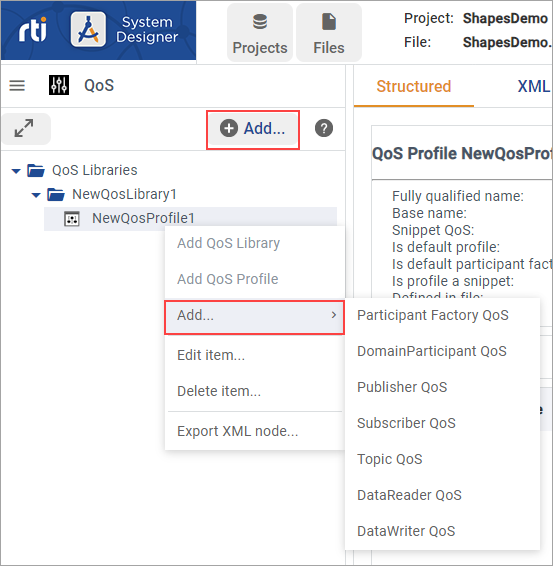
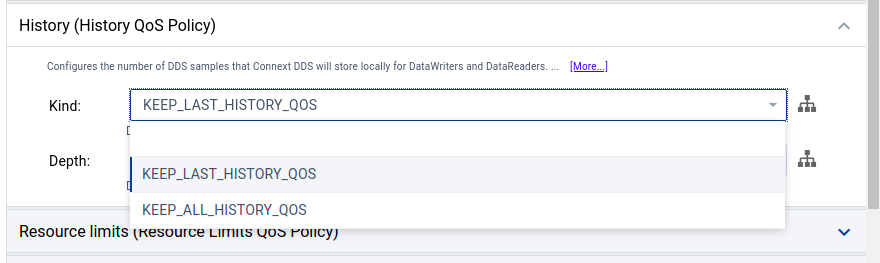
Select DataReader QoS in the tree, select the Structured View, select History (History QoS Policy), then set Kind to KEEP_ALL_HISTORY_QOS.
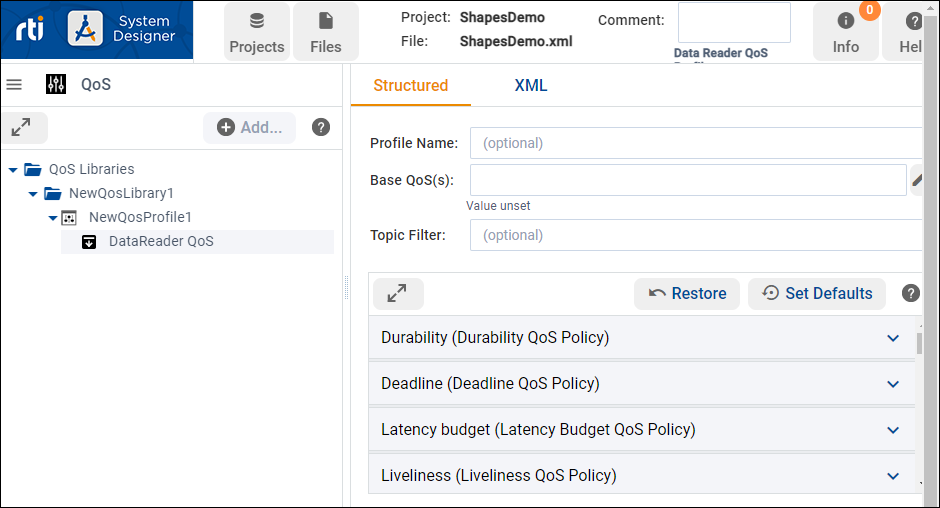
On completing this example, the QoS Structured View should indicate the History QoS policy was edited in the DataReader QoS. System Designer uses green text to indicate policies that were changed locally, in the active project.
There are several optional fields you can use to further configure your QoS:
Profile Name: create a unique name for the selected Entity’s QoS
Base QoS: configure QoS policy inheritance
Topic Filter: use a filter expression to apply this QoS only to specific Topics
2.4.2.4. Editing QoS
To edit a QoS Profile or QoS Library, right-click the item in the tree panel and select Edit item…, or double-click the item in the tree panel. For QoS Profiles, you can also select the Edit the profile icon in the Structured View.
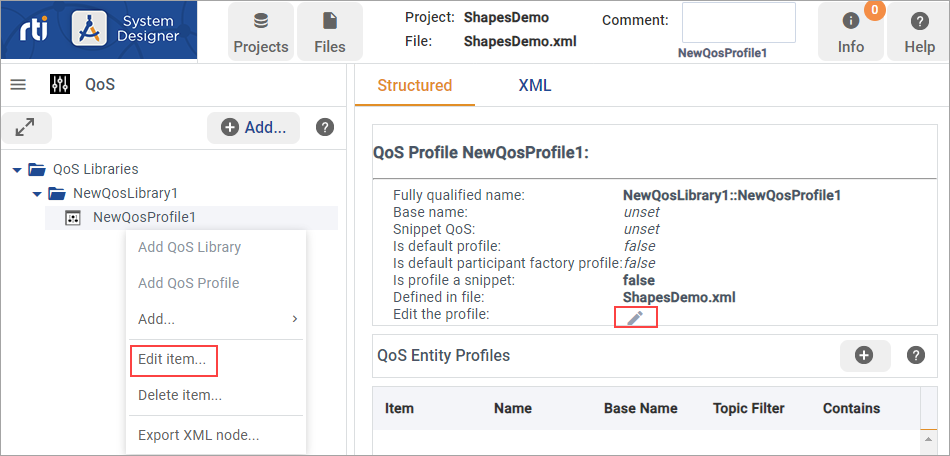
From the right-click context menu, you can also delete or add a member to the selected item. If you right-click a node, the Export XML node option is also available; this command lets you copy or download the node’s XML tree.
The experimental AI command uses Connext AI to provide guidance configuring your system. Use it to get clarification, suggestions for modifications and improvements, or to validate items.
Note
Connext AI is an experimental feature included in this release for evaluation only. Use it to explore the new AI features supported in System Designer.
Carefully review and validate AI-generated suggestions before deploying in production.
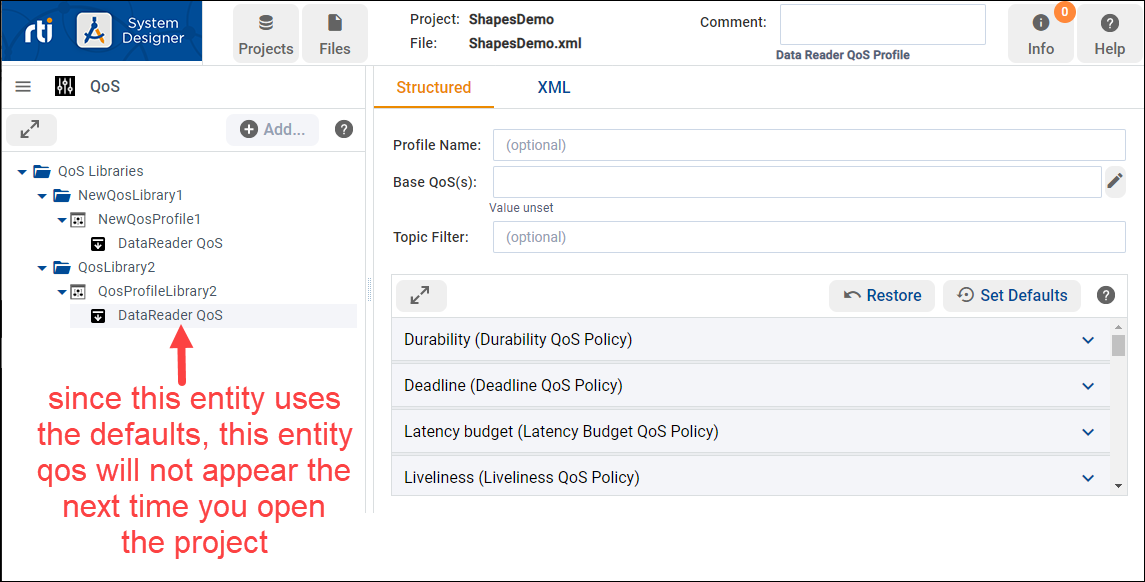
If you don’t change any QoS policies for an Entity, the default QoS is used. When you use the default QoS policy for an Entity, that QoS will not display the next time you open the project. Entities with no changes to the default QoS use the default settings and are not displayed.
Note
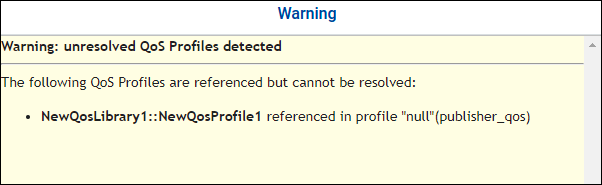
If you edit a profile name that’s already being used in
an Entity (such as in a <datawriter_qos>),
the Entity is not updated with your change. You will get a warning
when this occurs:
To use the new name, you can select and edit the Entity QoS in the Structured View, or edit the XML file in the XML View, to use the new name. System Designer allows you to change a name already in use to give you flexibility in trying out your model. For example, you may want to use your newly named profile in different entities. Entities that use the old (now unrecognized) name will revert to the default QoS.
2.4.2.5. QoS categories and filters
To simplify QoS configuration, Connext categorizes QoS by complexity, functionality, and other attributes. These categories can help you discover the QoS relevant or related to a desired function or feature.
Note
Details about all Connext categories and attributes are provided in the API reference HTML documentation; for example, see here for Modern C++.
In System Designer, you can narrow the list of visible QoS using the Complexity field and/or the QoS Filter option. Select the appropriate Entity QoS in the tree panel on the left to access these controls in the Structured View.
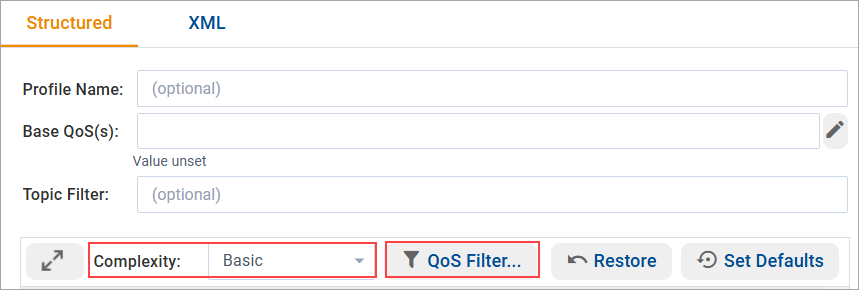
2.4.2.5.1. Complexity
Connext assigns complexity-based categories to QoS policies and individual QoS fields. Use the Complexity option to view only those QoS policies and fields categorized as Basic (the default), or to view all QoS.
Basic. This category includes fundamental QoS policies and fields that are relevant to many different use cases.
Advanced. This category includes commonly used QoS policies and fields that are relevant to a smaller set of use cases. In System Designer, this option displays all QoS supported by Connext.
To select the group of QoS you want to work with, select the appropriate category in the Complexity dropdown field.
Some Basic QoS policies include Basic and Advanced QoS fields. As a
result, the Advanced category includes some fields that are part of Basic QoS
policies. For example, the Multicast policy includes one Basic
field, Value, and an Advanced field, Kind. This classification
allows finer-grained control of QoS policies, enabling you to
more easily locate QoS for your specific use case.
When configuring a Basic QoS policy, use the Show all QoS toggle to access all of the selected policy’s fields, including those not labeled as basic.

If the Show all QoS toggle is not available, the selected policy does not contain any additional fields.
2.4.2.5.2. QoS filter
In addition to complexity, Connext categorizes QoS fields by function, attribute, mutability, and deprecation. These categories enable you to view only those QoS fields relevant for your project. To apply a filter, click the QoS Filter button and complete the QoS Filter dialog as needed.

Functional categories are based on the QoS field’s use case. For example, Durability, Discovery, or Debuggability.
Attribute-based categories are based on three non-functional characteristics; whether the field affects endpoint matching, is part of discovery metadata, or is applied on a per-instance basis when using keyed types.
Mutability is determined by whether the QoS field can be modified at runtime.
Deprecated QoS fields are those scheduled to be removed in a future Connext release. These fields are hidden by default and only shown when this filter is enabled.
When one or more filters are selected, the QoS Filter button displays in red to indicate that the listed policies are filtered.
Note
See QosPolicies in the Connext Core Libraries User’s Manual for detailed information about all QoS policies supported by Connext.
2.4.2.6. Inheritance chain
An individual QoS Profile or Entity QoS Policy (for example,
<datareader_qos>) can inherit values from other QoS Profiles and/or
be composed of QoS Snippets.
2.4.2.6.1. QoS profile inheritance
To inherit values from another profile, click ![]() next to
Inheritance Chain while creating or editing a QoS Profile.
Select the appropriate profile in the Base Profile field.
next to
Inheritance Chain while creating or editing a QoS Profile.
Select the appropriate profile in the Base Profile field.
To narrow the list of available profiles to those most commonly used, select Show Common Profiles. These common profiles include:
Builtin profiles starting with BuiltinQosLib::Pattern
QoS Profiles defined in the open project
To inherit values from a snippet, double-click in the QoS Snippets field to select one or more snippets. Note that some profiles cannot be defined as snippets because they inherit from a base profile.

2.4.2.6.2. QoS policy inheritance
To create or edit inherited values in an Entity QoS policy, select
the QoS policy in the tree. In the Structured View, click ![]() next
to Base QoS(s), then select the base profile and/or snippet(s) to
inherit from.
next
to Base QoS(s), then select the base profile and/or snippet(s) to
inherit from.

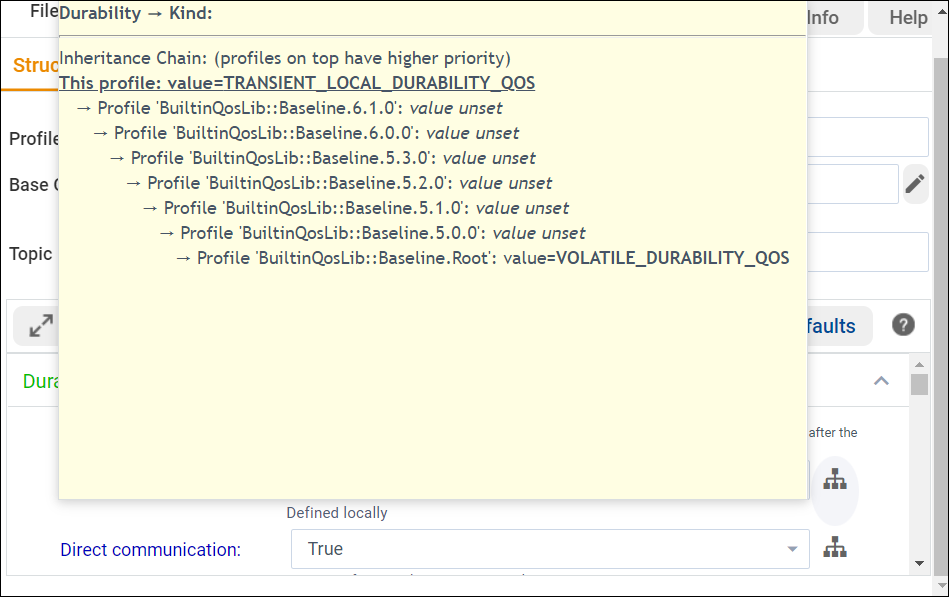
If your QoS Profile or policy is inheriting QoS settings from a different
profile, the values that are inherited from the base profile display in blue.
To see where a value is coming from, select ![]() next
to the QoS value to display the value’s inheritance chain.
next
to the QoS value to display the value’s inheritance chain.
For more information on Entities and Profiles, see these sections of the RTI Connext Core Libraries User’s Manual:
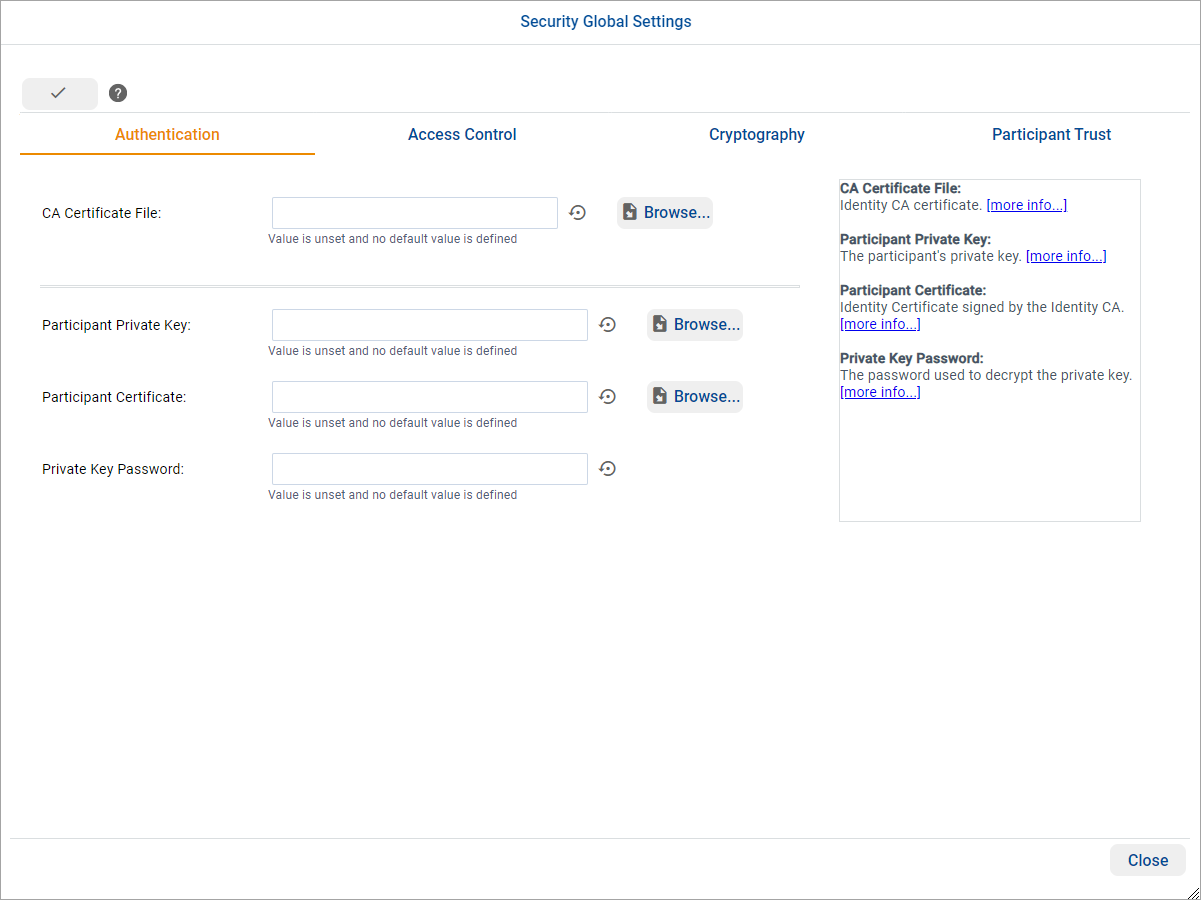
2.4.2.7. Configuring Security Plugins
Note
To use security in System Designer, you must install the Security Plugins. For more information, see the RTI Security Plugins Installation Guide.
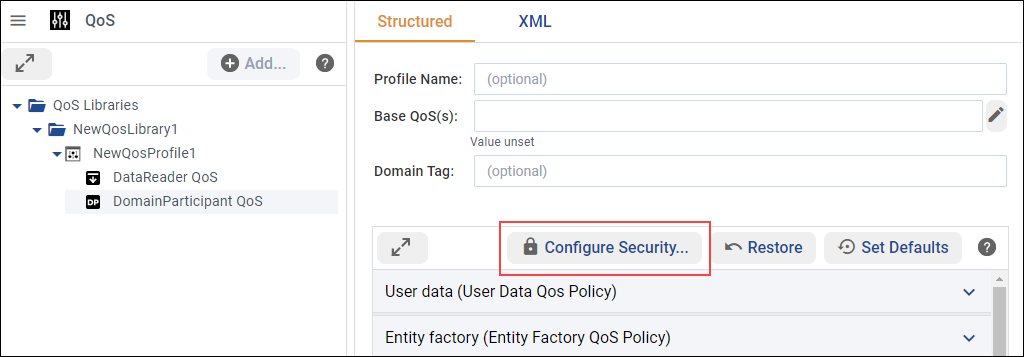
The QoS view also allows you to configure the Security Plugins of a DomainParticipant QoS.
Select a DomainParticipant QoS in the tree panel, then click ![]() .
.
The Editing security… dialog guides you through configuring the Security Plugins on the selected DomainParticipant QoS.
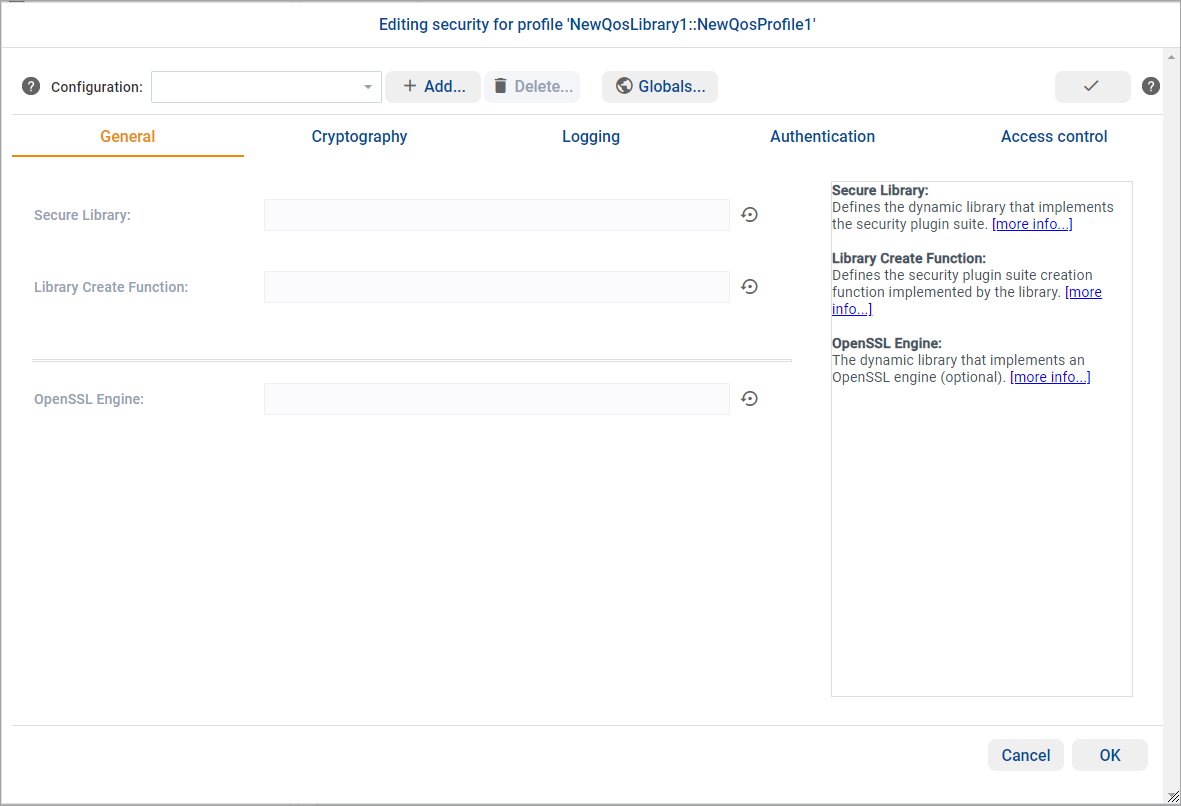
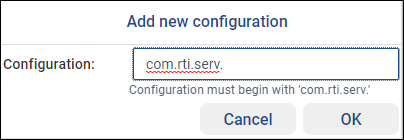
First, add a new configuration by clicking  , then
enter the name your security configuration will use. The configuration
name must begin with
, then
enter the name your security configuration will use. The configuration
name must begin with com.rti.serv.
After adding the new configuration, apply the desired security properties.
In addition to enabling you to change specific security properties
associated with each configuration, System Designer can be used to set security
properties that are not bound to a specific configuration. To configure
these properties, click the ![]() button. In the
Security Global Settings dialog, you can configure global properties
such as Authentication and Access Control.
button. In the
Security Global Settings dialog, you can configure global properties
such as Authentication and Access Control.
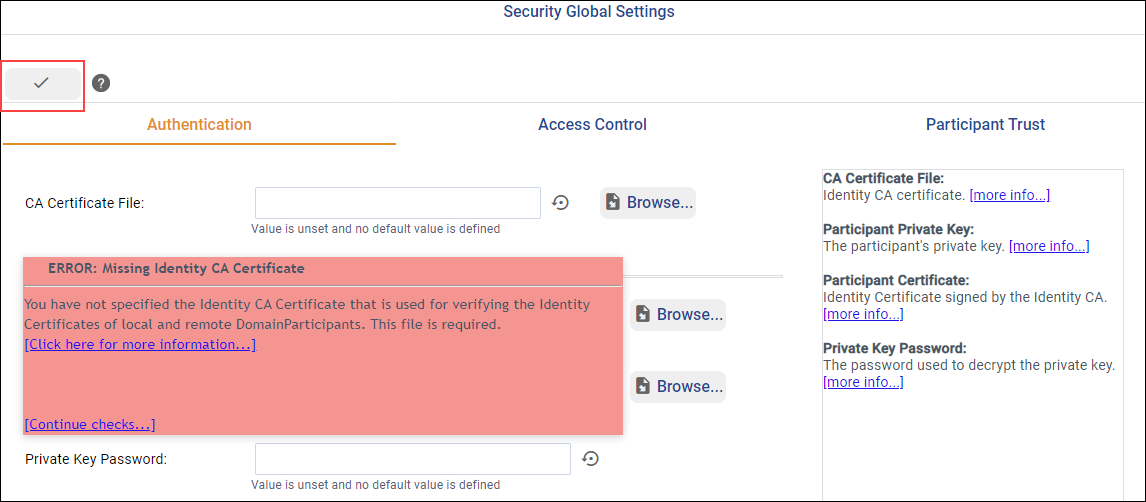
Tip
Both security configuration dialogs shown above can be used to check
whether the security configuration is valid. To validate the
configuration, click the checkmark button ![]() .
.
For more information on Security Plugins, see the RTI Security Plugins User’s Manual.