2.2.10. Step 10: Working with DomainParticipant Partitions
Admin Console allows you to visualize and understand how DomainParticipant partitions affect a Connext system’s configuration. Admin Console’s graph views will show you which DomainParticipants are not communicating with each other due to mismatched Partitions.
2.2.10.1. Configuring the scenario
First, let’s configure a specific scenario using Admin Console and Shapes Demo:
Start an instance of Shapes Demo using Launcher. Click on the Configuration button. In the Configuration dialog, enter
P1in the Partitions text box. Click on Update to confirm the changes. In this instance of Shapes Demo, publish a red square with the default configuration.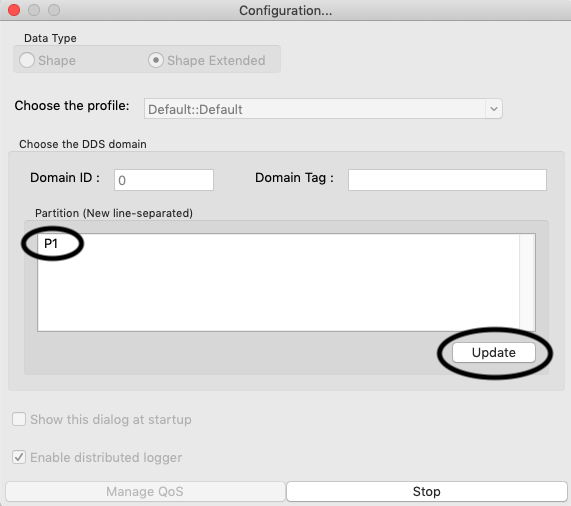
Start a second instance of Shapes Demo. As in the previous step, enter
P1in the Partitions text box of the Configuration dialog. Subscribe to squares with the default configuration.Start a third instance of Shapes Demo and enter
P2in the Partitions text box. Subscribe to squares with the default configuration.Start a fourth instance of Shapes Demo. In the Partitions text box, enter
P*. Subscribe to squares with the default configuration.Now you have four instances of Shapes Demo: one Publisher and three Subscribers. We expect the Publisher (the first instance) to send data that will be received by the second instance (with DomainParticipant partition
P1) and the fourth instance (with DomainParticipant partitionP*).Open Admin Console and, using auto-join, wait until all the instances of Shapes Demo are discovered.
2.2.10.2. Entity Info about DomainParticipant partitions
Information about DomainParticipant partitions is available in different sections of Admin Console.
First, you can see this information in the Entity Info panel when interacting with an element in the graph. We will use Admin Console’s Topic View, but you can use any available view.
In the DDS Logical View, select the topic Square for Domain 0.
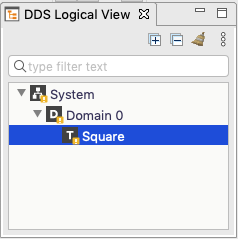
After selecting this topic, the Topic View will be open. If you click on any item, for example, in the first Shapes Demo process, the Entity Info tab will be updated with information relevant for the selected entity.
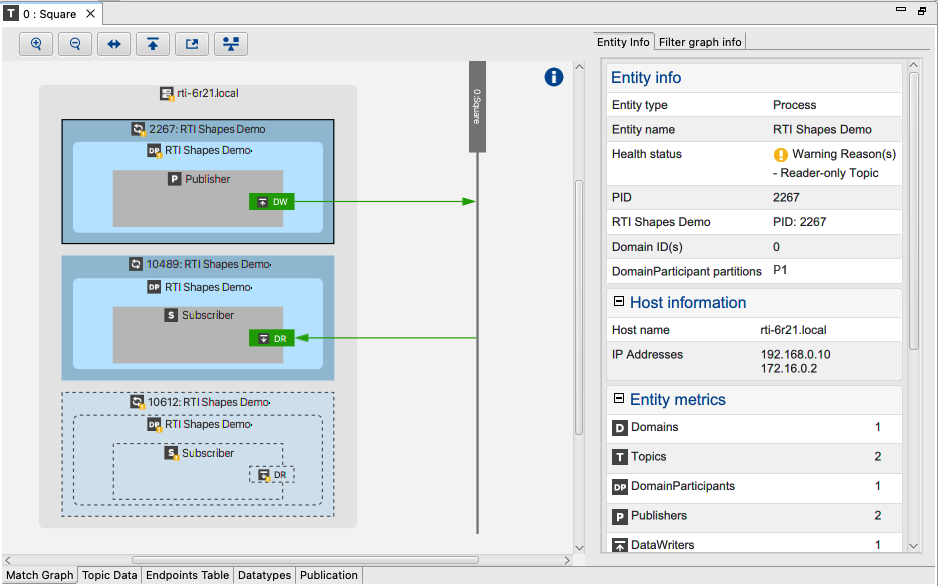
As seen in this image, the DomainParticipant partitions are indicated in the
Entity info panel. The selected Shapes Demo Process only has the
partition P1. All the items available in the graph, except Domains and
Topics, will indicate the DomainParticipant partitions to which it is
connected.
For example, if we select the hosts containing all our Shapes Demo
processes, the Entity Info panel will show that it is connected to the
DomainParticipant partitions {empty}, P1, P2, and P*.
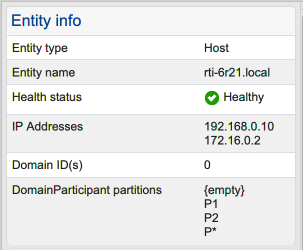
This shows the partitions for all the DomainParticipants contained by the Host.
Note
In the current Host Entity Info panel, the Health Status indicates the warning message Reader-only Topic. This is because the third Shapes Demo application that we started is subscribed to topic Square in the DomainParticipant partition P2 and, in that DomainParticipant Partition, there is no Publisher, causing the indicated Health Status warning.
Note
Information in the Entity Info tab is updated when changes in the selected entity are detected. If the DomainParticipant partition of the selected entity changes, the Entity Info tab will be updated with the detected changes.
2.2.10.3. DomainParticipant partitions in the DDS QoS tab
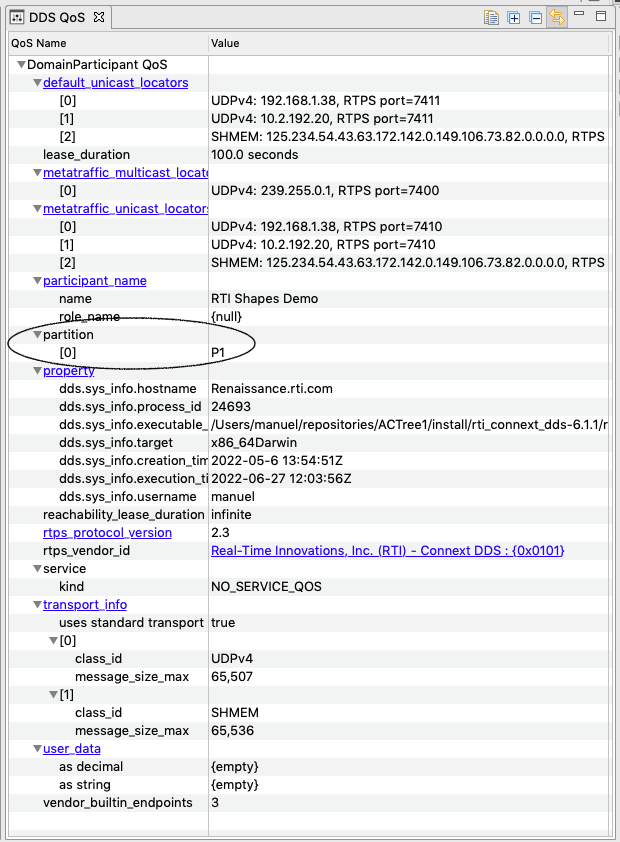
The second place where DomainParticipant partitions information is available is the DDS QoS tab.
This tab includes information about the selected entity. If we select a DataWriter, DataReader, Publisher, Subscriber, or DomainParticipant, the QoS tab is filled with information about the selected entity.
In the information about the DomainParticipant QoS, we can see the partition property, which includes the DomainParticipant partitions to which the selected entity is connected.
2.2.10.4. Match Analysis and DomainParticipant partitions
The next section that provides information about DomainParticipant partitions is the match analysis performed when an entity is selected.
To visualize the match analysis, we will select the only DataWriter in our graph, the publisher for squares created in the first Shapes Demo process we created.
When we select this DataWriter, the style of the nodes in the graph change,
according to the specific match analysis with the selected entity.
In the following image, notice that the node for the third Shapes Demo
process has a different style. Recall that this Shapes Demo was configured
with just DomainParticipant partition P2. This process is not sharing any
DomainParticipant partitions with our selected process.
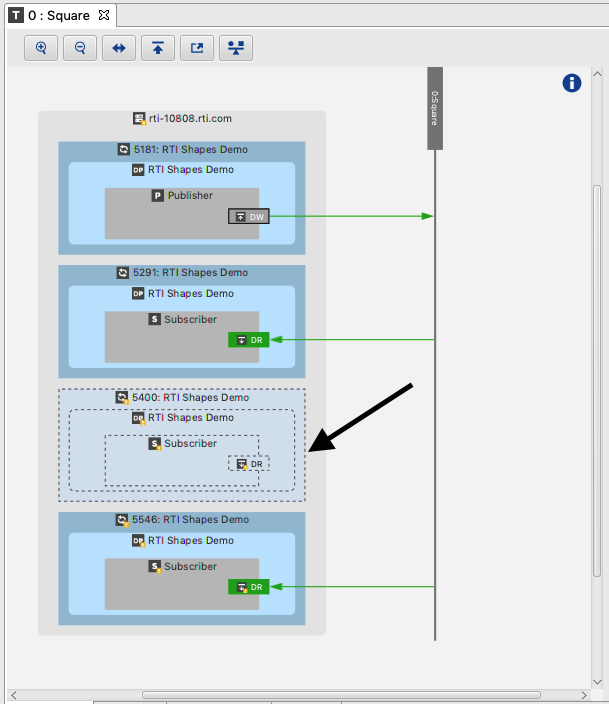
This style indicates entities that our selected entity cannot communicate with, because they do not share DomainParticipant partitions.
Note
It is important to note that just because an entity appears in this specific style does not indicate that there may be an error in the design of the the DDS system. It only indicates that, with the current configuration, the selected entity will not communicate with highlighted entity that has this style.
The match analysis will update accordingly, to reflect any changes Admin Console detects in the system. So if any DomainParticipant partitions are changed, the graphical view will be updated.
The Match Analysis tab only shows entities that are relevant to the match analysis.
For instance, if we select the DataWriter, one of the DataReaders does not appear.
The missing one isn’t relevant because its DomainParticipant partition, P2,
doesn’t match the DataWriter’s DomainParticipant partition, P1.
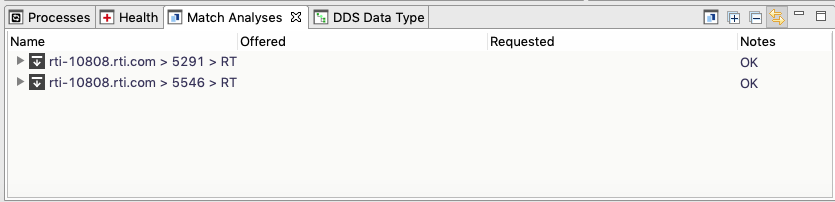
If you were to change the missing DataReader’s DomainParticipant partition to
P1 or P*, it would show up in the Match Analysis tab.
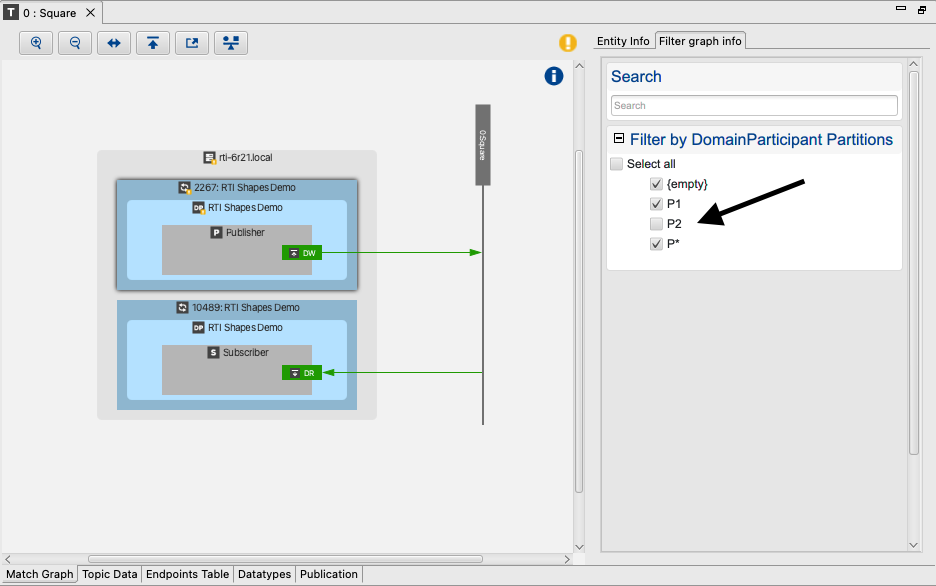
2.2.10.5. Filtering data using DomainParticipant partitions
Admin Console allows you to filter the data shown in the different graphs according to the DomainParticipant partitions. To do this, select the “Filter graph info” tab. Use the filter to choose the DomainParticipant partitions you want to see in the graph.
For example, if P2 is not selected in the filter, the process associated with that DomainParticipant does not appear in the graph, as you can see here:
2.2.10.6. Joining domains with a specific DomainParticipant partition
You can specify DomainParticipant partitions to use when joining to a specific domain. This allow you to reduce traffic and focus only on specific DomainParticipant partitions.
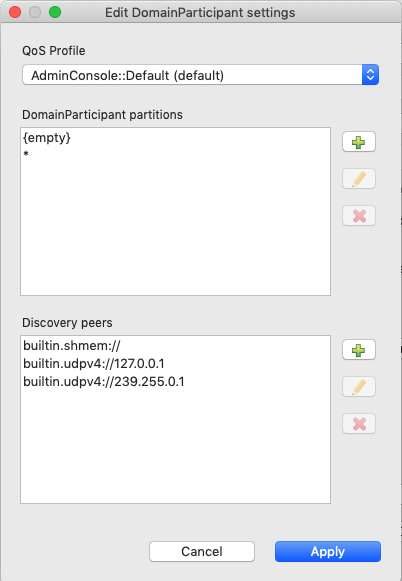
To join a domain using a specific DomainParticipant partition, go to View > Preferences and select the Administration panel. Select Manually join and leave domains, select Domain 0, then click Edit DomainParticipant(s).

This will open a dialog that allows you to modify DomainParticipant settings. In this panel you can see the DomainParticipant partitions used for the DomainParticipant that is created by Admin Console to join Domain 0.
By default, the partitions {empty} and * are used to match everything.
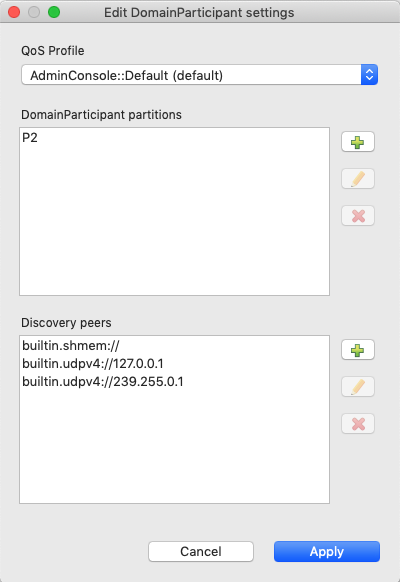
Select the DomainParticipant partitions to which Admin Console is connected
({empty} and *) and remove them clicking on the red X.
Then use the green + plus button to add the DomainParticipant partition P2.
Click on the Apply button.
This will cause Admin Console to update its DomainParticipant partitions without leaving the Domain, since they are mutable. The QoS value will be updated with the new DomainParticipant partitions.
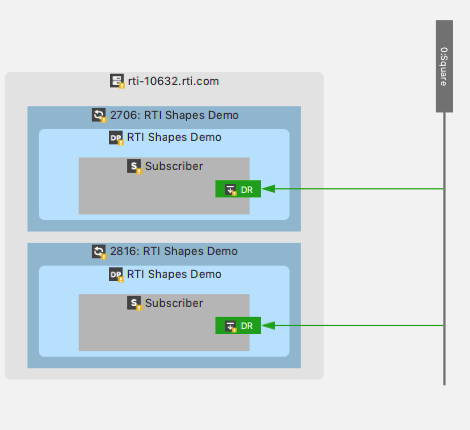
Finally, apply the changes in the Preferences page. Admin Console will change the partitions used by its own DomainParticipant and it will no longer see DomainParticipants with partition P1.
Finally, to ensure that we can continue with the remaining steps in this
tutorial, undo this change in the Preferences dialog and add
{empty} and * to the DomainParticipant partitions, using these steps:
In the Preferences dialog, select Admin Console’s DomainParticipant
0 AdminConsoleDomain::defaultand click on the “Edit DomainParticipant(s)” button.Remove
P2.Add one more DomainParticipant partition without filling in a name (press the green + button, then Apply). This gives you the
{empty}partition.
2.2.10.7. Subscriptions with DomainParticipant partitions
Finally, let’s subscribe to a topic using a DomainParticipant partition.
To do this, first we will create a publisher of blue squares in the
Shapes Demo instance that has DomainParticipant partition P2.
(This is the third instance of Shapes Demo, created at the start of this tutorial.)
Note
So far, the Shapes Demo using P2 has not received any data,
since it does not match with our only Publisher, which uses P1.
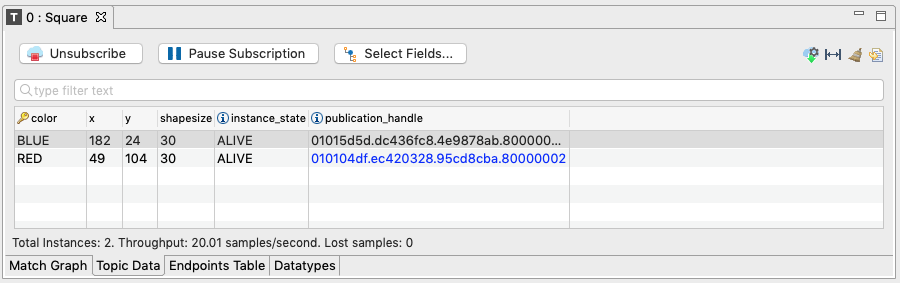
Once we create this new Publisher, Admin Console’s Topic View for square will look something like this:
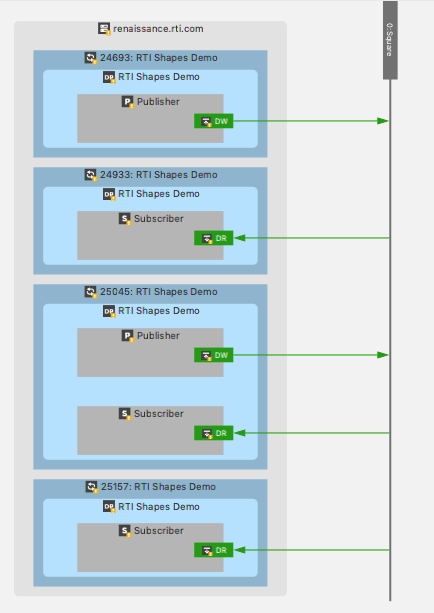
At this point, we have a Publisher for red squares using the DomainParticipant
partition P1, and a Publisher for blue squares using the DomainParticipant
partition P2.
Now we will create a Subscriber for squares using the DomainParticipant
partition P1. This will cause Admin Console to receive only samples for red squares.
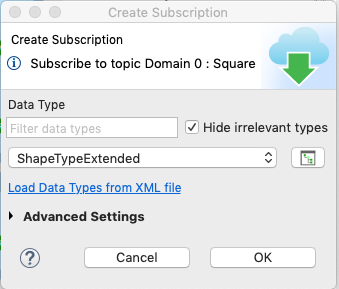
To do this, right-click while the mouse is over the topic square in the DDS
Logical View and select “Subscribe…”. The following dialog will open:
Expand the Advanced Settings to see all the options. Click on the edit button (pencil icon) to the right of the DomainParticipant partitions, as seen here:
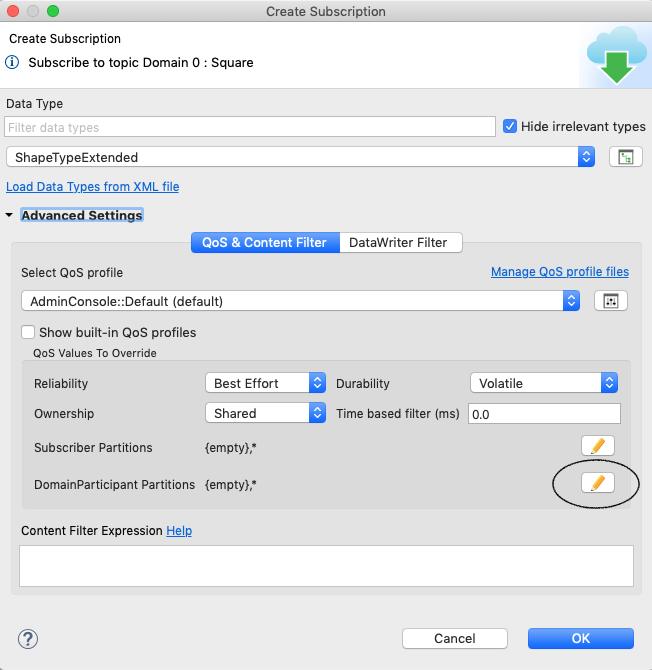
In the new dialog, remove the {empty} and * partitions
and add P1. Click the OK button. Now Admin Console should be subscribed
to squares, and only receiving red squares.
Now we will change the current subscription, so its associated
DomainParticipant uses partition P2 instead of P1. Then Admin Console will
stop receiving red squares and start receiving blue squares. Here
are the steps to make this change:
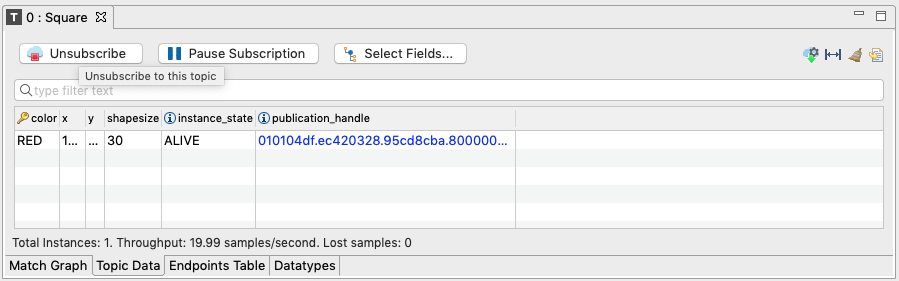
In the subscription view, change the subscription properties by selecting the button indicated in the following image (see the arrow in the top right):
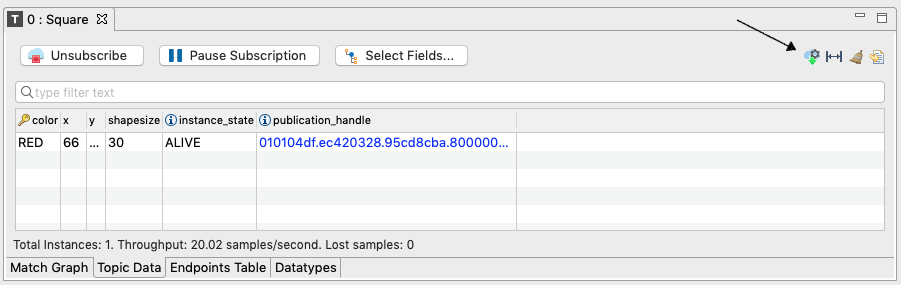
In the new dialog, find the DomainParticipant partitions. You should only see DomainParticipant partition
P1. Click the edit button (pencil icon) on the right, removeP1, addP2, then click OK to confirm the changes.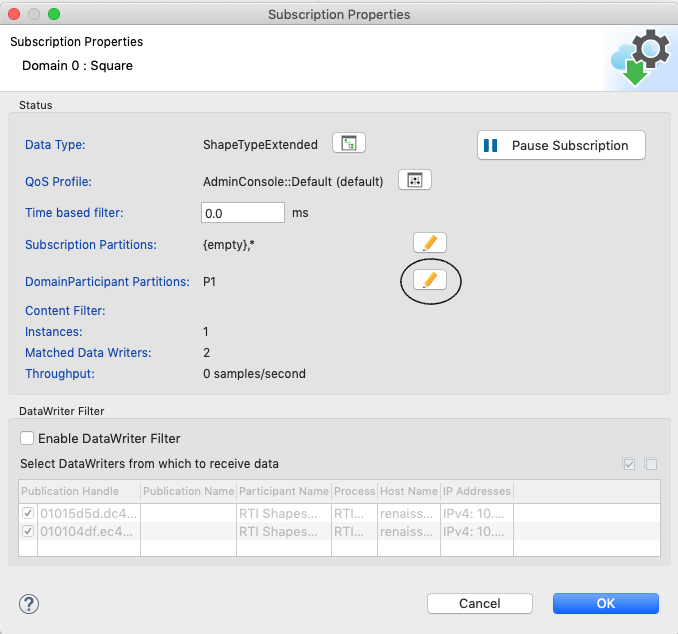
As result of this change, you will see a new entry for receiving blue squares, and no new red squares.